Audi A4. Body repair manual - part 30

Recaro seat
3 - Motor with transmission and Bowden
cable
- Remove seat page 72-25 .
- Remove 2-way lumbar support page
72-45 .
- Cut tie wraps -5- (2x).
- Push lumbar support body together.
- Pull Bowden cable -6- in direction of
arrow -A-.
- Detach Bowden cable -6- at pulley.
- Pull set pin -7- in direction of arrow -B-
out of bracket.
- Remove bolts -4- (2x).
4 - Bolts (2x)
5 - Tie wraps
6 - Bowden cable
7 - Set pin

Recaro seat
Backrest motor with transmission,
removing and installing
WARNING!
Before starting work on seats, connect VAS
5094 airbag adapter page 72-9 .
Note:
Illustration only shows backrest.
1 - Backrest frame
2 - Backrest motor with transmission
Removing:
- Move seat fully up.
- Remove seat page 72-25 .
- Remove trim panels page 72-41 .
- Remove backrest upholstery page 74-
22 .
- Using screwdriver, remove spring
washer -5- on backrest motor side (-B- in
illustration).
- Pull shaft out of backrest frame -1- far
enough so backrest motor -2- can be
removed.
-
Cut all tie wraps on backrest motor using
Recaro seat

Recaro seat
- Disconnect harness connector -8-.
- Unbolt mounting screw of backrest motor
-5- from welded threaded bushing -6-.
- Remove backrest motor -2-.
Installing:
- Push shaft -3- through backrest motor -2-
and backrest frame -1-.
- Secure backrest motor -2- between two
plastic washers -7- using mounting screw
-5- on threaded bushing -6-.
- Tap locking washer -4- onto shaft -3-.
3 - Shaft
4 - Locking washer
5 - Mounting screw
6 - Threaded bushing
7 - Plastic washers (2x)
8 - Harness connector

Recaro seat
Motor for seat height adjustment,
removing and installing
WARNING!
Before starting work on seats, connect VAS
5094 airbag adapter page 72-9 .
1 - Seat frame
2 - Seat height motor adjustment
Removing:
- Move seat fully up.
- Remove seat page 72-25 .
- Remove seat cushion page 72-32 .
- Disconnect harness connector -3-.
- Disconnect harness connector -3-
housing from seat frame.
- Using screwdriver, lift locking washer -5-
from shaft -6-.
- Remove motor -2-.
Installing:
Note:
Ensure that bushings -4- are correctly seated in the
seat frame.

Recaro seat
3 - Harness connector for motor
4 - Bushings (2x)
5 - Locking washer
6 - Shaft

Recaro seat
Headrest, removing and installing
- Press down on guide sleeves -2- from above.
- Press down slightly on headrest -1- to release catch.
- Pull headrest -1- up and off of backrest -3-.

Recaro seat
Headrest guides, removing and installing
WARNING!
Before starting work on seats, connect VAS
5094 airbag adapter page 72-9 .
1 - Headrest
2 - Headrest guide
Removing:
- Remove headrest -1- page 72-52 .
- Remove upholstery from backrest frame
- 3-
page 74-22 .
- Press catches -5- of headrest guide -2-
together and pull headrest guide -2- up
and off.
Installing:
CAUTION!
The locking pins for both headrest guides must
be on the inside so that they engage in the
height adjustment catches.
- Install headrest guides -2- so locking
pins -4- of headrest guides are both on
inside.

Recaro seat
3 - Backrest frame
4 - Locking pins
5 - Catches

Recaro seat
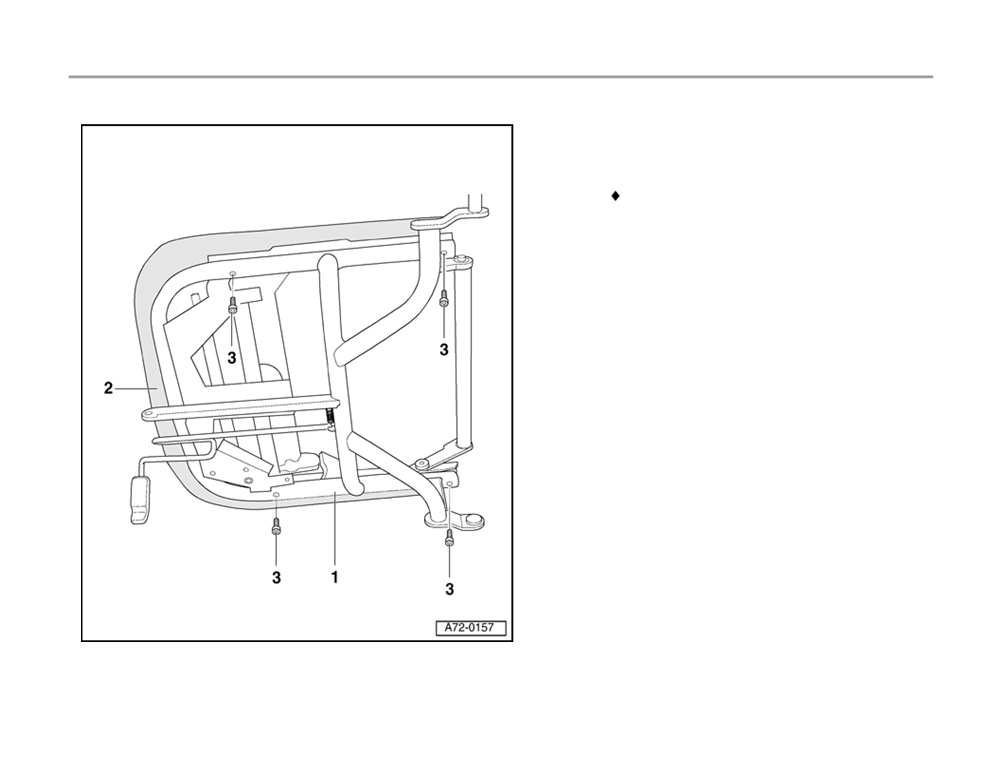
Seat frame, removing and installing
WARNING!
Before starting work on seats, connect VAS
5094 airbag adapter page 72-9 .
1 - Seat frame
Removing:
- Remove seat page 72-25 .
- Place seat so underside of seat cushion
is easily accessible.
- Disconnect tie wraps that are attached to
seat frame.
- Unbolt bracket for harness connecter
(two bolts).
- Unbolt both relays (2x).
- Unbolt bolts -3- (4x) on seat frame -1-.
- Remove seat frame -1- from seat -2-.
Installing:
Note:
Always replace bolts -3-.
- Place new seat frame -1- on seat -2-.
Recaro seat
Recaro seat
2 - Seat
3 - Bolts (4x)
23 Nm (17 ft lb)

Rear seat
Rear seat
Rear seat, removing and installing
- Using screwdriver -2-, carefully lift headrest guides -3- out of rear
backrest -1-.
- Detach rear seat -2- upward out of mounting -3-.
- To install, brackets -2- must be pushed into mountings -3-.