Scion FR-S. Instruction - part 10


  Index      Instructions     Scion FR-S. Instruction


Search            copyright infringement  


Content      ..     8      9      10      11     ..


Scion FR-S. Instruction - part 10


150

2-1. Driving procedures
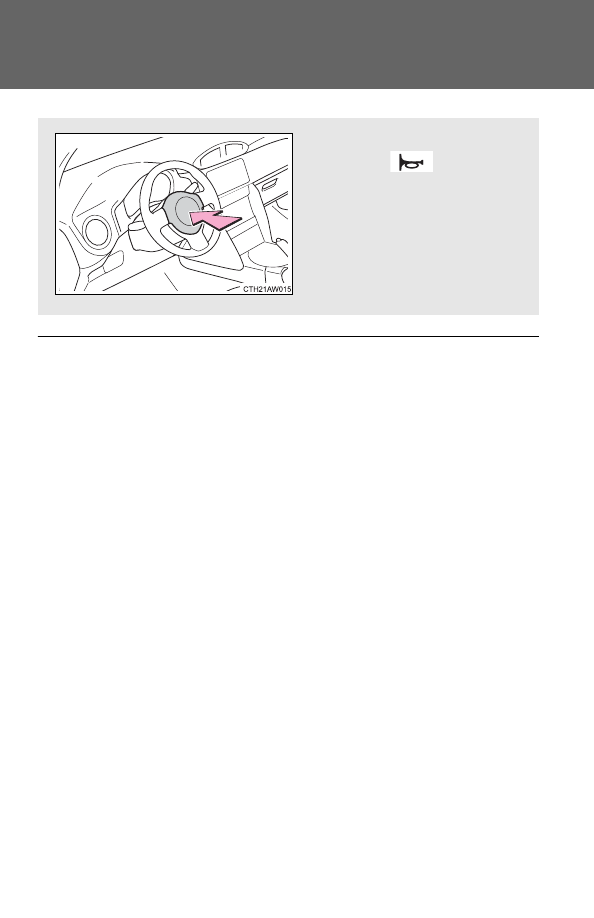
Horn

After adjusting the steering wheel

Make sure that the steering wheel is securely locked. 
The horn may not sound if the steering wheel is not securely locked. 
(

P. 47)

To sound the horn, press on or
close to the 

 mark.

-------------------------------------------------------------------------------------------------------------------------------------------------------------

151

2

Wh

en drivin

g

2-2. Instrument cluster

Gauges and meters

Analog Speedometer

Displays the vehicle speed.

Tachometer

Displays the engine speed in revolutions per minute.

Digital Speedometer

Displays the vehicle speed.

Fuel gauge

Displays the quantity of fuel remaining in the tank.

Engine coolant temperature gauge

Displays the engine coolant temperature.

Odometer, trip meter and multi-information display

Odometer: Displays the total distance the vehicle has been driven.

Trip meter: Displays the distance the vehicle has been driven since the
meter was last reset. Trip meters A and B can be used to record and
display different distances independently.

Multi-information display: Presents the driver with a variety of driving-
related data. (

P. 159)

“DISP” switch

P. 160

-------------------------------------------------------------------------------------------------------------------------------------------------------------

152

2-2. Instrument cluster

Switch the display

Each time the “ODO/TRIP” switch is pressed, the display changes as
follows.

Odometer

Trip meter A

*1

Trip meter B

*1

Setting screen for the shift position indicator and shift-up indica-
tor

*2

 (vehicles with a instruction transmission)

*1

: Pressing and holding the “ODO/TRIP” switch will reset the trip meter that

is currently displayed.

*2

: Only displayed when the engine switch is in the “ACC” or “LOCK” posi-

tion.

“ODO/TRIP” switch

P. 152

“km/h MPH” switch

Each time the switch is pressed, the display inside the meter changes
between km/h and MPH.

-------------------------------------------------------------------------------------------------------------------------------------------------------------

153

2-2. Instrument cluster

2

Wh

en drivin

g

Setting the shift position indicator and shift-up indicator
(vehicles with a instruction transmission)

Displaying of the shift position indicator and shift-up indicator can be
turned on/off.

Press the “ODO/TRIP” switch repeatedly until the setting
screen is displayed. (

P. 152)

Each time the switch is pressed and held, the display changes
between on/off.

“G-on”: Display on

“G-oFF”: Display off

Instrument panel light control

The brightness of the instrument panel lights can be adjusted.

Brighter

Darker

STEP 

STEP 

The brightness of the instrument panel lights

When the parking lights or the headlights turn on, the instrument panel lights
will dim. However, when the instrument panel brightness control dial is
turned to the up most position, the instrument panel lights will not dim even
when the parking lights or headlights turn on.

-------------------------------------------------------------------------------------------------------------------------------------------------------------

154

2-2. Instrument cluster

NOTICE

To prevent damage to the engine and its components

Do not let the indicator needle of the tachometer enter the red zone, which
indicates the maximum engine speed.

The engine may be overheating if the temperature gauge is in the red
zone (H). In this case, immediately stop the vehicle in a safe place, and
check the engine after it has cooled completely. (

P. 336)

-------------------------------------------------------------------------------------------------------------------------------------------------------------

155

2-2. Instrument cluster

2

Wh

en drivin

g

Indicators and warning lights

The indicator and warning lights on the instrument cluster and cen-

ter panel inform the driver of the status of the vehicle’s various sys-

tems.

For the purpose of explanation, the following illustration displays all
indicators and warning lights illuminated.

Instrument cluster

Center panel

-------------------------------------------------------------------------------------------------------------------------------------------------------------

156

2-2. Instrument cluster

Indicators

The indicators inform the driver of the operating state of the
vehicle’s various systems.

Turn signal indicator 
(

P. 148)

Slip indicator 
(

P. 176)

Headlight high beam 
indicator (

P. 165)

“TRAC OFF” indicator 
(

P. 177)

Security indicator 
(

P. 59)

VSC off indicator 
(

P. 179)

Shift position and shift 
range indicator 
(

P. 139)

“VSC SPORT” indicator 
(

P. 177)

(Vehicles with an automatic transmission)

Upshift/downshift indi-
cator (

P. 141, 143)

REV indicator 
(

P. 125)

(Vehicles with an automatic transmission)

“SPORT” indicator 
(

P. 140)

Cruise control indicator 
(

P. 171)

(Vehicles with an automatic transmission)

“SNOW” indicator
 (

P. 140)

“SET” indicator 
(

P. 171)

(Vehicles with an automatic transmission)

Shift position indicator 
(

P. 146)

Airbag on-off indicator (

P. 99)

(Vehicles with a instruction transmission)

Shift-up indicator
 (

P. 146)

(Vehicles with a instruction transmission)

*

1, 2

*

1

*

1

*

1

-------------------------------------------------------------------------------------------------------------------------------------------------------------

157

2-2. Instrument cluster

2

Wh

en drivin

g

*

1

: These lights turn on when the engine switch is turned to the “ON”

position to indicate that a system check is being performed. They
will turn off after the engine is started, or after a few seconds. There
may be a malfunction in a system if a light does not come on, or if
the lights do not turn off. Have the vehicle inspected by your Scion
dealer.

*

2

: The light flashes to indicate that the system is operating.

Warning lights

Warning lights inform the driver of malfunctions in any of the
vehicle’s systems. (

P. 308)

*

1

: These lights turn on when the engine switch is turned to the “ON”

position to indicate that a system check is being performed. They
will turn off after the engine is started, or after a few seconds. There
may be a malfunction in a system if a light does not come on, or if
the lights do not turn off. Have the vehicle inspected by your Scion
dealer for details.

*

2

: The light comes on in yellow to indicate a malfunction.

(U.S.A.) (Canada) (U.S.A.) (Canada)

(U.S.A.) (Canada)

(for driver)

(for front 

passen-

ger)

(If equipped)

*

1

*

1

*

1

*

1

*

1

*

1

*

1

*

1

*

1

*

1

*

1

*

2

*

1

*

1

*

1

-------------------------------------------------------------------------------------------------------------------------------------------------------------

158

2-2. Instrument cluster

CAUTION

If a safety system warning light does not come on

Should a safety system light such as the ABS and SRS warning light not
come on when you start the engine, this could mean that these systems are
not available to help protect you in an accident, which could result in death
or serious injury. Have the vehicle inspected by your Scion dealer immedi-
ately if this occurs.

-------------------------------------------------------------------------------------------------------------------------------------------------------------

159

2-2. Instrument cluster

2

Wh

en drivin

g

Multi-information display

The multi-information display presents the driver with a variety of

driving-related data, including the current outside air temperature.

● Outside temperature
● Current fuel consumption
● Average fuel consumption
● Setting screen for the REV

indicator

-------------------------------------------------------------------------------------------------------------------------------------------------------------

160

2-2. Instrument cluster

Switch the display

Each time the “DISP” switch is pressed, the display changes as fol-
lows.

Outside temperature
P. 215

Current fuel consumption

Displays the current rate of fuel consumption.

Average fuel consumption

Displays the average fuel consumption since the function was
reset.

• The function can be reset by pushing the “DISP” switch for longer

than one second when the average fuel consumption is displayed.

• Use the displayed average fuel consumption as a reference.

Setting screen for the REV indicator*
P. 161

*: Only displayed when the vehicle is stopped.

-------------------------------------------------------------------------------------------------------------------------------------------------------------

161

2-2. Instrument cluster

2

Wh

en drivin

g

Setting the REV indicator

Changing the REV indicator settings

The engine speed at which the REV indicator turns on at and
whether a buzzer sounds or not when the light turns on can be set.

Engine speed setting range: From 2000 to 7400 rpm (r/min)

Press the “DISP” switch repeatedly until the setting screen is
displayed. (

P. 160)

Press and hold the “DISP”
switch.

“REV.” and the thousandth place
flash. After flashing, the number
changes each time the button is
pressed and held.

Press the “DISP” switch.

The hundredth place flashes.
After flashing, the number
changes each time the button is
pressed and held.

Press the “DISP” switch.

A buzzer sounds once, and setting of the engine speed value is
complete.

STEP 

STEP 

STEP 

STEP 

-------------------------------------------------------------------------------------------------------------------------------------------------------------

162

2-2. Instrument cluster

Press and hold the “DISP”
switch.

Each time the “DISP” switch is
pressed and held, the buzzer
changes between activated and
deactivated. 
“b-on”: Buzzer activated 
“b-oFF”: Buzzer deactivated 
When the setting changes from
“b-oFF” to “b-on”, the buzzer
sounds 3 times.

Press the “DISP” switch.

When the buzzer sounds, all settings have been completed. The set-
tings are displayed.

Deactivating the REV indicator settings

After setting the thousandth
place to “-”, press the “DISP”
switch once.

STEP 

STEP 

-------------------------------------------------------------------------------------------------------------------------------------------------------------

163

2-2. Instrument cluster

2

Wh

en drivin

g

The multi-information display operate when

The engine switch is in the “ON” position.

CAUTION

The information display at low temperatures

Allow the interior of the vehicle to warm up before using the liquid crystal
information display. At extremely low temperatures, the information display
monitor may respond slowly, and display changes may be delayed. 
For example, there is a lag between the driver's shifting and the new shift
position number appearing on the display. In this case, wait until the display
changes and take care not to downshift again, causing rapid and excessive
engine braking and possibly an accident resulting in death or serious injury.

-------------------------------------------------------------------------------------------------------------------------------------------------------------

164

2-3. Operating the lights and windshield wipers

Headlight switch

The headlights can be operated instructionly or automatically. 

Turning the end of the lever turns on the lights as follows:

Off

The daytime running lights
turn on. (

P. 165)

The headlights, park-
ing, daytime running
lights

  (

P. 165)

 and so

on turn on and off auto-
matically. (When the
engine switch is in the
“ON” position.)

The side marker, park-
ing, tail, license plate,
daytime running lights
and instrument panel
lights turn on.

The headlights and all
the lights listed above
(except daytime run-
ning lights) turn on. 

-------------------------------------------------------------------------------------------------------------------------------------------------------------

165

2-3. Operating the lights and windshield wipers

2

Wh

en drivin

g

Turning on the high beam headlights

With the headlights on, push
the lever forward to turn on the
high beams. 

Pull the lever back to the center
position to turn the high beams
off.

Pull the lever toward you and
release it to flash the high
beams once. 

You can flash the high beams
with the headlights on or off.

Daytime running light system

Vehicles with an automatic transmission: To make your vehicle more visi-
ble to other drivers during daytime driving, the daytime running lights turn
on automatically whenever the engine is started, the shift lever is shifted
out of P and the parking brake is released with the headlight switch off or
in the “AUTO” position. (Illuminate dimmer than the high beam head-
lights.) Daytime running lights are not designed for use at night.

Vehicles with a instruction transmission: To make your vehicle more visible
to other drivers during daytime driving, the daytime running lights turn on
automatically whenever the engine is started and the parking brake is
released with the headlight switch off or in the “AUTO” position. (Illumi-
nate dimmer than the high beam headlights.) Daytime running lights are
not designed for use at night.

Compared to turning on the headlights, the daytime running light system
offers greater durability and consumes less electricity, so it can help
improve fuel economy.

-------------------------------------------------------------------------------------------------------------------------------------------------------------


Content      ..     8      9      10      11     ..