Lancia THEMA. Instruction - part 8


  Index      Instructions     Lancia THEMA. Instruction


Search            copyright infringement  


Content      ..     6      7      8      9     ..


Lancia THEMA. Instruction - part 8


To protect the battery, the interior
lights will turn off automatically 10
minutes after the ignition switch is
moved to the LOCK position. This
will occur if the interior lights were
switched on instructionly or are on be-
cause a door is open. This includes the
glove box light, but not the trunk
light. To restore interior light opera-
tion, either turn the ignition switch
ON or cycle the light switch.
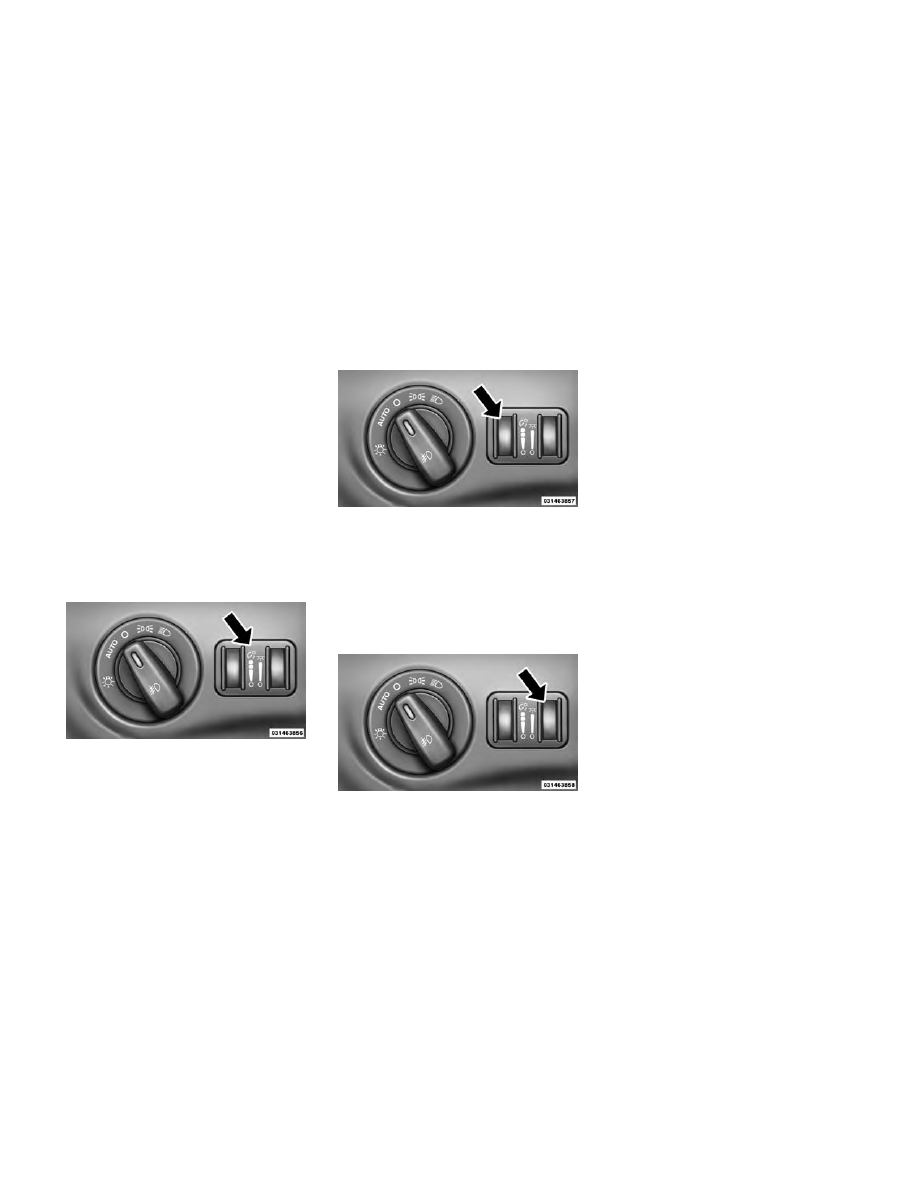
Dimmer Controls

The dimmer control is part of the
headlight switch and is located on the
left side of the instrument panel.

With the parking lights or headlights
on, rotating the left dimmer control

upward will increase the brightness of
the instrument panel lights and
lighted cupholders.

Ambient Light Control

Rotate the right dimmer control up-
ward or downward to increase or de-
crease the brightness of the door
handle lights and ambient light lo-
cated in the overhead console.

Dome Light Position

Rotate the left dimmer control com-
pletely upward to the second detent to
turn on the interior lights. The inte-
rior lights will remain on when the
dimmer control is in this position.

Interior Light Defeat (OFF)

Rotate the left dimmer control to the
extreme bottom OFF position. The
interior lights will remain off when
the doors are open.

Parade Mode (Daytime Brightness
Feature)

Rotate the left dimmer control up-
ward to the first detent. This feature
brightens all text displays such as the
odometer,

EVIC

(for

versions/

markets, where provided), and radio
when the parking lights or headlights
are on.

WINDSHIELD WIPERS
AND WASHERS

The multifunction lever operates the
windshield wipers and washer when
the ignition is placed in the ON/RUN

Dimmer Controls

Instrument Panel Dimmer

Door Handle/Ambient Light Dimmer

117

-------------------------------------------------------------------------------------------------------------------------------------------------------------

or ACC position. The multifunction
lever is located on the left side of the
steering column.

Rotate the end of the multifunction
lever to the first detent, past the inter-
mittent settings for low-speed wiper
operation, or to the second detent past
the intermittent settings for high-
speed wiper operation.

CAUTION!

• Turn the windshield wipers off

when driving through an auto-
matic car wash. Damage to the
windshield wipers may result if
the wiper control is left in any
position other than off.

(Continued)

CAUTION!

(Continued)

• In cold weather, always turn off

the wiper switch and allow the
wipers to return to the “Park”
position before turning off the en-
gine. If the wiper switch is left on
and the wipers freeze to the wind-
shield, damage to the wiper mo-
tor may occur when the vehicle is
restarted.

• Always remove any buildup of

snow that prevents the wind-
shield wiper blades from return-
ing to the off position. If the wind-
shield wiper control is turned off
and the blades cannot return to
the off position, damage to the
wiper motor may occur.

INTERMITTENT WIPER
SYSTEM

Use the intermittent wiper when
weather conditions make a single
wiping cycle with a variable pause
between cycles desirable. Rotate the
end of the multifunction lever to the
first detent position, and then turn the
end of the lever to select the desired

delay interval. There are four delay
settings, which allow you to regulate
the wipe interval from a minimum of
one cycle every second to a maximum
of approximately 18 seconds between
cycles. The delay intervals will double
in duration when the vehicle speed is
16 km/h or less.

MIST FEATURE

Rotate the end of the lever downward
to the Mist position to activate a single
wipe cycle to clear off road mist or
spray from a passing vehicle. The
wipers will continue to operate until
you release the multifunction lever.

NOTE: The mist feature does not
activate the washer pump; there-
fore, no washer fluid will be
sprayed on the windshield. The
wash function must be used in or-
der to spray the windshield with
washer fluid.

WINDSHIELD WASHERS

To use the washer, push the multi-
function lever inward (toward the
steering column) and hold it for as
long as washer spray is desired.

Windshield Wiper/Washer Control

118

-------------------------------------------------------------------------------------------------------------------------------------------------------------

If you activate the washer while the
windshield wiper control is in the de-
lay range, the wipers will operate for
two wipe cycles after releasing the
lever and then resume the intermit-
tent interval previously selected.

If you activate the washer while the
windshield wiper is turned off, the
wipers will operate for three wipe
cycles and then turn off.

WARNING!

Sudden loss of visibility through
the windshield could lead to a col-
lision. You might not see other ve-
hicles or other obstacles. To avoid
sudden icing of the windshield dur-
ing freezing weather, warm the
windshield with the defroster be-
fore and during windshield washer
use.

RAIN SENSING WIPERS
(for versions/markets,
where provided)

This feature senses moisture on the
windshield and automatically acti-
vates the wipers for the driver. The

feature is especially useful for road
splash or over spray from the wind-
shield washers of the vehicle ahead.
Rotate the end of the multifunction
lever to one of four settings to activate
this feature.

The sensitivity of the system can be
adjusted with the multifunction lever.
Wiper delay position 1 is the least
sensitive, and wiper delay position 4 is
the most sensitive. Setting 3 should be
used for normal rain conditions. Set-
tings 1 and 2 can be used if the driver
desires less wiper sensitivity. Settings
4 can be used if the driver desires
more sensitivity. The rain sense wip-
ers will automatically change between
an intermittent wipe, slow wipe and a
fast wipe depending on the amount of
moisture that is sensed on the wind-
shield. Place the wiper switch in the
OFF position when not using the sys-
tem.

The Rain Sensing feature can be
turned

on

and

off

using

the

Uconnect®

System,

refer

to

“Uconnect® Settings” in “Under-
standing Your Instrument Panel” for
further information.

NOTE:

• The Rain Sensing feature will

not operate when the wiper
speed is in the low or high posi-
tion.

• The Rain Sensing feature may

not function properly when ice
or dried salt water is present on
the windshield.

• The use of products containing

wax or silicone may reduce rain
sensor performance.

The Rain Sensing system has protec-
tive features for the wiper blades and
arms. It will not operate under the
following conditions:

• Low Temperature Wipe Inhibit

— The Rain Sensing feature will
not operate when the ignition is
placed in the RUN position, the ve-
hicle is stationary and the outside
temperature is below 0°C, unless
the wiper control on the multifunc-
tion lever is moved, the vehicle
speed becomes greater than 0 km/h
or the outside temperature rises
above freezing.

119

-------------------------------------------------------------------------------------------------------------------------------------------------------------

• Neutral Wipe Inhibit — The Rain

Sensing feature will not operate
when the ignition is placed in the
RUN position, the transmission
shift lever is in the NEUTRAL po-
sition and the vehicle speed is less
than 8 km/h, unless the wiper con-
trol on the multifunction lever is
moved or the shift lever is moved
out of the NEUTRAL position.

HEADLIGHT WASHERS

The multifunction lever operates the
headlight washers when the ignition
switch is in the ON position and the
headlights are turned on. The multi-
function lever is located on the left
side of the steering column.

To use the headlight washers, push
the multifunction lever inward (to-
ward the steering column) and release
it. The headlight washers will spray a
timed high-pressure spray of washer
fluid onto each headlight lens. In ad-
dition, the windshield washers will
spray the windshield and the wind-
shield wipers will cycle.

NOTE: After turning the ignition
switch and headlights ON, the
headlight washers will operate on
the first spray of the windshield
washer and then every eleventh
spray after that.

TILT/TELESCOPING
STEERING COLUMN

This feature allows you to tilt the
steering column upward or down-
ward. It also allows you to lengthen or
shorten the steering column. The tilt/
telescoping control handle is located
below the steering wheel at the end of
the steering column.

To unlock the steering column, pull
the control handle outward. To tilt the
steering column, move the steering

wheel upward or downward as de-
sired. To lengthen or shorten the
steering column, pull the steering
wheel outward or push it inward as
desired. To lock the steering column
in position, push the control handle
inward until fully engaged.

WARNING!

Do not adjust the steering column
while driving. Adjusting the steer-
ing column while driving or driving
with the steering column unlocked,
could cause the driver to lose con-
trol of the vehicle. Failure to follow
this warning may result in serious
injury or death.

POWER TILT/
TELESCOPING
STEERING COLUMN (for
versions/markets, where
provided)

This feature allows you to tilt the
steering column upward or down-
ward. It also allows you to lengthen or
shorten the steering column. The

Tilt/Telescoping Control Handle

120

-------------------------------------------------------------------------------------------------------------------------------------------------------------

power tilt/telescoping steering col-
umn switch is located below the mul-
tifunction lever on the steering col-
umn.

To tilt the steering column, move the
switch up or down as desired. To
lengthen or shorten the steering col-
umn, pull the switch toward you or
push the switch away from you as
desired.

NOTE: For vehicles equipped with
Driver Memory Seat, you can use
your Remote Keyless Entry (RKE)
transmitter or the memory switch
on the driver's door trim panel to
return the tilt/telescopic steering
column to pre-programmed posi-
tions. Refer to “Driver Memory
Seat” in this section.

WARNING!

Do not adjust the steering column
while driving. Adjusting the steer-
ing column while driving or driving
with the steering column unlocked,
could cause the driver to lose con-
trol of the vehicle. Failure to follow
this warning may result in serious
injury or death.

HEATED STEERING
WHEEL (for
versions/markets, where
provided)

The steering wheel contains a heating
element that helps warm your hands
in cold weather. The heated steering
wheel has only one temperature set-
ting. Once the heated steering wheel
has been turned on it will operate for
approximately 80 minutes before au-
tomatically shutting off. The heated
steering wheel can shut off early or
may not turn on when the steering
wheel is already warm.

The heated steering wheel can be
turned

on

and

off

using

the

Uconnect® System.

Touch the “Controls” soft-key then
touch the “Heated Steering Wheel”
soft-key to turn on the heated steering
wheel. Press the “Heated Steering
Wheel” soft-key a second time to turn
the heated steering wheel off.

Power Tilt/Telescoping Steering

Switch

Controls Soft-Key

Heated Steering Wheel Soft-Key

121

-------------------------------------------------------------------------------------------------------------------------------------------------------------

NOTE: The engine must be run-
ning for the heated steering wheel
to operate.

WARNING!

• Persons who are unable to feel

pain to the skin because of ad-
vanced age, chronic illness, dia-
betes, spinal cord injury, medica-
tion, alcohol use, exhaustion or
other physical condition must ex-
ercise care when using the seat
heater. It may cause burns even at
low temperatures, especially if
used for long periods of time.

• Do not place anything on the seat

or seatback that insulates against
heat, such as a blanket or cush-
ion. This may cause the seat
heater to overheat. Sitting in a
seat that has been overheated
could cause serious burns due to
the increased surface tempera-
ture of the seat.

ADJUSTABLE PEDALS
(for versions/markets,
where provided)

The adjustable pedals system is de-
signed to allow a greater range of
driver comfort for steering wheel tilt
and seat position. This feature allows
the brake and accelerator pedals to
move toward or away from the driver
to provide improved position with the
steering wheel.

The switch is located on the front side
of the driver's seat cushion side shield.

Press the switch forward to move the
pedals forward (toward the front of
the vehicle).

Press the switch rearward to move the
pedals rearward (toward the driver).

• The pedals can be adjusted with the

ignition OFF.

• The pedals cannot be adjusted

when the vehicle is in REVERSE or
when the Electronic Speed Control
System is on. The following mes-
sages will be displayed on vehicles
equipped with the Electronic Ve-
hicle Information System (EVIC) if
the pedals are attempted to be ad-
justed when the system is locked
out :Adjustable Pedal Disabled —
Cruise Control Engaged or Adjust-
able Pedal Disabled — Vehicle In
Reverse.

NOTE:

• Always adjust the pedals to a po-

sition that allows full pedal
travel.

• Further small adjustments may

be necessary to find the best pos-
sible seat/pedal position.

Adjustable Pedals Switch

122

-------------------------------------------------------------------------------------------------------------------------------------------------------------

NOTE: For

vehicles

equipped

with Driver Memory Seat, you can
use your Remote Keyless Entry
(RKE) transmitter or the memory
switch on the driver's door trim
panel to return the adjustable ped-
als to pre-programmed positions.
Refer to “Driver Memory Seat” in
“Understanding The Features Of
Your Vehicle” for further informa-
tion.

CAUTION!

Do not place any article under the
adjustable pedals or impede its
ability to move as it may cause
damage to the pedal controls. Pedal
travel may become limited if move-
ment is stopped by an obstruction
in the adjustable pedal's path.

WARNING!

Do not adjust the pedals while the
vehicle is moving. You could lose
control and have an accident. Al-
ways adjust the pedals while the
vehicle is parked.

ELECTRONIC SPEED
CONTROL

When engaged, the Electronic Speed
Control takes over accelerator opera-
tions at speeds greater than 40 km/h.

NOTE: In order to ensure proper
operation, the Electronic Speed
Control System has been designed
to shut down if multiple Speed
Control functions are operated at
the same time. If this occurs, the
Electronic Speed Control System
can be reactivated by pushing the
Electronic Speed Control ON/OFF
button and resetting the desired
vehicle set speed.

TO ACTIVATE

Push the ON/OFF button. The Cruise
Indicator Light in the Electronic Ve-
hicle Information Center (EVIC) will
illuminate. To turn the system off,
push the ON/OFF button a second
time. The Cruise Indicator Light will
turn off. The system should be turned
off when not in use.

WARNING!

Leaving the Electronic Speed Con-
trol system on when not in use is
dangerous. You could accidentally
set the system or cause it to go
faster than you want. You could
lose control and have an accident.
Always leave the system OFF when
you are not using it.

TO SET A DESIRED SPEED

Turn the Electronic Speed Control
ON. When the vehicle has reached the
desired speed, press the SET (-) but-
ton and release. Release the accelera-
tor and the vehicle will operate at the
selected speed.

Electronic Speed Control Buttons

1 — ON/OFF

2 — RES +

4 — CANCEL

3 — SET -

123

-------------------------------------------------------------------------------------------------------------------------------------------------------------

NOTE: The vehicle should be
traveling at a steady speed and on
level ground before pressing the
SET button.

TO DEACTIVATE

A soft tap on the brake pedal, pushing
the CANCEL button, or normal brake
pressure while slowing the vehicle will
deactivate Electronic Speed Control
without erasing the set speed memory.
Pressing the ON/OFF button or turn-
ing the ignition switch OFF erases the
set speed memory.

TO RESUME SPEED

To resume a previously set speed,
push the RES (+) button and release.
Resume can be used at any speed
above 32 km/h.

TO VARY THE SPEED
SETTING

When the Electronic Speed Control is
set, you can increase speed by pushing
the RES (+) button. If the button is
continually pressed, the set speed will

continue to increase until the button is
released, then the new set speed will
be established.

Pressing the RES (+) button once will
result in the following set speeds:

• 2.0 km/h (3.0L Diesel Engine)

• 1.6 km/h (3.6L Engine)

Each subsequent tap of the button
results in an increase of 2.0 km/h
(3.0L Diesel Engine) or 1.6 km/h
(3.6L Engine).

To decrease speed while the Elec-
tronic Speed Control is set, push the
SET (-) button. If the button is con-
tinually held in the SET (-) position,
the set speed will continue to decrease
until the button is released. Release
the button when the desired speed is
reached, and the new set speed will be
established.

Pressing the SET (-) button once will
result in the following decrease in set
speed:

• 2.0 km/h (3.0L Diesel Engine)

• 1.6 km/h (3.6L Engine)

Each subsequent tap of the button
results in a decrease of 2.0 km/h
(3.0L Diesel Engine) or 1.6 km/h
(3.6L Engine)

TO ACCELERATE FOR
PASSING

Press the accelerator as you would
normally. When the pedal is released,
the vehicle will return to the set speed.

Using Electronic Speed Control
On Hills

The transmission may downshift on
hills to maintain the vehicle set speed.

NOTE: The

Electronic

Speed

Control system maintains speed up
and down hills. A slight speed
change on moderate hills is nor-
mal.

On steep hills, a greater speed loss or
gain may occur so it may be prefer-
able to drive without Electronic Speed
Control.

124

-------------------------------------------------------------------------------------------------------------------------------------------------------------

WARNING!

Electronic Speed Control can be
dangerous where the system cannot
maintain a constant speed. Your ve-
hicle could go too fast for the con-
ditions, and you could lose control
and have an accident. Do not use
Electronic Speed Control in heavy
traffic or on roads that are winding,
icy, snow-covered or slippery.

ADAPTIVE CRUISE
CONTROL (ACC) (for
versions/markets, where
provided)

Adaptive Cruise Control (ACC) in-
creases the driving convenience pro-
vided by cruise control while traveling
on highways and major roadways.
However, it is not a safety system and
not designed to prevent collisions.

ACC will allow you to keep cruise
control engaged in light to moderate
traffic conditions without the con-
stant need to reset your cruise control.

ACC utilizes a radar sensor designed
to detect a vehicle directly ahead of
you.

NOTE:

• If the sensor does not detect a

vehicle ahead of you, ACC will
maintain a fixed set speed.

• If the ACC sensor detects a ve-

hicle ahead, ACC will apply lim-
ited braking or acceleration (not
to exceed the original set speed)
automatically to maintain a pre-
set following distance, while
matching the speed of the ve-
hicle ahead.

WARNING!

• Adaptive Cruise Control (ACC) is

a convenience system. It is not a
substitute for active driving in-
volvement. It is always the driv-
er’s responsibility to be attentive
of road, traffic, and weather con-
ditions, vehicle speed, distance to
the vehicle ahead; and, most im-
portantly, brake operation to en-
sure safe operation of the vehicle
under all road conditions. Your
complete attention is always re-
quired while driving to maintain
safe control of your vehicle. Fail-
ure to follow these warnings can
result in a collision and death or
serious personal injury.

• The ACC system:
• Does not react to pedestrians, on-

coming vehicles, and stationary
objects (e.g., a stopped vehicle in
a traffic jam or a disabled ve-
hicle).

(Continued)

125

-------------------------------------------------------------------------------------------------------------------------------------------------------------

WARNING!

(Continued)

• Cannot take street, traffic, and

weather conditions into account,
and may be limited upon adverse
sight distance conditions.

• Does not always fully recognize

complex

driving

conditions,

which can result in wrong or
missing distance warnings.

• Can only apply a maximum of

40% of the vehicle’s braking ca-
pability, and will not bring the
vehicle to a complete stop. You

should switch off the ACC system:
• When driving in fog, heavy rain,

heavy snow, sleet, heavy traffic,
and complex driving situations
(i.e., in highway construction
zones).

• When entering a turn lane or

highway off ramp; when driving
on roads that are winding, icy,
snow-covered, slippery, or have
steep uphill or downhill slopes.

• When towing a trailer up or down

steep slopes.

• When circumstances do not allow

safe driving at a constant speed.

The Cruise Control system has two
control modes:

• Adaptive Cruise Control mode for

maintaining an appropriate dis-
tance between vehicles.

• Normal (fixed speed) cruise control

mode is for cruising at a constant
preset speed. For additional infor-
mation, refer to “Normal (Fixed
Speed) Cruise Control Mode” in
this section.

NOTE: The system will not react
to preceding vehicles. Always be
aware of the mode selected.

You can change the mode by using the
Cruise Control buttons. The two con-
trol modes function differently. Al-
ways confirm which mode is selected.

ADAPTIVE CRUISE
CONTROL (ACC)
OPERATION

The speed control buttons (located on
the right side of the steering wheel)
operates the ACC system.

NOTE: Any

chassis/suspension

modifications to the vehicle will
effect the performance of the
Adaptive Cruise Control.

ACTIVATING ADAPTIVE
CRUISE CONTROL (ACC)

You can only activate ACC if the ve-
hicle speed is above 30 km/h.

When the system is turned on and in
the READY state, the Electronic Ve-
hicle Information Center (EVIC) dis-
plays “Adaptive Cruise Ready.”

Adaptive Cruise Control Buttons

1 — DISTANCE SETTING

2 — RES +

3 — SET -

4 — CANCEL

5 — ON/OFF

6 — MODE

126

-------------------------------------------------------------------------------------------------------------------------------------------------------------

When the system is OFF, the EVIC
displays “Adaptive Cruise Control
Off.”

NOTE: You cannot enable ACC
under the following conditions:

• When you apply the brakes.

• When the parking brake is set.

• When the automatic transmis-

sion is in PARK, REVERSE or
NEUTRAL.

• When pushing the RES + button

without a previously set speed in
memory.

TO ACTIVATE

Push and release the ON/OFF button.
The ACC menu in the EVIC displays
“Adaptive Cruise Control (ACC)
Ready.”

To turn the system OFF, push and
release the ON/OFF button again. At
this time, the system will turn off and
the EVIC will display “Adaptive
Cruise Control (ACC) OFF.”

WARNING!

Leaving the Adaptive Cruise Con-
trol (ACC) system on when not in
use is dangerous. You could acci-
dentally set the system or cause it to
go faster than you want. You could
lose control and have a collision.
Always leave the system off when
you are not using it.

TO SET A DESIRED ACC
SPEED

When the vehicle reaches the speed
desired, push the SET button and
release. The message “ACC Set” will
display in the EVIC and then will
display the set speed.

Remove your foot from the accelera-
tor pedal. If you do not, the vehicle
may continue to accelerate beyond
the set speed. If this occurs:

• The message “DRIVER OVER-

RIDE” will display in the EVIC.

• The system will not be controlling

the distance between your vehicle
and the vehicle ahead. The vehicle

Adaptive Cruise Control (ACC) Ready

Adaptive Cruise Control (ACC) OFF

ACC Set

127

-------------------------------------------------------------------------------------------------------------------------------------------------------------

speed will only be determined by
the position of the accelerator
pedal.

TO CANCEL

The system will disable ACC without
erasing the memory if:

• You softly tap the brake pedal.

• You depress the brake pedal.

• You press the CANCEL switch.

• An Anti-Lock Brake System (ABS)

event occurs.

• If the transmission is shifted into

NEUTRAL.

• The Electronic Stability Control/

Traction Control System (ESC/
TCS) activates.

NOTE:

If ACC is resumed or set

with the ESC/TCS off, ESC will au-
tomatically be re-engaged.

TO TURN OFF

The system will turn off and erase the
set speed in memory if:

• You push and release the ON/OFF

button.

• You turn OFF the ignition.

TO RESUME SPEED

Press the RES button and release.
Then remove your foot from the ac-
celerator pedal. The EVIC will dis-
play the last set speed.

NOTE: You can resume ACC from
a minimum of 30 km/h.

WARNING!

The Resume function should only
be used if traffic and road condi-
tions permit. Resuming a set speed
that is too high or too low for pre-
vailing traffic and road conditions
could cause the vehicle to acceler-
ate or decelerate too sharply for
safe operation. Failure to follow
these warnings can result in a colli-
sion and death or serious personal
injury.

TO VARY THE SPEED
SETTING

While ACC is set, you can increase the
set speed by pressing and holding the
RES button. The increase in set
speed is reflected in the EVIC display:

While in US Mode, if the button is
continually pressed, the set speed will
continue to increase in 8 km/h incre-
ments. While in Metric Mode, if the
button is continually pressed, the set
speed will continue to increase in
10 km/h increments.

Driver Override

Adaptive Cruise Control (ACC)

Cancelled

128

-------------------------------------------------------------------------------------------------------------------------------------------------------------

While in US Mode, pressing the RES +
button once will result in a 1.6 km/h
increase in set speed. Each subse-
quent tap of the button results in in-
crease of 1.6 km/h. While in Metric
Mode, pressing the RES button once
will result in a 1.0 km/h increase in set
speed. Each subsequent tap of the
button results in increase of 1.0 km/h.

While ACC is set, the set speed can be
decreased by pressing and holding the
SET button.

If the button is held while in US Mode,
the set speed will continue to decrease
in 8 km/h increments.

If the button is held while in Metric
Mode, the set speed will continue to
decrease in 10 km/h increments.

While in US Mode, pressing the SET -
button once will result in a 1.6 km/h
decrease in set speed. Each subse-
quent tap of the button results in de-
crease of 1.6 km/h.

While in Metric Mode, pressing the
SET button once will result in a

1.0 km/h decrease in set speed. Each
subsequent tap of the button results in
decrease of 1.0 km/h.

NOTE:

• When you use the SET - button

to decelerate, if the engine’s
braking power does not slow the
vehicle sufficiently to reach the
set speed, the brake system will
automatically slow the vehicle.

• The ACC system can only apply a

maximum of 25% of the vehi-
cle's braking capability and will
not bring the vehicle to a com-
plete stop.

• The ACC system maintains set

speed when driving up hill and
down hill. However, a slight
speed change on moderate hills
is normal. In addition, down-
shifting may occur while climb-
ing uphill or descending down-
hill. This is normal operation
and necessary to maintain set
speed.

SETTING THE
FOLLOWING DISTANCE IN
ACC

The specified following distance for
ACC can be set by varying the dis-
tance setting between 3 (long), 2 (me-
dium), and 1 (short). Using this dis-
tance setting and the vehicle speed,
ACC calculates and sets the distance
to the vehicle ahead. This distance
setting displays in the EVIC.

Distance Set 3 (long)

Distance Set 2 (medium)

129

-------------------------------------------------------------------------------------------------------------------------------------------------------------

To change the distance setting, press
the Distance button and release. Each
time the button is pressed, the dis-
tance setting adjusts between 3
(long), 2 (medium), and 1 (short).

If there is no vehicle ahead, the vehicle
will maintain the set speed. If a slower
moving vehicle is detected in the same
lane, the EVIC displays the “Sensed
Vehicle Indicator” icon, and the sys-
tem adjusts vehicle speed automati-
cally to maintain the distance setting,
regardless of the set speed.

The vehicle will then maintain the set
distance until:

• The vehicle ahead accelerates to a

speed above the set speed.

• The vehicle ahead moves out of

your lane or view of the sensor.

• The vehicle ahead slows to a speed

below 25 km/h and the system au-
tomatically disengages itself.

• The distance setting is changed.

• The system disengages. (Refer to

the information on ACC Activa-
tion).

The maximum braking applied by
ACC is limited; however, the driver
can always apply the brakes manu-
ally, if necessary.

NOTE: The brake lights will illu-
minate whenever the ACC system
applies the brakes.

A Proximity Warning will alert the
driver if ACC predicts that its maxi-
mum braking level is not sufficient to
maintain the set distance. If this oc-
curs, a visual alert “BRAKE” will flash
in the EVIC and a chime will sound
while ACC continues to apply its maxi-
mum braking capacity. When this oc-
curs, you should immediately apply
the brakes as needed to maintain a safe
distance from the vehicle ahead.

Distance Set 1 (short)

Brake Alert 3

Brake Alert 2

Brake Alert 1

130

-------------------------------------------------------------------------------------------------------------------------------------------------------------

OVERTAKE AID

When driving with ACC engaged and
following a target vehicle, the system
will provide an additional accelera-
tion to assist in passing vehicles in
front. This additional acceleration is
triggered when the driver utilizes the
left turn signal. In locations with left
hand drive traffic, Overtake Aid is
active only when passing on the left
hand side of the Target vehicles.

When a vehicle goes from a location
with left hand drive traffic to a loca-
tion with right hand drive traffic, the
ACC system will automatically detect
traffic direction. In this condition,
Overtake Aid is active only when
passing on the right side of the Target
vehicle. This additional acceleration
is triggered when the driver utilizes
the right turn signal. In this condition
the ACC system will no longer provide
Overtake Aid on the left side until it
determines that the vehicle has moved
back to a location with left hand drive
traffic.

ADAPTIVE CRUISE
CONTROL (ACC) MENU

The EVIC displays the current ACC
system settings. The EVIC is located
in the upper part of the instrument
cluster between the speedometer and
the tachometer. The information it
displays depends on ACC system sta-
tus.

UP and DOWN Buttons

Press the MENU button (located on
the steering wheel) repeatedly until
one of the following displays in the
EVIC:

Adaptive Cruise Control Off

• When ACC is deactivated, the dis-

play will read “Adaptive Cruise
Control Off.”

Adaptive Cruise Control Ready

• When ACC is activated but the ve-

hicle speed setting has not been se-
lected, the display will read “Adap-
tive Cruise Control Ready.”

ACC SET

• When ACC is set, the set speed will

display.

• The set speed will continue to dis-

play in place of the odometer read-
ing when changing the EVIC dis-
play while ACC is set.

The ACC screen will display once
again if any ACC activity occurs,
which may include any of the follow-
ing:

• Set Speed Change

• Distance Setting Change

• System Cancel

• Driver Override

• System Off

• ACC Proximity Warning

• ACC Unavailable Warning

• The EVIC will return to the last

display selected after five seconds
of no ACC display activity.

131

-------------------------------------------------------------------------------------------------------------------------------------------------------------

DISPLAY WARNINGS AND
MAINTENANCE

“Clean Radar Sensor In Front Of
Vehicle” Warning

The ACC “Clean Radar Sensor In
Front Of Vehicle” warning will dis-
play when conditions temporarily
limit system performance. This most
often occurs at times of poor visibility,
such as in snow or heavy rain. The
ACC system may also become tempo-
rarily blinded due to obstructions,
such as mud, dirt or ice. In these
cases, the EVIC will display “Clean
Radar Sensor In Front Of Vehicle”
and the system will deactivate.

The “Clean Radar Sensor In Front Of
Vehicle” message can sometimes be
displayed while driving in highly re-
flective areas (i.e. tunnels with reflec-
tive tiles, or ice and snow). The ACC
system will recover after the vehicle
has left these areas. Under rare condi-
tions, when the radar is not tracking
any vehicles or objects in its path this
warning may temporarily occur.

NOTE: If the ACC “Clean Radar
Sensor In Front Of Vehicle” warn-
ing is active Normal (Fixed Speed)
Cruise Control is still available.
For additional information refer to
“Normal (Fixed Speed) Cruise
Control Mode” in this section.

If weather conditions are not a factor,
the driver should examine the sensor.
It may require cleaning or removal of
an obstruction. The sensor is located
in the center of the vehicle behind the
lower grille.

To keep the ACC System operating
properly, it is important to note the
following maintenance items:

• Always keep the sensor clean. Care-

fully wipe the sensor lens with a soft
cloth. Be cautious not to damage
the sensor lens.

• Do not remove any screws from the

sensor. Doing so could cause an
ACC system malfunction or failure
and require a sensor realignment.

• If the sensor is damaged due to a

collision, see your authorized dealer
for service.

• Do not attach or install any acces-

sories near the sensor, including
transparent material or aftermar-
ket grilles. Doing so could cause an
ACC system failure or malfunction.

When the condition that deactivated
the system is no longer present, the
system will return to the “Adaptive
Cruise Control Off” state and will re-
sume function by simply reactivating
it.

NOTE: Installing a vehicle front-
end protector or an aftermarket
grille or modifying the grille is not
recommended.

Doing

so

may

block the sensor and inhibit ACC
operation.

ACC Unavailable Warning

If the system turns off, and the EVIC
displays “Adaptive Cruise Control
(ACC) Unavailable”, there may be a
temporary malfunction that limits
ACC functionality. Although the ve-
hicle is still drivable under normal
conditions, ACC will be temporarily

132

-------------------------------------------------------------------------------------------------------------------------------------------------------------


Content      ..     6      7      8      9     ..