MG 615. Instruction - part 13


  Index      Instructions     MG 615. Instruction


Search            copyright infringement  


Content      ..     11      12      13      14     ..


MG 615. Instruction - part 13


MAINTENANCE

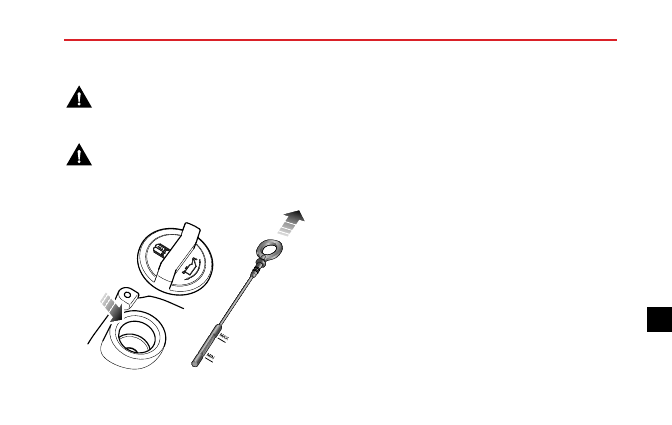
Diesel Engine Oil Level Check and Top Up

Driving the car with the engine oil level
ABOVE the upper mark, or BELOW the lower
mark on the dipstick, will damage the engine.

Take care to avoid spilling engine oil onto a
hot engine – a fire may result!

M

A X

M IN

Check the oil level weekly and top up with oil if necessary.
Ideally the oil level should be checked with the engine cold
and the car resting on level ground. However, if the car is
in use and the engine is already warm, wait for at least two
minutes after switching off before checking the level.

1 Withdraw the dipstick and wipe the blade clean.

2 Slowly insert the dipstick and withdraw again to check

the level, which should NEVER be allowed to fall below
the ‘MIN’ mark on the dipstick.

3 To top up, Screw off the oil filler cap and add oil to

maintain a level between the ‘MAX’ and ‘MIN’ marks
on the dipstick.

4 Wait for five minutes and then recheck the level,

adding more oil if necessary – DO NOT OVER-FILL
DIESEL ENGINES WITH LUBRICANT!

5 Finally, ensure the dipstick and filler cap are replaced.

For diesel engine oil type and capacity refer to the
‘Technical Data’ Chapter.

193

7

-------------------------------------------------------------------------------------------------------------------------------------------------------------

MAINTENANCE

Cooling System

Coolant Check and Top Up

DO NOT remove the reservoir cap when the
cooling system is hot - escaping steam or
water could cause serious injury.

M A X

M IN

The coolant level should be checked weekly when the
cooling system is cold and with the car resting on level
ground.

If the coolant level is below MIN level, remove the pressure
cap when cold and add correct coolant mix to MAX level.

Note: Prevent coolant coming into contact with the
vehicle bodywork, coolant will damage paint.

If the coolant level falls appreciably during a short period,
suspect leakage or overheating and arrange for a MG
Authorised Repairer to examine the car.

195

7

-------------------------------------------------------------------------------------------------------------------------------------------------------------

MAINTENANCE

Coolant Specification

Please use the coolant (mix of water and antifreeze) which
is recommended and certified by the manufacturer. Please
refer to ‘Recommended Fluids and Capacities’.

Note: In an emergency top up the cooling system with
clean water, but be aware of the resultant reduction in
frost protection and summer cooling performance. If
this occurs then replenish coolant mix to the correct
level at the earliest opportunity. DO NOT top up or
refill with other anti-freeze formulations.

Note: DO NOT top up or refill with rust inhibitor or
other coolant additives.

Note:

Should the low coolant level warning light

illuminate, check the coolant level as soon as possible.

Antifreeze

Antifreeze is poisonous and can be fatal
if swallowed - keep containers sealed and
out of the reach of children. If accidental
consumption is suspected,

seek medical

attention immediately.

Prevent antifreeze coming into contact
with the skin or eyes. If this occurs, rinse
immediately with plenty of water.

196

-------------------------------------------------------------------------------------------------------------------------------------------------------------

MAINTENANCE

Brakes

Brake Pads

DO NOT rest your foot on the brake pedal
while driving; this may overheat the brakes,
reduce their efficiency and cause excessive
wear.

For the first 900 miles (1,500 km), you should avoid
situations where heavy braking is required.

Remember that regular servicing is vital to ensure that
all the brake components are examined for wear at the
correct intervals, and changed when required to ensure
long term safety and optimum performance.

When a brake pad wears to a predetermined point, please
seek MG Authorised Repairer to replace brake pads, loss
of brake efficiency may result which may result in a serious
injury or accident.

At the time of brake pad replacement it is recommended
that the brake pad wear indicator sensor/s be replaced.

Brake Fluid Check and Top Up

Brake fluid is highly toxic - keep containers
sealed and out of the reach of children.
If accidental consumption of brake fluid
is

suspected,

seek

medical

attention

immediately.

Prevent brake fluid coming into contact
with the skin or eyes. If this occurs, rinse
immediately with plenty of water.

The brake fluid level should be checked weekly when the
system is cold and with the car on level ground.

The fluid level can be seen through the reservoir neck
and should be maintained as close to the ‘MAX’ mark as
possible. Do not allow the level to drop below the ‘MIN’
mark.

Note: Brake fluid will damage painted surfaces. Soak
up any spillage with an absorbent cloth immediately
and wash the area with a mixture of car shampoo and
water.

197

7

-------------------------------------------------------------------------------------------------------------------------------------------------------------

MAINTENANCE

M A X

M

IN

M A X

M

IN

Brake Fluid Specification

Use the brake fluid which is recommended and certified
by the manufacturer.

See ‘Recommended Fluids and

Capacities’.

IMPORTANT

The brake fluid must be replaced every two years.

198

-------------------------------------------------------------------------------------------------------------------------------------------------------------

MAINTENANCE

Power Steering

Power Steering Fluid Check and Top Up

Power steering fluid is highly toxic - keep
containers sealed and out of the reach
of children.

If accidental consumption of

fluid is suspected, seek medical attention
immediately.

If power steering fluid should come into
contact

with

the

skin

or

eyes,

rinse

immediately with plenty of water.

The fluid level should be checked every service.

This

should be done before the engine is started when the
system is cold and with the front wheels pointing straight
ahead.

Wipe the filler cap clean to prevent dirt from entering
the reservoir. Remove the filler cap and, using a clean
lint-free cloth, wipe the dipstick clean. Refit the cap fully
and remove again to check the fluid level. If necessary,
top up with a fluid meeting specification until the level is

between the upper and lower marks on the dipstick (see
illustration).

Note:

Power steering fluid will damage painted

surfaces. Soak up any spillage with an absorbent cloth
immediately and wash the area with a mixture of car
shampoo and water.

199

7

-------------------------------------------------------------------------------------------------------------------------------------------------------------

MAINTENANCE

IMPORTANT

Take care not to spill power steering fluid on to a hot
engine, a fire may result.

Power Steering Fluid Specification

Use the power steering fluid which is recommended and
certified by the manufacturer. Refer to ‘Recommended
Fluids and Capacities’.

200

-------------------------------------------------------------------------------------------------------------------------------------------------------------

MAINTENANCE

Battery

To access the battery, release the fixings and move the top
of the battery cover aside as shown in illustration.

Battery Safety

Batteries contain sulphuric acid, which is both corrosive
and poisonous. Wear suitable protective equipment when
handling batteries to protect your eyes, skin and clothing.

If a spillage occurs:

• On clothing or the skin - remove any contaminated

clothing immediately, flush the skin with large amounts
of water, and seek medical attention urgently.

• In the eyes - flush with clean water immediately for at

least 15 minutes. Seek medical attention urgently.

• Swallowing battery acid can be fatal unless IMMEDIATE

action is taken - seek medical attention urgently.

Battery Disconnection and Replacement

Note:

NEVER run the engine with the battery

disconnected, or disconnect the battery while the
engine is running.

Batteries contain sulphuric acid, which is both corrosive
and poisonous. If a battery requires replacement contact
an MG Authorised Repairer.

Only fit a replacement

201

7

-------------------------------------------------------------------------------------------------------------------------------------------------------------

MAINTENANCE

battery of the same type and specification as the original
to maintain the correct vehicle functionality.

Before disconnecting or removing the battery, ensure that
the starter switch and all electrical equipment is turned off.

Disconnect the negative (-) cable first and then the positive
(+) cable (when reconnecting, connect the positive cable
first and then the negative cable).

When lifting the battery from the car, keep the battery
upright at all times.

Make sure both the battery clamping plate and retaining
strap are fitted securely, this will prevent the battery from
moving in the event of an accident or sudden stop.

Note:

To maintain the correct functionality of

Stop/Start 

, the battery sensor requires resetting

after battery replacement.

Please consult an MG

Authorised Repairer to reset the battery sensor, it
takes 4 hours at least for the sensor to get the exact
status information of the battery. Failure to adhere
to the above will inhibit the stop/start functionality.

Used

batteries

can

be

harmful

to

the

environment , must be disposed of using an approved
method .

They should be recycled by a professional

company. Please consult an MG Authorised Repairer for
more details.

202

-------------------------------------------------------------------------------------------------------------------------------------------------------------

MAINTENANCE

Battery Charging

Note: DO NOT charge the battery if it is suspected of
being frozen.

As the battery ages, it may not retain its charge as
effectively as when it was new.

Cars that are used

infrequently, or are used excessively for short journey
motoring, or operation in cold climates, may need the
battery to be charged regularly.

Pre Charging Battery Appearance Check

• If the shell is broken or there is a leak, DO NOT charge

the battery and replace it after finding the reason.

• If the terminal is broken, DO NOT charge the battery

and replace it after finding the reason.

• DO NOT attempt to charge a ‘bulging' or ‘distorted'

battery.

• Prior to charging ensure terminals are free from

corrosion, apply petroleum jelly to terminal to help
prevent corrosion.

Charging Notes:

• Always wear safety glasses when connecting or

disconnecting a battery charger.

• Always ensure there the area is well ventilated. Ensure

the charging battery has adequate space and does not
‘over-heat'.

• DO NOT smoke in the vicinity of a charging battery,

and ensure sparks and naked lights are kept well away
from the engine compartment.

• Before charging, connect the positive cable at first.

After charging, disconnect the negative cable at first.

Battery Charging Operation:

Note: When charging or emergency starting always
ensure the negative lead has a good connection to a
body earth away from the battery (refers to the section
‘Emergency Starting’ in the ‘Emergency Information’
Chapter).

• If charging the battery whilst on the vehicle, please

connect the battery charger negative lead to the vehicle
body ensuring a good connection.

• Ensure all terminals are free from corrosion.

203

7

-------------------------------------------------------------------------------------------------------------------------------------------------------------

MAINTENANCE

• Only suitable battery chargers can be used - please

consult an MG Authorised Repairer for details.

• During the charging process the battery temperature

MUST NOT exceed 40ºC.

• DO NOT attempt to charge a battery at temperatures

below 0ºC.

Battery Maintenance

DO NOT leave electric components switched
on when the engine is not running, the
battery may become flat and you will not be
able to start the engine.

The battery is designed to be maintenance free, so
topping-up is unnecessary.

Note: If the vehicle is stored for more than 1 month,
remove the earth lead from the battery. Make sure
that the ignition switch has been turned off before
connecting or disconnecting the earth lead.

When

connecting the earth lead again, the vehicle must be
left in a locked state for 4 hours to re-calibrate the

battery condition. Failure to adhere to this will inhibit
the stop/start functionality.

204

-------------------------------------------------------------------------------------------------------------------------------------------------------------

MAINTENANCE

Washers

Windscreen and Front Lamp Washer Check
and Top Up

Some screen and front lamp wash products
are flammable,

particularly if high or

undiluted concentrations are exposed to
sparks. Do not allow screenwash to come
into contact with naked flames or sources of
ignition.

When filling the washer reservoir avoid
spillages onto painted surfaces, damage may
occur. if spillage occurs or fluid comes into
contact with bare skin please wash with
clean water immediately.

The washer reservoir is located on the offside of the engine
compartment and supplies the windscreen washers and
headlamp washers.

Check the fluid level at weekly intervals and top up when
low.

Note: DO NOT use an anti-freeze or vinegar/water
solution in the washer reservoir - anti-freeze will
damage paintwork while vinegar will damage the
windscreen washer pump.

205

7

-------------------------------------------------------------------------------------------------------------------------------------------------------------

MAINTENANCE

IMPORTANT

• Use the washer fluid which is recommended by the

manufacturer, or the washer motor may become
damaged by freezing if non-recommended washer
fluid is used in winter.

• The washer pumps may become damaged if used

when the reservoir is empty.

• The wipers may damage the windscreen if used when

dry - always ensure there is adequate fluid in the
reservoir.

Washer Nozzles

Operate the washer periodically to check if the windshield
washer nozzles are clean and they are in the correct
direction.

The windshield washer nozzles are configured during the
production, so generally there is no need for adjustments.If
necessary, a needle can be inserted into the jet orifice and
levered gently into position so that the spray is directed
toward the required area of the windscreen.

The front lamp washer nozzles

*

can not be configured.

If the nozzle is obstructed, insert a needle or thin metal
wire into the hole to remove the obstruction.

Washing Fluid Specification

Use the washing fluid recommended and approved by
the manufacturer.

Refer to ‘Recommended Fluids and

Capacities’.

206

-------------------------------------------------------------------------------------------------------------------------------------------------------------

MAINTENANCE

Wipers

Windscreen Wiper Blades

IMPORTANT

• Grease, silicon and petrol based products impair the blade’s wiping capability. Wash the wiper blades in warm soapy

water and periodically check their condition.

• Clean the windscreen frequently, DO NOT use wipers to remove stubborn or ingrained dirt, it will reduce their

effect and their life span.

• If signs of hardness or cracking in the rubber are found, or if the wipers leave streaks or unwiped areas on the screen,

then the wiper blades should be replaced.

• Clean the windscreen regularly with an approved glass cleaner and ensure the screen is thoroughly cleaned before

fitting replacement wiper blades.

• Only fit replacement wiper blades that are identical to the original specification.

• Clean ice and snow from around wipers and ensure they are not frozen or otherwise sticking to the windscreen

before attempting to operate them.

207

7

-------------------------------------------------------------------------------------------------------------------------------------------------------------

MAINTENANCE

Replacing Front Wiper Blades

0

00

0

1 Lift the wiper arm away from the windscreen.

2 Squeeze the two locating tags and pivot the blade away

from the wiper arm.

3 Unhook the blade from the wiper arm and discard.

4 Locate the tip of the new wiper blade in the slot in the

wiper arm.

5 Pivot the wiper blade towards the arm until the

locating tags engage.

6 Check that the blade is fitted correctly to the arm

before positioning on the windscreen.

208

-------------------------------------------------------------------------------------------------------------------------------------------------------------

MAINTENANCE

Tyres

Overview

• Take extra care when using new tyres for the first 500

km.

• Avoid excessive cornering at speed.

• Regularly check tyres for damage and foreign objects -

remove any foreign objects from the tread.

• Avoid tyre contact with oils, grease and fuel.

• Ensure valve caps are always fitted.

• If the tyre is to be removed always mark the tyre/wheel

orientation to ensure correct refitment.

New Tyres

New tyres may not have the same adhesion properties of
the old tyres, please take extra care for 500 km. This action
could benefit tyre life.

Tyre or rim damage can happen unnoticed. If abnormal
vibrations or handling is experienced, or you think tyre or
rim damage has occurred please contact an MG Autorised
Repairer.

Directional Tyres

Directional tyres are marked with 'direction of rotation'
(DOR).

To

maintain

handling

characteristics,

tyre

performance, low road noise and extend tyre life,
tyres/wheels must always be fitted with indication arrow
showing the correct 'DOR'.

209

7

-------------------------------------------------------------------------------------------------------------------------------------------------------------


Content      ..     11      12      13      14     ..