Vauxhall Astravan (2007 year). Instruction - part 18


  Index      Vauxhall     Vauxhall Astravan (2007 year) - instruction in english


Search            copyright infringement  


Content      ..     16      17      18      19     ..


Vauxhall Astravan (2007 year). Instruction - part 18


274

Self-help, vehicle care

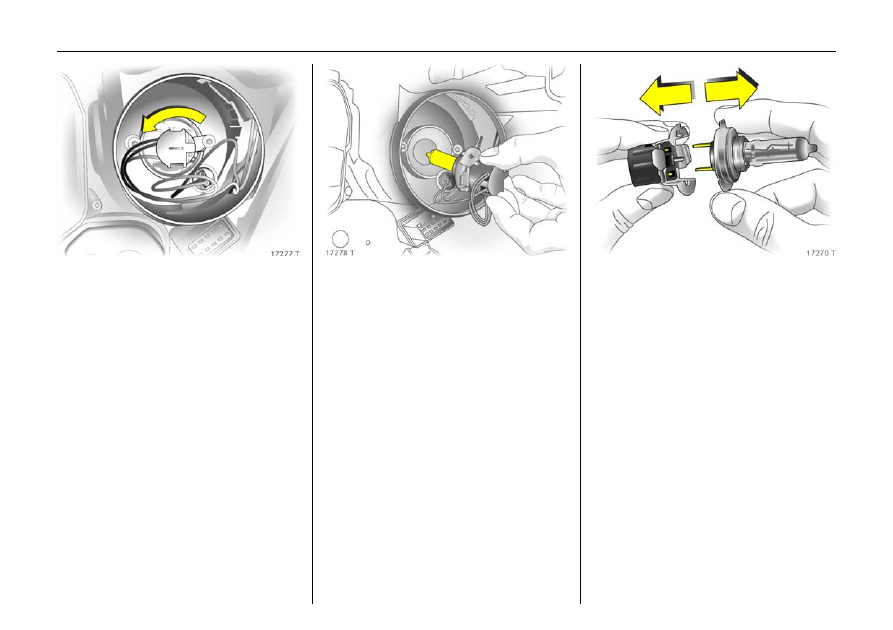
3. Rotate left bulb holder and disengage. 

4. Remove the bulb holder with bulb from 

the reflector. 

5. Detach bulb from bulb holder. 
6. Insert new bulb into bulb holder, 

without touching the glass. 

7. Insert new bulb so that the two lugs on 

the bulb holder engage in the recesses 

in the reflector. 

8. Rotate bulb holder to right as far as it 

will go. 

9. Place headlight protective cover in 

position and close. 

10. Position cover on opening in wheel arch 

and engage. 

-------------------------------------------------------------------------------------------------------------------------------------------------------------

275

Self-help, vehicle care

Parking lights 
1. Open bonnet and engage support. 
2. Replace bulb through the opening in the 

front wheel arch: turn appropriate wheel 

to gain access, release catch and 

remove cover, see page 269. 

3. Remove main beam headlight protective 

cover. 

4. Remove parking light socket from 

reflector. 

5. Remove bulb from socket. 
6. Insert new bulb, without touching the 

glass.

7. Insert holder in reflector. Place headlight 

protective cap in position and close. 

8. Position cover on opening in wheel arch 

and engage. 

-------------------------------------------------------------------------------------------------------------------------------------------------------------

276

Self-help, vehicle care

Front turn signal lights 

1. Open bonnet and engage support. 
2. Replace bulb through the opening in the 

front wheel arch: turn appropriate wheel 

to gain access, release catch and 

remove cover, see page 269. 

3. Rotate bulb holder to left and 

disengage. 

4. Push bulb into socket slightly, rotate left 

and remove. 

5. Insert new bulb, without touching the 

glass.

6. Insert light holder in reflector, rotate 

clockwise and engage in position. 

7. Position cover on opening in wheel arch 

and engage. 

Side turn signal lights 

Have the bulb changed by a workshop. 

Fog lights 

3


Have the bulb changed by a workshop. 

-------------------------------------------------------------------------------------------------------------------------------------------------------------

277

Self-help, vehicle care

Tail lights 

Hatch 5-door 

1. To replace bulbs on the right side, use a 

coin to open the lock as indicated in the 

Fig. and fold the cover down. 
To replace bulbs on the left side, use a 

coin to turn both locks (see Fig. 17261 T 

on page 262) and fold the cover down. 

2. Detach plug connector from bulb holder. 
3. Hold outside of bulb housing, loosen 

fastening nuts with wheel bolt wrench 3 

and unscrew by hand. Wheel bolt 

wrench 3, see vehicle tools on page 251. 

4. Detach bulb housing towards the rear. 

-------------------------------------------------------------------------------------------------------------------------------------------------------------

278

Self-help, vehicle care

5. Unscrew three screws using a screwdriver 

(vehicle tools, see page 251). Press 

locking tabs on outside of bulb holder 

inward and remove the bulb holder. 

Bulbs in bulb carrier: 

6. Remove bulb from socket. 
7. Insert new bulb, without touching the 

glass. 

8. Engage bulb holder in bulb housing, 

ensuring that it properly engages. Insert 

three screws with washers and tighten as 

far as possible. 

= Reversing light
= Flasher
= Reversing light/brake light
= Reversing light
= Fog tail light (country-specific 

version: fog tail light on left side 

only. The bulb on the right side 

can be used as a spare)

-------------------------------------------------------------------------------------------------------------------------------------------------------------

279

Self-help, vehicle care

9. Ensure that the seals are applied to the 

bulb holder and fixing screws. 

10. Insert the bulb housing in the body, 

engaging the lug and the ball pin in the 

recesses. Tighten the fastening nuts 

using a wheel bolt wrench 3. Attach the 

plug connector. Close and engage the 

flap. 

11. Carry out the following steps to ensure 

proper function of the tail lights: 

– Switch on ignition
– Operate brake
– Switch on parking lights

-------------------------------------------------------------------------------------------------------------------------------------------------------------

280

Self-help, vehicle care

Hatch 3-door 

1. To replace bulbs, fold the cover down. 

2. Detach plug connector from bulb holder. 
3. Hold outside of bulb housing, loosen 

fastening nuts with wheel bolt wrench 3 

and unscrew by hand. Wheel bolt 

wrench 3, see vehicle tools on page 251. 

4. Detach bulb housing towards the rear. 

-------------------------------------------------------------------------------------------------------------------------------------------------------------

281

Self-help, vehicle care

5. Remove the round seal from the 

fastening bolt. Press the locking tabs on 

the outside of the bulb holder outward 

and remove the bulb holder. 

Bulbs in bulb carrier: 

6. Remove bulb from socket. 
7. Insert new bulb, without touching the 

glass. 

8. Engage bulb holder in bulb housing, 

ensuring that it properly engages. 

= Reversing light
= Flasher
= Reversing light/brake light
= Reversing light
= Fog tail light (country-specific 

version: fog tail light on left side 

only. The bulb on the right side 

can be used as a spare)

-------------------------------------------------------------------------------------------------------------------------------------------------------------

282

Self-help, vehicle care

9. Ensure that the seals are applied to the 

bulb holder and fixing screws. 

10. Insert the bulb housing in the body, 

engaging the lug and the ball pin in the 

recesses. Tighten the fastening nuts 

using a wheel bolt wrench 3. Attach the 

plug connector. Close and engage the 

flap. 

11. Carry out the following steps to ensure 

proper function of the tail lights: 

– Switch on ignition
– Operate brake
– Switch on parking lights

-------------------------------------------------------------------------------------------------------------------------------------------------------------

283

Self-help, vehicle care

Estate, Van

1. Disengage cover by pressing retaining 

lugs and remove. 

2. Detach plug connector from bulb holder. 
3. Hold the outside of the bulb housing, 

unscrew the three fastening nuts and 

remove the bulb housing rearwards. 

4. Unscrew the three screws with a 

screwdriver (vehicle tools, see page 251) 

and remove the bulb holder. 

-------------------------------------------------------------------------------------------------------------------------------------------------------------

284

Self-help, vehicle care

Bulbs in bulb carrier: 

5. Remove bulb from socket. 

6. Insert new bulb without touching the 

glass. Insert bulb holder in bulb housing 

and screw in place. Insert bulb housing 

into body and tighten fastening nuts by 

hand. Attach plug connector. Close and 

lock cover. 

7. Carry out the following steps to ensure 

proper function of the tail lights: 

Astra TwinTop

1. Unscrew retaining nuts. 

=

Reversing light/brake light

=

Flasher

=

Reversing light

=

Fog tail light (country-specific 

version: fog tail light on left side 

only. The bulb on the right side 

can be used as a spare)

– Switch on ignition
– Operate brake
– Switch on parking lights

-------------------------------------------------------------------------------------------------------------------------------------------------------------

285

Self-help, vehicle care

2. Remove bulb housing from outside. 

Disengage plug by pressing on flap and 

remove from bulb holder. 

3. Detach seal from bulb holder. 

4. Disengage sockets by turning and 

remove. Press locking tabs on the long 

sides of the bulb holder outwards; lift 

bulb holder at front end (arrow) and 

remove.

Bulbs in bulb carrier: 

=

Reversing light/brake light

=

Reversing light

=

Fog tail light (country-specific 

design: fog tail light on left-side 

only. The bulb on the right side 

can be used as a spare)

=

Reversing light

=

Flasher

-------------------------------------------------------------------------------------------------------------------------------------------------------------

286

Self-help, vehicle care

5. Remove bulb from socket. 
6. Insert new bulb, without touching the 

glass. 

7. Insert bulb holder in bulb housing by first 

inserting the lug at the front of the plug. 

Fold together bulb holder, ensuring that 

it engages properly. Insert sockets and 

engage by turning. 

8. Fit seal on bulb holder as illustrated. 

Ensure that the seal is flat in the area of 

the screws. 

9. Engage plug. Insert light housing in 

body, ensuring proper positioning of 

the ball pins in the recesses. Tighten the 

retaining nuts. 

10. Carry out the following steps to ensure 

proper function of the tail lights: 

Number plate light 

1. Insert screwdriver vertically in bulb insert 

as illustrated in figure. Press to the side 

and release spring. 

– Switch on ignition
– Operate brake
– Switch on parking lights.

-------------------------------------------------------------------------------------------------------------------------------------------------------------

287

Self-help, vehicle care

2. Remove bulb housing downward, taking 

care not to pull on the cable. 

3. Lift flap and disconnect plug from bulb 

socket. 

4. Rotate bulb socket anti-clockwise and 

disengage. 

5. Remove bulb from socket. 
6. Insert new bulb, without touching the 

glass. 

7. Insert bulb holder into bulb housing and 

engage by turning it clockwise. 

8. Connect plug to bulb socket. 
9. Insert and engage bulb housing. 

Courtesy lights 

Front courtesy light, reading lights 3 

To ensure that no power is supplied to the 

lights, close the doors before removing. 
1. Disengage lens by hand at location 

illustrated in figure, press it downward 

slightly and remove at a downward 

angle. 

2. Remove bulb from socket. 
3. Insert new bulb, without touching the 

glass. 

4. Mount lens and engage in position. 

-------------------------------------------------------------------------------------------------------------------------------------------------------------

288

Self-help, vehicle care

Rear courtesy lights 3

rear reading lights 3 

Have the bulb changed by a workshop. 

Glove compartment lighting, 

luggage compartment lighting, 

footwell lighting 3 

To ensure that no power is supplied to the 

lights, close the doors or hold the contact 

switch depressed before removing. 
1. Prise the light out with a screwdriver. 

2. Press bulb slightly towards spring clip 

and remove. 

3. Insert new bulb, without touching the 

glass. 

4. Insert light in opening and engage in 

position. 

Instrument illumination, 

information display illumination 

Have the bulb changed by a workshop. 

-------------------------------------------------------------------------------------------------------------------------------------------------------------

289

Self-help, vehicle care

Vehicle care

When caring for your vehicle, observe all 

national environmental regulations, 

particularly when washing it. 
Regular, thorough care helps to improve 

the appearance of your vehicle and 

maintain its value over the years. It is also 

prerequisite for warranty claims for any 

paint or corrosion damage. The following 

pages contain tips for vehicle care which, if 

used properly, will help combat the 

unavoidable, damaging effects of the 

environment.

Vehicle care aids 

Vehicle wash: 

z Wash brush 

z Car Shampoo 

z Sponge

z Chamois Leather

z Engine Cleaner

z Glass Cleaner

Vehicle care: 

z Paintwork Cleaner 

z Car Polish/Colour Restorer

z Car Wax/Sealer

z Metallic Paintwork Wax 

z Touch-up Applicator 

z Aerosol and Touch-up Paint 

z Wheel Preserver 

z Insect Remover 

z Window Cleaner 

z Vauxhall Windscreen Wash Solvent 

z Silicone Oil for Rubber Seals 

z De-icer 

Washing 

The paintwork of your vehicle is exposed to 

environmental influences, e.g. continuous 

changes in weather conditions, industrial 

waste gases and dust or thawing salts, so 

wash and wax your vehicle regularly. When 

using automatic car washes, select a 

programme which includes waxing. 
Bird droppings, dead insects, resin, pollen 

and the like should be cleaned off 

immediately, as they contain aggressive 

constituents which can cause paint 

damage. 
If using a car wash, comply with the 

relevant instructions of the car wash 

manufacturer. The windscreen wiper and 

rear screen wiper must be switched off, see 

pages 12, 13, 141. Remove antenna 3 and 

roof rack 3. Stand on the door sill to reach 

them more easily. 
If you wash your vehicle by hand, make 

sure that the insides of the wings are also 

thoroughly rinsed out. 

-------------------------------------------------------------------------------------------------------------------------------------------------------------


Content      ..     16      17      18      19     ..