Pontiac Montana SV6 (2006 year). Instruction - part 14


  Index      Pontiac     Pontiac Montana SV6 (2006 year) - instruction in english


Search            copyright infringement  


Content      ..     12      13      14      15     ..


Pontiac Montana SV6 (2006 year). Instruction - part 14


Radio with CD

Radio Data System (RDS)

The audio system has a Radio Data System (RDS).
RDS features are available for use only on FM stations
that broadcast RDS information.

With RDS, the radio can do the following:

Seek to stations broadcasting the selected type of
programming

Receive announcements concerning local and
national emergencies

Display messages from radio stations

Seek to stations with traffic announcements

This system relies upon receiving specific information
from these stations and will only work when the
information is available. In rare cases, a radio station
may broadcast incorrect information that will cause
the radio features to work improperly. If this happens,
contact the radio station.

While the radio is tuned to an RDS station, the station
name or call letters will appear on the display. RDS
stations may also provide the time of day, a program
type (PTY) for current programming, and the name
of the program being broadcast.

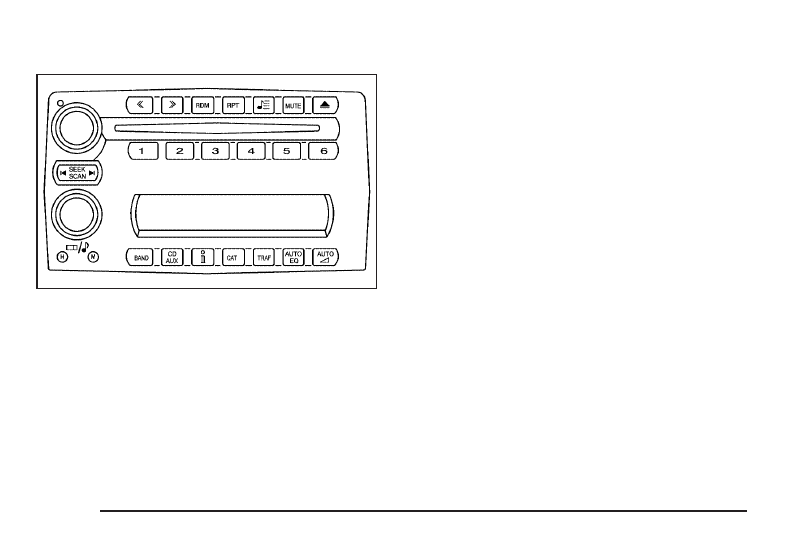
Radio with CD shown, Radio with Six-Disc

CD similar

3-78

-------------------------------------------------------------------------------------------------------------------------------------------------------------

XM™ Satellite Radio Service

If your vehicle has XM™, XM™ is a satellite
radio service that is based in the 48 contiguous
United States and in Canada (if available). XM™ offers
over 100 coast-to-coast channels including music,
news, sports, talk, and children’s programming.
XM™ provides digital quality audio and text information
that includes song title and artist name. A service
fee is required in order to receive the XM™ service.
For more information, contact XM™ at
www.xmradio.com or call 1-800-852-XMXM (9696).

Playing the Radio

Top Knob (Power/Volume): Press this knob to turn
the system on and off. Turn this knob to increase or to
decrease the volume.

4

(Information): For RDS, press this button to change

what appears on the display while using RDS. The
display options are station name, RDS station frequency,
PTY, and the name of the program (if available).

For XM™ (if equipped), press the information button
while in XM™ mode to retrieve four different categories
of information related to the current song or channel:
Artist, Song Title, Category or PTY, Channel
Number/Channel Name.

To change the default on the display, press the
information button until you see the display you want,
then hold the button for two seconds. The radio will
produce one beep and the selected display will now be
the default.

AUTO

n

(Automatic Volume): With automatic

volume, the audio system will adjust automatically to
make up for road and wind noise as you drive, by
increasing the volume as vehicle speed increases.

Set the volume at the desired level. Press this button to
select AUTO VOLUME MIN, AUTO VOLUME MED,
or AUTO VOLUME MAX. Each higher setting will
provide more volume compensation at faster vehicle
speeds. To turn automatic volume off, press this button
until AUTO VOLUME OFF appears on the display.

MUTE: Press this button to silence the system. Press
this button again to turn the sound on.

This button is not available on the Radio with
Six-Disc CD.

Finding a Station

BAND: Press this button to switch between FM1, FM2,
AM, or XM1 or XM2 (if equipped). The display will
show the selection.

O

/

e

(Tune): Turn this knob to select radio

stations.

3-79

-------------------------------------------------------------------------------------------------------------------------------------------------------------

t

SEEK

u

Press the right or the left arrow to go to

the next or to the previous station and stay there.

The radio will only seek stations with a strong signal
that are in the selected band.

t

SCAN

u

Press and hold either arrow for

two seconds until FREQUENCY SCAN appears on
the display. The radio will go to a station, play for a
few seconds, then go on to the next station. Press either
arrow again to stop scanning.

To scan preset stations, press and hold either arrow for
four seconds until PRESET SCAN appears on the
display. The radio will go to the next preset station, play
for a few seconds, then go on to the next preset
station. Press either scan arrow again or one of the
pushbuttons to stop scanning presets.

The radio will only scan stations with a strong signal
that are in the selected band.

Setting Preset Stations

Up to 30 stations (six FM1, six FM2, and six AM,
six XM1 and six XM2 (if equipped)), can be programmed
on the six numbered pushbuttons, by performing the
following steps:

1. Turn the radio on.

2. Press BAND to select FM1, FM2, AM, or XM1

or XM2.

3. Tune in the desired station.

4. Press AUTO EQ to select the equalization.

5. Press and hold one of the six numbered

pushbuttons until you hear a beep. Whenever that
numbered pushbutton is pressed, the station that
was set will return and the equalization that
was selected will be stored for that pushbutton.

6. Repeat the steps for each pushbutton.

Setting the Tone (Bass/Treble)

e

(Bass/Treble/Midrange): Press this knob to select

BASS, MIDRANGE, or TREBLE. Turn the knob to
increase or to decrease. If a station is weak or noisy,
decrease the treble.

To adjust the bass, midrange, and treble to the middle
position, press and hold this knob when the tone
control is on the display. The level will change to the
middle position.

To adjust all tone and speaker controls to the middle
position, press and hold this knob when no tone
or speaker control is displayed. AUDIO SETTINGS
CENTERED will appear on the display.

3-80

-------------------------------------------------------------------------------------------------------------------------------------------------------------

AUTO EQ (Automatic Equalization): Press this button
to select customized equalization settings designed
for country/western, jazz, talk, pop, rock, and classical.
Selecting CUSTOM or changing bass or treble,
returns the EQ to the instruction bass and treble settings.

The radio will save separate AUTO EQ settings for
each preset and source.

Adjusting the Speakers (Balance/Fade)

e

(Balance/Fade): To adjust the balance between

the right and the left speakers, press this knob until
BALANCE appears on the display. Turn the knob to
move the sound toward the right or the left speakers.

To adjust the fade between the front and the rear
speakers, press this knob until FADE appears on the
display. Turn the knob to move the sound toward
the front or the rear speakers.

To adjust the balance and fade to the middle position,
press and hold this knob when the speaker control is on
the display. The level will change to the middle
position.

To adjust all tone and speaker controls to the middle
position, press and hold this knob when no tone
or speaker control is displayed. AUDIO SETTINGS
CENTERED will appear on the display.

Finding a Category Station
(RDS and XM™)

To select and find a desired category perform the
following:

1. Press the CAT button. The last selected category

will appear on the display.

2. Turn the tune knob to select the category.

3. Once the desired category is displayed, press either

SEEK arrow to take you to a category’s station.
SEEKING CATEGORY will appear on the display.

4. To go to another station within that category, press

the CAT button to display the category, then press
either SEEK arrow to go to another station.

If both category and traffic are on, the radio will search
for stations with the selected category and traffic
announcements.

If the radio cannot find the desired category, NONE will
appear on the display and the radio will return to the
last station you were listening to.

3-81

-------------------------------------------------------------------------------------------------------------------------------------------------------------

SCAN: Scan the stations within a category by
performing the following:

1. Press the CAT button. The last selected category

will appear on the display.

2. Turn the tune knob to select the category.

3. Once the desired category is displayed, press and

hold either SCAN arrow until you hear a beep and
SCAN CATEGORY appears on the display.
The radio will begin scanning the stations in the
category.

4. Press either SCAN arrow to stop scanning.

If both category and TRAF are on, the radio will scan
for stations with the selected category and traffic
announcements.

BAND (Alternate Frequency): Alternate frequency
allows the radio to switch to a stronger station with the
same category. To turn alternate frequency on,
press and hold BAND for two seconds. AF ON will
appear on the display. The radio may switch to stations
with a stronger frequency.

To turn alternate frequency off, press and hold BAND
again for two seconds. AF OFF will appear on the
display. The radio will not switch to other stations.

This function does not apply for XM™ Satellite Radio
Service.

RDS Messages

ALERT!: Alert warns of local or national emergencies.
When an alert announcement comes on the current
radio station, ALERT! will appear on the display. You will
hear the announcement, even if the volume is low or
a CD is playing. If a CD is playing, play will stop during
the announcement. Alert announcements cannot be
turned off.

ALERT! will not be affected by tests of the emergency
broadcast system. This feature is not supported by
all RDS stations.

4

(Information): If the current station has a message,

INFO will appear on the display. Press this button to
see the message. The message may display the artist,
song title, call in phone numbers, etc.

If the entire message is not displayed, parts of the
message will appear every three seconds. To scroll
through the message, press and release this button.
A new group of words will appear on the display
after every press of the button. Once the complete
message has been displayed, INFO will disappear from
the display until another new message is received.
The last message can be displayed by pressing this
button. You can view the last message until a new
message is received or a different station is tuned to.

3-82

-------------------------------------------------------------------------------------------------------------------------------------------------------------

When a message is not available from a station,
NO INFO will appear on the display.

TRAF (Traffic): If TA appears on the display, the tuned
station broadcasts traffic announcements and when a
traffic announcement comes on the tuned radio
station you will hear it.

If the station does not broadcast traffic announcements,
press the TRAF button and the radio will seek to a
station that does. When a station that broadcasts traffic
announcements is found, the radio will stop seeking
and TA will appear on the display. If no station is found
that broadcasts traffic announcements, NO TRAFFIC
will appear on the display.

If TA is on the display, press the TRAF button to turn off
the traffic announcements.

The radio will play the traffic announcement even if the
volume is low. The radio will interrupt the play of a
CD if the last tuned station broadcasts traffic
announcements.

This function does not apply to XM™ Satellite Radio
Service.

Radio Messages

CAL ERR (Calibration Error): The audio system
has been calibrated for your vehicle from the factory.
If CAL ERR appears on the display, it means that
the radio has not been configured properly for your
vehicle and must be returned to your GM dealer
for service.

LOCKED: This message is displayed when the
THEFTLOCK

®

system has locked up. Take the vehicle

to your GM dealer for service.

If any error occurs repeatedly or if an error cannot be
corrected, contact your GM dealer. If the radio displays
an error message, write it down and provide it to
your GM dealer when reporting the problem.

3-83

-------------------------------------------------------------------------------------------------------------------------------------------------------------

XM™ Radio Messages

Radio Display

Message

Condition

Action Required

XL (Explicit Language
Channels)

XL on the radio display,
after the channel name,
indicates content with
explicit language.

These channels, or any others, can be blocked at a
customer’s request, by calling 1-800-852-XMXM (9696).

Updating

Updating
encryption code

The encryption code in the receiver is being updated, and
no action is required. This process should take no longer
than 30 seconds.

No Signal

Loss of signal

The system is functioning correctly, but the vehicle is in a
location that is blocking the XM™ signal. When you move
into an open area, the signal should return.

Loading XM

Acquiring channel audio
(after 4 second delay)

The audio system is acquiring and processing audio and
text data. No action is needed. This message should
disappear shortly.

CH Off Air

Channel not in service

This channel is not currently in service. Tune to another
channel.

CH Unavail

Channel no longer
available

This previously assigned channel is no longer assigned.
Tune to another station. If this station was one of the
presets, choose another station for that preset button.

No Info

Artist Name/Feature not
available

No artist information is available at this time on this
channel. The system is working properly.

No Info

Song/Program Title not
available

No song title information is available at this time on this
channel. The system is working properly.

3-84

-------------------------------------------------------------------------------------------------------------------------------------------------------------

XM™ Radio Messages (cont’d)

Radio Display

Message

Condition

Action Required

No Info

Category Name not
available

No category information is available at this time on this
channel. The system is working properly.

No Info

No Text/Informational
message available

No text or informational messages are available at this
time on this channel. The system is working properly.

Not Found

No channel available for
the chosen category

There are no channels available for the selected category.
The system is working properly.

XM Locked

Theft lock active

The XM™ receiver in the vehicle may have previously
been in another vehicle. For security purposes, XM™
receivers cannot be swapped between vehicles. If this
message is received after having your vehicle serviced,
check with your GM dealer.

Radio ID

Radio ID label
(channel 0)

If tuned to channel 0, this message will alternate with the
XM™ Radio eight digit radio ID label. This label is needed
to activate the service.

Unknown

Radio ID not known
(should only be if
hardware failure)

If this message is received when tuned to channel 0, there
may be a receiver fault. Consult with your GM dealer.

Chk XMRcvr

Hardware failure

If this message does not clear within a short period of time,
your receiver may have a fault. Consult with your GM
dealer.

3-85

-------------------------------------------------------------------------------------------------------------------------------------------------------------

Playing a CD (Single CD Player)

Insert a CD partway into the slot, label side up. The
player will pull it in and the CD should begin playing.

If the ignition or radio is turned off with a CD in the
player, it will stay in the player. When the ignition or
radio is turned on, the CD will start playing where
it stopped, if it was the last selected audio source.

When a CD is inserted, CD and the CD symbol will
appear on the display. As each new track starts to play
the track number will appear on the display.

The CD player can play the smaller 3 inch (8 cm) single
CDs with an adapter ring. Full-size CDs and the
smaller CDs are loaded in the same manner.

If playing a CD-R, the sound quality may be reduced
due to CD-R quality, the method of recording, the quality
of the music that has been recorded, and the way the
CD-R has been handled. There may be an increase in
skipping, difficulty in finding tracks, and/or difficulty in
loading and ejecting. If these problems occur, check the
bottom surface of the CD. If the surface of the CD is
damaged, such as cracked, broken, or scratched, the
CD will not play properly. If the surface of the CD
is soiled, see “Care of Your CDs” later in this section.

If there is no apparent damage, try a known good CD.

Do not add any label to a CD, it could get caught in the
CD player. If a CD is recorded on a personal computer
and a description label is needed, try labeling the top of
the recorded CD with a marking pen instead.

Notice: If you add any label to a CD, insert more
than one CD into the slot at a time, or attempt
to play scratched or damaged CDs, you could
damage the CD player. When using the CD player,
use only CDs in good condition without any
label, load one CD at a time, and keep the CD player
and the loading slot free of foreign materials,
liquids, and debris.

If an error appears on the display, see “CD Messages”
later in this section.

O

/

e

(Tune): Turn this knob to go to the next or

previous track.

{

(Reverse): Press and hold this button to reverse

the current track.

|

(Fast Forward): Press and hold this button to fast

forward through the current track.

RDM (Random): Press this button to hear the tracks in
random, rather than sequential, order. RANDOM DISC
will appear on the display. Press this button again to turn
off random play.

3-86

-------------------------------------------------------------------------------------------------------------------------------------------------------------

RPT (Repeat): Press this button to hear a track over
again. REPEAT will appear on the display. Press
this button again to turn off repeat play.

MUTE: Press this button to silence the system. Press
this button again to turn the sound on.

t

SEEK

u

Press the left arrow to go to the start of

the current track if more than eight seconds have
played. Press the right arrow to go to the start of the
next track. If either arrow is held or pressed more than
once, the player will continue moving backward or
forward through the CD.

BAND: Press this button to listen to the radio when a
CD is playing. The inactive CD will remain safely
inside the radio for future listening.

CD AUX (Auxiliary): Press this button to play a CD
when listening to the radio. CD will appear on the display
when a CD is in the player. If the system has a remote
playback device, pressing this button a second time
will allow the remote device to play.

AUTO EQ (Automatic Equalization): Press AUTO EQ
to select the equalization setting while playing a CD.
The equalization will be stored whenever a CD is played.
For more information on AUTO EQ, see “AUTO EQ”
listed previously in this section.

X

(Eject): Press this button to eject the CD. EJECT

may be activated with either the ignition or radio off.

Playing a CD(s) (Six-Disc CD Player)

If the ignition or radio is turned off, with a CD in
the player, it will stay in the player. When the ignition or
radio is turned on, the CD will start playing where it
stopped, if it was the last selected audio source.

When a CD is inserted, the CD symbol will appear on
the CD. As each new track starts to play, the track
number will appear on the display.

The CD player can play the smaller 3 inch (8 cm) single
CDs with an adapter ring. Full-size CDs and the
smaller CDs are loaded in the same manner.

If playing a CD-R, the sound quality may be reduced
due to CD-R quality, the method of recording, the quality
of the music that has been recorded, and the way the
CD-R has been handled. There may be an increase
in skipping, difficulty in finding tracks, and/or difficulty in
loading and ejecting. If these problems occur, check
the bottom surface of the CD. If the surface of the CD is
damaged, such as cracked, broken, or scratched, the
CD will not play properly. If the surface of the CD
is soiled, see “Care of Your CDs” later in this section.

If there is no apparent damage, try a known good CD.

3-87

-------------------------------------------------------------------------------------------------------------------------------------------------------------

Do not add any label to a CD, it could get caught in the
CD player. If a CD is recorded on a personal computer
and a description label is needed, try labeling the top of
the recorded CD with a marking pen instead.

Notice: If you add any label to a CD, insert more
than one CD into the slot at a time, or attempt
to play scratched or damaged CDs, you could
damage the CD player. When using the CD player,
use only CDs in good condition without any
label, load one CD at a time, and keep the CD player
and the loading slot free of foreign materials,
liquids, and debris.

If an error appears on the display, see “CD Messages”
later in this section.

M

(Load): Press this button to load CDs into the CD

player. This CD player will hold up to six CDs.

To insert one CD, do the following:

1. Turn the ignition on.

2. Press and release the load button.

3. When INSET CD # appears on the display, load

a CD. Insert the CD partway into the slot, label
side up. The player will pull the CD in.

To insert multiple CDs, do the following:

1. Turn the ignition on.

2. Press and hold the load button for two seconds.

You will hear a beep and LOAD ALL DISC will
appear on the display.

3. When INSERT CD # appears on the display, load

a CD. Insert the CD partway into the slot, label side
up. The player will pull the CD in.

Once the CD is loaded, wait for INSERT CD # to
appear on the display, then load the next CD.
The CD player takes up to six CDs. Do not try to
load more than six.

To load more than one CD but less than six, complete
Steps 1 through 3. When finished loading CDs, press
the load button to cancel the loading function. The radio
will begin to play the last CD loaded.

If more than one CD has been loaded, a number for
each CD will appear on the display.

3-88

-------------------------------------------------------------------------------------------------------------------------------------------------------------

Playing a Specific Loaded CD

For every CD loaded, a number will appear on the
display. To play a specific CD press the numbered
pushbutton that corresponds to the CD.

If an error appears on the display, see “CD Messages”
later in this section.

X

(Eject): Press this button to eject CD(s).

To eject the CD that is currently playing, press and
release this button.

To eject multiple CDs, do the following:

1. Press and hold the eject button for two seconds.

You will hear a beep and EJECT ALL DISCS will
appear on the display.

2. When REMOVE DISC appears on the display,

the CD will eject and can be removed.

To stop ejecting the CDs, press the load or the
eject button.

If the CD is not removed, after 25 seconds, the CD will
be automatically pulled back into the player. If CD is
pushed back into the player, before the 25 second time
period is complete, the player will sense an error and
will try to eject the CD several times before stopping.

Do not repeatedly press the eject button to eject a
CD after you have tried to push it in instructionly.
The player’s 25-second eject timer will reset at each
press of eject, causing the player to not eject the
CD until the 25-second time period has elapsed.

O

/

e

(Tune): Turn this knob to go to the next or

previous track.

{

(Reverse): Press and hold this button to reverse

within the current track.

|

(Fast Forward): Press and hold this button to fast

forward through the current track.

RDM (Random): Press this button to hear the tracks in
random, rather than sequential order, on one CD or
all of the loaded CDs.

To use random, do one of the following:

To play the tracks on the CD you are listening to in
random order, press and release this button until
RANDOM DISC PLAY appears on the display.

To play the tracks on all of the CDs that are loaded
in random order, press and release this button until
RANDOM ALL DISCS appears on the display.

To turn off random play, press and release the RDM
button until RANDOM OFF appears on the display.

3-89

-------------------------------------------------------------------------------------------------------------------------------------------------------------

RPT (Repeat): Press this button to hear a track or an
entire CD over again.

To use repeat, do one of the following:

To repeat a track, press and release this button
until REPEAT appears on the display.

To repeat an entire CD, press and release this
button until REPEAT ONE DISC appears on
the display.

To turn off repeated play, press and release the RPT
button until REPEAT OFF appears on the display

t

SEEK

u

Press the left arrow to go to the start

of the current track, if more than ten seconds have
played. Press the right arrow to go to the next track.
If either arrow is held or pressed more than once,
the player will continue moving backward or forward
through the CD.

t

SCAN

u

To scan one CD, press and hold either

SCAN arrow for more than two seconds until SCAN
appears on the display and you hear a beep. The radio
will go to the next track, play for 10 seconds, then go
on to the next track. Press either SCAN arrow again,
to stop scanning.

To scan all loaded CDs, press and hold either SCAN
arrow for more than four seconds until CD SCAN
appears on the display and you hear a beep. Use this
feature to listen to 10 seconds of the first track of
each loaded CD. Press either SCAN arrow again,
to stop scanning.

BAND: Press this button to listen to the radio when
a CD is playing. The inactive CD(s) will remain safely
inside the radio for future listening.

CD AUX (Auxiliary): Press this button to play a CD
when listening to the radio. CD will appear on the display
when a CD is in the player. If your system is equipped
with a remote playback device, pressing this button
a second time will allow the remote device to play.

AUTO EQ (Automatic Equalization): Press AUTO EQ
to select the equalization setting while playing a CD.
The equalization will be stored whenever a CD is played.
For more information on AUTO EQ, see “AUTO EQ”
listed previously in this section.

3-90

-------------------------------------------------------------------------------------------------------------------------------------------------------------

Using an MP3 CD

MP3 Format

If you burn your own MP3 disc on a personal computer:

Make sure the MP3 files are recorded on
a CD-R disc.

Make sure to finalize the disc when burning an MP3
disc, using multiple sessions. It is usually better to
burn the disc all at once.

Files can be recorded with a variety of fixed or
variable bit rates. Song title, artist name, and album
will be available for display by the radio when
recorded using ID3 tags version 1 and 2.

Do not mix standard audio and MP3 files
on one disc.

Make sure playlists have a.pls, or.m3u, or.rmp
extension, other file extensions may not work.

The player will be able to read and play a
maximum of 50 folders, 50 playlists, 10 sessions, and
255 files. Long file names, folder names, or playlist
names may use more disc memory space than
necessary. To conserve space on the disc, minimize
the length of the file, folder or playlist names. You can
also play an MP3 CD that was recorded using no
file folders.

The system can support up to 11 folders in depth,
though, keep the depth of the folders to a minimum
in order to keep down the complexity and confusion
in trying to locate a particular folder during playback.
If a CD contains more than the maximum of 50 folders,
50 playlists, 10 sessions, and 255 files the player will
let you access and navigate up to the maximum, but all
items over the maximum will be ignored.

Root Directory

The root directory will be treated as a folder. If the root
directory has compressed audio files, the directory
will be displayed as F1 ROOT. All files contained directly
under the root directory will be accessed prior to any
root directory folders. However, playlists (Px) will always
be accessed before root folders or files.

Empty Directory or Folder

If a root directory or a folder exists somewhere in the
file structure that contains only folders/subfolders and no
compressed files directly beneath them, the player will
advance to the next folder in the file structure that
contains compressed audio files and the empty folder
will not be displayed or numbered.

3-91

-------------------------------------------------------------------------------------------------------------------------------------------------------------

No Folder

When the CD contains only compressed files, the files will
be located under the root folder. The next and previous
folder functions will have no function on a CD that was
recorded without folders or playlists. When displaying the
name of the folder the radio will display ROOT.

When the CD contains only playlists and compressed
audio files, but no folders, all files will be located under
the root folder. The folder down and the folder up
buttons will search playlists (Px) first and then go to
the root folder. When the radio displays the name of the
folder the radio will display ROOT.

Order of Play

Tracks will be played in the following order:

Play will begin from the first track in the first playlist
and will continue sequentially through all tracks in
each playlist. When the last track of the last playlist
has been played, play will continue from the first
track of the first playlist.

If the CD does not contain any playlists, then play
will begin from the first track under the root
directory. When all tracks from the root directory
have been played, play will continue from files
according to their numerical listing. After playing the
last track from the last folder, play will begin
again at the first track of the first folder or root
directory.

When play enters a new folder, the display will not
automatically show the new folder name unless
you have chosen the folder mode as the default display.
See the information button later in this section for
more information. The new track name will appear on
the display.

File System and Naming

The song name that will be displayed will be the song
name that is contained in the ID3 tag. If the song name
is not present in the ID3 tag, then the radio will display
the file name without the extension (such as .mp3)
as the track name.

Track names longer than 32 characters or four pages
will be shortened. The display will not show parts
of words on the last page of text and the extension of
the file name will not be displayed.

Preprogrammed Playlists

You can access preprogrammed playlists which were
created by WinAmp™, MusicMatch™, or Real
Jukebox™ software, however, you will not have editing
capability. These playlists will be treated as special
folders containing compressed audio song files.

3-92

-------------------------------------------------------------------------------------------------------------------------------------------------------------

Playing an MP3

Insert a CD partway into the slot, label side up.
The player will pull it in, and READING will appear
on the display. The CD should begin playing and the
CD symbol will appear on the display.

If the ignition or radio is turned off with a CD in the
player it will stay in the player. When the ignition or radio
is turned on, the CD will start to play where it stopped,
if it was the last selected audio source.

As each new track starts to play, the track number will
appear on the display.

The CD player can play the smaller 3 inch (8 cm) single
CDs with an adapter ring. Full-size CDs and the
smaller CDs are loaded in the same manner.

If playing a CD-R, the sound quality may be reduced
due to CD-R quality, the method of recording, the quality
of the music that has been recorded, and the way the
CD-R has been handled. There may be an increase
in skipping, difficulty in finding tracks, and/or difficulty
in loading and ejecting. If these problems occur, check
the bottom surface of the CD. If the surface of the
CD is damaged, such as cracked, broken, or scratched,
the CD will not play properly. If the surface of the CD
is soiled, see “Care of Your CDs” later in this section.

If there is no apparent damage, try a known good CD.

Do not add any label to a CD, it could get caught in the
CD player. If a CD is recorded on a personal computer
and a description label is needed, try labeling the top of
the recorded CD with a marking pen instead.

Notice: If you add any label to a CD, insert more
than one CD into the slot at a time, or attempt
to play scratched or damaged CDs, you could
damage the CD player. When using the CD player,
use only CDs in good condition without any
label, load one CD at a time, and keep the CD player
and the loading slot free of foreign materials,
liquids, and debris.

If an error appears on the display, see “CD Messages”
later in this section.

O

/

e

(Tune): Turn this knob to go to the next or

previous track.

{

(Previous Folder): Press this button to go to the

first track in the previous folder. Press and hold this
button to reverse through the current track.

|

(Next Folder): Press this pushbutton to go to the

first track in the next folder. Press and hold this button to
fast forward the current track.

RDM (Random): Press this button to hear the tracks in
random, rather than sequential order, on one CD,
one folder, or all of the loaded CDs.

3-93

-------------------------------------------------------------------------------------------------------------------------------------------------------------


Content      ..     12      13      14      15     ..