Lotus Evora. Instruction - part 15


  Index      Lotus     Lotus Evora - service repair instruction 2009 year


Search            


Content   ..  13  14  15  16   ..


Lotus Evora. Instruction - part 15


Lotus Service Notes   


    Section DJ

Alignment

Wheel alignment refers to the parallelism of the wheels when viewed from above and is crucial to vehicle 

stability, handling and tyre wear.  It is measured either by the angle a wheel makes with the vehicle centre 

line, or the difference in dimension between the wheel rim to wheel rim measurement at the front and rear of 

the wheel at hub centre height.  The wheels are said to 'toe-in' when the wheel paths converge ahead of the 

vehicle, and 'toe-out' when they diverge.  Rear wheel alignment should be measured only using equipment 

which measures 

individual rear wheel alignment relative to the car centreline.  Wheel alignment is designed 

to vary with suspension travel ('bump steer') and the base setting should be measured only at the specified 

mid laden ride height.

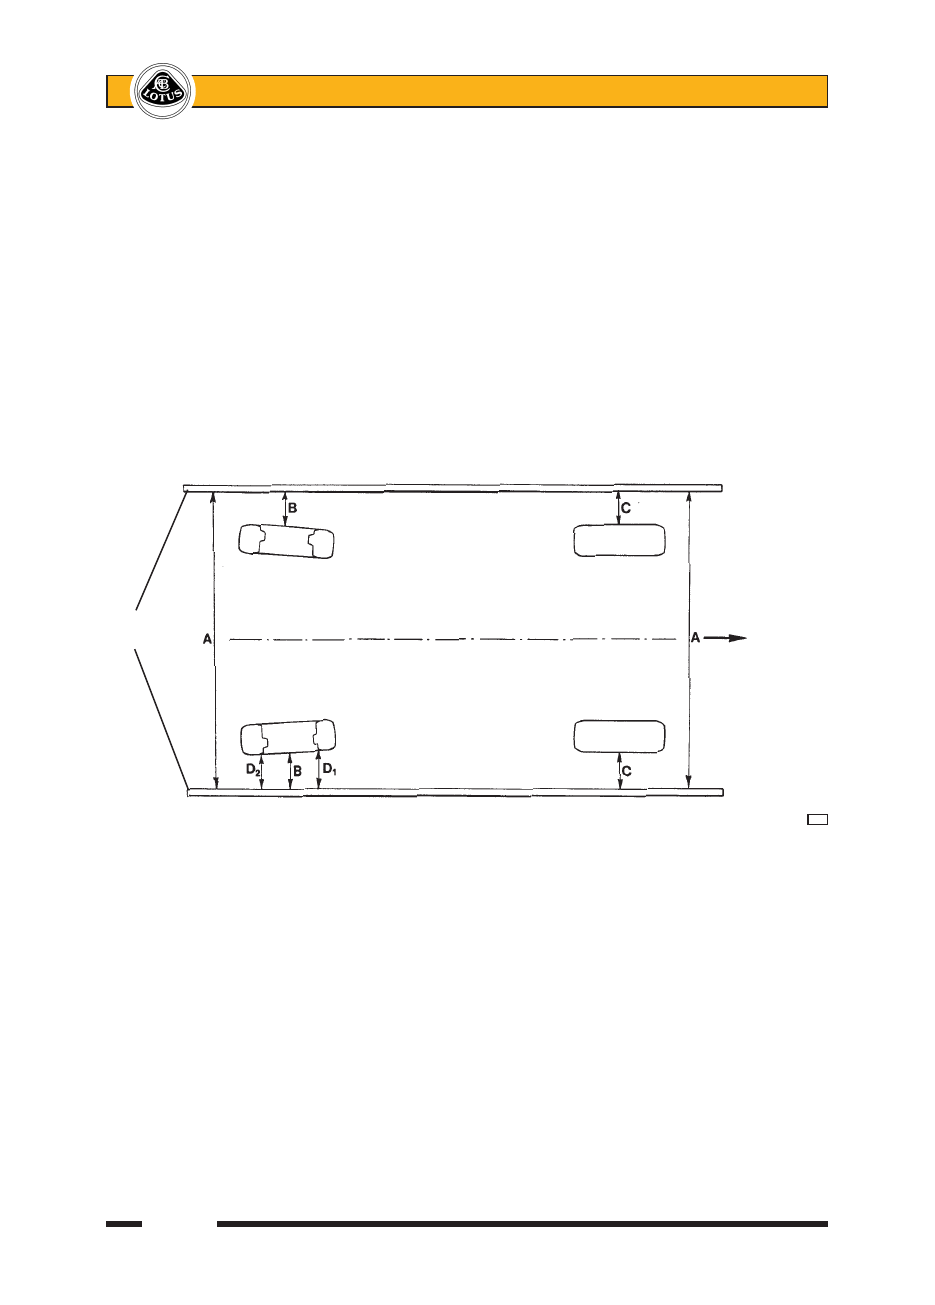
It is possible to accurately measure individual wheel alignment using a pair of long straight bars or round 

section elastic in conjunction with 4 axle stands or similar.  Any bars used must be longer than the length of the 

car, and be suitably stiff and straight.

Set up the bars or elastic on each side of the car at wheel centre height as shown an the diagram, so that 

A = A, B = B and C = C.


Measure the distance from the bar to the rim of the wheel concerned at the front and rear of the centre line 

of the wheel (D

1

, D

2

).  If the front dimension, D

1

, is greater than the rear dimension, D

2

, the wheel has TOE-IN.  

If the rear dimension is greater than the front dimension, the wheel has TOE-OUT.  The difference between the 

two measurements is the amount the wheel has toe-in or toe-out.

Wheel alignment is adjusted via the toe control link which is equipped with a turnbuckle at its centre.  

Slacken both locknuts, and turn the buckle as necessary to increase or decrease the effective length of the 

link.  As a guide, lengthening the link rod by a turn of one 'flat' (one sixth of a turn) will increase toe-in by ap-

proximately 1.6 mm.

After adjustment, hold each section of the toe-link in turn using the flats provided, whilst tightening each 

of the two locknuts to 45 Nm.  Ensure that the axes of the toe-link pivot bearings are parallel.

Straight

edge                                                              FRONT


                                            d21


Lotus Service Notes   


    Section DJ

Camber Adjustment

Camber is the angle from vertical of the wheel when viewed from the rear, and is said to be negative when 

the wheel leans inwards at the top (positive when leaning outwards).

The primary purpose of camber is to achieve the maximum efficiency of the tyre under cornering loads and 

body roll, with the specification closely allied to a particular wheel/tyre combination.  The camber angle changes 

with suspension travel, becoming more negative on bump, and should be measured only at the specified ride 

height.  Incorrect camber can result in handling deficiencies and excessive tyre wear.

Illustration TBA

An eccentric cam at the rear inboard pivot of each lower wishbone provides a means of camber adjust-

ment.  The pivot bolt is inserted from the rear, with the bolt head featuring an integral eccentric cam, and with 

a corresponding eccentric camplate clamped beneath the nut on the front side of the rear pivot.  The camplate 

is keyed to the bolt via a tongue and groove feature to ensure alignment between the two cams.  Each cam is 

constrained by vertical guides in a riveted insert in the subframe, whereas the pivot bolt hole in the subframe 

is slotted horizontally.  Thus by turning the bolt (and eccentric cams) the wishbone pivot axis may be moved 

inboard or outboard.  

When adjusting camber, note that the horizontal movement produced is not linear, but accords with simple 

harmonic motion.  After adjustment, ensure that the pivot bolt is tightened to 86 Nm.  Be aware that any camber 

adjustment will also affect wheel alignment, which must subsequently be checked and/or reset (see above). 

                                                      Camber angle

                                             Vertical                Wheel centreline


c29


Lotus Service Notes   


    Section DJ

DJ.3 - WIShBONE PIvOT BUShES & SPhERICAL JOINTS

Pivot Bushes

The upper and lower wishbone pivot bushes are bonded rubber type with a plastic flanged outer sleeve, 

an alloy inner  sleeve, and an aluminium interleaf sleeve within the rubber bush to control the flexing charac-

teristic.  The rubber material specification has been selected to optimise the handling/refinement balance.  The 

flanged end of the bush incorporates a snubbing feature to limit the axial distortion of the bush, with each bush 

arranged to resist braking forces transmitted through the suspension; Both top wishbone bushes are inserted 

from the front, and both bottom wishbone bushes from the rear.  A chamfer is provided in the wishbone bore 

for this purpose.

The bushes may be pressed out of the wishbone eyes, and new bushes fitted using suitable press tool 

dollies.  Smear the outer surface of the new bush with IPC 'P-80' rubber lubricant emulsion (A082C6042v) to 

ease fitment, and assemble in the direction detailed above. 

Damper Upper Bush

The upper eye of the damper houses a bonded rubber bush, with a steel outer sleeve and an alloy inner 

sleeve.  The bush may be replaced using suitable press tools.

Spherical Joints

Through bolted spherical joints are used at the outboard ends of the upper and lower wishbones, both ends 

of the toe control links, and in the lower eye of the dampers.  All joints have an outside diameter of 40mm apart 

from the lower wishbone joint (pressed into the hub carrier) which is 47mm.  Spherical joints are maintenance 

free, but may be replaced using suitable press tools.

DJ.4 - ANTI-ROLL BAR

A 21mm o.d. tubular steel anti-roll bar is mounted beneath the rear subframe behind the axle line, in rubber 

bushes retained by extruded alloy clamps.  One clamp secures the bar at each side to the bottom surface of 

the subframe longeron via two bolts tapping into a steel nutplate riveted inside the longeron.  Each end of the 

bar curves over the toe-link before connecting to a lug on the lower wishbone rear leg via a short ball jointed 

drop link.  A pair of washers crimped to the bar, bear against the outboard sides of the mounting bushes to 

provide lateral location of the bar.

The drop link ball joints require no maintenance, and are replaceable only as part of the handed drop link 

assembly.  The chassis mounted bushes are lubricated with rubber grease on assembly, but require no routine 

maintenance.

To be revised


Lotus Service Notes   


    Section DJ

ARB illustration

DJ.5 - SUSPENSION DISASSEMBLY/ASSEMBLY

The suspension may be disassembled without the use of any special tools other than spring compressor 

clamps if the sping and damper are to be separated.  If the hub carrier is to be removed, necessitating with-

drawal of the driveshaft, it is recommended first to release the driveshaft nut before dismantling the brakes, in 

order that the brakes may be used to react against the release torque. 

With the car on a wheel free lift and with the rear wheels and engine undertray removed:

Hub Unit

1.  With the parking and footbrakes firmly applied, remove the driveshaft nut (both Rh thread).

2.  Release the two bolts securing the brake calliper to the hub carrier, release the flexible hose from the top 

wishbone, and support the calliper aside without straining the brake hose.

3.  Check that the parking brake is released, back off the brake shoe adjuster, remove the two countersunk 

retaining screws and withdraw the brake disc/drum from the hub.

4.  Release the single screw securing the wheel speed sensor, and withdraw the sensor from the hub car-

rier.  

5.  Release the four hex. head securing bolts and withdraw the hub unit from the hub carrier and driveshaft.  

Note that this unit is common to all four wheels.


Parking Brake Backplate

6.  Release the parking brake cable from the backplate actuating lever.  Remove the three bolts securing the 

backplate to the hub carrier and withdraw the backplate complete with brake shoes.


Hub Carrier 

7.  Remove the bolt securing the toe-link to the hub carrier, and separate from the clevis.

8.  Remove the bolt securing the top wishbone to the hub carrier, and that securing the lower wishbone to 

the hub carrier, and withdraw the carrier from the car.

Damper and Spring

9.  Remove the bolt securing the lower end of the damper to the lower wishbone, noting and retaining the 

steel washers fitted between the spherical joint and wishbone.


Content   ..  13  14  15  16   ..