Kawasaki Diesel MULE 4010 TRANS 4x4 (KAF950G9). Manual - part 39
 

  Index      Engines     Kawasaki Diesel MULE 4010 TRANS 4x4 (KAF950G9) - service manual


Search            


Content   ..  37  38  39  40   ..


Kawasaki Diesel MULE 4010 TRANS 4x4 (KAF950G9). Manual - part 39


6-8 CONVERTER SYSTEM

Air Cleaner

Air Cleaner Housing Removal

•

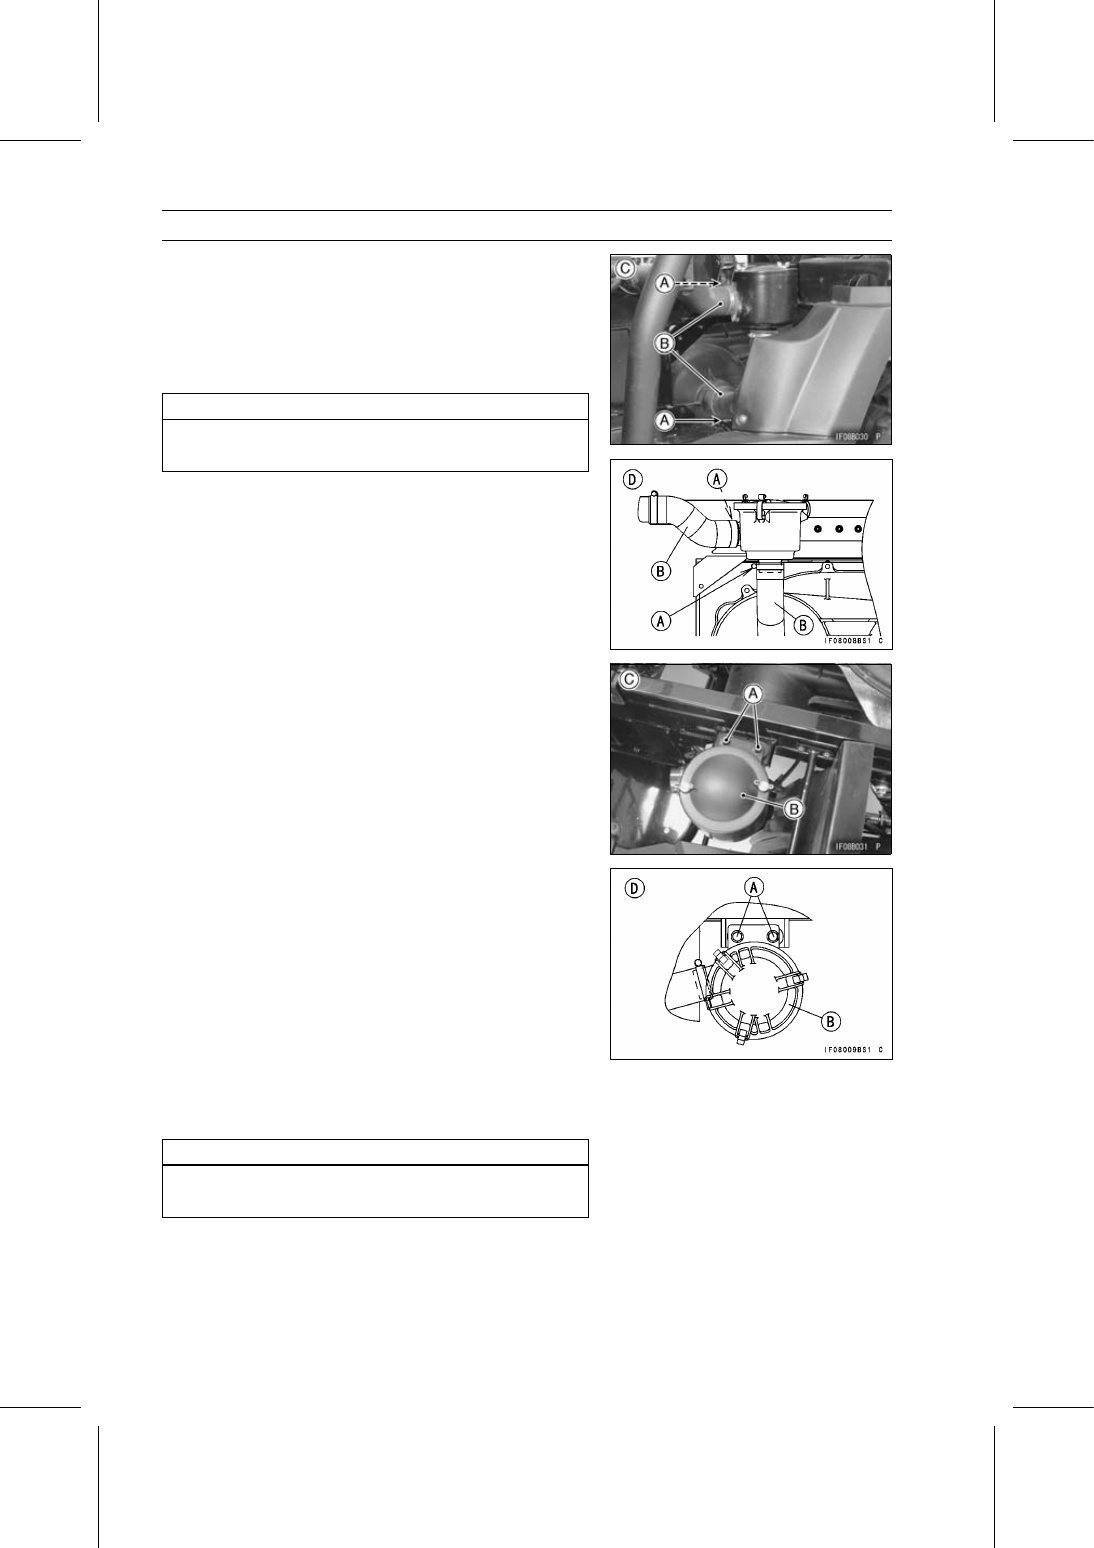
Loosen:

Clamps [A]

•

Remove:

Air Ducts [B]
[C] KAF950G9 and KAF950GA/HA early models
[D] KAF950GA/HA late models and KAF950GB

∼

NOTICE

If dirt gets into the torque converter, excessive wear
and loss of driving power may result.

•

Remove:

Air Cleaner Housing Bolts [A], Washers and Nuts
Air Cleaner Housing [B]
[C] KAF950G9 and KAF950GA/HA early models
[D] KAF950GA/HA late models and KAF950GB

∼

•

After removing the housing, stuff pieces of lint-free, clean
cloth into the torque converter cover duct to keep dirt out
of the torque converter.

NOTICE

If dirt gets into the torque converter, excessive wear
and loss of driving power may result.

CONVERTER SYSTEM 6-9

Air Cleaner

Air Cleaner Housing Installation

•

Install:

Air Cleaner Housing [A]
Bracket Bolt [B]
Washer [C]
Damper [D] (The shorter side faces lower side.)
Collar [E]
Nut [F]

For KAF950G9 and KAF950GA/HA Early Models

•

Tighten:

Torque - Air Cleaner Housing Mounting Bolts: 20 N·m (2.0

kgf·m, 15 ft·lb)

For KAF950GA/HA Late Models and KAF950GB

∼

•

Tighten:

Torque - Air Cleaner Housing Mounting Bolts: 16 N·m (1.6

kgf·m, 12 ft·lb)

•

Install the clamps [A] at about 3mm (0.12 in.) [B] from the
end of air ducts.

•

Install the clamp [C] into the bare position from the end of
air duct.

Air Cleaner Element Removal

•

Tilt up the cargo bed.

For KAF950G9 and KAF950GA/HA Early Models

•

Remove:

Wingbolts [A]
Cap [B]

6-10 CONVERTER SYSTEM

Air Cleaner

For KAF950GA/HA Late Models and KAF950GB

∼

•

Remove:

Clamps [A]
Cap [B]

•

Remove the air cleaner element [A].

•

After removing the element, stuff pieces of lint-free, clean
cloth into the air cleaner duct to keep dirt out of the torque
converter.

NOTICE

If dirt gets into the torque converter, excessive wear
and loss of driving power may result.

Air Cleaner Element Cleaning/Inspection

•

Refer to the Converter Air Cleaner Element Cleaning/In-
spection in the Periodic Maintenance chapter.

CONVERTER SYSTEM 6-11

Torque Converter

Torque Converter Outer Cover Removal

•

Lift up the cargo easy to work.

•

Remove:

Converter Air Cleaner Housing (see Air Cleaner Housing
Removal)
Left Rear Wheel (see Wheel Removal in the
Wheels/Tires chapter)
Flap Stay (see Flap and Flap Stay Removal in the Frame
chapter)
Left Rear Shock Absorber (see Rear Shock Absorber
Removal in the Suspension chapter)
Screws [A]
Cover [B]

•

Remove:

Converter Cover Bolts [A] and Collars
Torque Converter Outer Cover [B]

Torque Converter Outer Cover Installation

•

Install the outer cover [A] as shown in the figure.

○

First, insert the rear side [B] of the outer cover in the
frame.

•

Install the collars and converter cover bolts.

•

Tighten:

Torque - Converter Cover Bolts: 4.4 N·m (0.45 kgf·m, 39

in·lb)

Torque Converter Inner Cover Removal

•

Remove:

Exhaust Pipe (see Exhaust Pipe Removal in the Engine
Top End chapter)
Torque Converter Outer Cover (see Torque Converter
Outer Cover Removal)
Drive Pulley (see Drive Pulley Removal)

•

Loosen the clamp [A] and separate the air duct [B] from
the cover.


Content   ..  37  38  39  40   ..