DB2 Server for VSE. Operations Guide / Handbooks (2004-2007) - page 16
About This Manual
This manual is a tutorial and reference for IBM DB2 Server for VSE & VM
interactive SQL (ISQL) users in a Virtual Storage Extended/Enterprise Systems
Architecture (VSE/ESA) or Virtual Machine/Enterprise Systems Architecture
(VM/ESA) environment. The manual presents reference information for particular
topics, followed by tutorial exercises that illustrate the reference information.
Screen images (hereafter referred to as displays) that are similar to the displays that
you view when performing ISQL exercises are included in the text.
The manual begins with an introduction to:
v The DB2 Server for VSE & VM relational database management system
(RDBMS).
v The Structured Query Language (SQL) which manipulates and controls data
managed by the RDBMS.
v The Interactive SQL (ISQL) facility, through which SQL statements are issued
from a display terminal.
The manual continues with query and management techniques for DB2 Server for
VSE & VM tables that are used during an ISQL session. Specific guidelines are
provided for the use of ISQL commands, SQL statements, routines, and VM
functions.
The examples and exercises that are provided throughout this manual to
familiarize you with ISQL are supplemented by answers and example table
layouts, both of which are in appendixes.
Note:
v The terms DB2 Server for VM, DB2 Server for VSE, and DB2 Server for VSE & VM
are used in this guide to refer to DB2 Server for VM Version 7 Release 1 unless
otherwise indicated.
v When the term CICS is used in this manual, CICS/VSE is implied. The
CICS/VSE product is required for DBCS support.
|
v The term VSE refers to VSE/Enterprise Systems Architecture Version 2 Release 3
|
or later.
|
v The term VM is used in this guide to refer to VM/ESA Version 2 Release 2 or
|
later.
For a quick summary of reference information on ISQL functions, refer to the DB2
Server for VSE & VM Quick Reference manual.
How to Use This Manual
The following information provides a brief description of each chapter and
appendix in the manual.
The Summary of Changes summarizes the technical and library changes made for
Version 7 Release 1 of the database manager product.
vii
“Chapter 1. Getting Started” on page 1, introduces the database manager, SQL, and
ISQL facilities, and takes the reader through a typical ISQL session using the
display terminal.
“Chapter 2. Querying Tables” on page 21, discusses the presentation of queried
information both on the display and in a printed report.
“Chapter 3. Managing Table Data” on page 33, provides DB2 Server for VSE & VM
table management guidelines for table changes.
“Chapter 4. Using ISQL Commands to Save Time When Executing Statements” on
page 35, explains the use of ISQL commands with SQL statements during an ISQL
session.
“Chapter 5. Formatting Query Results” on page 43, offers additional methods of
displaying queried information. Formatting techniques for both the display and for
printed reports are discussed in detail.
“Chapter 6. Storing SQL Statements” on page 67, describes the use of stored SQL
statements, including management and processing methods.
“Chapter 7. Creating and Using Routines” on page 73, discusses the use of database
manager routines to process a series of ISQL commands or SQL statements.
“Chapter 8. Creating and Managing Tables” on page 83, describes procedures to
create and maintain a personal set of database manager tables with an emphasis on
the use of table keys. In addition, information is provided that explains the sharing
of tables with other database manager users. Guidelines that improve query
performance are also provided.
DB2 Server for VM
“Chapter 9. Using VM Functions” on page 99, discusses the use of VM
commands and functions to enhance the ISQL session, such as the
specification of the number of copies of printed reports.
“Chapter 10. ISQL Commands” on page 105, is a reference chapter for ISQL
commands that provides a format diagram, a description, and an example, where
appropriate, for each command.
“Appendix A. Answers to the Exercises” on page 165, contains the answers to the
exercises in the manual.
“Appendix B. Sample Tables” on page 169, describes the structure and contents of
the sample database manager tables used in the examples and exercises in the
manual.
“Appendix C. Summary of ISQL PF Keys” on page 183, describes the ISQL
commands associated with the PF keys on the keyboard.
“Appendix D. Summary of SQL Statements for Interactive Use” on page 185, lists
the SQL statements that you can refer to the DB2 Server for VSE & VM SQL
Reference manual, if you want more information.
viii Interactive SQL Guide and Reference
DB2 Server for VSE
“Appendix E. Suppressing the ISQL Sign-On Display for DB2 Server for VSE”
on page 187, gives you information on suppressing the ISQL sign-on display
and related terminal messages.
The Bibliography lists the full titles and order numbers of related publications, and
is followed by the Index.
Components of the Relational Database Management System
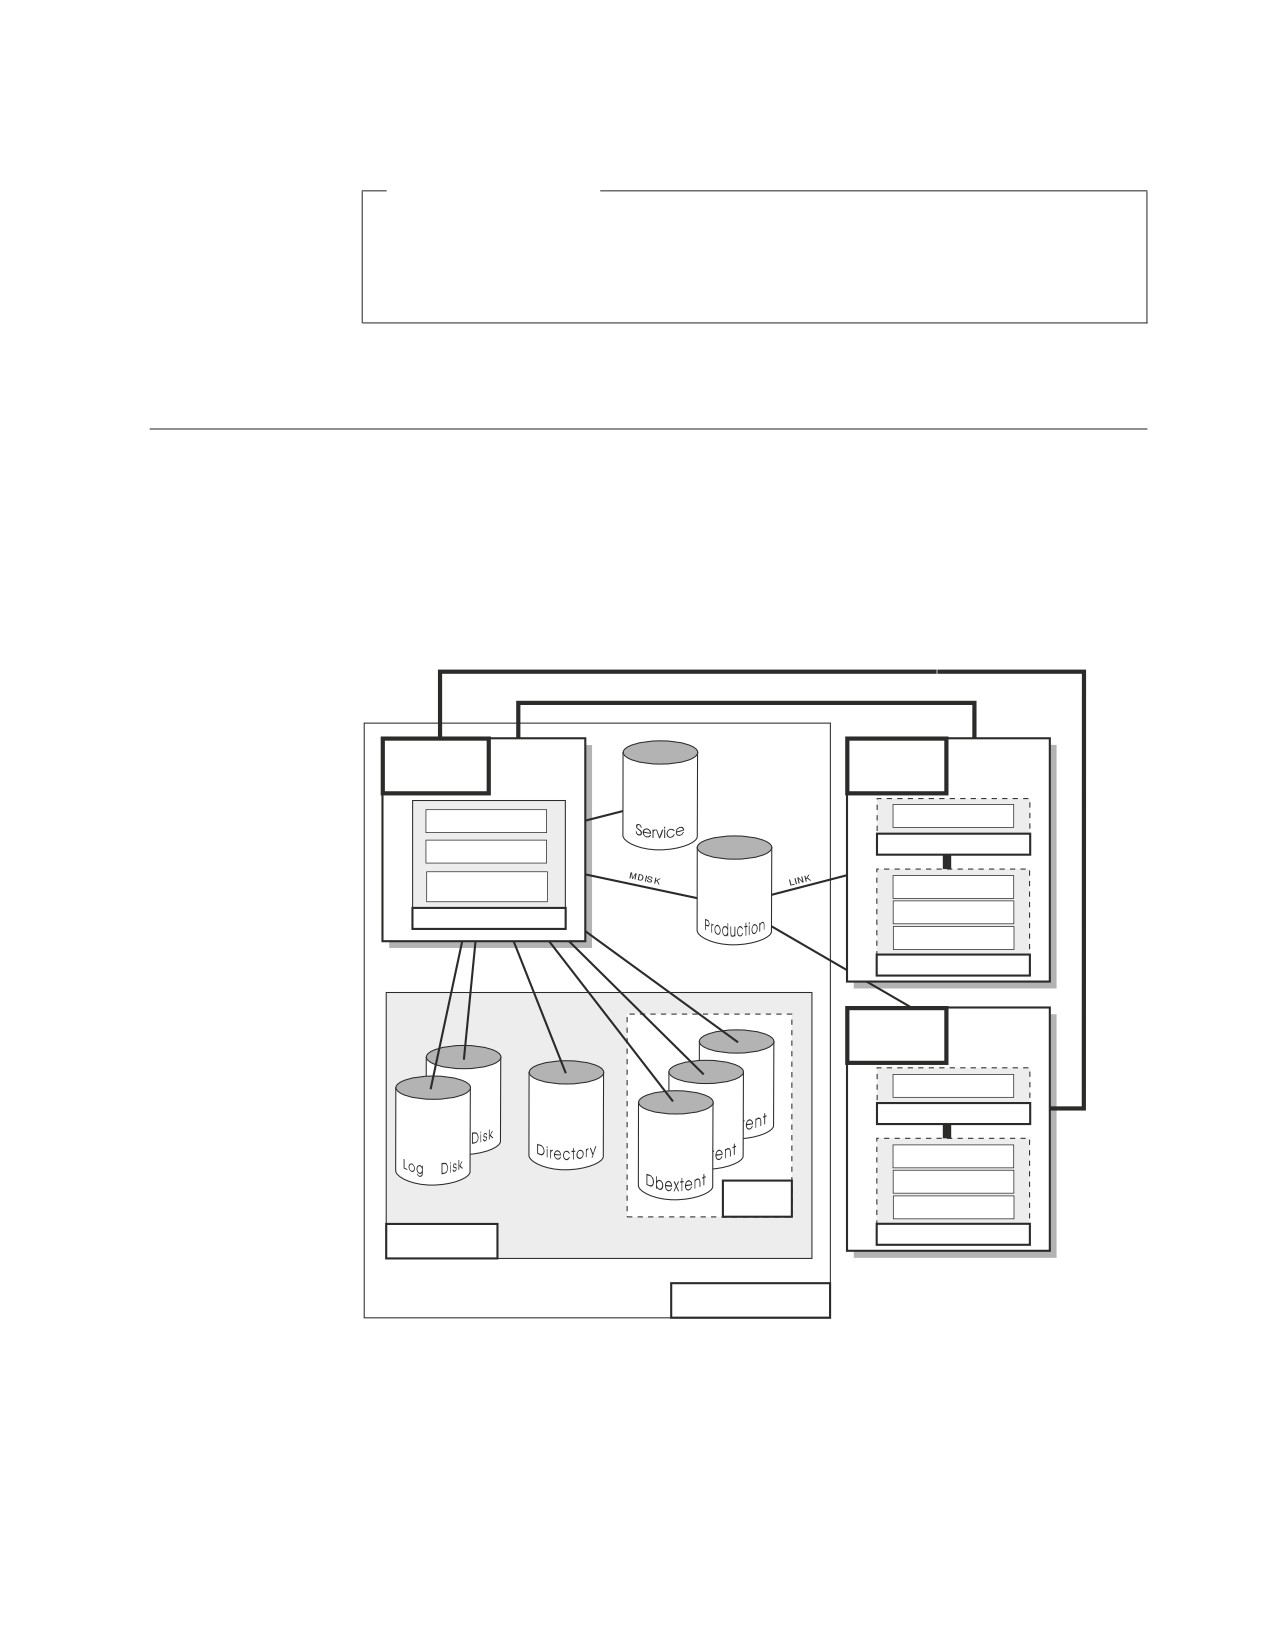
Figure 1 depicts a typical configuration with one database and two users.
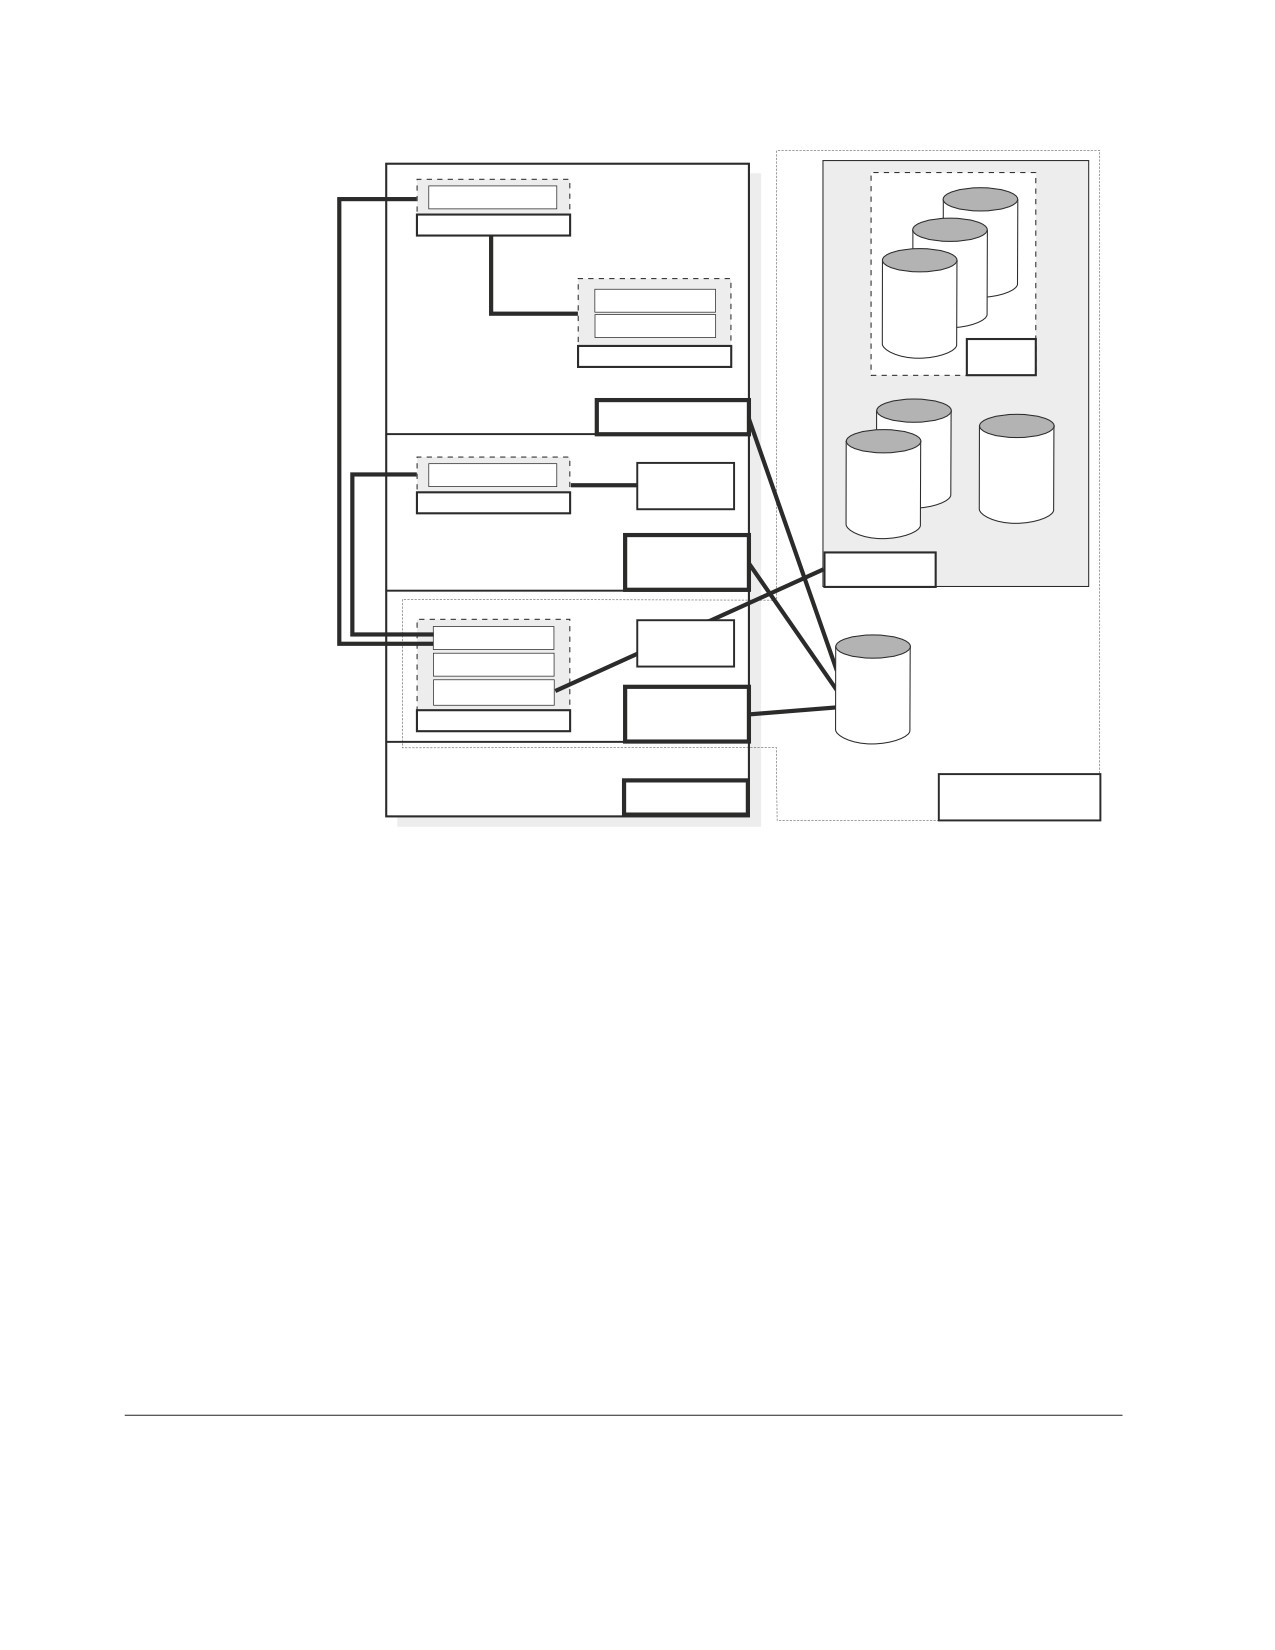
Figure 2 on page x depicts a typical configuration with one database, one batch
partition user, and a CICS® partition with several interactive users.
Communication Link
(IUCV, APPC/VM or TCP/IP)
Database
User
Machine
Machine
Resource Adapter
Data System Control
Application Requester
Relational Data System
Database Storage
Interactive SQL
Subsystem
Preprocessors
Database Manager
DBS Utility
Applications
User
Machine
Resource Adapter
Application Requester
Interactive SQL
Preprocessors
Storage
Pool
DBS Utility
Applications
Database
Application Server
Figure 1. Basic Components of the RDBMS in VM/ESA
About This Manual ix
Online Resource Adapter
Application Requester
ent
Interactive SQL
ent
CICS Application
Dbextent
Storage
Applications
Pool
CICS Partition
Batch Resource Adapter
Application
Program
Application Requester
Directory
Log
VSE Batch
Partition
Database
Data System Control
VSAM
Relational Data System
Database Storage
DB2
Subsystem
for VSE
Database
Database Manager
Library
Partition
VSE
Application Server
Figure 2. Basic Components of the RDBMS in VSE/ESA
The database is composed of :
v A collection of data contained in one or more storage pools, each of which in turn
|
is composed of one or more database extents (dbextents). A dbextent is a VM
|
minidisk or a VSE VSAM cluster.
v A directory that identifies data locations in the storage pools. There is only one
directory per database.
v A log that contains a record of operations performed on the database. A database
can have either one or two logs.
The database manager is the program that provides access to the data in the
database. In VM it is loaded into the database virtual machine from the production
disk. In VSE it is loaded into the database partition from the DB2 Server for VSE
library.
The application server is the facility that responds to requests for information from
and updates to the database. It is composed of the database and the database
manager.
The application requester is the facility that transforms a request from an
application into a form suitable for communication with an application server.
Prerequisite Publications
Although not required, you should have an understanding of material covered in
the DB2 Server for VSE & VM Overview manual.
x Interactive SQL Guide and Reference
Corequisite Publications
The following manuals should be used with this manual:
DB2 Server for VSE & VM SQL Reference
DB2 Server for VSE & VM Database Administration
DB2 Server for VSE & VM Overivew.
|
How to Send Your Comments
|
Your feedback is important in helping to provide the most accurate and
|
high-quality information. If you have any comments about this book or any other
|
DB2 Server for VSE & VM documentation:
|
v
Visit our home page at:
|
|
v
A form for readers’ comments is provided at the back of this publication. If the
|
form has been removed, address your comments to:
|
IBM CANADA LTD.
|
DB2 Server for VSE & VM
|
2S/240/1150/TOR
|
1150 Eglinton Ave. East
|
North York, Ontario
|
Canada M3C 1H7
|
v
Send your comments by electronic mail to one of the following addresses:
|
Format
Address
|
Internet
torrcf@ca.ibm.com
|
Facsimile
(416) 448-6161 (Attention RCF
|
Coordinator)
|
|
Be sure to include the name of the book, the form number (including the suffix),
|
and the page, section title, or topic you are commenting on.
|
If you choose to respond through the Internet, please include either your entire
|
Internet network address, or a postal address.
|
v
Fill out the form at the back of this book and return it by mail, by fax, or by
|
giving it to an IBM representative.
| Syntax Notation Conventions
Throughout this manual, syntax is described using the structure defined below.
v Read the syntax diagrams from left to right and from top to bottom, following
the path of the line.
The
─── symbol indicates the beginning of a statement or command.
The ─── symbol indicates that the statement syntax is continued on the next
line.
The
─── symbol indicates that a statement is continued from the previous line.
The ─── symbol indicates the end of a statement.
Diagrams of syntactical units that are not complete statements start with the
─── symbol and end with the ─── symbol.
About This Manual xi
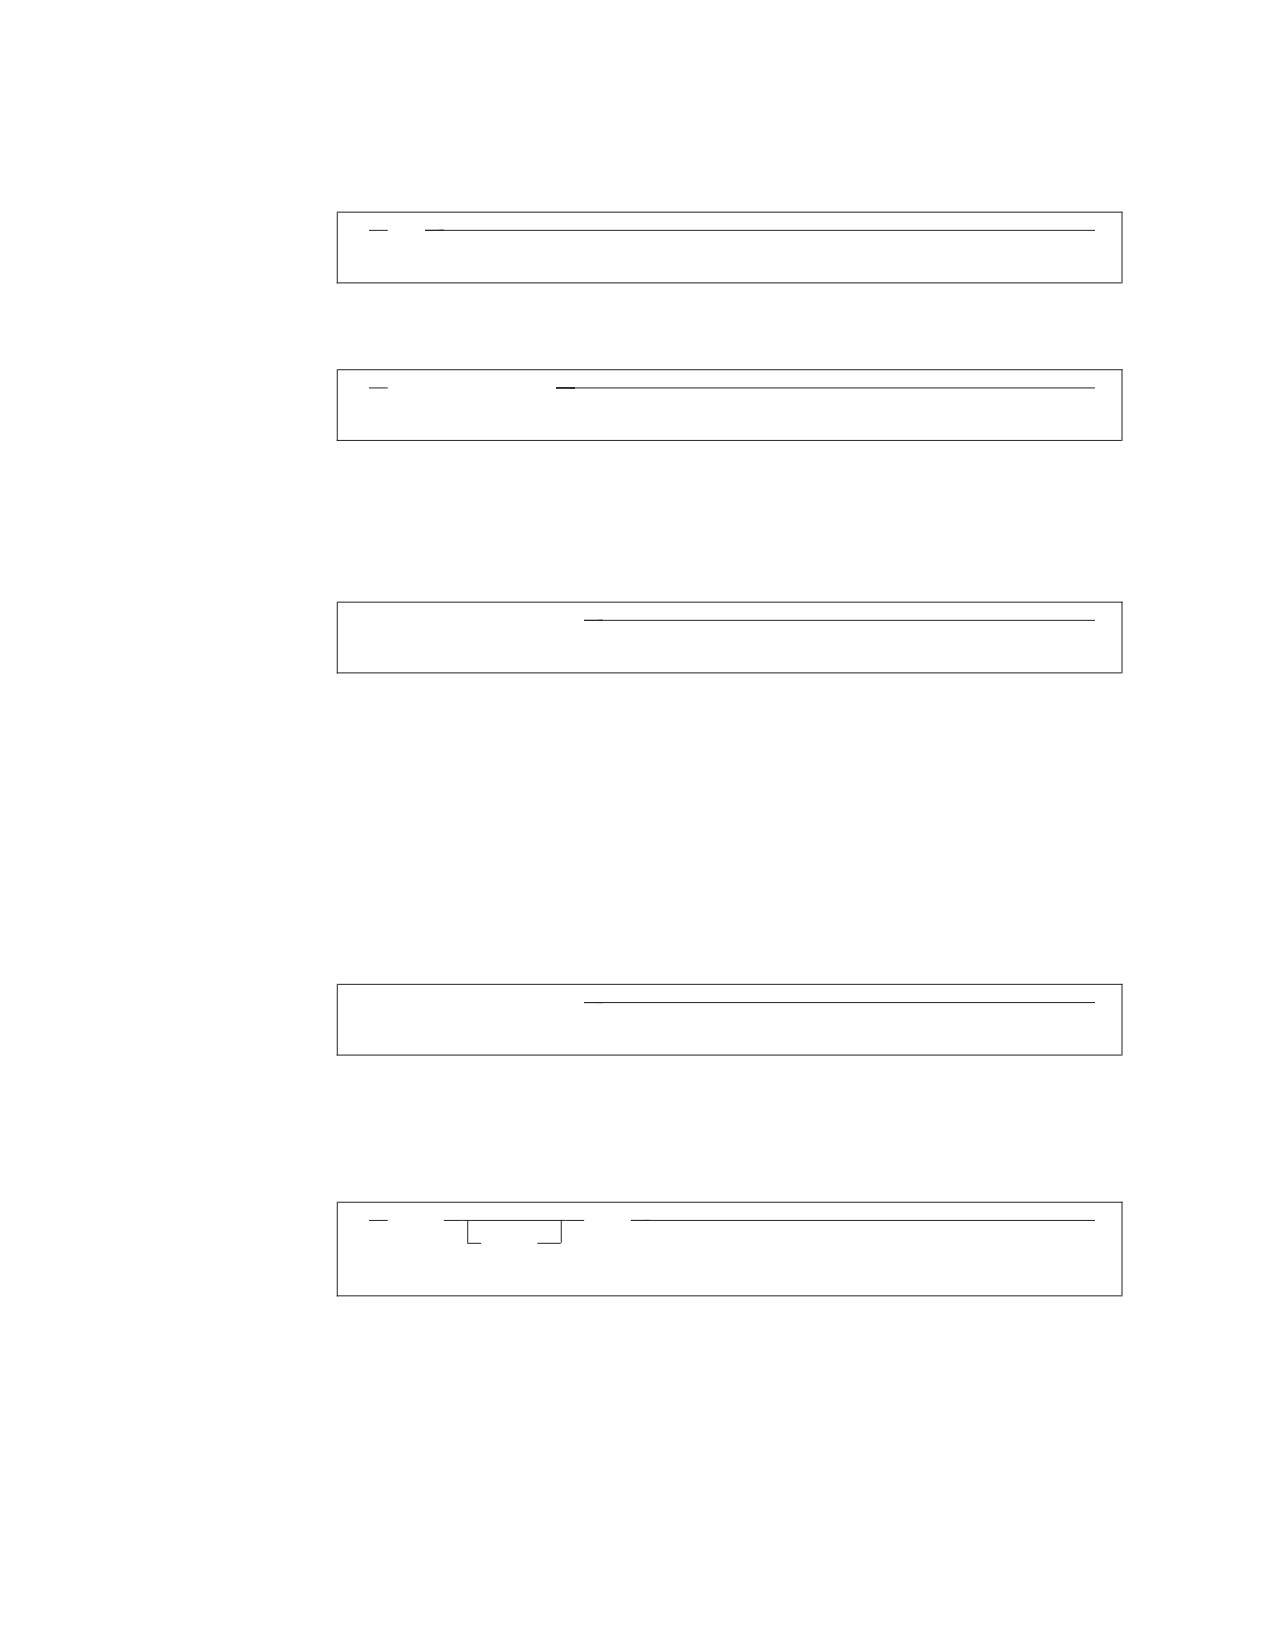
v Some SQL statements, Interactive SQL (ISQL) commands, or database services
utility (DBS Utility) commands can stand alone. For example:
SAVE
Others must be followed by one or more keywords or variables. For example:
SET AUTOCOMMIT OFF
v Keywords may have parameters associated with them which represent
user-supplied names or values. These names or values can be specified as either
constants or as user-defined variables called host_variables (host_variables can only
be used in programs).
DROP SYNONYM synonym
v Keywords appear in either uppercase (for example, SAVE) or mixed case (for
example, CHARacter). All uppercase characters in keywords must be present;
you can omit those in lowercase.
v Parameters appear in lowercase and in italics (for example, synonym).
v If such symbols as punctuation marks, parentheses, or arithmetic operators are
shown, you must use them as indicated by the syntax diagram.
v All items (parameters and keywords) must be separated by one or more blanks.
v Required items appear on the same horizontal line (the main path). For example,
the parameter integer is a required item in the following command:
SHOW DBSPACE integer
This command might appear as:
SHOW DBSPACE 1
v Optional items appear below the main path. For example:
CREATE
INDEX
UNIQUE
This statement could appear as either:
CREATE INDEX
or
CREATE UNIQUE INDEX
v If you can choose from two or more items, they appear vertically in a stack.
xii Interactive SQL Guide and Reference

If you must choose one of the items, one item appears on the main path. For
example:
SHOW LOCK DBSPACE
ALL
integer
Here, the command could be either:
SHOW LOCK DBSPACE ALL
or
SHOW LOCK DBSPACE 1
If choosing one of the items is optional, the entire stack appears below the main
path. For example:
BACKWARD
integer
MAX
Here, the command could be:
BACKWARD
or
BACKWARD 2
or
BACKWARD MAX
v The repeat symbol indicates that an item can be repeated. For example:
2
ERASE
name
This statement could appear as:
ERASE NAME1
or
ERASE NAME1 NAME2
A repeat symbol above a stack indicates that you can make more than one
choice from the stacked items, or repeat a choice. For example:
About This Manual xiii
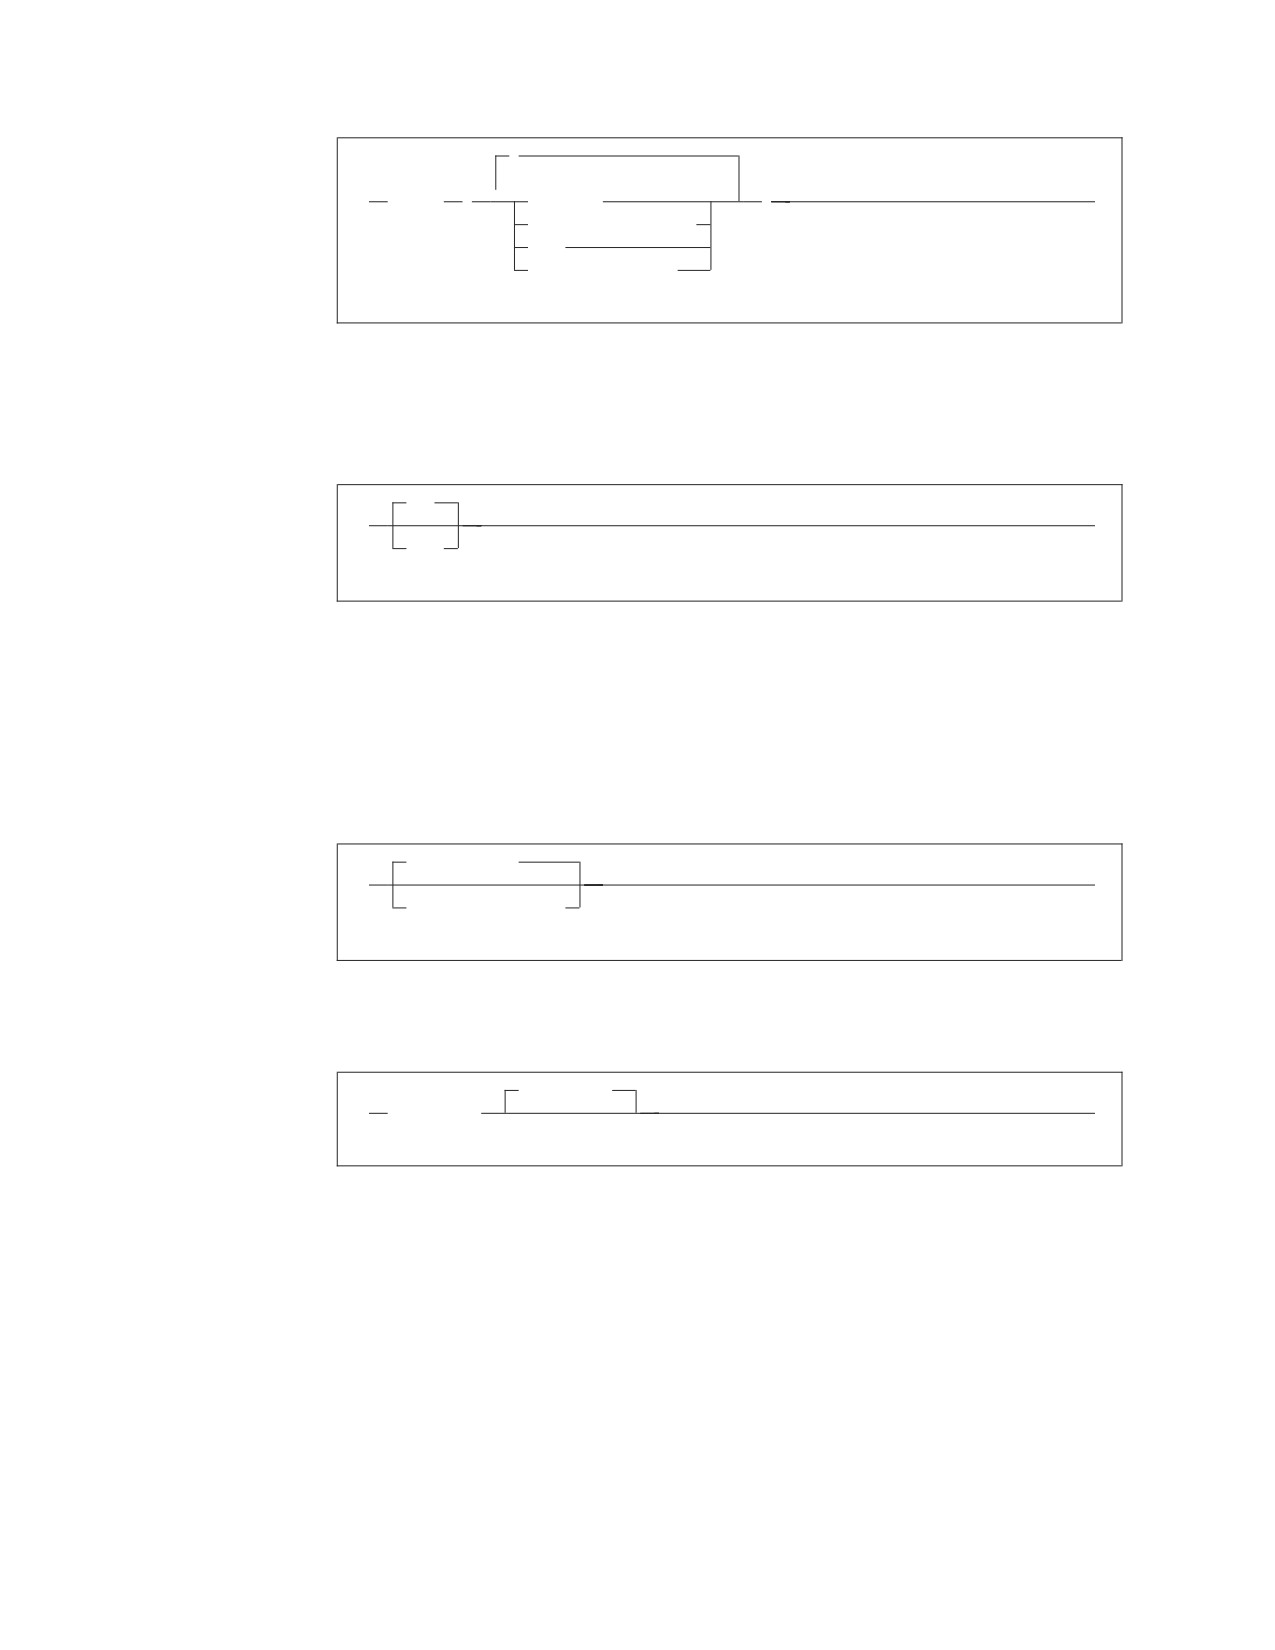
,
2
VALUES
(
constant
)
host_variable_list
NULL
special_register
v If an item is above the main line, it represents a default, which means that it will
be used if no other item is specified. In the following example, the ASC keyword
appears above the line in a stack with DESC. If neither of these values is
specified, the command would be processed with option ASC.
ASC
DESC
v When an optional keyword is followed on the same path by an optional default
parameter, the default parameter is assumed if the keyword is not entered.
However, if this keyword is entered, one of its associated optional parameters
must also be specified.
In the following example, if you enter the optional keyword PCTFREE =, you
also have to specify one of its associated optional parameters. If you do not
enter PCTFREE =, the database manager will set it to the default value of 10.
PCTFREE = 10
PCTFREE = integer
v Words that are only used for readability and have no effect on the execution of
the statement are shown as a single uppercase default. For example:
PRIVILEGES
REVOKE ALL
Here, specifying either REVOKE ALL or REVOKE ALL PRIVILEGES means the
same thing.
xiv Interactive SQL Guide and Reference
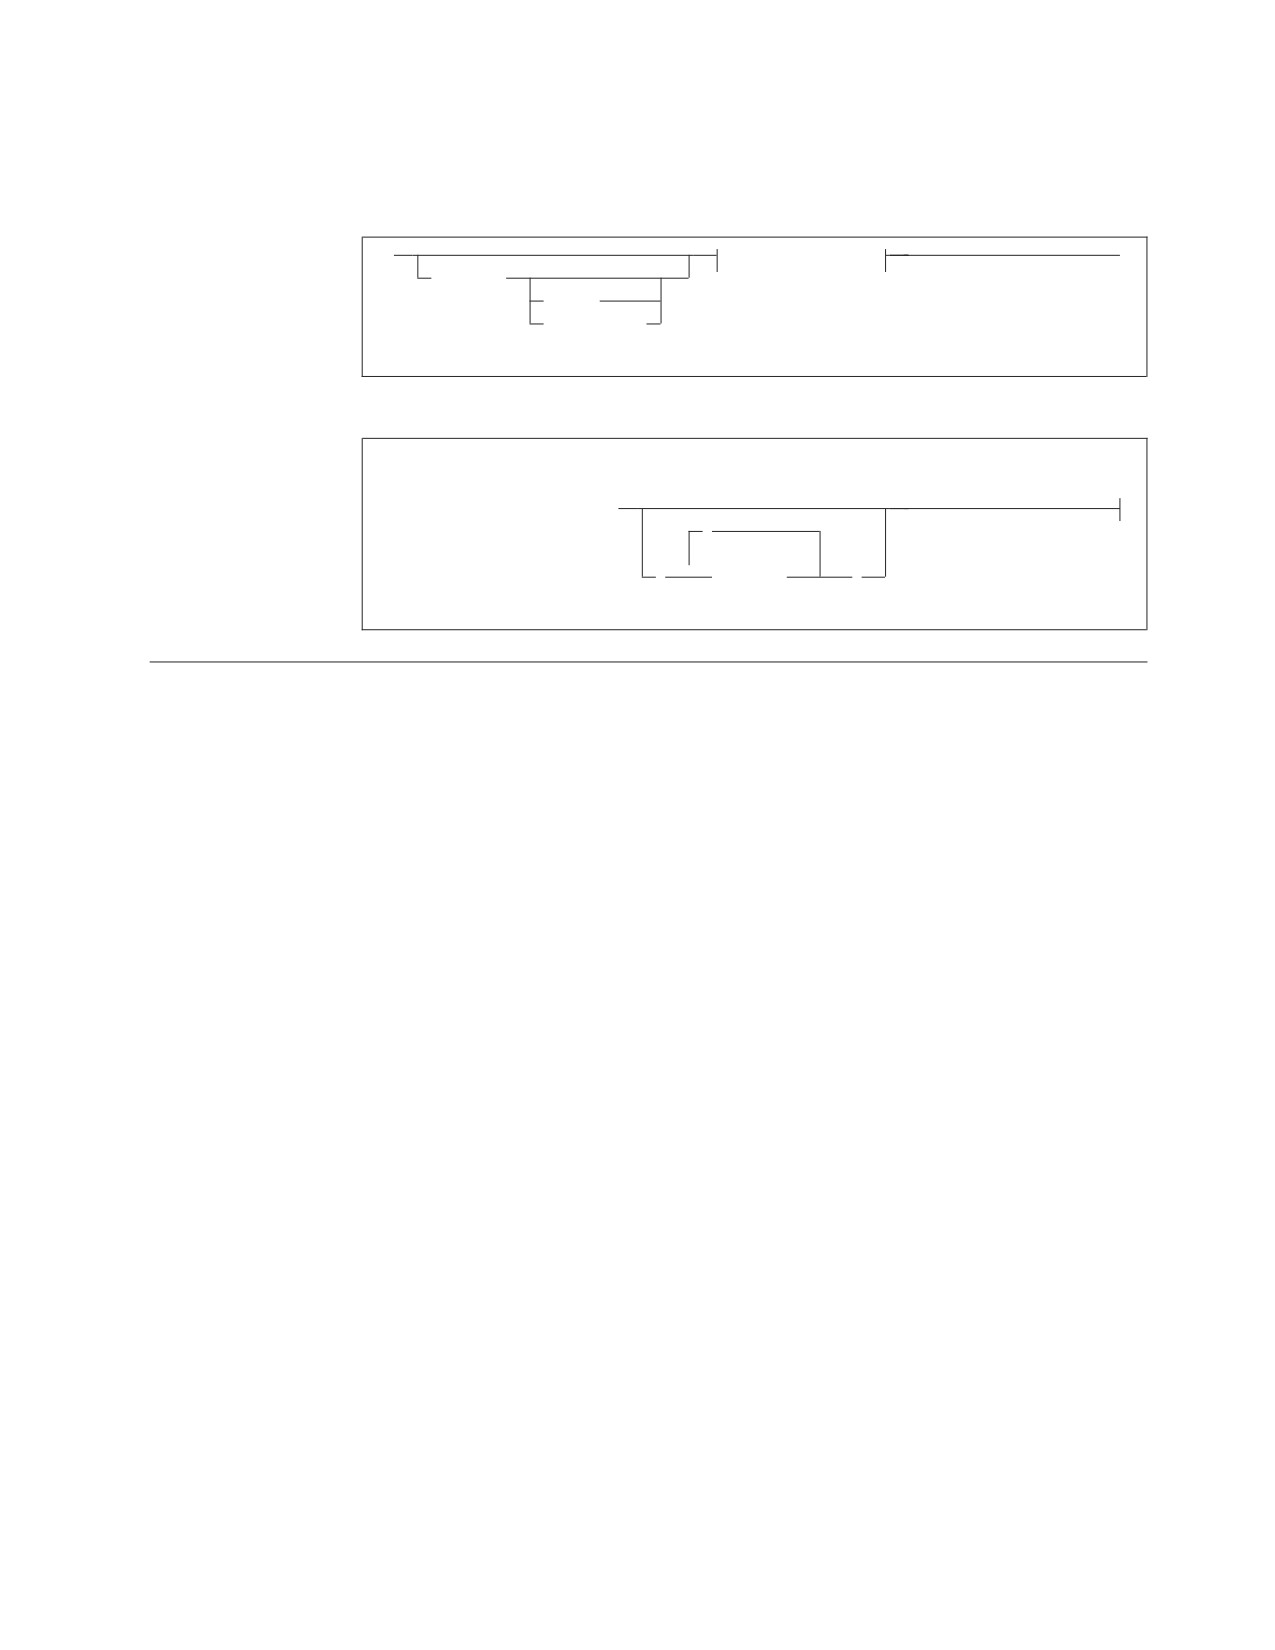
v Sometimes a single parameter represents a fragment of syntax that is expanded
below. In the following example, fieldproc_block is such a fragment and it is
expanded following the syntax diagram containing it.
fieldproc_block
NOT NULL
UNIQUE
PRIMARY KEY
fieldproc_block:
FIELDPROC program_name
,
2
(
constant
)
SQL Reserved Words
The following words are reserved in the SQL language. They cannot be used in
SQL statements except for their defined meaning in the SQL syntax or as host
variables, preceded by a colon.
In particular, they cannot be used as names for tables, indexes, columns, views, or
dbspaces unless they are enclosed in double quotation marks (").
About This Manual xv
ACQUIRE
GRANT
RESOURCE
ADD
GRAPHIC
REVOKE
ALL
GROUP
ROLLBACK
ALTER
ROW
AND
HAVING
RUN
ANY
AS
IDENTIFIED
SCHEDULE
ASC
IN
SELECT
AVG
INDEX
SET
INSERT
SHARE
BETWEEN
INTO
SOME
BY
IS
STATISTICS
STORPOOL
|
CALL
LIKE
SUM
CHAR
LOCK
SYNONYM
CHARACTER
LONG
COLUMN
TABLE
COMMENT
MAX
TO
COMMIT
MIN
CONCAT
MODE
UNION
CONNECT
UNIQUE
COUNT
NAMED
UPDATE
CREATE
NHEADER
USER
CURRENT
NOT
NULL
VALUES
DBA
VIEW
DBSPACE
OF
DELETE
ON
WHERE
DESC
OPTION
WITH
DISTINCT
OR
WORK
DOUBLE
ORDER
DROP
PACKAGE
EXCLUSIVE
PAGE
EXECUTE
PAGES
EXISTS
PCTFREE
EXPLAIN
PCTINDEX
PRIVATE
FIELDPROC
PRIVILEGES
FOR
PROGRAM
FROM
PUBLIC
Authorization Names and Passwords
Authorization names and passwords are limited to 8 characters and cannot have
embedded blanks.
Authorization Names without Quotation Marks
The name must begin with a letter, $, #, or @ and contain letters, numbers, $, #, @,
or underscore. Avoid using SQL reserved words and Database Services Utility
reserved words. See the DB2 Server for VSE & VM Quick Reference manual for a list
of these reserved words.
xvi Interactive SQL Guide and Reference
DB2 Server for VM
Note: # is the usual CP TERMINAL LINEND character.
Authorization Names in Double Quotation Marks
Names can begin with any character and contain any combination of characters
when enclosed in double quotation marks. However, the double quotation mark
character itself is not allowed within the names, and leading blanks cause errors.
Use of Highlighting in This Guide
Database manager commands and statements are illustrated throughout this
manual using
indented and highlighted type.
You can type these commands and statements. Commands or statements that are
indented but not highlighted
illustrate additional examples and options. If you type them, you may produce
results different from those shown in this manual.
Titles of publications, command variables, parameter values, character strings, and
the first use of a term are printed in italics.
Any information appearing on the display that is referred to in the text is
highlighted in this manual. For example, if the term User ID appears on the
display, an instruction to the reader to make an entry beside the term is written in
the manual as: Type your user ID in the User ID input area. Note the special
highlighting for User ID.
Uppercase characters are used for:
v Acronyms (for example, DB2 Server for VSE & VM)
v ISQL commands, statements, and instructions (for example, the CHANGE
command)
v Names on top of keys (for example, PF3)
v Names of programs, macros, and EXECs (for example, the PROFILE EXEC)
v Option names, keywords, and special registers (for example, the CASE keyword
of the SET command)
v Datasets and files, including tables (for example, the ACTIVITY table).
Italics emphasize the importance of the italicized phrase.
About This Manual xvii
xviii Interactive SQL Guide and Reference
Summary of Changes
|
This is a summary of the technical changes to the DB2 Server for VSE & VM
|
database management system for this edition of the book. All manuals are affected
|
by some or all of the changes discussed here. For your convenience, the changes
|
made in this edition are identified in the text by a vertical bar (|) in the left
|
margin. This edition may also include minor corrections and editorial changes that
|
are not identified.
This summary does not list incompatibilities between releases of the DB2 Server
for VSE & VM product; see either the DB2 Server for VSE & VM SQL Reference, DB2
Server for VM System Administration, or the DB2 Server for VSE System
Administration manuals for a discussion of incompatibilities.
|
Summary of Changes for DB2 Version 7 Release 1
|
Version 7 Release 1 of the DB2 Server for VSE & VM database management
|
system is intended to run on the Virtual Machine/Enterprise Systems Architecture
|
(VM/ESA®) Version 2 Release 3 or later environment and on the Virtual Storage
|
Extended/Enterprise Systems Architecture (VSE/ESA™) Version 2 Release 3
|
Modification 1 or later environment.
|
Enhancements, New Functions, and New Capabilities
|
TCP/IP Support for DB2 Server for VSE
|
TCP/IP support allows:
|
v VSE online and batch application programs to access remote application servers
|
which support IBM’s implementation of the DRDA architecture over TCP/IP.
|
v Remote application requesters which support IBM’s implementation of the
|
DRDA architecture to access the DB2 for VSE application server over TCP/IP.
|
For more information, see the following DB2 Server for VSE & VM documentation:
|
v DB2 Server for VSE & VM Database Administration
|
v DB2 Server for VSE System Administration
|
v DB2 Server for VSE Program Directory.
|
DRDA RUOW Application Requester for VSE (Batch)
|
DRDA Remote Unit of Work Application Requester provides read and update
|
capability in one location in a single unit of work.
|
This support provides VSE batch application programs with the ability to execute
|
SQL statements to access and manipulate data managed by any remote application
|
server that supports IBM’s implementation of the DRDA architecture.
|
VSE batch application programs can access only one remote application server per
|
unit of work, and must use TCP/IP communications.
|
For more information, see the following DB2 Server for VSE & VM documentation:
|
v DB2 Server for VSE System Administration
|
v DB2 Server for VSE & VM Database Administration
|
v DB2 Server for VSE & VM Application Programming
1987, 2000
xix
|
v DB2 Server for VSE Program Directory.
|
Stored Procedures Application Requester
|
A stored procedure is a user-written application program compiled and stored at
|
the server. Stored procedures allow logic to be encapsulated in a procedure that is
|
local to the database manager. The ability to use stored procedures provides
|
distributed solutions that let more people access data faster. SQL statements and
|
replies flowing across the network are reduced and performance is improved.
|
This support provides VM and VSE (online and batch) application programs with
|
the ability to invoke stored procedures from any remote application servers that
|
support IBM’s implementation of the DRDA architecture. It also allows processing
|
of result sets if supported by the remote DRDA application server.
|
For more information, see the following DB2 Server for VSE & VM documentation:
|
v DB2 Server for VSE & VM Application Programming
|
v DB2 Server for VSE & VM SQL Reference.
|
Simplified DB2 Server for VSE Installation/Migration
|
A REXX procedure Job Manager is supplied to assist in the DB2 Server for VSE
|
Installation/Migration process. It controls the overall job flow based on the
|
contents of the job list control tables and the parameter table (supplied as Z-type
|
members). The job manager selects the job control member from the job list file (a
|
Z-type member), extracts the member from the Installation Library, modifies the
|
JCL, submits the job, evaluates the execution, posts the results, and then repeats
|
the process as required. The users are required to modify the parameter table,
|
according to their environment.
|
This support simplifies the process of installation and migration by reducing user
|
intervention - the Job Manager submits the prepared jobs.
|
See the DB2 Server for VSE Program Directory for further details.
|
New Code Page and Euro Symbol Code Page Support
|
The following CCSIDs are now supported:
|
v
1137: Hindi
|
v
1142: E-Danish/Norweigan
|
v
1143: E-Finnish/Swedish
|
v
1145: E-Spanish.
|
Additional support has been added for conversions from Unicode (UTF-8) to host
|
CCSIDs.
|
For a complete list of CCSIDs supported, refer to the DB2 Server for VM System
|
Administration and DB2 Server for VSE System Administration manuals.
|
Control Center for VM Enhancements
|
The following is a list of enhancements that have been made to the Control Center
|
for VM:
|
v QMF™ Tools: allow the user to list QMF objects, view and unload QMF queries
|
and PROCS, schedule QMF PROCS to execute, and run explain on QMF queries.
|
v Table Create Tool: allows the user to create new tables.
|
v Search List improvements.
|
v Referential Integrity Report tool: A referential integrity map report can now be
|
generated directly from the CMS command interface.
xx
Interactive SQL Guide and Reference
|
v PL/I prerequisite removal.
|
v New and improved tape hopper support.
|
v High density tape drive support: support for high density (non-CMS density)
|
tape drives.
|
Control Center for VSE Enhancements
|
The following enhancements have been provided for Control Center for VSE:
|
v Additional Operator Command Support
|
v Installation of IBM-provided Stored Procedures.
|
QMF for VSE & VM Optional Feature
|
The following enhancements have been provided for QMF for VSE & VM:
|
v Application Requester support for VSE QMF users
|
v Command enhancements to default to object type
|
v Fast path to the QMF home screen
|
v Cross-platform install capability
|
v DB2 for AS/400 database access.
|
QMF for Windows® Optional Feature
|
The following enhancements have been provided for QMF for Windows :
|
v Java-based Query
|
v Aggregating, grouping and formatting directly within query results and
|
automatic Form creation
|
v Personal portal user interface that launches centrally shared queries and reports,
|
and sends results to spreadsheets, desktop databases, and browsers
|
v Procedures with REXX.
|
Reliability, Availability, and Serviceability Improvements
|
DBNAME Directory Restructuring
|
ARISDIRD has been restructured to improve readability and flexibility. Each
|
DBNAME entry is now defined explicitly by its type (Local, Remote or Host VM
|
(Guest Sharing)). CICS AXE Transaction TPNs (Transaction Program Names) are
|
still included in the directory as a type of ’LOCALAXE’. The DBNAME Directory
|
Builder program, ARICBDID has been rewritten as a REXX/VSE procedure with
|
extensive error and dependency checking. Support for TCP/IP information is
|
added and ’alias’ DBNAMEs are supported. ALL DBNAMEs must be specified in
|
the new DBNAME Directory, including the Product Default DBNAME ″SQLDS″. A
|
migration REXX/VSE procedure, ARICCDID, is provided to assist in migrating to
|
the new format. See the DB2 Server for VSE System Administration and DB2 Server
|
for VSE Program Directory for additional information.
|
Migration Considerations
|
Migration is supported from SQL/DS™ Version 3 and DB2 Server for VSE & VM
|
Versions 5 and 6. Migration from SQL/DS Version 2 Release 2 or earlier releases is
|
not supported. Refer to the DB2 Server for VM System Administration or DB2 Server
|
for VSE System Administration manual for migration considerations.
|
Library Enhancements
|
Some general library enhancements include:
|
v The following books have been removed from the library:
|
- DB2 Server for VM Application Programming
|
- DB2 Server for VSE Application Programming
Summary of Changes xxi
|
- DB2 Server for VM Database Administration
|
- DB2 Server for VSE Database Administration
|
- DB2 Server for VSE Installation
|
- DB2 REXX SQL Interface Installation
|
- DB2 REXX SQL Reference
|
- DB2 Server for VM Diagnosis Guide and Reference
|
- DB2 Server for VSE Diagnosis Guide and Reference
|
- DB2 VM Data Spaces Support
|
Note: Information from this book can now be found in the DB2 Server for VSE
|
& VM Performance Tuning Handbook
|
- DB2 Server for VM Master Index and Glossary
|
- DB2 Server for VSE Master Index and Glossary.
|
v The following books have been added to the library:
|
- DB2 Server for VSE & VM Database Administration
|
- DB2 Server for VSE & VM Application Programming
|
- DB2 REXX SQL for VM/ESA Installation and Reference
|
- DB2 Server for VSE & VM Diagnosis Guide and Reference
|
- DB2 Server for VSE & VM Master Index and Glossary.
|
Refer to the new DB2 Server for VSE & VM Overivew for a better understanding of
|
the benefits DB2 Server for VSE & VM can provide.
xxii Interactive SQL Guide and Reference
Chapter 1. Getting Started
This chapter introduces the database manager and the Interactive SQL (ISQL)
facility, and shows how to access both.
With the ISQL facility, you can manipulate data contained in a relational database
from a display terminal. In the ISQL environment, you will learn such procedures
as controlling the display, interpreting database manager messages, entering ISQL
commands, and stopping ISQL.
Introducing the DB2 Server for VSE & VM Database Manager
The DB2 Server for VSE & VM relational database management system uses the
Structured Query Language (SQL) to manage stored data.
Using SQL, you can query, add, delete, and update data. The language consists of
a collection of statements, each of which performs a particular function.
This manual describes how to use the database manager interactively from a CICS
display terminal. The terminals supported are IBM 3277, 3278, 3279, or 3290 (or
equivalent) with a line length of at least 80 characters and at least 24 lines per
display. The database manager also supports the larger display sizes offered by
some models of the 3278 and 3279 terminals.
Designed for the interactive user, the manual gives examples of those functions
and statements that can be used interactively. For a more comprehensive
description of database manager functions, as well as SQL statements used for
querying and displaying data, see the DB2 Server for VSE & VM SQL Reference
manual.
All data stored in the database is in the form of tables. The person who creates the
table also names it. The table shown in Figure 3 is named CARS.
column
CARS
MODEL
YEAR
COLOR
Dodge
1963
Green
Ford
1967
Blue
row
Buick
1970
White
Jeep
1978
Red
Figure 3. A DB2 Server for VSE & VM Table
A table consists of (vertical) columns and (horizontal) rows. Each column has a
name; the columns in the CARS table are MODEL, YEAR, and COLOR.
1
A value is found at the intersection of a column and a row; for example, in the
third row of the CARS table, the information in the COLOR column is the value White.
You usually require several tables to adequately store information for an
organization. To illustrate how information is stored and used, a set of sample
tables is provided for your use. These tables reside in a sample relational database.
For DB2 Server for VM users, who request access to this relational database are
generally granted their own individual online copies. For DB2 Server for VSE
users, if your administrator used the IBM-supplied routine ARINEWUS to set you
up as a new ISQL user, you receive a copy of the sample tables with all privileges
on these tables. Your copy ensures that the table data will remain uncorrupted by
other users, which sometimes occurs when multiple users have access to the same
data.
If you do not have a copy of the sample tables, you can still do the exercises, but
you must use the prefix SQLDBA. with the table names.
This book uses simple examples and samples, but this database manager can
readily be used for complex applications in many environments, including
scientific, technological, and academic.
Introducing ISQL
SQL statements retrieve, add, delete, and update data in tables, and can be either
embedded or interactive. The Embedded SQL statements are coded within an
application program, and do not begin until the program is being run. SQL
statements that are issued interactively, by comparison, create an immediate
program or system response for each statement the user issues at a display
terminal. This is interactive processing, and it is the focus of this manual.
You can issue statements or commands from a display terminal through the
interactive SQL (ISQL) facility. Using the following ISQL commands, you can work
with the database manager from a display terminal to:
v Control the Display of Data
You can control the display of data that results from a query in several ways.
For example, you can scroll through the results of a query that has more rows
than can fit on one display, or look at results that are too wide for the display.
v Print Reports
You can create reports that are based on data in tables. You can also modify
these reports to fit your needs with titles, page numbers, dates and totals.
v Enter Data
You can enter one or more rows of data into an existing table with the ISQL
INPUT command.
v Obtain Online HELP Information from a Display Terminal
If online HELP information was loaded during installation, you can obtain
reference information on your display for ISQL topics. The topics available
include reference information about SQL statements, ISQL commands, and
messages.
Online HELP information may also have been installed on your system in other
national languages. If you want HELP information in one of these languages,
you can specify the language for online HELP by using the SET LANGUAGE
command.
v Store SQL Statements for Repetitive Use
2
Interactive SQL Guide and Reference
You can store SQL statements that are used frequently. A name is assigned to
each stored statement to identify it for future use.
v List Operating Characteristics
You can inquire about operating characteristics that are set using the ISQL SET
command. For example, you can see the character that is displayed in null fields.
v Use Routines
You can store routines, which consist of a series of ISQL commands, SQL
statements, or both, and run them at a later time. A routine is especially useful
for a frequently used sequence of commands and statements. Routines are
discussed in detail in “Chapter 7. Creating and Using Routines” on page 73.
v Switch between Application Servers
With the CONNECT statement, you can access other application servers. You
can access any application servers that have implemented the DRDA protocol.
For more information about the CONNECT statement, see the DB2 Server for
VSE & VM SQL Reference manual.
Introducing the ISQL Display Terminal
ISQL can be run on a variety of display terminals, including the larger display
sizes offered by some models of the IBM 3278 and 3279 (or equivalent) display
devices. ISQL also supports 5550 terminals with double-byte character sets.
The amount of data displayed varies according to the dimensions of the display
terminal being used. Examples in this book are usually a 24-line by 80-character
display.
DB2 Server for VSE
Note: The 62 x 160 display requires a CICS/VSE terminal. In an SNA
environment, it requires CICS 1.6 ACF/VTAM® Release 1 or later or
TCAM Version 2 Release 3 or later.
Using the Program Function Keys
Most keyboards have a group of special keys called program function (or just PF)
keys. You use them for quick entry of common ISQL commands. Use of the keys is
explained as you proceed through this manual. A summary of the PF keys is in
“Appendix C. Summary of ISQL PF Keys” on page 183.
If your PF keys do not match those described in the summary, you can change
their functions and tailor them to your needs. Consult the appropriate person in
your organization to determine the customized key setting.
Defining the ISQL Session
An ISQL session is signing on, starting ISQL, performing a task (or tasks), and
then stopping ISQL.
Before using ISQL from a display terminal, consult the appropriate person in your
organization to obtain the following:
Chapter 1. Getting Started
3
DB2 Server for VSE
v A user ID. This is a unique user identification that identifies you to the
database manager. The user ID and password are optional. If you do not
want to type a user ID or password, press ENTER, and the default user ID
and password are used. This lets you perform certain activities as defined
by your site.
v A password. This identification is yours exclusively, and should be kept
secret. The user ID and password are optional. If you do not want to type a
user ID or password, press ENTER, and the default user ID and password
are used. This lets you perform certain activities as defined by your site.
v Access to the sample tables. A description of how your database
administrator (DBA) can provide these tables for you is in the DB2 Server
for VSE & VM Database Administration manual. The tables must be created
as described in the DB2 Server for VSE & VM Database Administration
manual to ensure that the examples and exercises produce the results
described in this manual.
DB2 Server for VM
v Access to ISQL. You must have a user ID (to identify you to the VM
system) and a password. You must also have authorization to connect with
the database manager. This authorization is generally granted by someone
with database administrator (DBA) authority.
v Access to the sample tables. A description of how your DBA can provide
these tables for you is in the DB2 Server for VSE & VM Database
Administration manual. The tables must be created as described in the DB2
Server for VSE & VM Database Administration manual to ensure that the
examples and exercises produce the results described in this manual.
Note: Your site may have a different signon procedure than that shown on the
following pages. Consult the appropriate person in your organization for the
correct procedure.
To access ISQL in the VM system environment, you must do the following:
1. Log on the VM system.
2. Start IPL to load the Conversational Monitor System (CMS).
3. Start ISQL.
Each of the activities is described later in this chapter.
Using DBCS for DB2 Server for VM
Some languages, such as Japanese and Korean, require double-byte character sets.
If you want to input or see double-byte character sets (DBCS) during your ISQL
session, you must enter the following CMS command before starting ISQL:
SET FULLSCREEN ON
The SET FULLSCREEN ON command lets you input DBCS characters in CMS
command mode, and allows input and display of DBCS characters in ISQL
command and display mode.
If you are not going to work with DBCS, you do not need this command.
4
Interactive SQL Guide and Reference
Before Starting ISQL
DB2
Server for VSE
The online resource adapter (ORA) must be enabled before you can start ISQL.
ISQL accesses the application server to which the ORA is connected. The ORA
connects multiple application servers at a time. You specify the application servers
by the DBNAME parameter of the CIRB transaction.
After the online resource adapter is started, you can use the CIRA transaction to
add connections to other DB2 Server for VSE & VM application servers. CIRA can
be entered multiple times with different server_names to establish connections to the
specified application server. With one CIRA command, you can also establish a list
of server_names. The system operator or database administrator (DBA) usually
performs these tasks.
While in ISQL you can enter a null CONNECT statement to display the connected
user ID and application server names.
DB2
Server for VM
Before you can start ISQL, the following steps must be completed for you:
v The DB2 Server for VM disks must be linked.
v The application server must be started.
v The SQLINIT EXEC must be run.
The first two tasks are usually performed by the system operator or the database
administrator (DBA), and the SQLINIT EXEC is usually automatically run when
you log on your user ID.
The SQLINIT EXEC establishes the required links and defines the name of the
application server. If the SQLINIT EXEC is not automatically run for you, run the
EXEC before you start ISQL. You must know the name of the application server. If
you do not know the name of the application server, speak to your DBA. In the
following example, to run the SQLINIT EXEC establishing a link to the
SAMPLEDB server, type the following and press ENTER:
sqlinit dbname(sampledb)
If you want to use the SQLINIT EXEC, refer to the DB2 Server for VSE & VM
Database Administration manual.
Starting ISQL for DB2 Server for VSE
ISQL runs as a CICS/VSE transaction. A CICS user invokes this transaction just
like any other CICS transaction.
After CICS has been activated and the DB2 Server for VSE & VM online support
has been started, the CICS user starts ISQL by entering the following four-character
CICS transaction identifier from a CICS terminal, and pressing ENTER:
isql
ISQL responds with a display like the one shown in Figure 4 on page 6.
The screen displays the default application server to which the ORA is connected.
Chapter 1. Getting Started
5
The target application server can be changed by entering the target database
information as in the following example:
Enter User ID, Password and Target Database, then press Enter
User ID ==========> ________
Password =========> ________
Target Database ==> SQLDB1_TOR_INV
This is also the application server to which ISQL will be connected to subsequently.
At this point, because ISQL is not connected to the application server to which the
ORA is connected, you can end the ORA and restart to another database. If you
log on to ISQL again, the signon screen is redisplayed showing the target
application server to which the ORA is now connected.
When not connected to a target application server, the ISQL system displays the
line Online Support is not ready. Please exit ISQL. The online resource adapter
(ORA) must be enabled before you can start ISQL. For additional information on
enabling the ORA, and other requirements before you can start ISQL, refer to
“Before Starting ISQL” on page 5 and the DB2 Server for VSE System Administration
and DB2 Server for VM System Administration manuals.
Welcome to the interactive SQL facility of DB2 for VSE
IIIIIIII SSSSSSSS QQQQQQQQQ LL
II
SS
QQ
QQ LL
II
SSSSSSSS
QQ
QQ LL
II
SS QQ QQ QQ LL
IIIIIIII SSSSSSSS QQQQQQQQQ LLLLLLLL
QQ
Default Target Database is SQLDS
Enter User ID, Password and Target Database, then press Enter
User ID ==========>
Password =========>
Target Database ==>
To exit now, enter EXIT in user ID field with no password, press Enter.
To exit later, use the EXIT command. Use the HELP command for help.
Figure 4. Initial ISQL Screen
Alternative Methods for Starting ISQL
If you decide to press ENTER instead of specifying your user ID and password
when the signon display is displayed, then you must use the explicit database
manager CONNECT statement as follows:
CONNECT authorization_name IDENTIFIED BY password TO server_name
An exception to using the CONNECT statement in the above situation is if your
installation has defined a default authorization_name for you, in which case, you do
not have to specify your authorization_name, password, nor server_name.
6
Interactive SQL Guide and Reference
If the TO parameter is not specified, then the connection to the previously
connected server will be maintained.
An alternate method for invoking ISQL without having to use the ISQL signon
display is described in “Appendix E. Suppressing the ISQL Sign-On Display for
DB2 Server for VSE” on page 187.
You may run an ISQL routine as part of the ISQL signon procedure. Refer to
“Using the ISQL Transaction Identifier (DB2 Server for VSE)” on page 74 and
“Appendix E. Suppressing the ISQL Sign-On Display for DB2 Server for VSE” on
page 187.
Signing On by Using the Signon Display
Signon is accomplished by:
1. Entering your user ID at the location identified by the cursor (two positions to
the right of User ID ==>). There must be one, and only one, blank between the
> and your user ID.
2. Positioning the cursor two positions to the right of Password ==> and typing
your DB2 Server for VSE & VM password. There must be one, and only one,
blank between the > and your password. (You can use the tab key to position
the cursor to the correct position. Tab is the key with the arrow pointing to a
vertical line on the right side of the key.)
The area to the right of Password ==> is a dark field; characters typed in this
area remain invisible.
3. Entering the target application server identified by the cursor (two positions to
the right of Target Database ==>). There must be one, and only one, blank
between the > and the target application server.
4. Pressing ENTER.
Note: On some occasions, your display may lock up and you are unable to type
data. If this happens, simply press RESET, ensure that the cursor is in the
correct position, and retype the information.
When ISQL recognizes your signon name and password, it responds with the
display shown in Figure 5 on page 8.
Chapter 1. Getting Started
7
ARI7399I The ISQL default profile values are in effect.
ARI7079I ISQL initialization complete.
ARI7080A Please enter an ISQL or SQL command.
_
Enter a command
Figure 5. Initial ISQL Display
Leaving ISQL from the Signon Display
You can exit ISQL from the signon display by typing EXIT in the user ID field,
leaving the password field blank, and pressing ENTER. If you enter EXIT in the
user ID field, but also enter a password, ISQL will treat it as a user ID and
continue processing.
If you enter EXIT to end ISQL, message ARI7601I is displayed as follows:
ARI7601I ISQL ended normally by your request.
Starting ISQL for DB2 Server for VM
Now type ISQL (or the name of your EXEC for ISQL) as follows:
isql
Press ENTER.
ISQL responds with a display similar to the one shown in Figure 6.
Ready; T=0.01/0.03 13:41:49
isql
ARI0659I Line-edit symbols reset:
LINEND=# LINEDEL=OFF CHARDEL=OFF
ESCAPE=OFF TABCHAR=OFF
ARI0662I EMSG function value reset to ON.
ARI0320I The default server name is SAMPLEDB.
ARI7716I User SQLUSER1 connected to server SAMPLEDB.
ARI7399I The ISQL default profile values are in effect.
ARI7079I ISQL initialization complete.
ARI7080A Please enter an ISQL command or an SQL statement
Figure 6. Initial ISQL Display
8
Interactive SQL Guide and Reference
Controlling the Display
If your system default is not set for the full-screen environment, you can set it by
typing SET FULLSCREEN ON on a CMS command line. Full-screen CMS uses
several preset PF keys and displays the current PF key settings in the bottom
portion of the display. Before you start ISQL, the PF settings reflect those for the
CMS environment. For example, keying PF12 lets you type a command on the
command line. After you start ISQL, the PF key settings displayed change to the
ISQL settings, and the display is similar to the one shown in Figure 7.
Fullscreen CMS
Columns 1 - 79 of 81
Ready; T=0.01/0.03 13:41:49
isql
ARI0659I Line-edit symbols reset:
LINEND=# LINEDEL=OFF CHARDEL=OFF
ESCAPE=OFF TABCHAR=OFF
ARI0662I EMSG function value reset to ON.
ARI0320I The default server name is SAMPLEDB.
ARI7716I User SQLUSER1 connected to server SAMPLEDB.
ARI7399I The ISQL default profile values are in effect.
ARI7079I ISQL initialization complete.
ARI7080A Please enter an ISQL command or an SQL statement
PF1=HELP
2=START
3=
4=
5=RECALL
6=
PF7=
8=
9=HOLD
10=
11=
12=RETRIEVE
Figure 7. Initial ISQL Display with Full-Screen CMS
All commands you type appear in the input area near the bottom of the display.
All data returned by ISQL appears on a different display; when you exit from such
a display, a display similar to the one shown in Figure 7 is returned.
If you want to temporarily suspend the full-screen option, see the VM/ESA: CMS
Command Reference manual, for information on the SET FULLSCREEN command.
Interpreting DB2 Server for VSE & VM Messages
The system displays messages about certain operating conditions for your terminal
session. (See Figure 6 on page 8 for examples of the system messages.) You can
receive messages in the language you want, depending on your site. The text of
the messages that you receive may be slightly different from those shown here.
Messages have two parts. The first part is the message number, which remains the
same regardless of the language setting. An example of a message number is
ARI0503E. It starts with the letters ARI, which identify it as a DB2 Server for VSE &
VM message. Then it contains a four-digit number to identify the message. Finally,
it ends with one of the following letters that indicates the message type:
I
An informational message is displayed.
W
A system wait message is displayed.
E
An error has occurred and may require some action on your part.
A
An action on your part is required.
Chapter 1. Getting Started
9
D Your decision and reply is required.
The second part is the text of the message; for example, An SQL error has
occurred. ISQL uses the same language for messages as your CMS language
setting. For more information, see “SET” on page 149. In most situations, the text is
self-explanatory. If it is not, you can use the message number with the HELP
command. (For information about using the HELP command to display the
message description, refer to “Chapter 10. ISQL Commands” on page 105.) You can
also use the message number to look up the message description in the DB2 Server
for VSE Messages and Codes and DB2 Server for VM Messages and Codes manuals.
Messages ARI0503E, ARI0505I, and ARI0504I are usually encountered when an error
is detected while the system is processing an SQL statement. Message ARI0504I is
an informational message that provides data useful to those who are responsible
for locating problems within the system. You can usually ignore this message, but
there may be occasions when you are prompted to record its contents.
Message ARI0504I always follows message ARI0505I. Message ARI0503E indicates
that the SQL statement being processed was unsuccessful. Message ARI0505I
follows ARI0503E and provides a 3-digit number called an SQLCODE in its
message text. For example, assume you receive the following messages:
ARI0503E An SQL error has occurred.
SQL command begins properly but is incomplete.
ARI0505I SQLCODE = -106
SQLSTATE = 37501
ROWCOUNT = 0
ARI0504I SQLERRP: ARIXPA1 SQLERRD1: -150 SQLERRD2: 0
The SQLCODE provided in message ARI0505I is -106. Text for this SQLCODE
begins on the second line of message ARI0503E and describes the cause of the error.
If you want further explanation of the error, use the SQLCODE (in this example,
-106) to view the online help information or to look up the explanation in the DB2
Server for VSE Messages and Codes and DB2 Server for VM Messages and Codes
manuals.
The SQLSTATE information provides a code for error conditions that are common
across relational database products. For more information about SQLSTATE, refer
to the DB2 Server for VSE Messages and Codes and DB2 Server for VM Messages and
Codes manuals.
The ROWCOUNT information is useful only for certain commands and is
explained in the command descriptions. You can ignore the information in message
ARI0504I, unless you are prompted to record it.
Entering Commands
DB2 Server for VSE
Figure 8 on page 11 shows a diagram of how ISQL divides your display.
10
Interactive SQL Guide and Reference
OUTPUT AREA
-------------------------------------------------------------------------------
INPUT AREA
-------------------------------------------------------------------------------
STATUS AREA
Figure 8. DB2 Server for VSE & VM Display Format
The bottom line is the status area. Here, ISQL provides brief messages which
indicate its current status during your terminal session. For example, whenever
Enter a command appears, you know ISQL is ready to receive another command.
Note: For the remainder of this chapter, the general term command indicates ISQL
commands, SQL statements and data.
You type commands in the input area, which is just above the status area. The
input area consists of a single line and begins at the second-character position of
the line. You do not have to move the cursor to this location; it is placed there by
the database manager.
Although the --> cursor-movement key can be used to leave a blank space in the
input line, it does not provide a blank character as does the space bar. Use the
space bar to insert a blank character; use the cursor key to move the cursor.
The input area is also used by ISQL to provide the following message:
ARI7044I Command in progress. Terminal is now free.
This message, displayed when you have typed a command that is taking longer to
execute than a preset amount of time, is meant for users involved with more than
one CICS transaction. This message is only displayed if the ISQL user is connected
to a local application server. ISQL is one of several CICS transactions available at
your terminal. If you are not involved with multiple CICS transactions, ignore the
message and wait for the command to complete. If you are involved with multiple
CICS transactions and want to issue another CICS transaction while waiting for the
command to be completed, this message indicates the terminal is free to do so. To
enter another CICS transaction in response to this message, press CLEAR and type
the desired CICS transaction identifier code. The transaction must not be
pseudoconversational. For more information, see the DB2 Server for VSE System
Administration and DB2 Server for VM System Administration manuals.
Chapter 1. Getting Started
11
The output area displays information typed in the input area. It is also used to
display any database manager responses to your input. Specific uses of the output
area are discussed where appropriate in the manual.
DB2 Server for VM
A diagram of the way ISQL divides your display is shown in Figure 9.
The last 21 characters of the bottom line are the status area. Here, the current VM
OUTPUT AREA
--------------------------------------------------------------------------------
INPUT AREA
--------------------------
| STATUS AREA
Figure 9. DB2 Server for VSE & VM Display Format
system status is displayed during your terminal session. For example, when the VM
READ message appears, you know that the system is ready to receive another
command from you.
You type commands and data in the input area, which includes all of the line
above the status area and the part of the next line that is to the left of the status
area. The input area begins at the second character position of the display. You do
not have to move the cursor to this location; it is placed there by the ISQL system.
The key marked --> only moves the cursor. This key does not insert blank
characters into an input line. To insert a blank character, you must use the space
bar.
The output area displays your commands and data after they are typed in the
input area. It also displays ISQL status messages and any database manager
responses to your input. Specific uses of the output area are discussed where
appropriate in the manual.
ISQL status messages are displayed as informational or ARI-type messages. They
appear on the last line of the output area.
12
Interactive SQL Guide and Reference
The command line is usable at all times. You can type commands or statements
even while others are being processed. For example, you can type a SELECT
statement and then several FORMAT commands before the query results are
displayed.
VM also permits you to stack commands. Commands are stored in the console
stack; VM will then execute them one at a time.
Entering Commands While Viewing the Results of a Query
You can type any SQL statement or ISQL command while viewing the results of a
query as long as that result does not originate from a query processed in an ISQL
routine. Exceptions to this restriction are display commands, which you can use
while viewing the results of a query being processed in a routine. (Routines are
discussed in “Chapter 7. Creating and Using Routines” on page 73.)
If you do type a command, other than a display command, while viewing the
results of a query being processed in a routine, you receive the following message:
ARI7956E Command failed. This command is not valid
while you view a query result from a routine.
The query result, because it is the result of a routine, is not affected.
If you are viewing a query result that is not from a routine, and you type an ISQL
command or SQL statement that changes the current display, you receive the
following message:
ARI7955I The system ended your query result to process your command.
In this situation, ISQL ends the current query display and processes the new
command or statement.
If you are viewing a query result that is not from a routine, and you type a display
command, the display command is processed.
Understanding ISQL Modes
The two modes in ISQL are wait and display. They provide different displays and,
for particular commands and statements, they react differently. Wait mode is
indicated by the VM READ displayed in the status area (lower right corner) of the
display. In wait mode, you can enter any SQL statement and any ISQL command
other than display commands. Each command or statement that you type is
displayed line by line in the output area. From wait mode, you can query your
application server. A query (a SELECT statement) puts the display into display
mode.
In display mode, no message is displayed in the status area, and the entire output
area displays the results of a query. From display mode, you can type any SQL
statement or any ISQL command including ISQL display commands to move
through the displayed data. You end display mode when you type END, an SQL
statement other than SELECT, an ISQL command other than a display command,
or an incorrect SELECT statement. In all instances wait mode is returned.
Chapter 1. Getting Started
13
Using the Continuation Character
Sometimes your input (commands, statements, or data) is too long to fit on the
single input area line. When this happens, you can continue typing by using the
continuation character, which is usually a hyphen. When the database manager is
installed, the hyphen is the continuation character. The continuation character can
be changed. For more information on the continuation character, see the SET
command description in “Chapter 10. ISQL Commands” on page 105. This
continuation character causes what you type to be redisplayed in the output area
and frees the input area for more typing.
If a line ends in a complete word, leave a space after it, type the hyphen, and press
ENTER. If you have to break a word at the end of a line, just type the hyphen
without a space before it, and press ENTER.
DB2 Server for VSE
The continuation character lets ISQL know that you have not finished with
the command, and it responds with continue command in the status area.
DB2 Server for VM
The continuation character indicates that you are not finished with the
command. The system displays VM READ in the status area. It also displays the
following message in the output area:
ARI7068I Your input is being continued. Type more input or press Enter.
Type the additional input for the command. When you are finished typing, press
ENTER. The entire command cannot exceed 2048 characters and the last line of the
command must not end with a continuation character.
If the output area becomes full, you are prompted to clear it. Press CLEAR to clear
both the input and output areas to allow the command in progress to continue.
Incomplete portions of the command that were in the output area are stored in the
SQL command buffer, but are not displayed. You do not have to repeat them.
Everything in the input area is removed from the display when you press CLEAR.
You can also press PA2 (Field Mark) to clear the output area. This clears only the
output area and leaves anything that you have typed in the input area intact.
Correcting Typing Errors
You can correct a typing error in the input area by backspacing and typing the
correct characters before you press ENTER.
If you press ENTER before you notice the typing error, the command or statement
containing the typing error is displayed in the output area. It is no longer in the
input area. You cannot backspace and retype information already in the output
area.
To correct a mistake in a multiple-line command, type the following ISQL
command at the beginning of the input area and press ENTER.
ignore
14
Interactive SQL Guide and Reference
ISQL responds by telling you that it has ignored all lines previously entered in a
multi-line input.
DB2 Server for VSE
The status area contains Enter a new command. You can then retype the
command correctly.
You can also use the RETRIEVE function to review and correct any typed
information. ISQL saves the typed lines.
DB2 Server for VM
The status area contains VM READ. You can then retype the information
correctly.
You can also use the CMS RETRIEVE function to review and correct typed
information. CMS saves the lines that you have typed.
To use the RETRIEVE function, press PF12 (or PF24).
This function retrieves the last line that you typed and redisplays it in the input
area for review and correction. The cursor is positioned at the end of the displayed
line. You can continue to press PF12 (or PF24) until the command you want to
change is redisplayed in the input area. Then, you can make any necessary
corrections and press ENTER.
Each time you press F12, ISQL retrieves another line and redisplays it in the input
area. After the earlier line is retrieved, command retrieval begins again with the
most recent command typed. ISQL retains a varying number of your commands
depending on their size. The shorter the commands, the more ISQL retains. For
more information on the RETRIEVE function, see “Retrieving and Correcting SQL
Lines” on page 35.
Canceling Running Commands
It may take extended time for your commands, statements, or routines to be
performed. The processing of your query statement, for example, can be delayed if
another user is accessing the same table.
DB2 Server for VM
You can query the status of the command, statement or routine by issuing the
CMS Immediate command, SQLQRY. The SQLQRY command returns
information that can help you to determine the cause of the delay. For more
information on the SQLQRY command, refer to the DB2 Server for VSE & VM
Database Administration manual.
You have the option of canceling in-progress commands (such as the ISQL INPUT
command), long-running SQL commands (in which case message ARI7044I is
issued), or LUWs (where AUTOCOMMIT is off), by issuing a CANCEL command.
You can type this command anytime during the typing of commands, statements,
or data.
Chapter 1. Getting Started
15
To cancel an operation, type:
cancel
DB2 Server for VSE
This command also performs a ROLLBACK operation.
To cancel a long-running command, wait until you receive the message:
ARI7044I Command in progress. Terminal is now free.
Press CLEAR, and type:
isql cancel
DB2 Server for VM
This command also causes a ROLLBACK RELEASE operation to be
performed. The database manager releases your connection to the application
server that you are using. If you previously issued an explicit CONNECT
command to connect to a particular application server, you must reissue
another CONNECT command. If you do not, the next statement or command
you type causes you to be implicitly connected to the default application
server. If you have been implicitly connected to a default application server,
your next statement or command implicitly reconnects you.
When you cancel a routine that is in progress, the routine stops execution
immediately, and you are left in ISQL.
For information on the effects of AUTOCOMMIT on the CANCEL command, see
“Using the AUTOCOMMIT ON Setting” on page 33, or the description of the
CANCEL command in “Chapter 10. ISQL Commands” on page 105.
Obtaining Online HELP Information at a Terminal
The database manager offers online HELP information that provides you with, for
example, information about ISQL commands; this saves you time in looking up the
commands in “Chapter 10. ISQL Commands” on page 105.
Online HELP information is available for:
v Reference information
v SQL statements
v ISQL commands
v Messages, codes and SQLSTATEs.
Online HELP information is not supported on non-DB2 Server for VSE & VM
application servers.
Selecting Online HELP Information
Online HELP information may also have been installed on your system in
languages other than English. If you want to read HELP information in one of
these other languages, you can specify the language for online HELP using the SET
LANGUAGE command, which is discussed in “Language of Messages and HELP
Text” on page 62 and in “Chapter 10. ISQL Commands” on page 105.
16
Interactive SQL Guide and Reference
The database manager online HELP information is stored in a table and displayed
in the same manner as queries. After you have retrieved some information, you
can use display commands to move through it. The online information is broken
up into many topics. Each topic is identified by a name. Most topic names are
either a statement name (such as SELECT or INSERT), a message number (such as
ARI7399I or ARI7307A), a message code (such as -205 or 100), or an SQLSTATE
(such as SQLSTATE 01525). For example, to retrieve the online help information for
the UPDATE statement, type:
help update
To move forward through the UPDATE information, type FORWARD commands
until you have reached the end. See “Results That Have Too Many Rows for One
Display” on page 22 for more information about FORWARD. Type the END
command to end the display.
Some topic names have more than one word. When retrieving these topics, enclose
the topic name in single quotation marks. For example, to retrieve the online help
information for search conditions, type:
help 'search conditions'
To see a list of the topics available, type:
help contents
To obtain a list of topics, and a description of how to use the HELP command,
press PF1 or type:
help
Typing While Viewing Online HELP Information
You can type commands and statements while online HELP information is being
displayed. This is particularly useful when you want to type a statement, and you
know all the necessary column and table name information, but you cannot
remember the correct format for the statement.
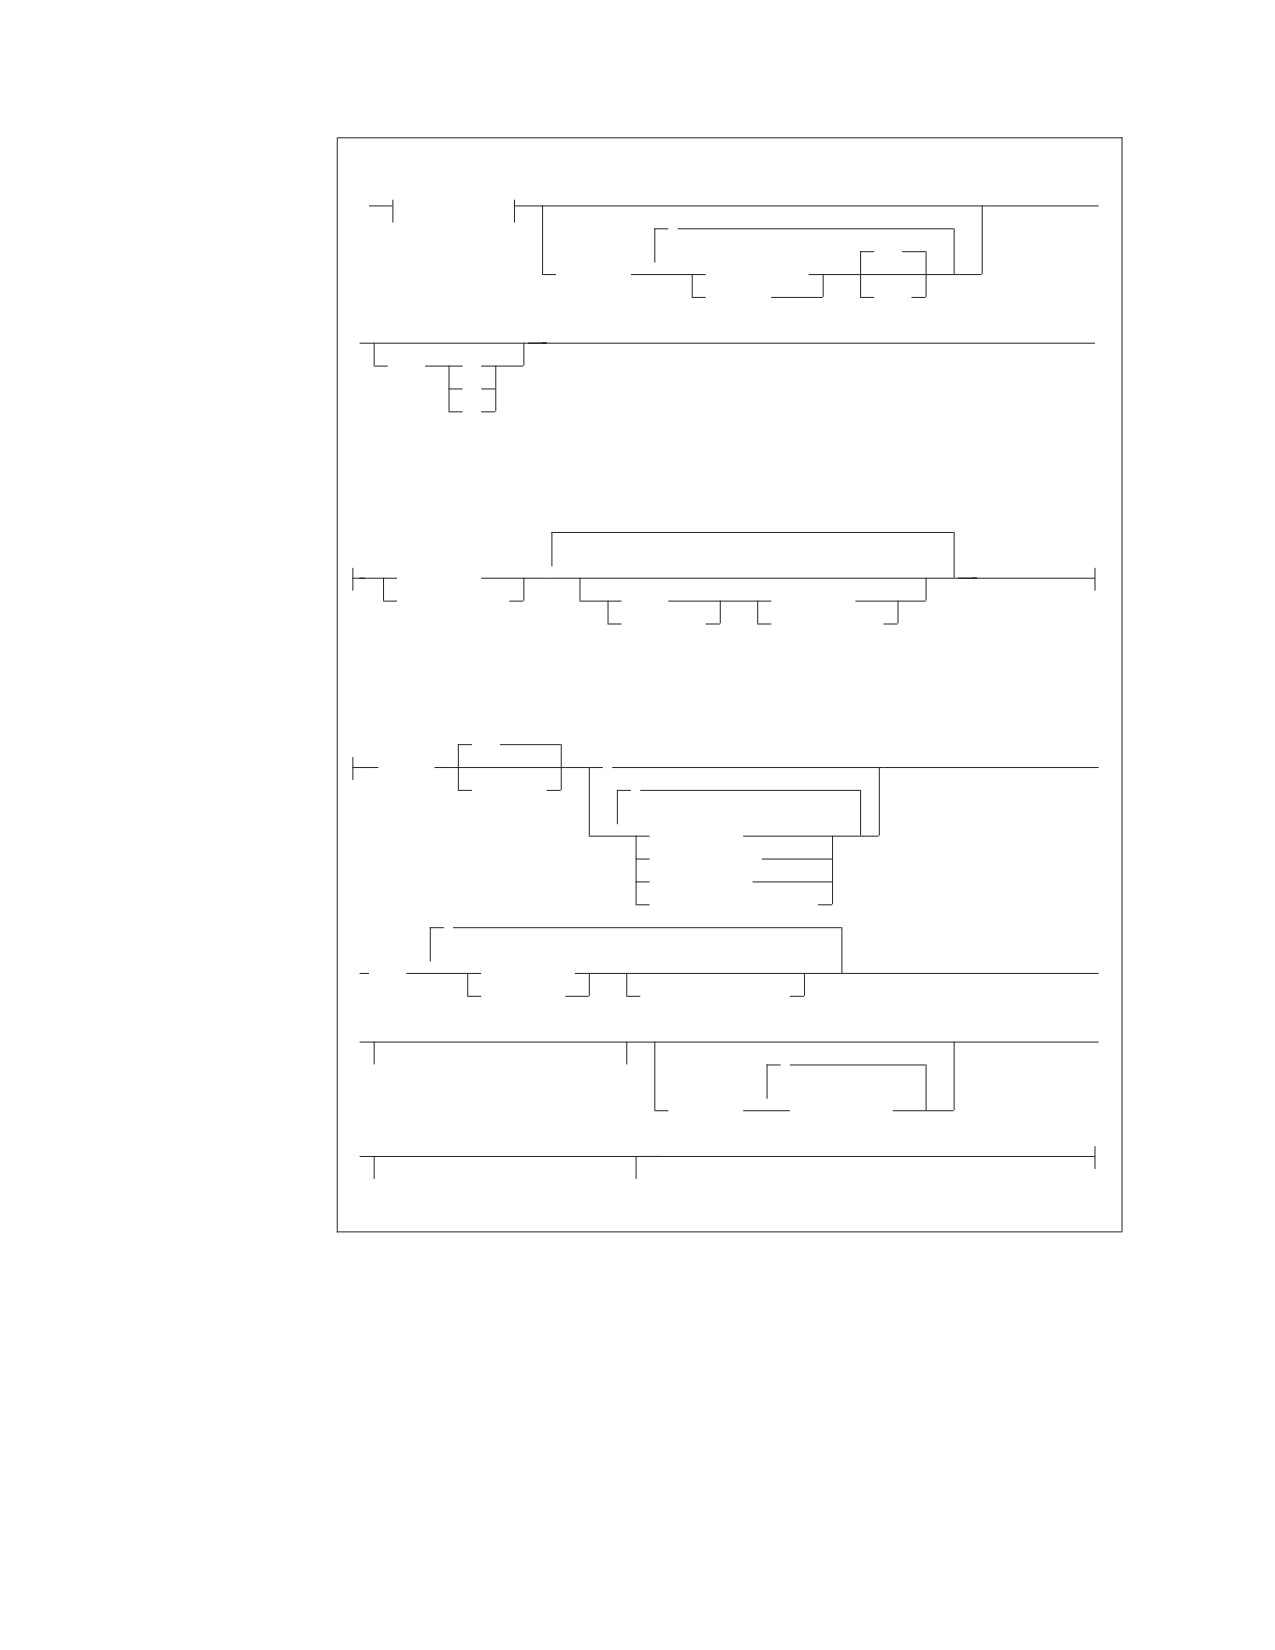
If you want to execute a SELECT statement but cannot remember its format, type:
help select
This displays online HELP information for the SELECT statement similar to the
following:
Chapter 1. Getting Started
17
interactive-select-statement
fullselect
,
ASC
2
ORDER BY
column_name
integer
DESC
WITH
RR
CS
UR
fullselect:
subselect
2
(fullselect)
UNION
subselect
UNION ALL
(fullselect)
subselect:
ALL
SELECT
DISTINCT
,
2
expression
table_name.*
view_name.*
correlation_name.*
,
2
FROM
table_name
view_name
correlation_name
WHERE search_condition
,
2
GROUP BY
column_name
HAVING search_condition
18
Interactive SQL Guide and Reference
PROJNO PRSTAFF
------
-------
IF2000
1.00
OP2012
1.00
OP2013
1.00
OP2011
1.00
PL2100
1.00
AD3112
1.00
MA2111
2.00
IF1000
2.00
AD3113
2.00
AD3111
2.00
* End of Result *** 10 Rows Displayed ***Cost Estimate is 1********************
Figure 10. A Query Result after Using Online HELP Information
Using ISQL on a Non-DB2 Server for VM Application Server (VM Only)
With the implementation of the Distributed Relational Database Architecture™
(DRDA) protocol, you can use ISQL to access data on non-DB2 Server for VM
application servers that support the DRDA protocol and on which ISQL is loaded.
If you plan to use ISQL to access data on a non-DB2 Server for VM application
server, you should check with your System Administrator to see whether your
application requester and the non-DB2 Server for VM application server are set up
for access using the DRDA protocol.
Using ISQL on a Remote Application Server (VSE Only)
With the implementation of the Distributed Relational Database Architecture
(DRDA) protocol, you can use ISQL to access data on remote DRDA application
servers that support the DRDA protocol and on which ISQL is loaded. If you plan
to use ISQL to access data on a remote DRDA application server, you should check
with your System Administrator to see whether your application requester and the
remote DRDA application server are set up for access using the DRDA protocol.
Stopping ISQL
To stop communication with the application server through ISQL, type the
following command in the input area and press ENTER.
exit
This completes your first ISQL session.
Using CHARNAME and DBCS Options in VSE
ISQL queries the following system catalog tables at initialization:
1. SYSTEM.SYSOPTIONS catalog - to retrieve information such as the default
setting for DBCS and CHARNAME. Starting from DB2 Server for VSE Version
6 Release 1, this information is retrieved from the SQLGLOB file. The user
DBCS and CHARNAME SQLGLOB values become the default setting for DBCS
and CHARNAME, if they exist. Otherwise, the global DBCS and CHARNAME
SQLGLOB values become the default setting for DBCS and CHARNAME.
ISQL uses the user CHARNAME to get the folding table to fold input from the
terminal from lowercase to uppercase. However, for CCSID data conversion,
ISQL uses the global CHARNAME.
Chapter 1. Getting Started
19
2. SYSTEM.SYSCHARSETS catalog - to retrieve the CHARTRANS information
corresponding to the default CHARNAME. Starting from DB2 Server for VSE
Version 6 Release 1, this information is retrieved from the ARISSCRD phase file,
if it exists. If not, the system defaults are supplied.
20
Interactive SQL Guide and Reference
Chapter 2. Querying Tables
Querying table data is the most common activity performed by the database
manager.
The topics that follow describe query techniques. Before continuing, check with the
persons responsible for the system in your organization to ensure the sample tables
are stored in the system for your use. If they are, you can use them to practice
commands and statements as you learn them. Having access to the sample tables is
not absolutely necessary, but being able to work with them from your display
terminal is of considerable help as you learn to use the system.
Selecting Columns
Use the interactive SELECT statement to query data in a table. With this statement,
|
you select columns from a table. See the DB2 Server for VSE & VM SQL Reference
|
manual for details on how to use SELECT statements.
Note: ISQL recognizes (by default) uppercase and lowercase letters as identical in
commands. Also by default, all character data in a table is stored as
uppercase. Your query on the row containing the word James, for example,
selects the row containing JAMES in uppercase, even if you typed james in
lowercase in your query. These case defaults can be changed using the SET
CASE command, which is discussed in detail in “Chapter 10. ISQL
Commands” on page 105.
The displayed length attribute of VARCHAR columns is determined by the default
VARCHAR length set in your profile. The system default length for VARCHAR
columns is 20 characters. Only the first 20 characters are displayed. You can change
the default length by using the SET command. Because the default length for
VARCHAR columns can be different, you may see more or fewer characters on
your display of VARCHAR columns than are shown in this manual.
You may have seen the following message on your display just before the query
result:
ARI7960I The query cost estimate for this SELECT statement is 1.
The cost estimate value for this SELECT statement is also displayed in the last row
of output at the end of the query result.
This information is useful for estimating the time needed to obtain query results.
Larger cost-estimate values suggest that processing takes longer. The information is
provided before the query result is displayed so that you can cancel the request if
you think it will take too much time. The information is also provided after the
query result is displayed, because the query result may have been displayed before
you read message ARI7960I, or the message may have been suppressed. For
additional information on the SET COSTEST command refer to “Chapter 10. ISQL
Commands” on page 105.
The cost estimate value is not a unit of time such as seconds. The value becomes
more useful as you enter more SELECT statements and become acquainted with
the processing times for the cost estimate values.
1987, 2000
21
|
Using Query Results
|
When you have the query result on your display, you can look at it, and perhaps
|
print it. You can manipulate query results shown on your display by using ISQL
|
display commands. The following sections show how to look at the entire query
|
results when it does not all fit on your display, and how to direct the query result
|
to a printer.
|
Displaying Query Results
|
When your query results are larger than a single display, you must know the
|
display commands with which you can view different portions of the query result.
|
The following examples show how to use the other display commands to query
|
longer and wider tables.
|
Type the following query and press ENTER:
|
select * -
|
from proj_act -
|
where projno <> 'AD3111' -
|
order by actno,acendate
|
This query selects all the rows that contain project numbers other than AD3111 in
|
the column named PROJNO from the PROJ_ACT table. It produces a result similar
|
to the display in Figure 11.
|
PROJNO ACTNO ACSTAFF ACSTDATE
ACENDATE
------
------
-------
----------
----------
AD3100
10
0.50
1982-01-01
1982-07-01
MA2100
10
0.50
1982-01-01
1982-11-01
IF2000
10
0.50
1982-01-01
1983-01-01
IF1000
10
0.50
1982-06-01
1983-01-01
IF1000
10
0.50
1982-01-01
1983-01-01
AD3110
10
1.00
1982-01-01
1983-01-01
OP1000
10
0.25
1982-01-01
1983-02-01
OP1010
10
1.00
1982-01-01
1983-02-01
OP2010
10
1.00
1982-01-01
1983-02-01
MA2110
10
1.00
1982-01-01
1983-02-01
MA2100
20
1.00
1982-01-01
1982-03-01
PL2100
30
1.00
1982-02-01
1982-09-01
PL2100
30
1.00
1982-01-01
1982-09-15
MA2111
40
1.00
1982-01-01
1983-02-01
MA2111
50
1.00
1982-01-01
1982-06-01
OP2000
50
0.75
1982-01-01
1983-02-01
AD3112
60
0.75
1982-01-01
1982-03-15
AD3112
60
0.50
1982-02-01
1982-03-15
MA2112
60
2.00
1982-01-01
1982-07-01
AD3113
60
1.00
1982-04-01
1982-09-01
MA2113
60
1.00
1982-02-15
1982-09-01
AD3113
60
0.75
1982-03-01
1982-10-15
Figure 11. Example of a Long Query Result
|
This query result is used in the following topics. Do not end it yet.
|
Results That Have Too Many Rows for One Display
|
The query results that you are retrieving are longer than can be shown on one
|
display. To see the remaining portions of the query result, you must know how to
|
scroll forward through it. Usually, the command to scroll forward 20 rows is
|
FORWARD 20.
22
Interactive SQL Guide and Reference
|
Instead of entering FORWARD 20, take advantage of the special function of the
|
ENTER key on query results. While viewing a query result, pressing ENTER
|
without having a command in the input area repeats the previous display
|
command. If there was no previous display command entered, the length of the
|
display is scrolled forward. If the previous command is BACKWARD MAX and
|
the display starts from the beginning of the table, press ENTER to scroll forward
|
the length of the display.
|
Press ENTER. On a 24 X 80 terminal you see a result similar to the display in
|
Figure 12.
|
PROJNO ACTNO ACSTAFF ACSTDATE
ACENDATE
------
------
-------
----------
----------
AD3112
70
0.50
1982-02-01
1982-03-15
AD3113
70
0.50
1982-06-15
1982-07-01
AD3112
70
1.00
1982-03-15
1982-08-15
MA2112
70
1.00
1982-02-01
1982-10-01
AD3112
70
0.75
1982-01-01
1982-10-15
AD3112
70
0.25
1982-08-15
1982-10-15
AD3113
70
0.75
1982-09-01
1982-10-15
AD3113
70
1.25
1982-06-01
1982-12-15
MA2112
70
1.50
1982-02-15
1983-02-01
AD3113
70
1.00
1982-07-01
1983-02-01
AD3113
70
1.00
1982-10-15
1983-02-01
MA2112
70
1.00
1982-06-01
1983-02-01
MA2113
70
2.00
1982-04-01
1983-12-15
AD3113
80
1.75
1982-01-01
1982-04-15
AD3113
80
0.50
1982-03-01
1982-04-15
AD3112
80
0.50
1982-10-15
1982-12-01
AD3112
80
0.35
1982-08-15
1982-12-01
MA2113
80
0.50
1982-10-01
1983-02-01
MA2113
80
1.50
1982-09-01
1983-02-01
MA2113
80
1.00
1982-01-01
1983-02-01
MA2112
80
1.00
1982-10-01
1983-10-01
IF1000
90
0.50
1982-10-01
1983-01-01
Figure 12. Display 20 Rows Forward by Pressing ENTER
|
To scroll through the query result a half display at a time, you can either enter
|
FORWARD or press PF8.
|
Press PF8.
|
The rows on the display scroll half the display. The middle row of the previous
|
display is now the first row of the new display.
|
Now, to move forward to the remaining rows, enter:
|
forward max
|
This results in a display similar to Figure 13 on page 24.
|
Chapter 2. Querying Tables
23
PROJNO ACTNO ACSTAFF ACSTDATE
ACENDATE
------
------
-------
----------
----------
IF1000
90
0.50
1982-10-01
1983-01-01
IF1000
90
1.00
1982-01-01
1983-01-01
IF2000
100
0.50
1982-03-01
1982-07-01
IF2000
100
0.75
1982-01-01
1982-07-01
IF1000
100
0.50
1982-10-01
1983-01-01
IF2000
110
0.50
1982-03-01
1982-07-01
IF2000
110
0.50
1982-10-01
1983-01-01
OP1010
130
4.00
1982-01-01
1983-02-01
OP2012
140
0.25
1982-01-01
1983-02-01
OP2011
140
0.75
1982-01-01
1983-02-01
OP2013
140
0.50
1982-01-01
1983-02-01
OP2011
150
0.25
1982-01-01
1983-02-01
OP2012
160
0.75
1982-01-01
1983-02-01
OP2013
170
0.50
1982-01-01
1983-02-01
AD3113
180
1.00
1982-04-15
1982-06-01
AD3113
180
0.50
1982-06-01
1982-07-01
AD3113
180
0.75
1982-03-01
1982-07-01
AD3112
180
0.50
1982-08-15
1983-01-01
MA2113
180
0.50
1982-10-01
1983-01-01
MA2112
180
1.00
1982-07-01
1983-02-01
MA2112
180
1.00
1982-07-15
1983-02-01
* End of Result *** 70 Rows Displayed ***Cost Estimate is 1*******************
Figure 13. Display after Moving to the End of the Query Result
|
To move back through the query result, use a BACKWARD command. Also, you
|
can use PF7 to move your view of the result backward one-half display. Moving
|
back through the query result is limited; you can move back only to a limit of one
|
full display from the last FORWARD command. If you want to go farther back,
|
you must return directly to the beginning of the query result.
|
For example, to view the previous 15 rows, enter:
|
backward 15
|
This command presents the display in Figure 14 on page 25.
|
24
Interactive SQL Guide and Reference