Kia Rio / Rio Hatchback (2022 year). Manual in english - page 18
What to do in an emergency
When using a compact spare tire,
•
Avoid driving over obstacles. The
WARNING - Spare tire
observe the following precautions:
compact spare tire diameter is
Do not operate your vehicle on
•
Under no circumstances should you
smaller than the diameter of a con-
ventional tire and reduces the
this compact spare at speeds
exceed 50 mph (80 km/h); a higher
over
50 mph (80 km/h). The
speed could damage the tire.
ground clearance approximately
1 inch (25 mm), which could result
compact spare tire is for emer-
•
Ensure that you drive slowly enough
gency use only. The original tire
in damage to the vehicle.
for the road conditions to avoid all
should be repaired or replaced
•
Do not take this vehicle through an
hazards. Any road hazard, such as a
as soon as possible to avoid
automatic car wash while the com-
pothole or debris, could seriously
failure of the spare that may
pact spare tire is installed.
damage the compact spare.
possibly lead to bodily injury or
•
Do not use tire chains on the com-
•
Any continuous road use of this tire
death.
pact spare tire. Because of the
could result in tire failure, loss of
smaller size, a tire chain will not fit
vehicle control, and possible per-
properly. This could damage the
sonal injury.
The compact spare should be inflat-
vehicle and result in loss of the
ed to 60 psi (420 kPa).
•
Do not exceed the vehicle’s maxi-
chain.
mum load rating or the load-carry-
•
The compact spare tire should not
ing capacity shown on the sidewall
✽ NOTICE
be installed on the front axle if the
of the compact spare tire.
vehicle must be driven in snow or
Check the inflation pressure after
on ice.
installing the spare tire. Adjust it to
the specified pressure, as necessary.
6
26
What to do in an emergency
•
Do not use the compact spare tire
on any other vehicle because this
tire has been designed especially
for your vehicle.
•
The compact spare tire’s tread life
is shorter than a regular tire.
Inspect your compact spare tire
regularly and replace worn com-
pact spare tires with the same size
and design, mounted on the same
wheel.
•
The compact spare tire should not
be used on any other wheels, nor
should standard tires, snow tires,
wheel covers or trim rings be used
with the compact spare wheel. If
such use is attempted, damage to
these items or other car compo-
nents may occur.
•
Do not use more than one compact
spare tire at a time.
•
Do not tow a trailer while the com-
pact spare tire is installed.
6 27
What to do in an emergency
Jack label
1. Model Name
2. Maximum allowable load
■ Example
• Type A
3. When using the jack, set your
parking brake.
4. When using the jack, stop the
engine.
5. Do not get under a vehicle that is
supported by a jack.
6. The designated locations under
OHYK060006
the frame
• Type B
7. When supporting the vehicle, the
base plate of the jack must be ver-
tical under the lifting point.
8. Move the shift lever to the P posi-
tion on vehicles with Intelligent
Variable Transmission.
9. The jack should be used on firm
OHYK060007
level ground.
• Type C
10. Jack manufacturer
11. Production date
12. Representative company and
address
OHYK064002
❈ The actual Jack label in the vehicle may differ from the illustration.
For more detailed specifications, refer to the label attached to the jack.
6
28
What to do in an emergency
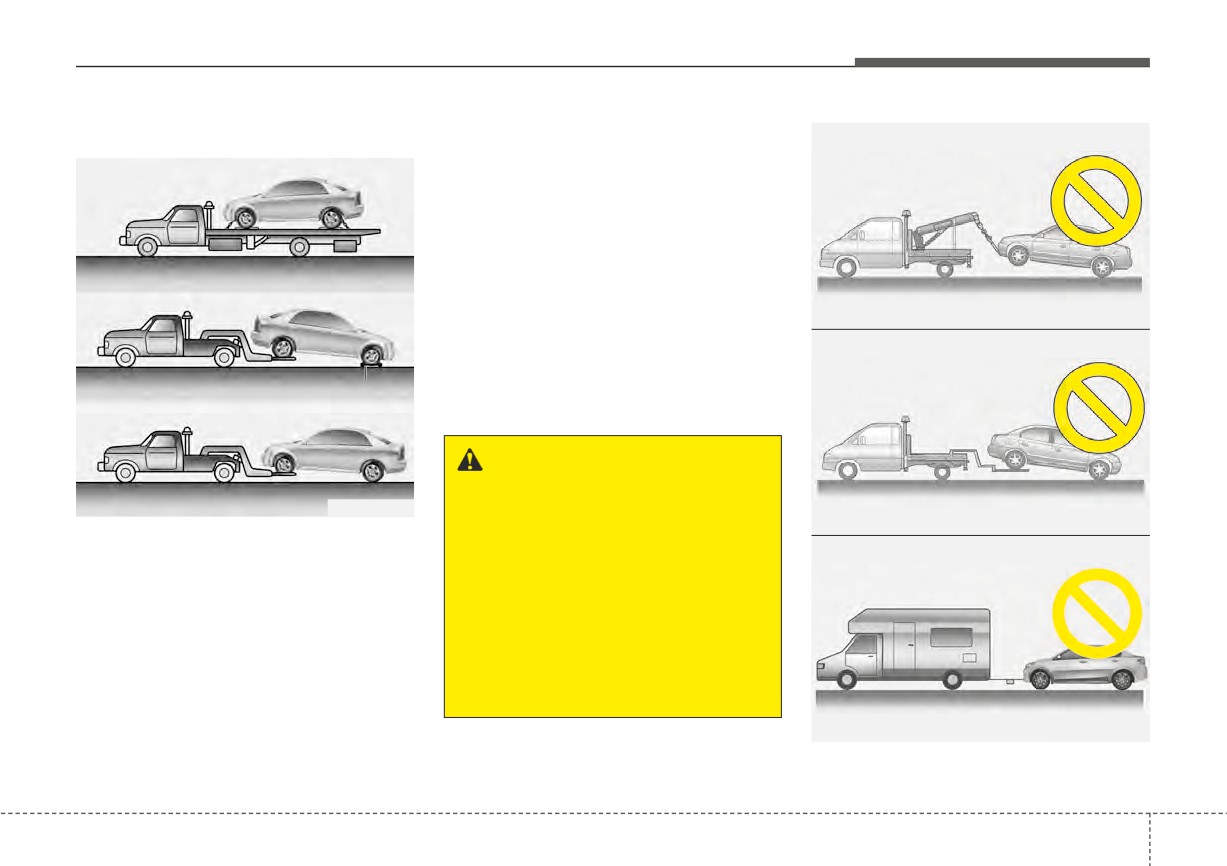
TOWING
Towing service
It is acceptable to tow the vehicle
with the rear wheels on the ground
(without dollies) and the front wheels
off the ground.
If any of the loaded wheels or sus-
pension components are damaged
or the vehicle is being towed with the
front wheels on the ground, use a
towing dolly under the front wheels.
HXD02
When being towed by a commercial
tow truck and wheel dollies are not
dolly
used, the front of the vehicle should
always be lifted, not the rear.
WARNING - Side and cur-
tain air bag
OMC045012
If your vehicle is equipped with
HXD03
side and curtain air bags, set
If emergency towing is necessary,
the ignition switch to the LOCK
we recommend having it done by an
or ACC position when the vehi-
authorized Kia dealer or a commer-
cle is being towed. The side and
cial tow-truck service. Proper lifting
curtain air bag may deploy
and towing procedures are neces-
when the ignition is in the ON
sary to prevent damage to the vehi-
position and the rollover sensor
cle. The use of wheel dollies or
detects a rollover situation.
flatbed is recommended.
OSC071054N
6
29
What to do in an emergency
When towing your vehicle in an
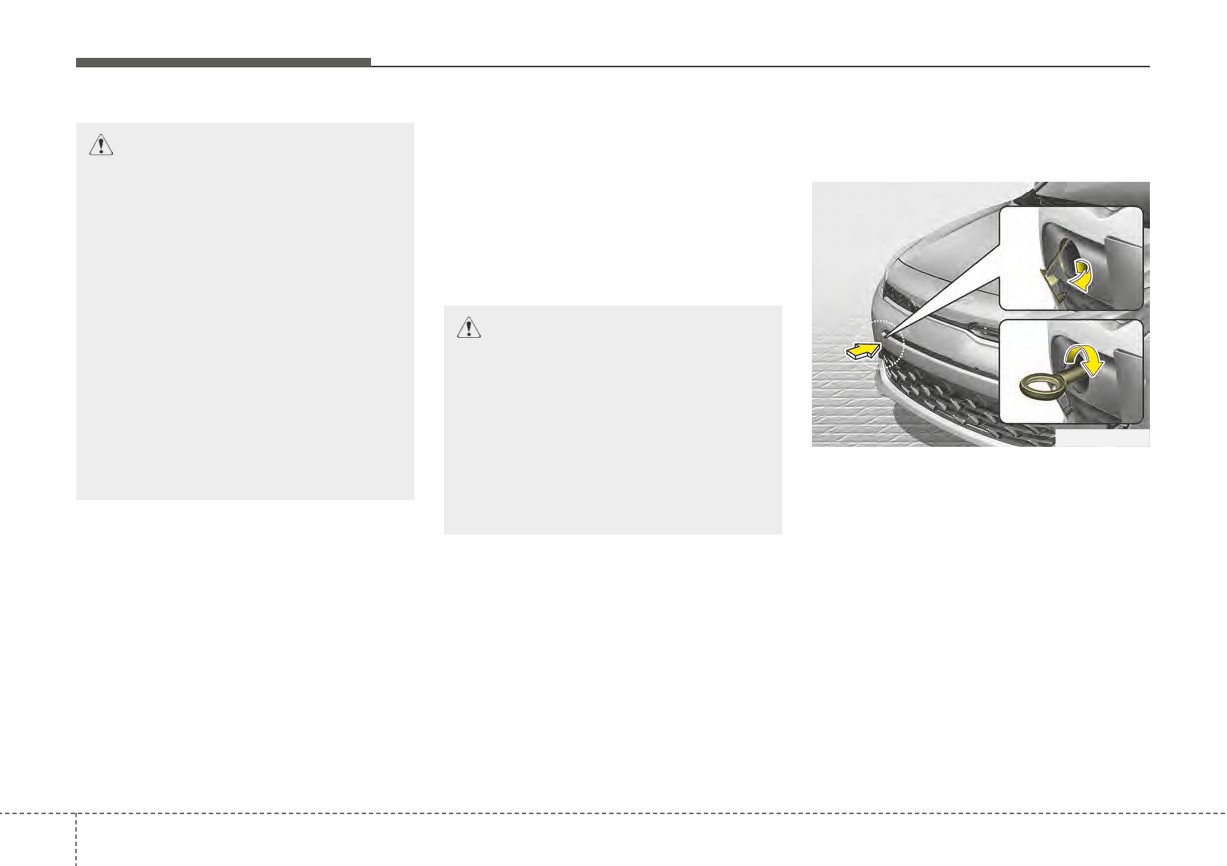
Removable towing hook (front)
CAUTION
- Towing
emergency without wheel dollies :
(if equipped)
•
Do not tow the vehicle back-
1. Set the ignition switch in the ACC
wards with the front wheels on
position.
the ground as this may cause
2. Place the transmission shift lever
damage to the vehicle.
in N (Neutral).
•
Do not tow with sling-type
3. Release the parking brake.
equipment. Use wheel lift or
flatbed equipment.
CAUTION - Towing gear
•
Do not tow the vehicle with 4
position
wheels on the ground (such
as dinghy towing behind a
Always place the transmission
motorhome or other motor
shift lever in N (Neutral) when
vehicle) as this can seriously
towing your vehicle. Failure to
OSC061008N
damage the Intelligent
place the transmission shift
Variable Transmission.
lever in N (Neutral) may cause
1. Remove the towing hook from the
internal damage to the trans-
tool case located in the trunk/lift-
mission.
gate.
2. Remove the hole cover pressing
the lower part of the cover on the
front bumper.
3. Install the towing hook by turning it
clockwise into the hole until it is
fully secured.
4. Remove the towing hook and
install the cover after use.
6
30
What to do in an emergency
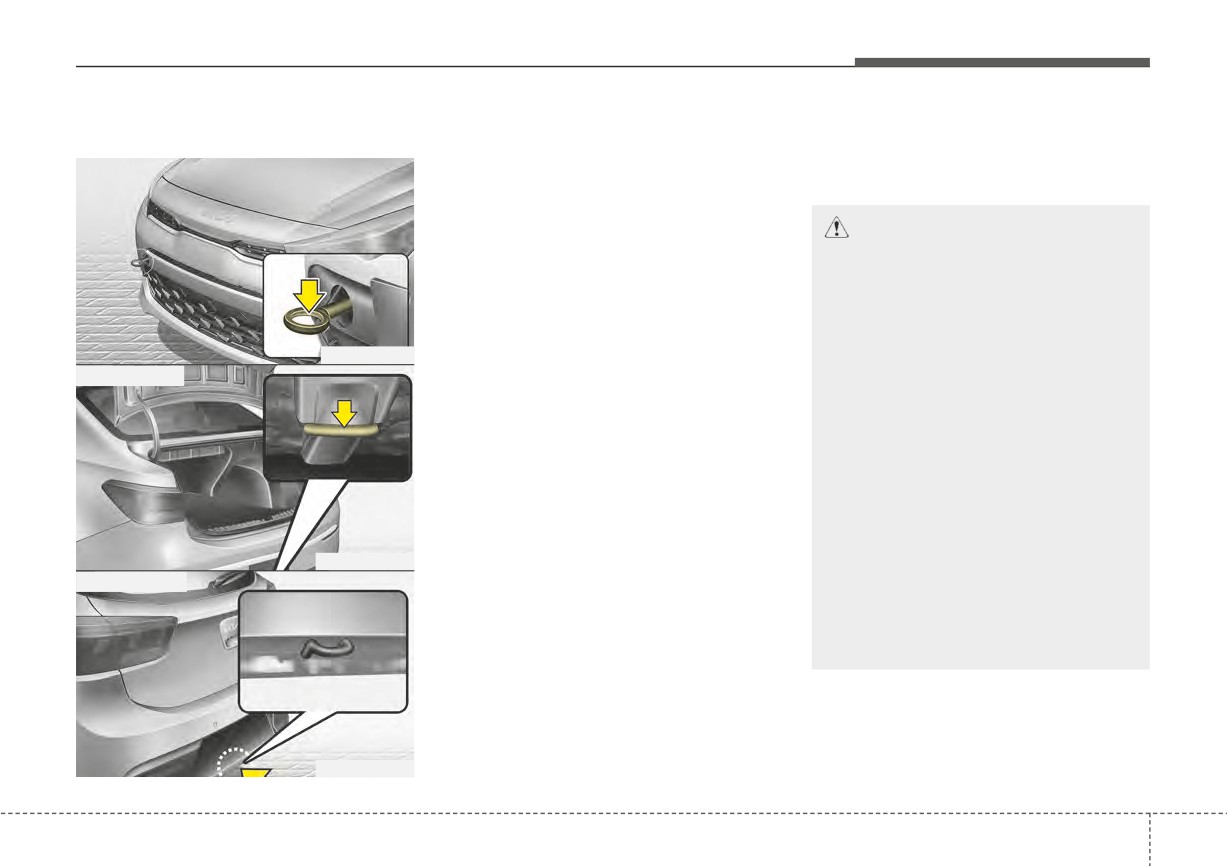
Emergency towing
If towing is necessary, we recom-
• The drivers of both vehicles should
mend you have it done by an
communicate with each other fre-
• Front
authorized Kia dealer or a com-
quently.
mercial tow truck service.
If towing service is not available in an
CAUTION
emergency, your vehicle may be
•
Attach a towing strap to the
temporarily towed using a cable or
towing hook.
chain secured to the emergency tow-
ing hook under the front (or rear) of
•
Using a portion of the vehicle
the vehicle. Use extreme caution
other than the tow hooks for
OSC061009N
when towing the vehicle. A driver
towing may damage the body
• Rear (4 Door)
must be in the vehicle to steer it and
of your vehicle.
operate the brakes.
•
Use only a cable or chain
Towing in this manner may be done
specifically intended for use
only on hard-surfaced roads for a
in towing vehicles. Securely
short distance and at low speeds.
fasten the cable or chain to
Also, the wheels, axles, power train,
the towing hook provided.
steering and brakes must all be in
•
Accelerate or decelerate the
good condition.
vehicle in a slow and gradual
OSC060010N
• Do not use the towing hooks to pull
manner while maintaining ten-
• Rear (5 Door)
a vehicle out of mud, sand or other
sion on the tow rope or chain
conditions from which the vehicle
to start or drive the vehicle,
cannot be driven out under its own
otherwise tow hooks and the
power.
vehicle may be damaged.
• Avoid towing a vehicle heavier than
the vehicle doing the towing.
OSC061051N
6
31
What to do in an emergency
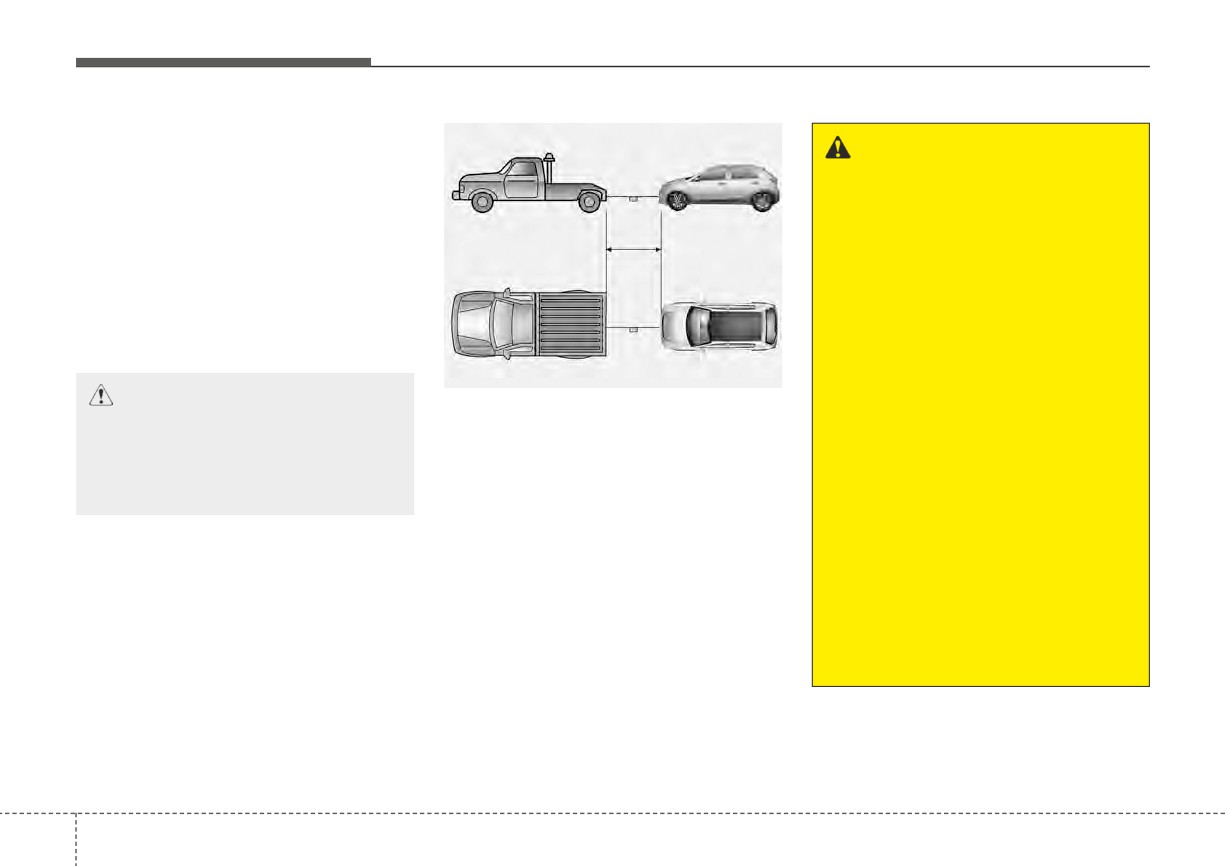
• Before emergency towing, check
whether the hook is broken or
WARNING - Emergency
damaged.
Towing Precautions
• Fasten the towing cable or chain
Use extreme caution when tow-
securely to the hook.
ing the vehicle.
• Do not jerk the hook. Apply it
•
Avoid sudden starts or erratic
steadily with even force.
driving maneuvers which
would place excessive stress
• To avoid damaging the hook, do not
pull from the side or at a vertical
on the emergency towing hook
and towing cable or chain. The
angle. Always pull straight ahead.
hook and towing cable or
OSC061052N
chain may break and cause
CAUTION
•
Use a towing strap less than 16
serious injury or damage.
Using a portion of the vehicle
feet (5 m) long. Attach a white or
•
If the disabled vehicle is
other than the tow hooks for
red cloth (about 12 inches (30 cm)
unable to be moved, do not
towing may damage the body of
wide) in the middle of the strap for
forcibly continue the towing.
your vehicle.
easy visibility.
In this case, contact an
•
Drive carefully so that the towing
authorized Kia dealer or a
strap is not loosened during tow-
commercial tow truck service
ing.
for assistance.
•
The driver must be in the vehicle
•
Tow the vehicle as straight
for steering and braking operations
ahead as possible.
when the vehicle is towed and pas-
•
Keep away from the vehicle
sengers other than the driver must
during towing.
not be allowed to be on board.
6
32
What to do in an emergency
Emergency towing precautions
If the car is being towed with all four
wheels on the ground, it can be
CAUTION - Intelligent
•
Turn the ignition switch to ACC so
towed only from the front. Be sure
Variable Transmission
the steering wheel isn’t locked.
that the transmission is in neutral. Be
Before towing, check for an
•
Place the transmission shift lever in
sure the steering is unlocked by plac-
Intelligent Variable Transmission
N (Neutral).
ing the ignition switch in the ACC
fluid leak under your vehicle. If the
•
Release the parking brake.
position. A driver must be in the
Intelligent Variable Transmission
•
Press the brake pedal with more
towed vehicle to operate the steering
fluid is leaking, a flatbed equip-
force than normal since you will
and brakes.
ment
or
towing
dolly
must
be
have reduced brake performance.
used.
•
More steering effort will be
required because the power steer-
ing system will be disabled.
•
If you are driving down a long hill,
the brakes may overheat and brake
performance will be reduced. Stop
often and let the brakes cool off.
•
To avoid serious damage to the
Intelligent Variable Transmission,
limit the vehicle speed to 10 mph
(15 km/h) and drive less than 1
mile
(1.5 km) when towing. (for
Intelligent Variable Transmission
vehicle)
6
33
Maintenance
Engine compartment
7-4
Climate control air filter
7-33
Maintenance services
7-5
• Filter inspection
7-33
• Owner’s responsibility
7-5
Wiper blades
7-35
• Owner maintenance precautions
7-6
• Blade inspection
7-35
Owner maintenance
7-7
• Blade replacement
7-35
• Owner maintenance schedule
7-7
Battery
7-39
Scheduled maintenance service
7-9
• For best battery service
7-39
• Scheduled maintenance service precaution
7-9
• Recharging the battery
7-40
• Reset items
7-41
Explanation of scheduled maintenance items . . . 7-15
Tires and wheels
7-42
Checking fluid levels
7-20
• Tire care
7-42
Engine oil
7-21
• Recommended cold tire inflation pressures
7-42
• Checking the engine oil level
7-21
• Tire pressure
7-43
• Changing the engine oil and filter
7-22
• Checking tire inflation pressure
7-43
Engine coolant
7-24
• Tire rotation
7-44
• Checking the coolant level
7-24
• Wheel alignment and tire balance
7-45
• Changing the coolant
7-26
• Tire replacement
7-46
Brake fluid
7-27
• Wheel replacement
7-47
• Checking the brake fluid level
7-27
• Tire traction
7-47
7
Washer fluid
7-29
• Tire maintenance
7-47
• Checking the washer fluid level
7-29
• Tire sidewall labeling
7-47
Parking brake
7-30
• All season tires
7-54
• Checking the parking brake
7-30
• Summer tires
7-54
Air cleaner
7-31
• Snow tires
7-54
• Filter replacement
7-31
• Tire chains
7-55
• Radial-ply tires
7-55
• Static bending light replacement
• Low aspect ratio tire
7-56
(Headlamp Type B, C)
7-82
Fuses
7-57
• Front fog lamp (Bulb type) bulb replacement
7-83
• Inner panel fuse replacement
7-59
• Headlamp (Low/High beam) (LED type)
• Memory fuse
7-60
bulb replacement (Headlamp Type C)
7-84
• Engine compartment fuse replacement
7-61
• Position lamp + DRL (LED type) bulb
• Fuse/relay panel description
7-63
replacement
7-84
• Side marker (front) (LED type) bulb replacement
Light bulbs
7-72
(Headlamp Type B, C)
7-84
• Bulb replacement precaution
7-72
• Side repeater lamp (LED type) bulb replacement . 7-85
• Light bulb position (Front)
7-74
• Light bulb position (Rear) (5 Door)
7-75
• Side repeater lamp (bulb type) bulb replacement . . 7-85
• Light bulb position (Rear) (4 Door)
7-76
• Rear turn signal lamp bulb replacement
• Light bulb position (Side)
7-77
(for 5 door)
7-86
• Headlamp (Low/High beam) (Bulb type)
• Back-up lamp bulb replacement (for 5 door)
7-87
bulb replacement (Headlamp Type A)
7-77
• Stop and tail lamp bulb replacement (for 5 door) . . 7-88
• Headlamp (Low/High beam) (Bulb type)
• Tail lamp (inside) bulb replacement (for 5 door) . . . 7-89
bulb replacement (Headlamp Type B)
7-78
• Side marker (rear) (Bulb type) bulb replacement
• Front turn signal lamp bulb replacement
(Rear combination lamp Type A) (for 5 door)
7-90
(Headlamp Type A)
7-80
• Stop and tail lamp (LED type) bulb replacement
7
(for 5 door)
7-91
• Front turn signal lamp bulb replacement
(Headlamp Type B, C)
7-80
• Side marker (rear) (LED type) bulb replacement
• Position lamp bulb replacement
(Rear combination lamp Type B) (for 5 door)
7-91
(Headlamp Type A)
7-81
• License plate lamp bulb replacement
7-92
• Side marker (front) (Bulb type) bulb replacement
• High mounted stop lamp bulb replacement
(Headlamp Type A)
7-82
(for 5 door)
7-92
• Rear turn signal lamp bulb replacement
Emission control system
7-111
(for 4 door)
7-93
• Crankcase emission control system
7-111
• Back-up lamp bulb replacement (for 4 door)
7-94
• Evaporative emission control (including ORVR:
• Stop and tail lamp / Side marker (Bulb type)
Onboard Refueling Vapor Recovery) system
7-111
replacement (for 4 door)
7-94
• Exhaust emission control system
7-112
• Tail lamp (Bulb type) bulb replacement
California perchlorate notice
. . . . . . . . . . . . . . . 7-114
(for 4 door)
7-95
• Stop and tail lamp (LED type) bulb replacement
(for 4 door)
7-96
• Side marker (rear) (LED type) bulb replacement
(Rear combination lamp Type B) (for 4 door)
7-97
• High mounted stop lamp bulb replacement
(for 4 door)
7-97
• Trunk lamp bulb replacement (for 4 door)
7-98
• Map lamp bulb replacement
7-98
• Vanity mirror lamp bulb replacement
7-99
• Room lamp bulb replacement
7-100
• Glove box lamp bulb replacement
7-100
• Liftgate room lamp bulb replacement
(for 5 door)
7-101
7
Appearance care
7-102
• Exterior care
7-102
• Interior care
7-108
Maintenance
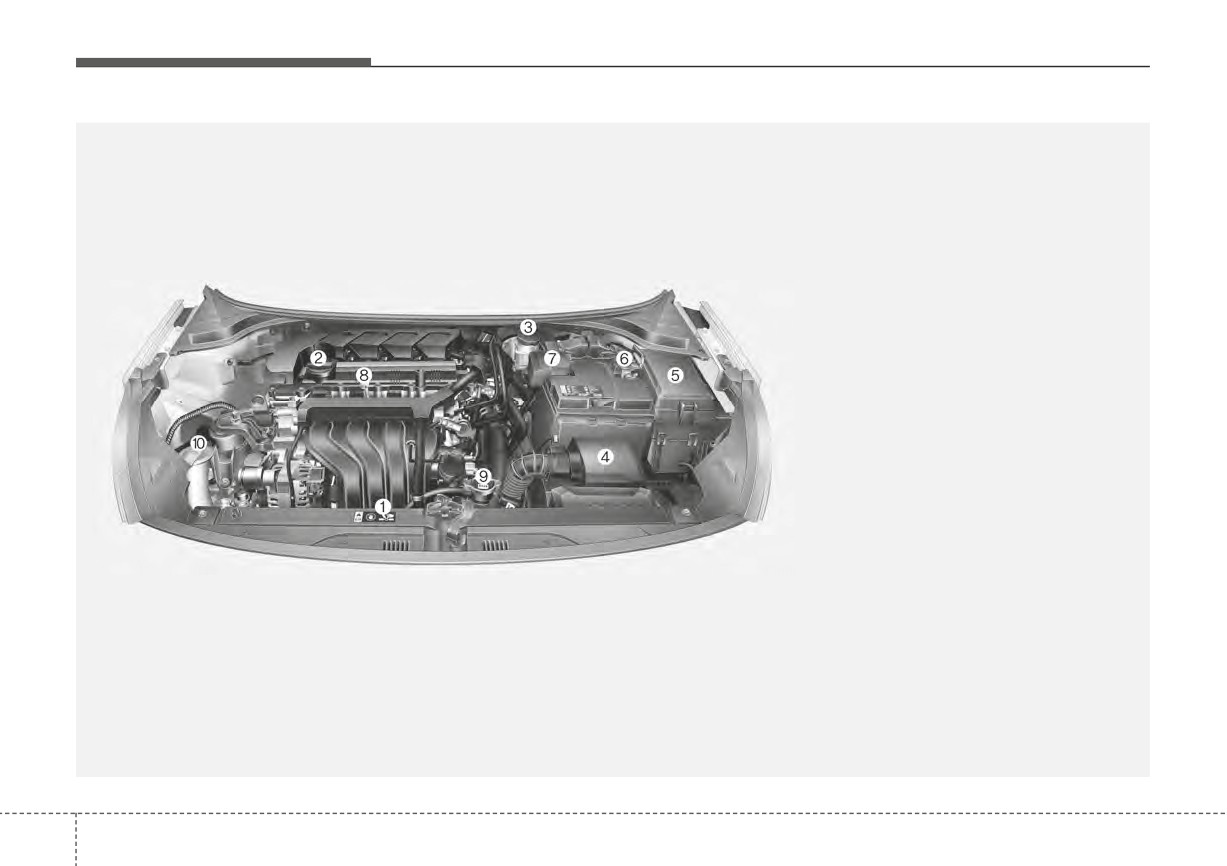
ENGINE COMPARTMENT
■ Smartstream G1.6
1. Engine coolant reservoir
2. Engine oil filler cap
3. Brake fluid reservoir
4. Air cleaner
5. Fuse box
6. Negative battery terminal
7. Positive battery terminal
8. Engine oil dipstick
9. Radiator cap
10. Windshield washer fluid reservoir
❈ The actual engine compartment in the vehicle may differ from the illustration.
OSC078047N
7
4
Maintenance
MAINTENANCE SERVICES
You should exercise the utmost care
Owner’s responsibility
Repairs and adjustments required as
to prevent damage to your vehicle
a result of improper maintenance or
and injury to yourself whenever per-
a lack of required maintenance are
forming any maintenance or inspec-
✽ NOTICE
not covered.
tion procedures.
Maintenance Service and Record
We recommend you have your vehi-
Should you have any doubts con-
Retention are the owner's responsi-
cle maintained and repaired by an
bility.
cerning the inspection or servicing of
authorized Kia dealer. An authorized
your vehicle, we strongly recom-
You should retain documents that
Kia dealer meets Kia’s high service
show proper maintenance has been
mend that you have an authorized
quality standards and receives tech-
Kia dealer perform this work.
performed on your vehicle in accor-
nical support from Kia in order to pro-
dance with the scheduled mainte-
An authorized Kia dealer has factory-
vide you with a high level of service
nance service charts shown on the
satisfaction.
trained technicians and genuine Kia
following pages. You need this infor-
parts to service your vehicle proper-
mation to establish your compliance
ly. For expert advice and quality serv-
with the servicing and maintenance
✽ NOTICE - NHTSA Safety
ice, see an authorized Kia dealer.
requirements of your vehicle war-
Corrosion Alert
Inadequate, incomplete or insuffi-
ranties.
The National Highway Traffic
cient servicing may result in opera-
Detailed warranty information is
Safety Administration (NHTSA) has
tional problems with your vehicle that
provided in your Warranty &
issued a general warning to all vehi-
could lead to vehicle damage, an
Consumer Information manual.
cle owners of all brands regarding
accident, or personal injury.
the risks associated with vehicle
underbody corrosion. From your
initial purchase, take the following
steps to prevent unsafe corrosion
damage to your vehicle:
(Continued)
7
5
Maintenance
(Continued)
Owner maintenance precau-
•
Wash the undercarriage of your
tions
WARNING - Maintenance
vehicle regularly during the win-
work
Improper or incomplete service may
ter and whenever your vehicle has
Do not wear jewelry or loose
result in problems. This section gives
been exposed to such salts or
instructions only for the maintenance
clothing while working under
chemicals.
the hood of your vehicle with
items that are easy to perform.
•
Do a thorough washing of the
the engine running. These can
undercarriage at the end of the
As explained earlier in this section,
become entangled in moving
winter.
several procedures can be done only
parts, if you must run the
•
Use professional service techni-
by an authorized Kia dealer with spe-
engine while working under the
cians or governmental inspection
cial tools.
hood, make certain that you
stations to annually inspect for
remove all jewelry
(especially
corrosion.
✽ NOTICE
rings, bracelets, watches, and
•
Immediately seek an inspection of
necklaces) and all neckties,
Improper owner maintenance dur-
your vehicle if you become visual-
scarves, and similar loose
ing the warranty period may affect
ly aware of corrosion flaking or
clothing before getting near the
warranty coverage. For details, read
scaling or if you become aware of
engine or cooling fans.
the separate Warranty & Consumer
a change in vehicle performance,
Information manual provided with
such as soft or spongy brakes, flu-
the vehicle. If you're unsure about
ids leaking, impairment of direc-
any servicing or maintenance proce-
tional control, suspension noises
WARNING - Touching
dure, have it done by an authorized
or rattling metal straps.
metal parts
Kia dealer.
NHTSA further advises that after
Do not touch metal parts
a vehicle is 7 years old, it is essen-
(including strut bars) while the
tial that you take these indicated
engine is operating or hot.
maintenance steps to ensure that
Doing so could result in serious
you protect yourself from unsafe
personal injury. Turn the engine
corrosion conditions.
off and wait until the metal parts
cool down to perform mainte-
nance work on the vehicle.
7
6
Maintenance
OWNER MAINTENANCE
The following lists are vehicle checks
Owner maintenance schedule
While operating your vehicle:
and inspections that should be per-
•
Note any changes in the sound of
When you stop for fuel:
formed by the owner or an author-
the exhaust or any smell of
ized Kia dealer at the frequencies
• Check the coolant level in coolant
exhaust fumes in the vehicle.
indicated to help ensure safe,
reservoir.
•
Check for vibrations in the steering
dependable operation of your vehi-
• Check the windshield washer fluid
wheel. Notice any increased steer-
cle.
level.
ing effort or looseness in the steer-
Any adverse conditions should be
• Look for low or under-inflated tires.
ing wheel, or change in its straight-
brought to the attention of your deal-
ahead position.
er as soon as possible.
WARNING - Hot coolant
•
Notice if your vehicle constantly
These Owner Maintenance Checks
turns slightly or “pulls” to one side
Be careful when checking your
are generally not covered by war-
when traveling on smooth, level
engine coolant level when the
ranties and you may be charged for
road.
engine is hot. Scalding hot
labor, parts and lubricants used.
coolant and steam may blow
•
When stopping, listen and check
out under pressure.
for unusual sounds, pulling to one
side, increased brake pedal travel
or “hard-to-push” brake pedal.
•
If any slipping or changes in the
operation of your transmission
occurs, take your vehicle to an
authorized Kia dealer.
•
Check the intelligent variable trans-
mission P (Park) function.
7
7
Maintenance
• Check the parking brake.
At least twice a year
At least once a year :
• Check for fluid leaks under your
(i.e., every Spring and Fall) :
•
Clean the body and door drain
vehicle (water dripping from the air
•
Check the radiator, heater and air
holes.
conditioning system during or after
conditioning hoses for leaks or
•
Lubricate the door hinges and
use is normal).
damage.
check the hood hinges.
•
Check the windshield washer
•
Lubricate the door and hood locks
At least monthly:
spray and wiper operation. Clean
and latches.
the wiper blades with a clean cloth
• Check the coolant level in the
•
Lubricate the door rubber weather-
dampened with washer fluid.
engine coolant reservoir.
strips.
•
Check the headlight alignment.
• Check the operation of all exterior
•
Check the air conditioning system.
lights, including the stoplights, turn
•
Check the muffler, exhaust pipes,
•
Inspect and lubricate intelligent
shields and clamps.
signals and hazard warning flash-
variable transmission linkage and
ers.
•
Check the lap/shoulder belts for
controls.
wear and function.
• Check the inflation pressures of all
•
Clean the battery and terminals.
tires including the spare for tires
•
Check the brake fluid level.
that are worn, show uneven wear,
or are damaged.
• Check for loose wheel lug nuts.
7
8
Maintenance
SCHEDULED MAINTENANCE SERVICE
Scheduled maintenance service precaution
Follow the Normal Maintenance Schedule if the vehicle is usually operated where none of the following conditions apply.
If any of the following conditions apply, follow the Maintenance Under Severe Usage Conditions.
• Repeated driving short distance of less than 5 miles (8 km) in normal temperature or less than 10 miles (16 km) in
freezing temperature
• Extensive engine idling or low speed driving for long distances
• Driving on rough, dusty, muddy, unpaved, graveled or salt-spread roads
• Driving in areas using salt or other corrosive materials or in very cold weather
• Driving in heavy dust condition
• Driving in heavy traffic area
• Driving on uphill, downhill, or mountain road repeatedly
• Using for towing or camping and driving with loading on the roof.
• Driving as a patrol car, taxi, other commercial use of vehicle towing
• Frequently driving under high speed or rapid acceleration/deceleration
• Frequently driving in stop-and-go condition
If your vehicle is operated in any of the prior listed conditions, you should inspect, replace or refill more frequently,
using the severe usage maintenance schedule instead of the normal usage maintenance schedule.
✽ NOTICE
After 10 years or 100,000 miles (150,000 km), we recommend to use severe maintenance schedule.
7
9
Maintenance
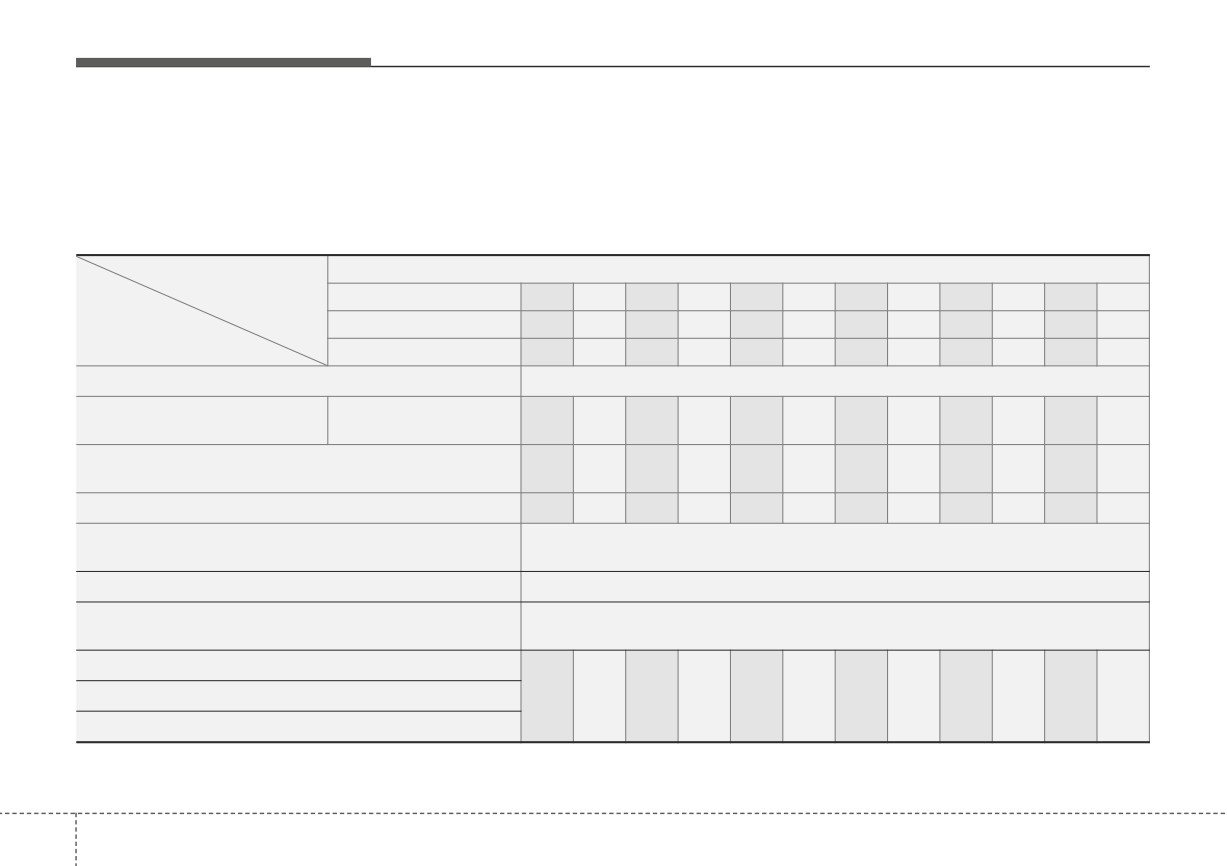
Normal Maintenance Schedule - Non Turbo Models
The following maintenance services must be performed to ensure good emission control and performance.
Keep receipts for all vehicle services to protect your warranty. Where both mileage and date are shown, the frequen-
cy of service is determined by whichever occurs first.
I : Inspect and if necessary, adjust, correct, clean or replace
R : Replace or change
MAINTENANCE
Number of months or driving distance, whichever comes first
INTERVALS
Months
12
24
36
48
60
72
84
96
108
120
132
144
Miles×1,000
8
16
24
32
40
48
56
64
72
80
88
96
MAINTENANCE
ITEM
Km×1,000
13
26
39
52
65
78
91
104
117
130
143
156
Rotate tires
Rotate every 8,000 miles (13,000 km)
Engine oil and engine oil fil-
Smartstream G1.6
R
R
R
R
R
R
R
R
R
R
R
R
ter*1
Climate control air filter
I
R
I
R
I
R
I
R
I
R
I
R
(for evaporator and blower unit)
Air cleaner filter
I
I
R
I
I
R
I
I
R
I
I
R
Inspect every 8,000 miles (13,000 km) or 12 months,
Brake fluid
Replace every 48,000 miles (78,000 km) or 48 months
Spark plugs
Replace every 96,000 miles (156,000 km)
At first, replace at 120,000 miles (195,000 km) or 120 months
Coolant (Engine)
After that, replace every 24,000 miles (39,000 km) or 24 months
Battery condition
Vacuum hose
I
I
I
I
I
I
I
I
I
I
I
I
Air conditioner refrigerant
7
10
Maintenance
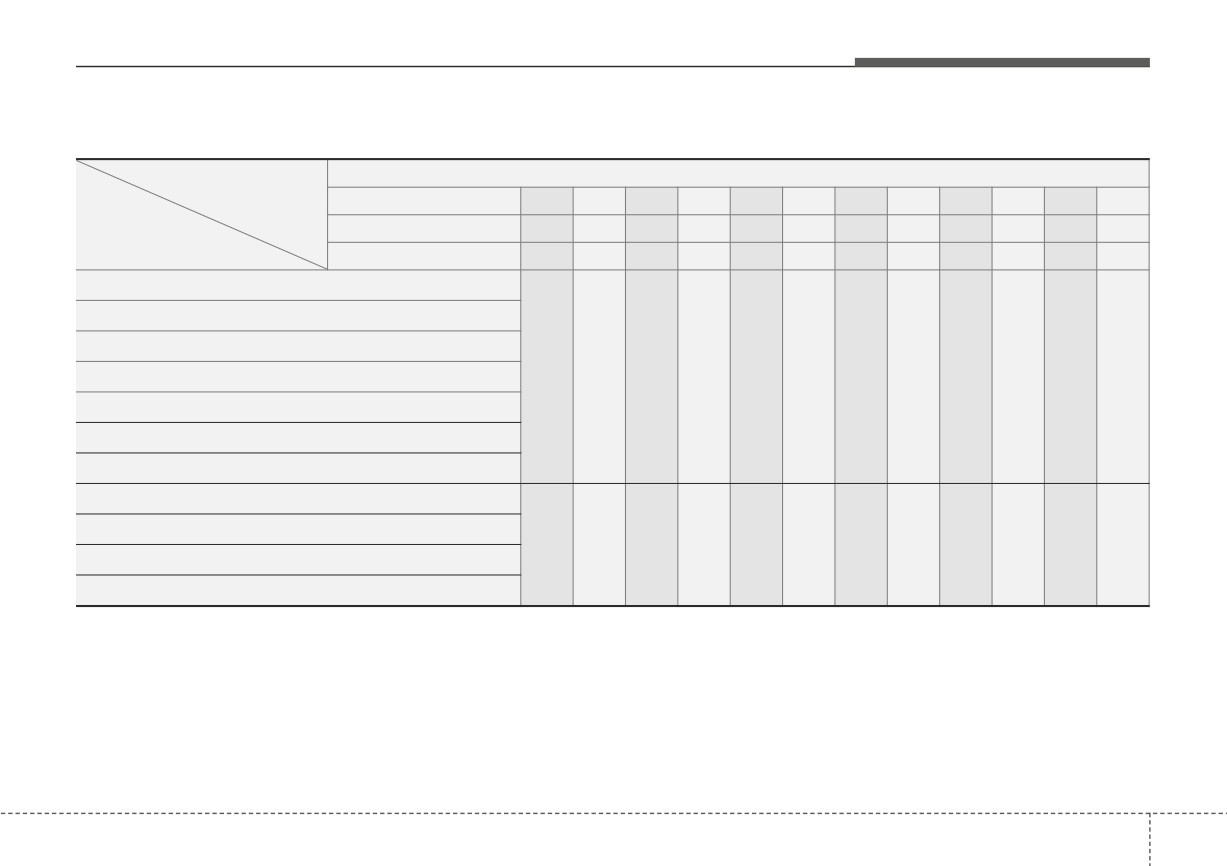
Normal Maintenance Schedule - Non Turbo Models (CONT.)
MAINTENANCE
Number of months or driving distance, whichever comes first
INTERVALS
Months
12
24
36
48
60
72
84
96
108
120
132
144
Miles×1,000
8
16
24
32
40
48
56
64
72
80
88
96
MAINTENANCE
ITEM
Km×1,000
13
26
39
52
65
78
91
104
117
130
143
156
Exhaust system
Brake lines, hoses and connections
Parking brake
Brake discs and pads
I
I
I
I
I
I
I
I
I
I
I
I
Suspension ball joints and mounting bolts
Steering gear rack, linkage and boots
Air conditioner compressor
Drive shaft and boots
Fuel tank and fuel cap
-
I
-
I
-
I
-
I
-
I
-
I
Fuel lines, hoses and connections
Fuel tank air filter*2
7
11
Maintenance
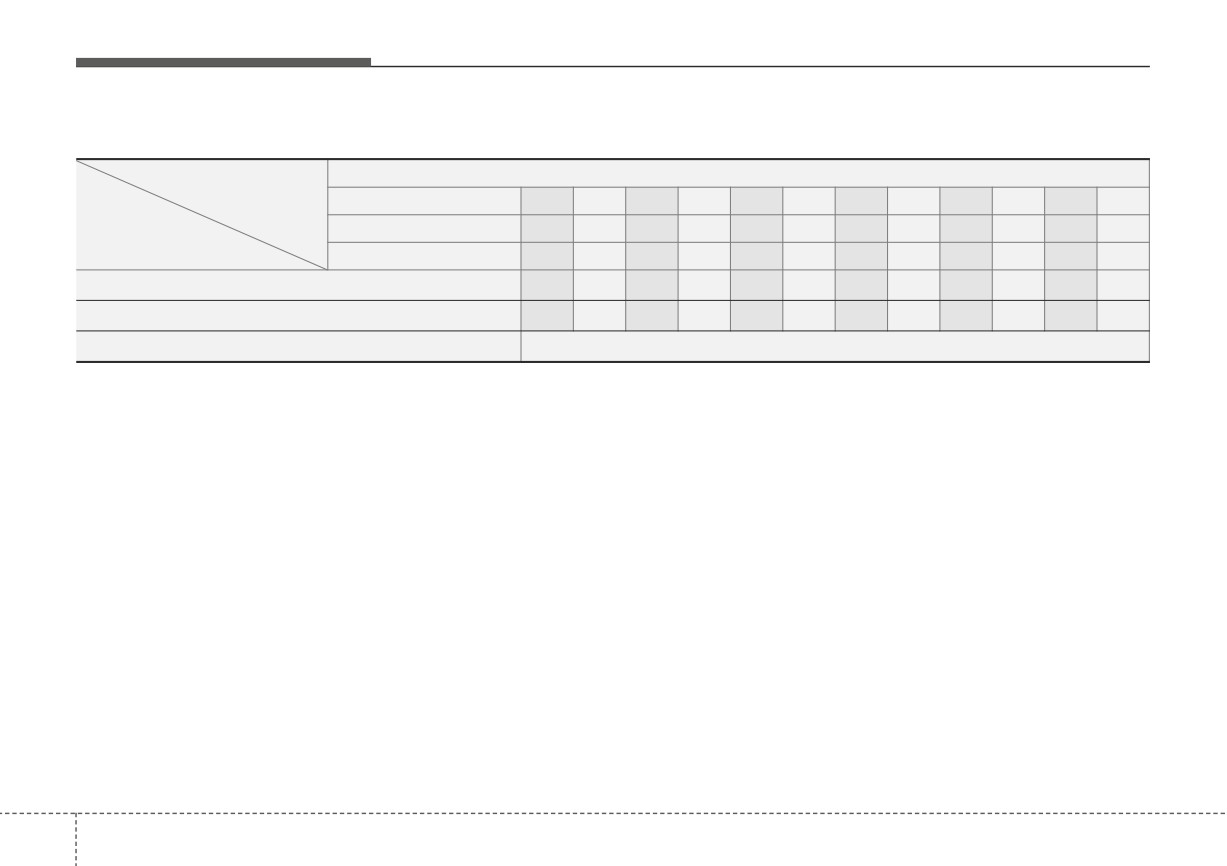
Normal Maintenance Schedule - Non Turbo Models
MAINTENANCE
Number of months or driving distance, whichever comes first
INTERVALS
Months
12
24
36
48
60
72
84
96
108
120
132
144
Miles×1,000
8
16
24
32
40
48
56
64
72
80
88
96
MAINTENANCE
ITEM
Km×1,000
13
26
39
52
65
78
91
104
117
130
143
156
Cooling system
-
-
-
I
-
I
-
I
-
I
-
I
Drive belts*3
-
-
-
-
-
I
I
I
I
I
I
I
Intelligent variable transmission fluid
No service required
1
:As it is normal for engine oil to be consumed during driving, the engine oil level should be checked on regular basis. The engine
oil change interval for normal operating conditions is based on the use of the recommended engine specification. If the recom-
mended engine oil specification is not used, then replace the engine oil according to the maintenance schedule under severe
operating conditions.
2
:Fuel tank air filter is considered to be maintenance free but periodic inspection is recommended as the level of maintenance
will be dependent upon the quality fuel used in the vehicle.
3
:The drive belt should be replaced when cracks occur or tension is reduced.
• Fuel filter (gasoline engine): The fuel filter is considered to be maintenance free but periodic inspection is recommended for this
maintenance schedule depends on fuel quality.
- If there are some important safety matters like fuel flow restriction, surging, loss of power, hard starting problem etc., replace
the fuel filter immediately regardless of maintenance schedule and consult an authorized Kia dealer for details.
7
12
Maintenance
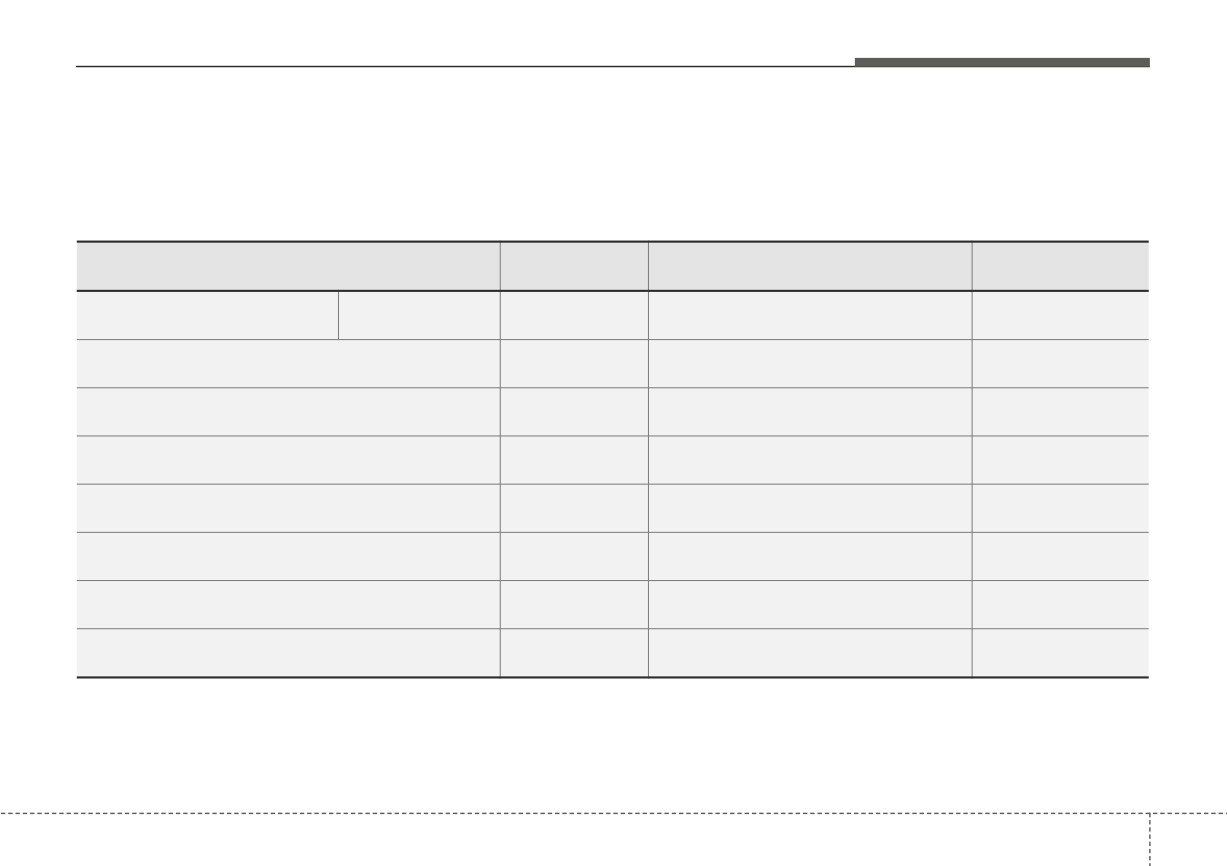
Maintenance Under Severe Usage Conditions - Non Turbo Models
The following items must be serviced more frequently on cars normally used under severe driving conditions. Refer
to the chart below for the appropriate maintenance intervals.
R : Replace I : Inspect and, after inspection, clean, adjust, repair or replace if necessary
MAINTENANCE
DRIVING
MAINTENANCE ITEM
MAINTENANCE INTERVALS
OPERATION
CONDITION
Every 5,000 miles (8,000 km) or
A, B, C, D, E, F, G,
Engine oil and engine oil filter
Smartstream G1.6
R
6 months
H, I, J, K
Intelligent variable transmission fluid
R
Every 56,000 miles (91,000 km)
A, C, F, G, H, I, J, K
Climate control air filter
R
More frequently
C, E, G
(for evaporator and blower unit)
Air cleaner filter
R
More frequently
C, E
Spark plugs
R
More frequently
A, B, F, G, H, I, K
Parking brake
I
More frequently
C, D, G, H
Brake discs and pads and calipers
I
More frequently
C, D, E, G, H, J, K
Suspension ball joints and mounting bolts
I
More frequently
C, D, E, F, G, H, I
7
13
Maintenance
MAINTENANCE
DRIVING
MAINTENANCE ITEM
MAINTENANCE INTERVALS
OPERATION
CONDITION
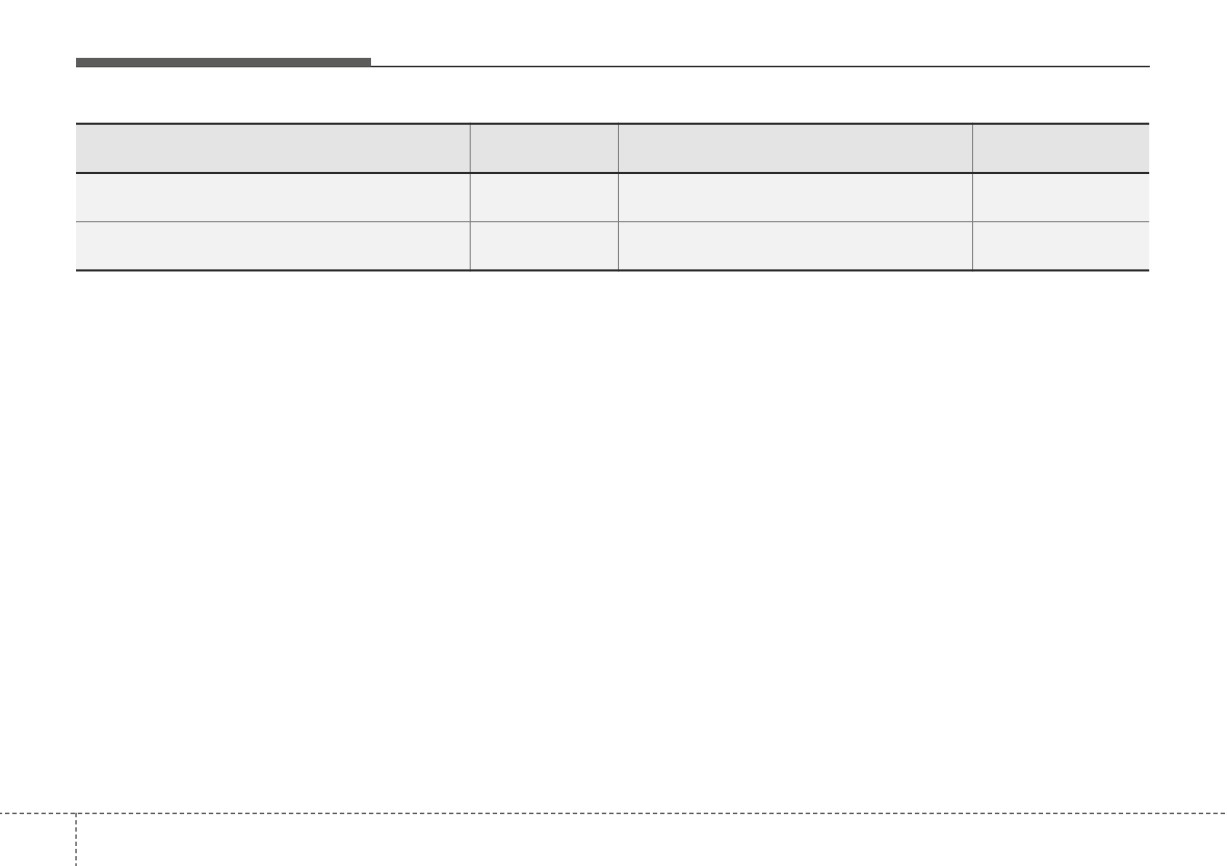
Steering gear rack, linkage and boots
I
More frequently
C, D, E, F, G, H, I
Drive shafts and boots
I
More frequently
C, D, E, F, G, H, I, J
Severe driving conditions
A-Repeatedly driving short distance of less than 5 miles (8 km)
H-Using for towing or camping, and driving with loading on the
in normal temperature or less than 10 miles (16 km) in freez-
roof.
ing temperature.
I
- Driving for a patrol car, taxi, other commercial use or vehicle
B-Extensive engine idling or low speed driving for long dis-
towing.
tance.
J -Frequently driving under high speed or rapid
C-Driving on rough, dusty, muddy, unpaved, graveled or salt-
acceleration/deceleration.
spread roads.
K-Frequently driving in stop-and-go conditions.
D-Driving in areas using salt or other corrosive materials or in
very cold weather.
E-Driving in heavy dust condition.
F-Driving in heavy traffic area.
G-Driving on uphill, downhill, or mountain road repeatedly.
7
14