Kia Niro Hybrid / Plug-in Hybrid (2022 year). Manual in english - page 21
Maintenance
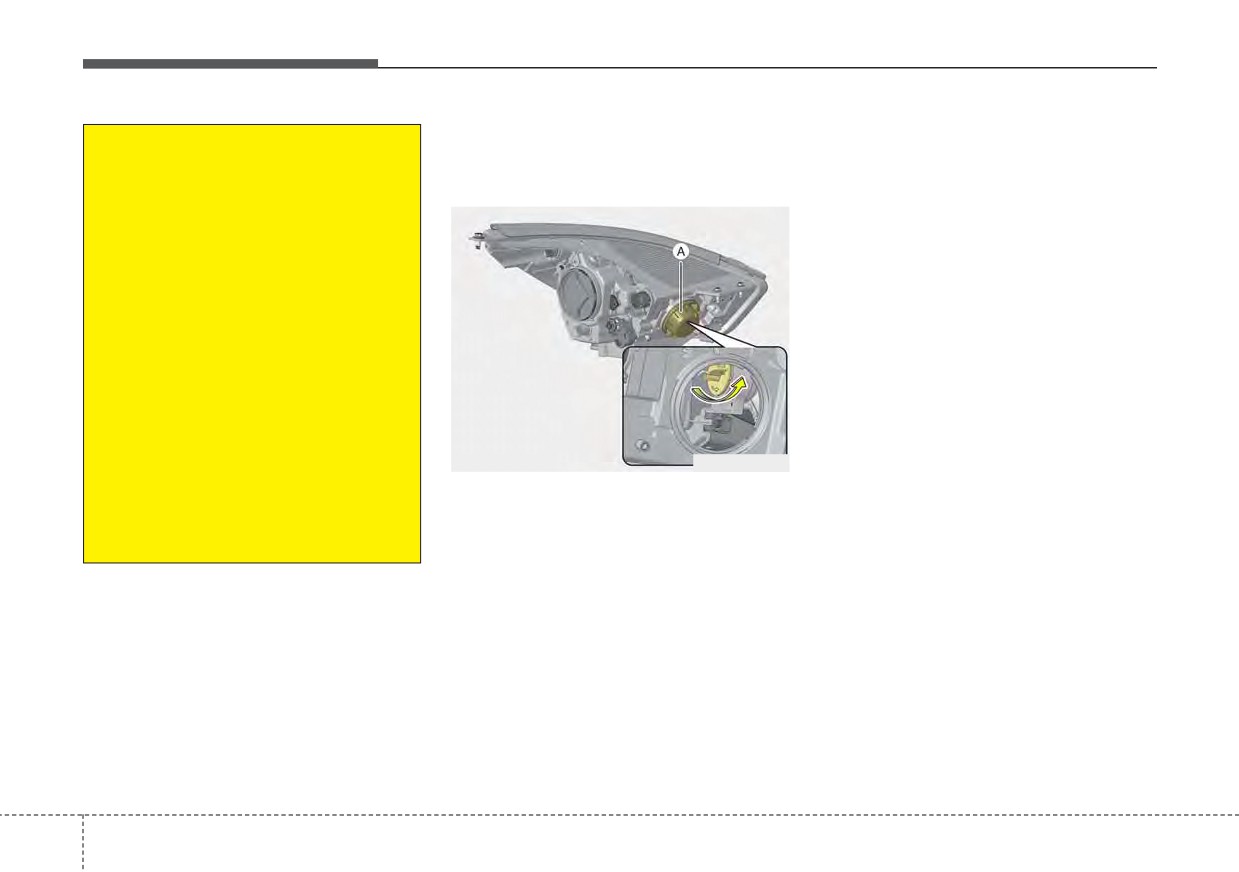
Front turn signal lamp (Bulb
4. Insert a new bulb by inserting it
(Continued)
type) bulb replacement
into the bulb-socket and rotating it
•
Always handle them carefully,
until it locks into place.
(Headlamp type A)
and avoid scratches and abra-
5. Install the socket in the headlamp
sions. If the bulbs are lit, avoid
assembly by aligning the tabs on
contact with liquids. Never
the bulb-socket with the slots in
touch the glass with bare
the assembly. Push the bulb-sock-
hands. Residual oil may cause
et into the headlamp assembly
the bulb to overheat and burst
and turn the socket clockwise.
when lit.
A bulb should be operated
only when installed in a head-
light.
•
If a bulb becomes damaged or
cracked, replace it immediate-
ly and carefully dispose of it.
ODE076058L
•
Wear eye protection when
1. Open the hood.
changing a bulb. Allow the bulb
2. Remove the dust cover (A) from
to cool down before handling it.
the headlamp assembly then bulb-
socket by turning the counter-
clockwise until the tabs on the
bulb-socket align with the slots on
the headlamp assembly.
3. Remove the bulb from the bulb-
socket by pressing it in and rotat-
ing it counterclockwise until the
tabs on the bulb align with the
slots in the bulb-socket. Pull the
bulb out of the bulb-socket.
7
92
Maintenance
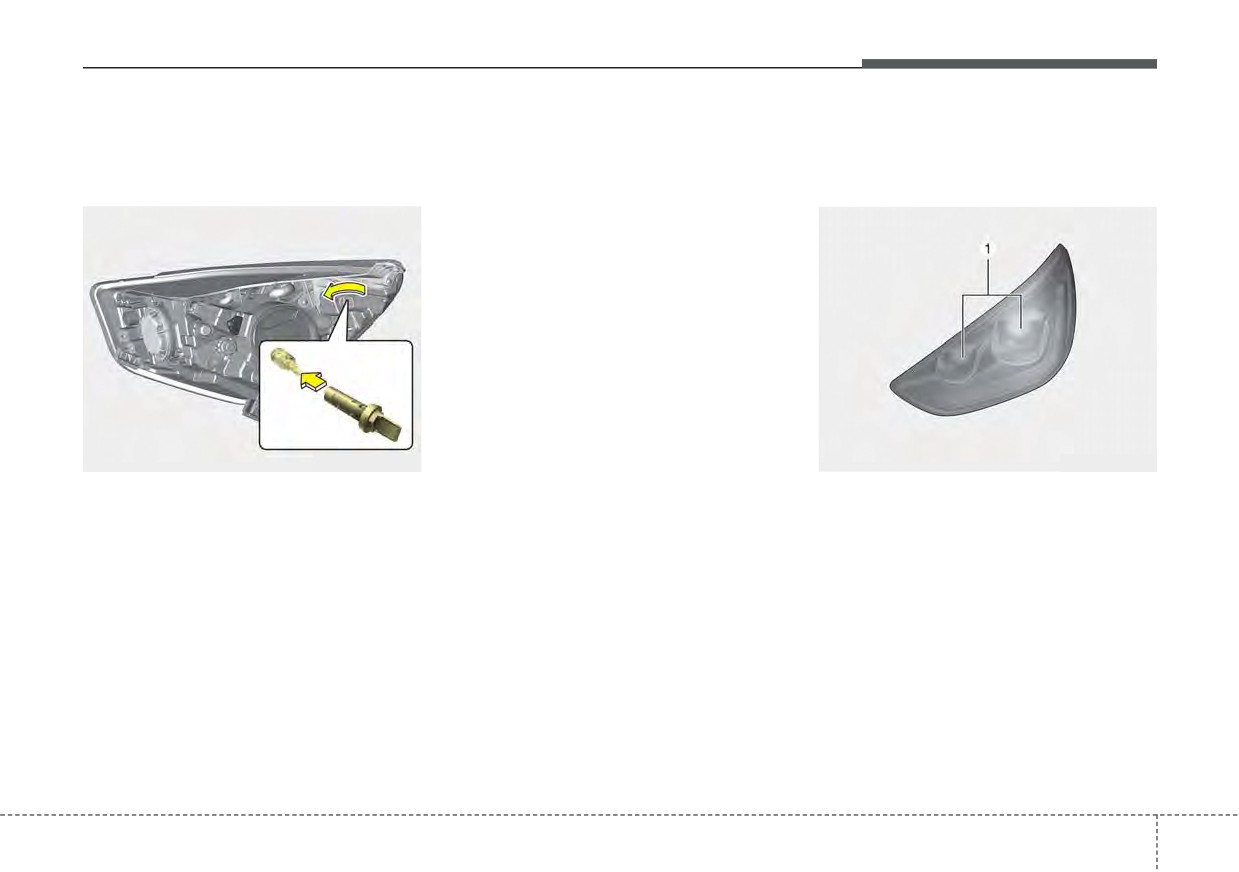
Front side marker (Bulb type)
5. Install the socket in the headlamp
Headlamp (High/Low beam)
bulb replacement (Headlamp
assembly by aligning the tabs on
(LED type) bulb replacement
type A)
the bulb-socket with the slots in
(Headlamp type B)
the assembly. Push the bulb-sock-
et into the headlamp assembly
and turn the socket clockwise.
ODEP079124N
ODEP077068
1. Open the hood.
If the headlamp (LED type) (1) does
not operate, have the vehicle
2. Remove the bulb-socket from the
checked by an authorized Kia dealer.
headlamp assembly by turning the
bulb-socket counterclockwise until
The LED lamp cannot be replaced
the tabs on the bulb-socket align
as a single component because it is
with the slots on the headlamp
an integrated unit. The LED lamp has
assembly.
to be replaced with the unit.
3. Remove the bulb from the bulb-
A skilled technician should check or
socket by pulling it out.
repair the headlamp (LED type), for it
4. Insert a new bulb by inserting it
may damage related parts of the
vehicle.
into the bulb-socket.
7 93
Maintenance
Front turn signal (LED type)
Front side marker (LED type)
Daytime running lamp/Position
bulb replacement (Headlamp
bulb replacement (Headlamp
lamp (LED type) bulb replace-
type B)
type B)
ment
ODEP077069
ODEP079121N
ODEP071108N
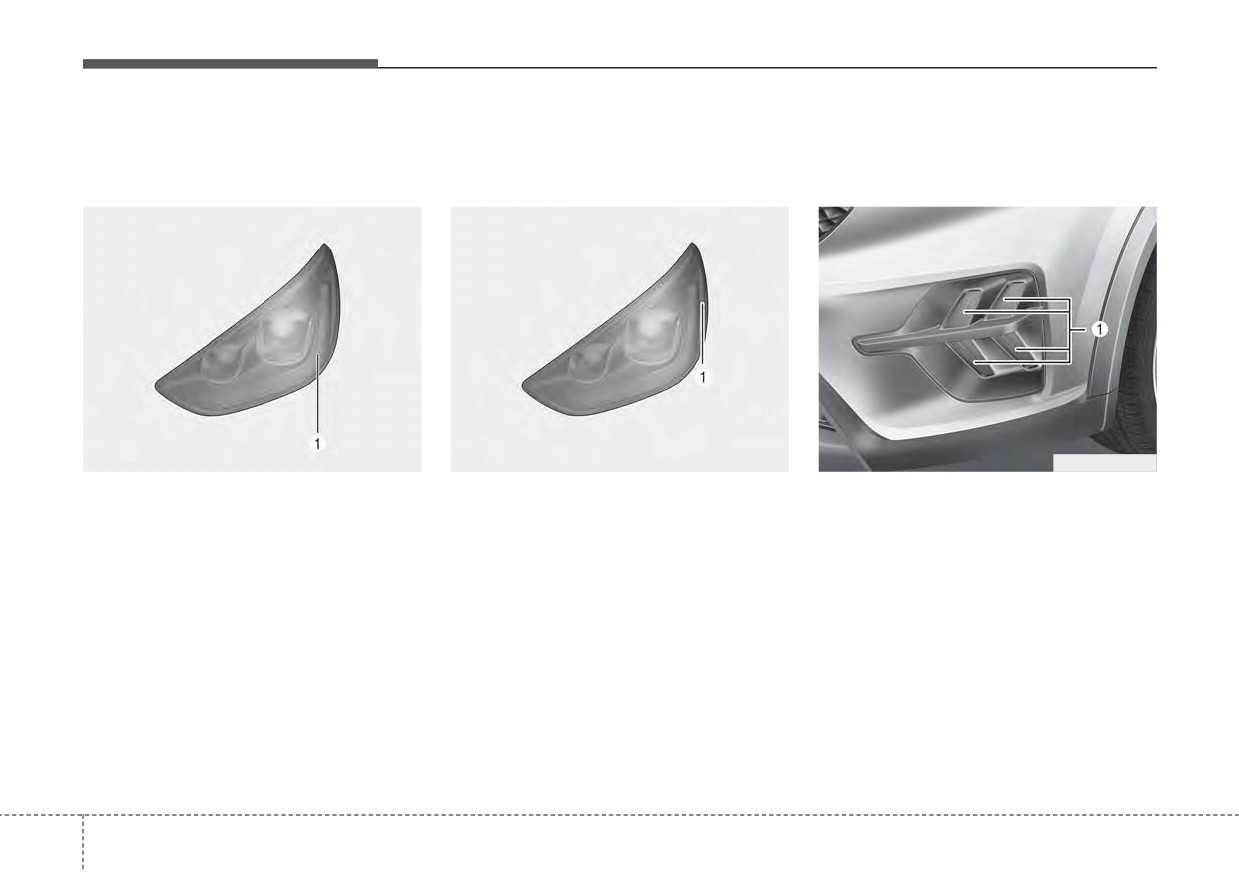
If the front turn signal lamp (LED type)
If the front side marker (LED type)
If the daytime running lamp/position
(1) does not operate, have the vehicle
(1) does not operate, have the vehi-
lamp (LED type) (1) does not oper-
checked by an authorized Kia dealer.
cle checked by an authorized Kia
ate, have the vehicle checked by an
dealer.
authorized Kia dealer.
The LED lamp cannot be replaced
as a single component because it is
The LED lamp cannot be replaced
The LED lamp cannot be replaced
an integrated unit. The LED lamp has
as a single component because it is
as a single component because it is
to be replaced with the unit.
an integrated unit. The LED lamp has
an integrated unit. The LED lamp has
to be replaced with the unit.
to be replaced with the unit.
A skilled technician should check or
repair the front turn signal lamp (LED
A skilled technician should check or
A skilled technician should check or
type), for it may damage related
repair the front side marker
(LED
repair
the
daytime running
parts of the vehicle.
type), for it may damage related
lamp/position lamp (LED type), for it
parts of the vehicle.
may damage related parts of the
vehicle.
7
94
Maintenance
Front fog lamp (Bulb/LED
Stop and tail lamp, Rear turn
type) bulb replacement
signal lamp (Bulb type) bulb
replacement
ODE076038
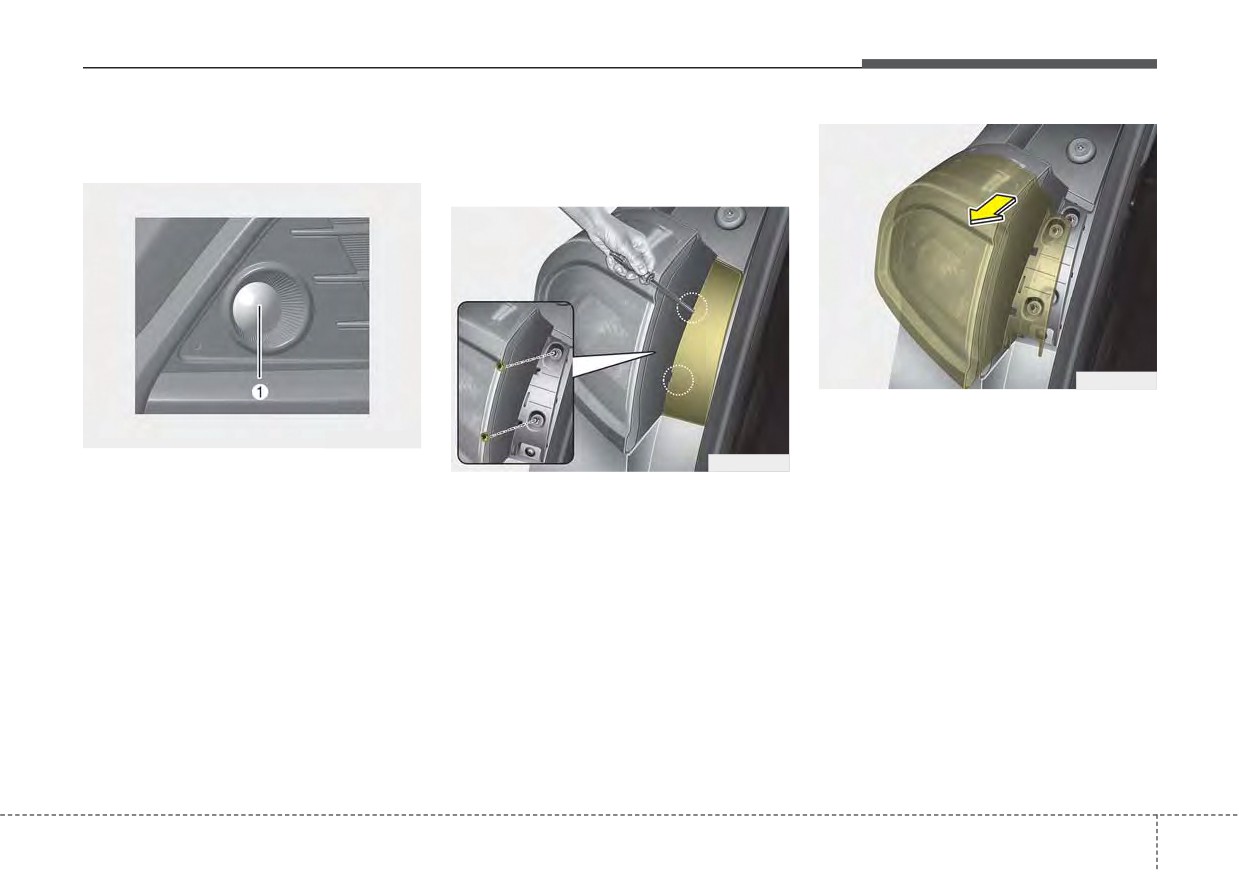
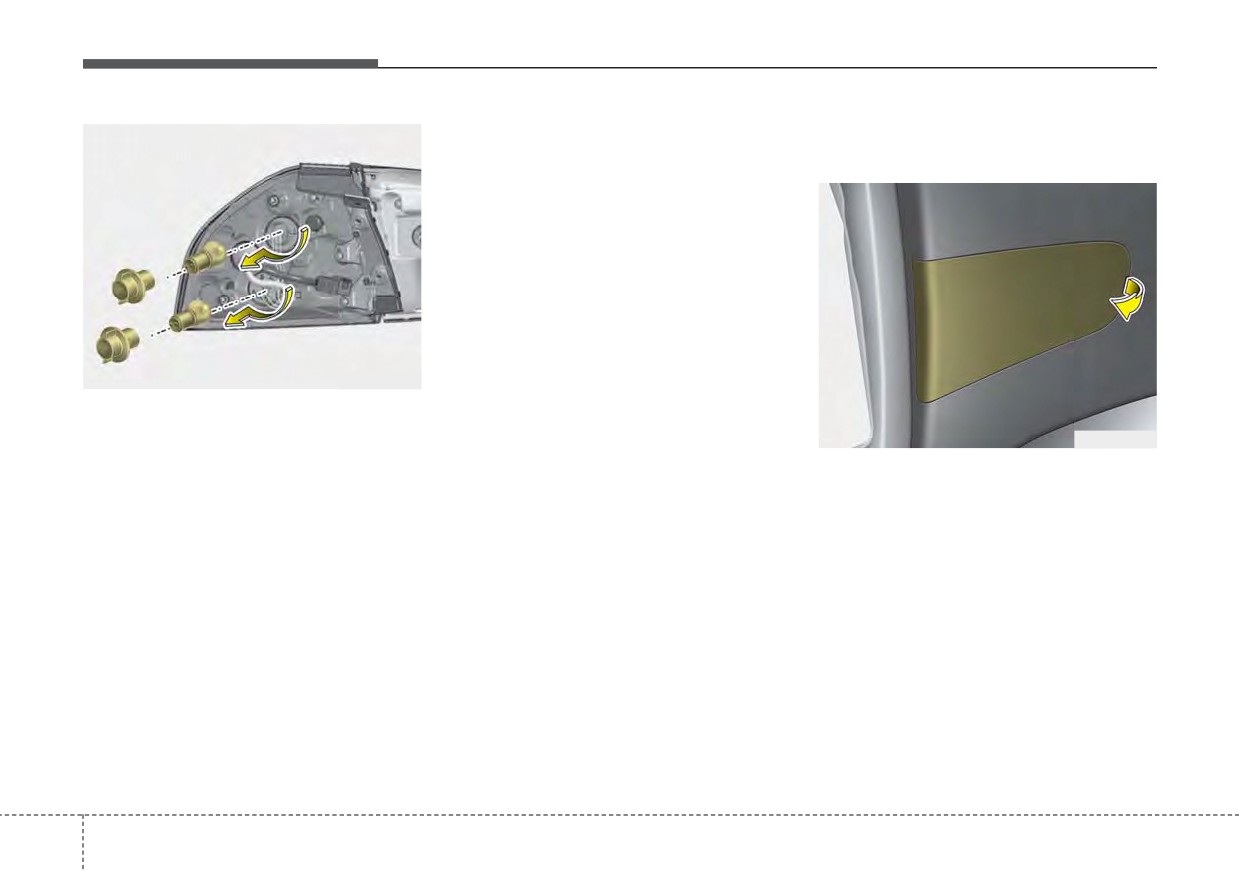
4. Remove the rear combination
lamp assembly from the body of
ODEP079101
the vehicle.
ODE076037
If the front fog lamp (Bulb/LED type)
5. Disconnect the rear combination
1. Open the liftgate.
(1) does not operate, have the vehicle
lamp connector.
checked by an authorized Kia dealer.
2. Open the service cover.
3. Loosen the light assembly retain-
ing screws with a cross-tip screw-
driver.
7 95
Maintenance
9. Install the socket in the assembly
Tail lamp (inside) (Bulb type)
by aligning the tabs on the socket
bulb replacement
with the slots in the assembly.
Push the socket into the assembly
and turn the socket clockwise.
10. Install the rear combination lamp
assembly to the body of the vehi-
cle.
11. Install the service cover.
ODE076039
6. Remove the socket from the
assembly by turning the socket
ODE076040
counterclockwise until the tabs on
the socket align with the slots on
1. Open the liftgate.
the assembly.
2. Remove the service cover.
7. Remove the bulb from the socket by
pressing it in and rotating it counter-
clockwise until the tabs on the bulb
align with the slots in the socket.
Pull the bulb out of the socket.
8. Insert a new bulb by inserting it
into the socket and rotating it until
it locks into place.
7
96
Maintenance
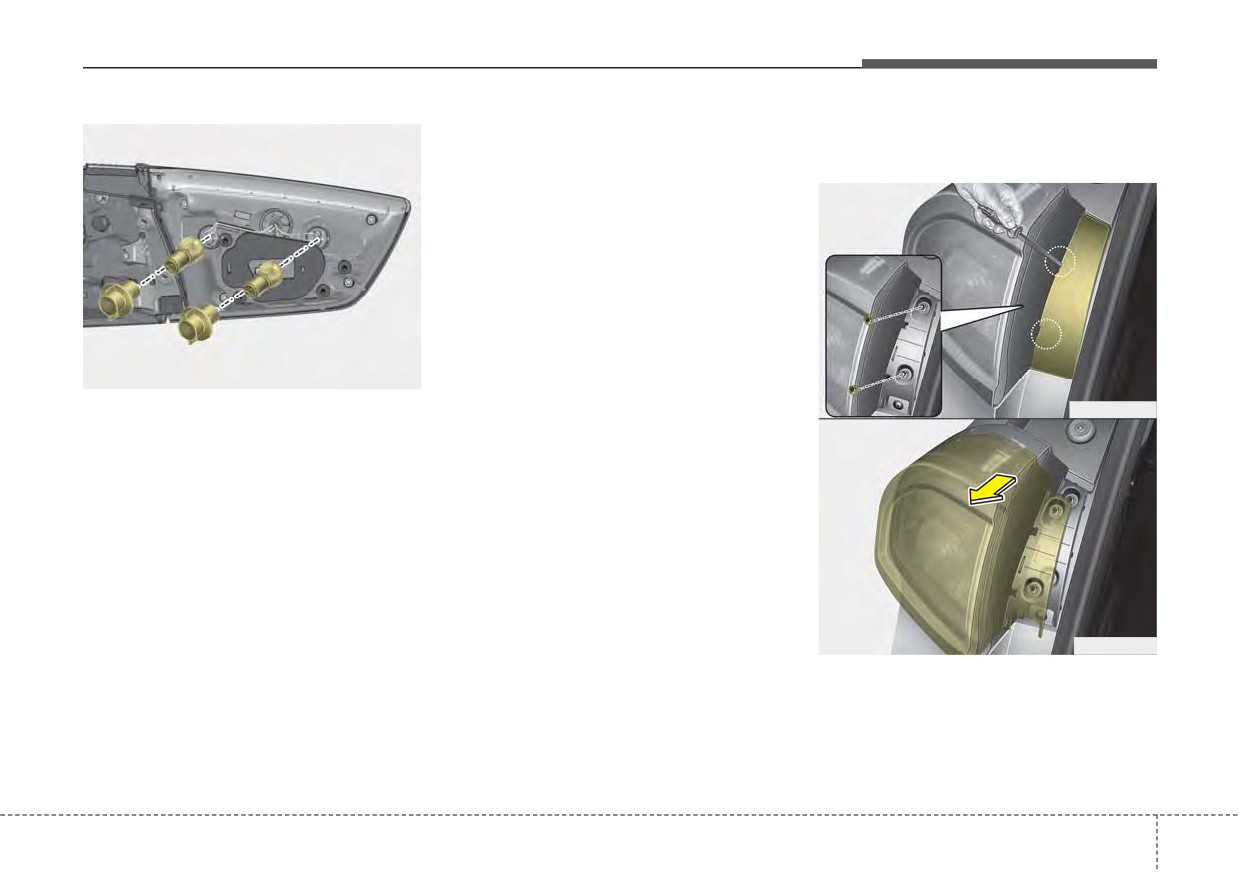
6. Install the socket in the assembly
Rear side marker (Bulb type)
by aligning the tabs on the socket
bulb replacement
with the slots in the assembly.
Push the socket into the assembly
and turn the socket clockwise.
7. Install the service cover by putting
it into the service hole.
ODE076041
3. Remove the socket from the
ODE076037
assembly by turning the socket
counterclockwise until the tabs on
the socket align with the slots on
the assembly.
4. Remove the bulb from the socket
by pressing it in and rotating it
counter-clockwise until the tabs on
the bulb align with the slots in the
socket. Pull the bulb out of the
socket.
ODE076038
5. Insert a new bulb by inserting it
1. Open the liftgate.
into the socket and rotating it until
it locks into place.
2. Remove the service cover.
3. Loosen the light assembly retain-
ing screws with a cross-tip screw-
driver.
7 97
Maintenance
4. Remove the rear combination
10. Connect the rear combination
lamp assembly from the body of
lamp connector.
the vehicle.
11. Install the rear combination lamp
5. Disconnect the rear combination
assembly to the body of the vehi-
lamp connector.
cle.
12. Install the service cover.
ODEP079123N
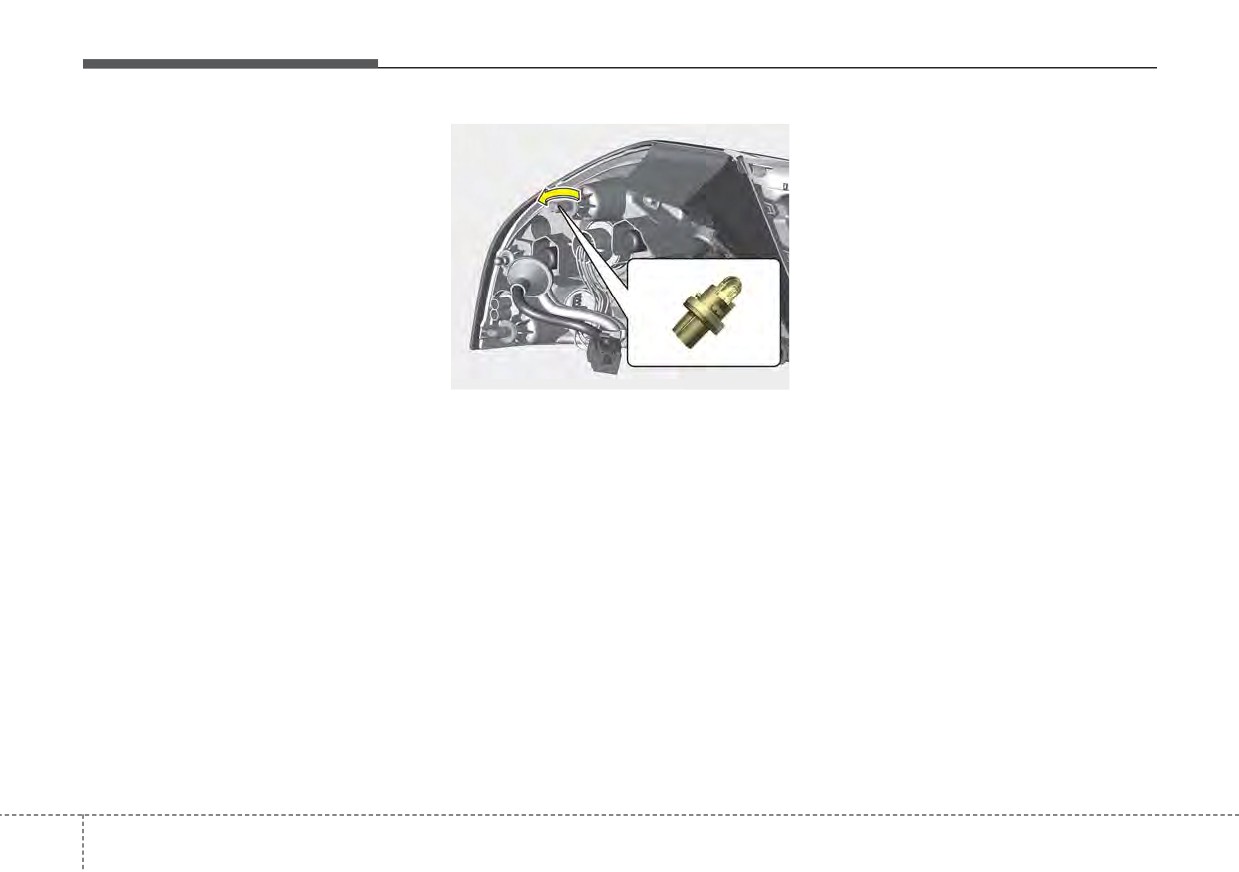
6. Remove the socket from the
assembly by turning the socket
counterclockwise until the tabs on
the socket align with the slots on
the assembly.
7. Remove the bulb from bulb-socket
by pulling it out.
8. Insert a new bulb by inserting it
into the bulb-socket.
9. Install the socket in the assembly
by aligning the tabs on the socket
with the slots in the assembly.
Push the socket into the assembly
and turn the socket clockwise.
7
98
Maintenance
Stop and tail lamp (LED type)
Rear side marker (LED type)
Back-up lamp (Bulb type) bulb
bulb replacement
bulb replacement
replacement
ODEP079103
ODEP079122N
ODEP079111L
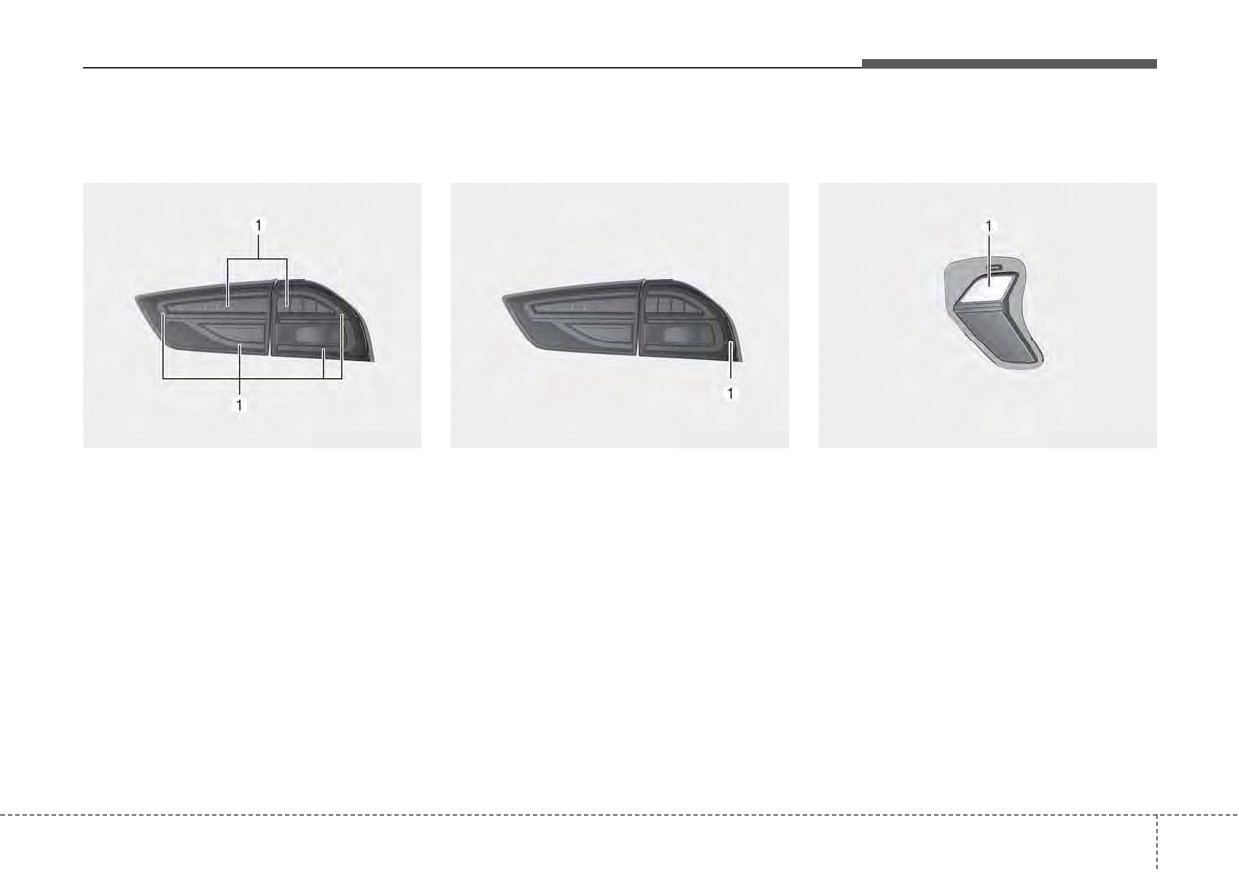
If the rear side marker (LED type) (1)
If the back-up lamp (Bulb type) (1)
If the stop and tail lamp (LED type) (1)
does not operate, have the vehicle
does not operate, have the vehicle
does not operate, have the vehicle
checked by an authorized Kia dealer.
checked by an authorized Kia dealer.
checked by an authorized Kia dealer.
The LED lamp cannot be replaced
The LED lamp cannot be replaced
as a single component because it is
as a single component because it is
an integrated unit. The LED lamp has
an integrated unit. The LED lamp has
to be replaced with the unit.
to be replaced with the unit.
A skilled technician should check or
A skilled technician should check or
repair the rear side marker
(LED
repair the stop and tail lamp (LED
type), for it may damage related
type), for it may damage related
parts of the vehicle.
parts of the vehicle.
7
99
Maintenance
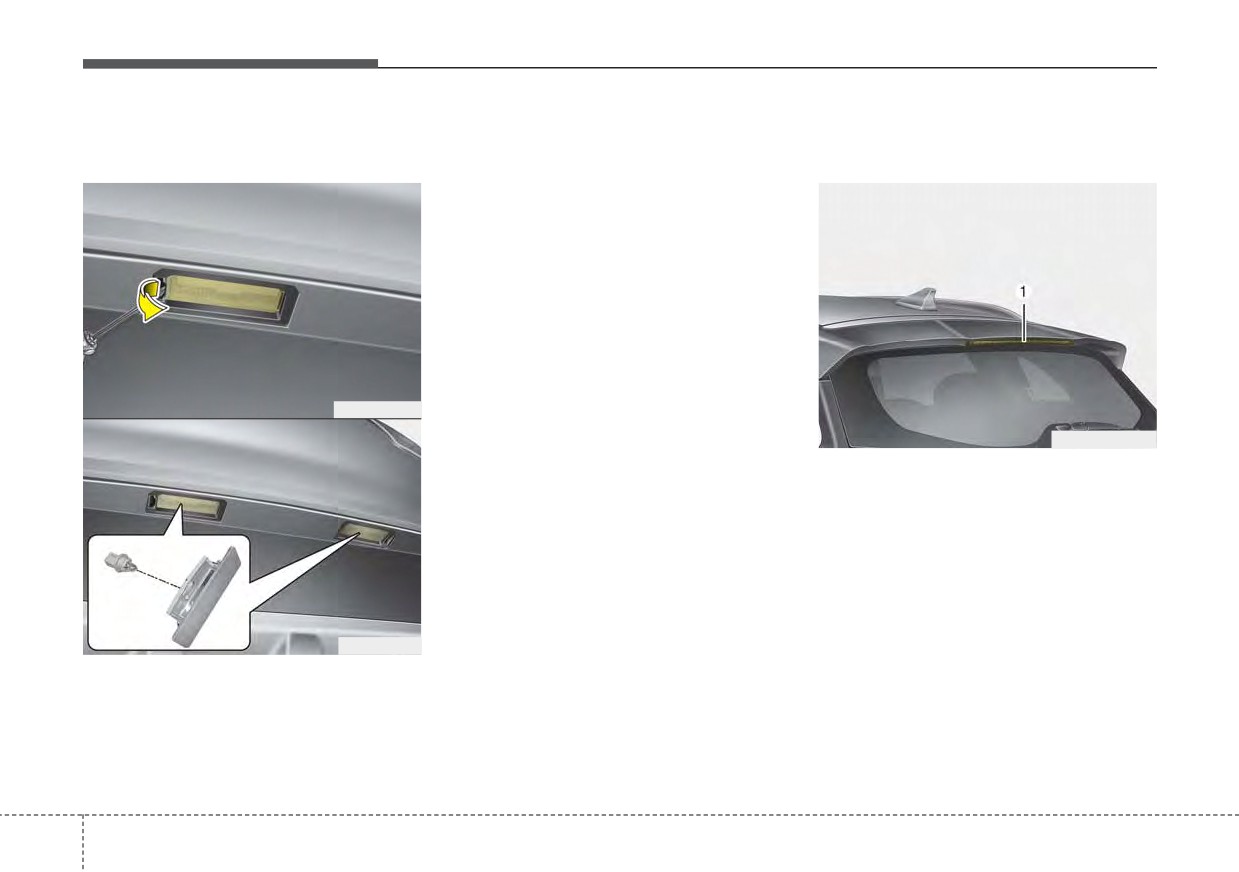
License plate lamp (Bulb type)
2. Remove the socket from the
High mounted stop lamp (LED
bulb replacement
assembly by turning the socket
type) bulb replacement
counterclockwise until the tabs on
the socket align with the slots on
the assembly.
3. Remove the bulb from bulb-socket
by pulling it out.
4. Insert a new bulb by inserting it
into the bulb-socket.
5. Install the socket in the assembly
by aligning the tabs on the socket
with the slots in the assembly.
ODE076045
Push the socket into the assembly
and turn the socket clockwise.
ODEP079044
6. Align the lens cover tabs with the
If the high mounted stop lamp (LED
lamp housing notches and snap
type) (1) does not operate, have the
the lens into place.
vehicle checked by an authorized Kia
dealer.
The LED lamp cannot be replaced
as a single component because it is
an integrated unit. The LED lamp has
to be replaced with the unit.
ODE076046
A skilled technician should check or
1. Using
a
flat-blade
screwdriver,
repair the high mounted stop lamp
gently
pry the lens cover from
(LED type), for it may damage relat-
lamp housing.
ed parts of the vehicle.
7
100
Maintenance
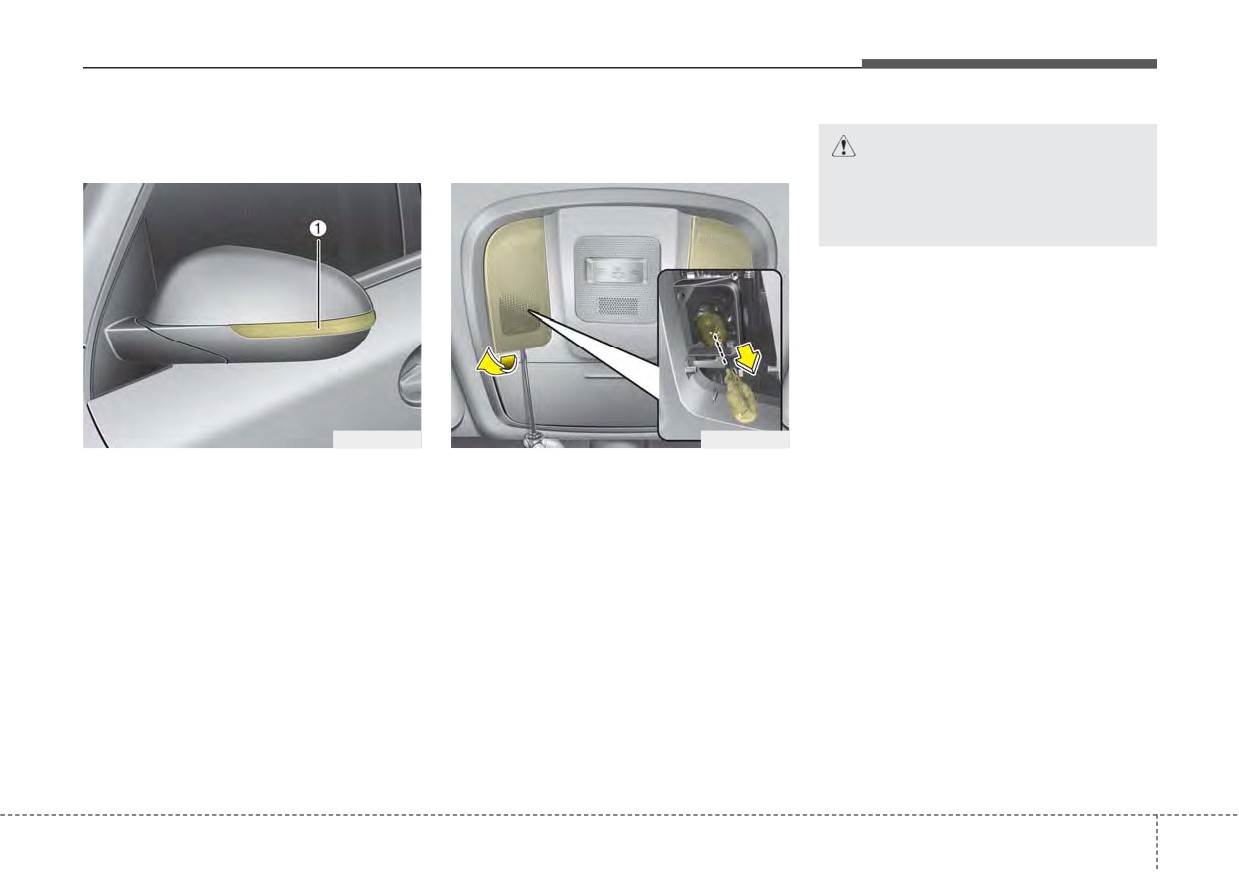
Side repeater lamp (LED type)
Map lamp (Bulb type) bulb
CAUTION
bulb replacement
replacement
Be careful not to dirty or dam-
age the lens, lens tab, and plas-
tic housings.
ODE076034
ODE076047
If the side repeater lamp (LED type)
1. Using a flat-blade screwdriver,
(1) does not operate, have the vehicle
gently pry the lens cover from
checked by an authorized Kia dealer.
lamp housing.
The LED lamp cannot be replaced
2. Remove the bulb by pulling it
as a single component because it is
straight out.
an integrated unit. The LED lamp has
3. Install a new bulb in the socket.
to be replaced with the unit.
4. Align the lens cover tabs with the
A skilled technician should check or
lamp housing notches and snap
repair the side repeater lamp (LED
the lens into place.
type), for it may damage related
parts of the vehicle.
7 101
Maintenance
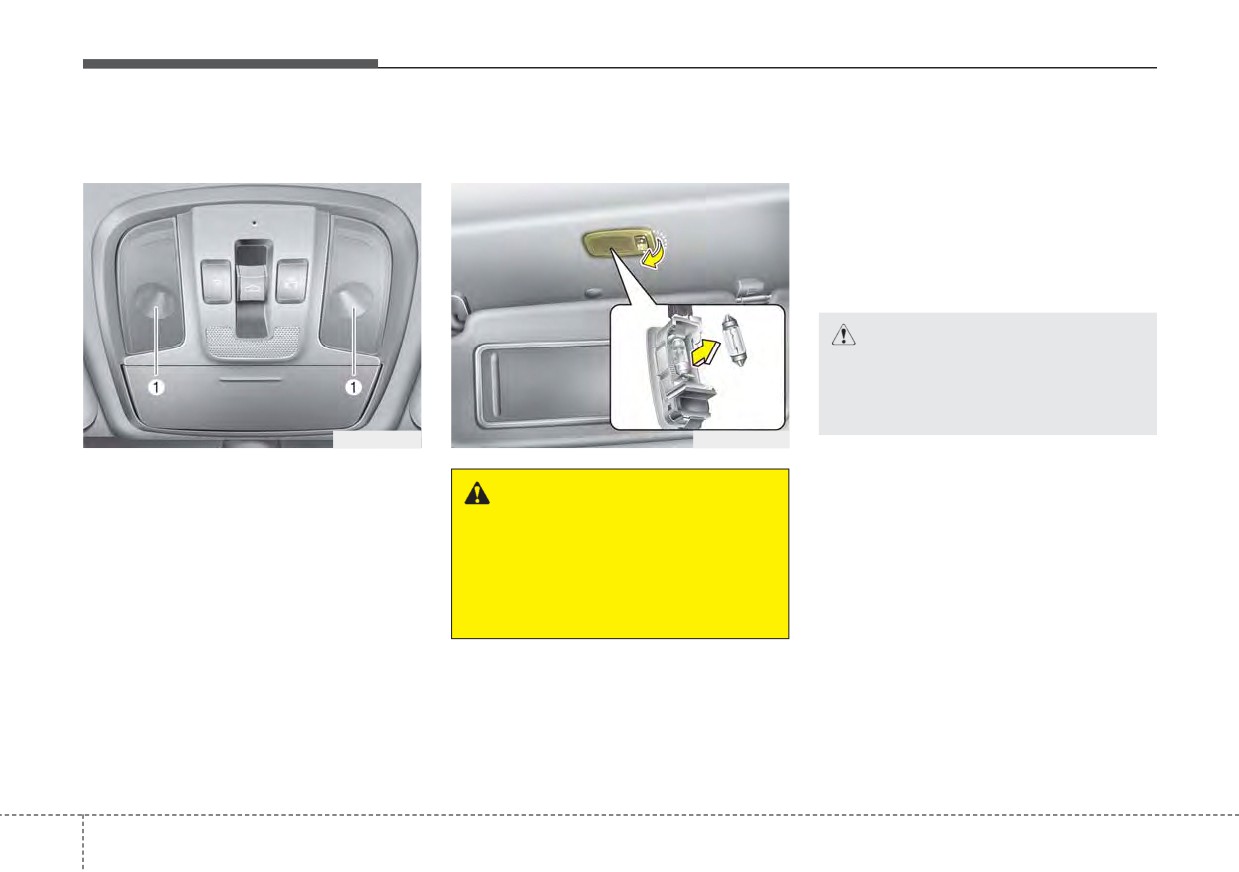
Map lamp (LED type) bulb
Vanity mirror lamp (Bulb type)
1. Using a flat-blade screwdriver,
replacement
bulb replacement
gently pry the lamp assembly from
interior.
2. Remove the bulb by pulling it
straight out.
3. Install a new bulb in the socket.
4. Install the lamp assembly to interior.
CAUTION
Be careful not to dirty or dam-
age the lens, lens tab, and plas-
tic housings.
OQM076063
ODE076048
If the map lamp (LED type) (1) does
not operate, have the vehicle
WARNING
checked by an authorized Kia dealer.
Prior to working on the Interior
The LED lamp cannot be replaced
lamps, ensure that the “OFF”
as a single component because it is
button is depressed to avoid
an integrated unit. The LED lamp has
burning your fingers or receiv-
to be replaced with the unit.
ing an electric shock.
A skilled technician should check or
repair the map lamp (LED type), for it
may damage related parts of the
vehicle.
7
102
Maintenance
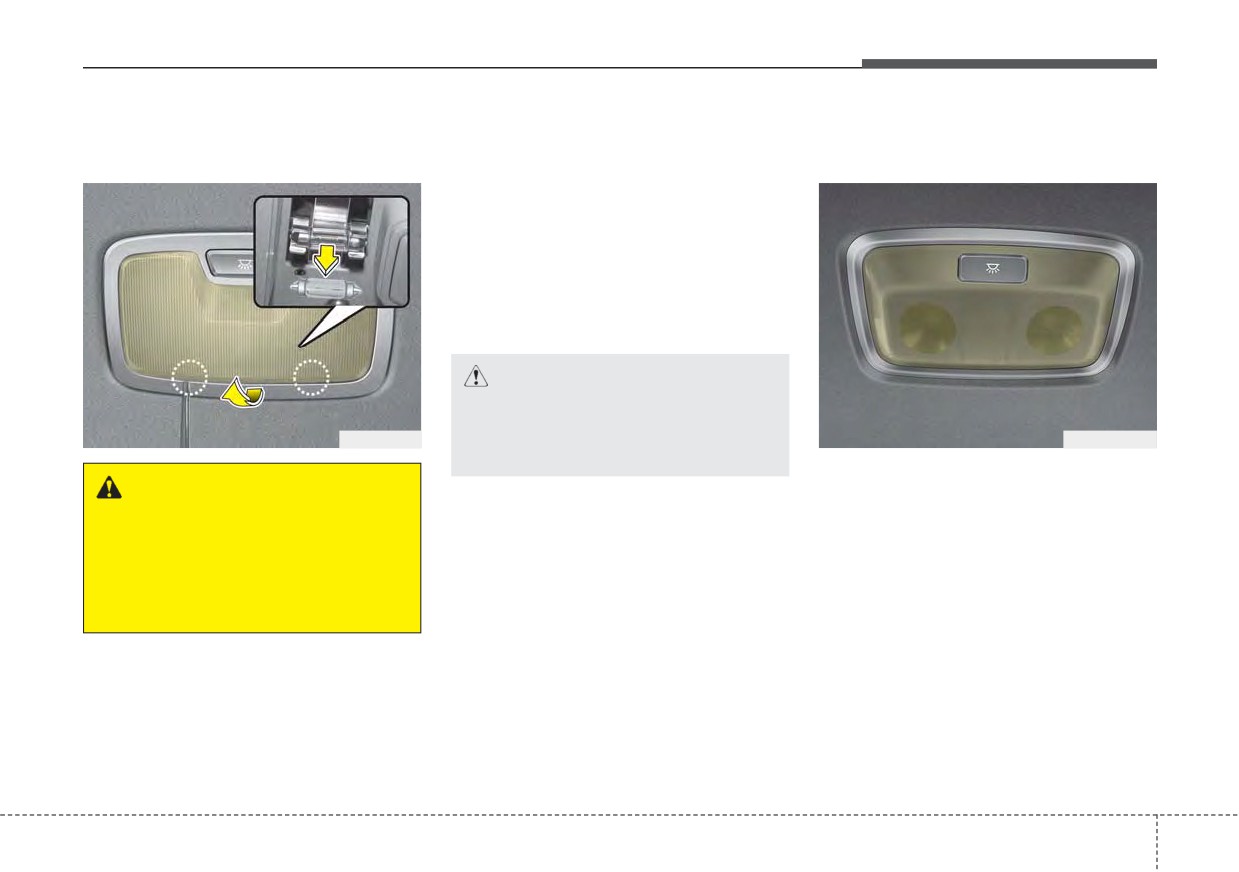
Room lamp (Bulb type) bulb
1. Using a flat-blade screwdriver,
Room lamp (LED type) bulb
replacement
gently pry the lens cover from
replacement
lamp housing.
2. Remove the bulb by pulling it
straight out.
3. Install a new bulb in the socket.
4. Align the lens cover tabs with the
lamp housing notches and snap
the lens into place.
CAUTION
Be careful not to dirty or dam-
age the lens, lens tab, and plas-
ODE076049
ODEP077070
tic housings.
If the room lamp (LED type) (1) does
WARNING
not operate, have the vehicle
checked by an authorized Kia dealer.
Prior to working on the Interior
lamps, ensure that the “OFF”
The LED lamp cannot be replaced
button is depressed to avoid
as a single component because it is
burning your fingers or receiv-
an integrated unit. The LED lamp has
ing an electric shock.
to be replaced with the unit.
A skilled technician should check or
repair the room lamp (LED type), for
it may damage related parts of the
vehicle.
7
103
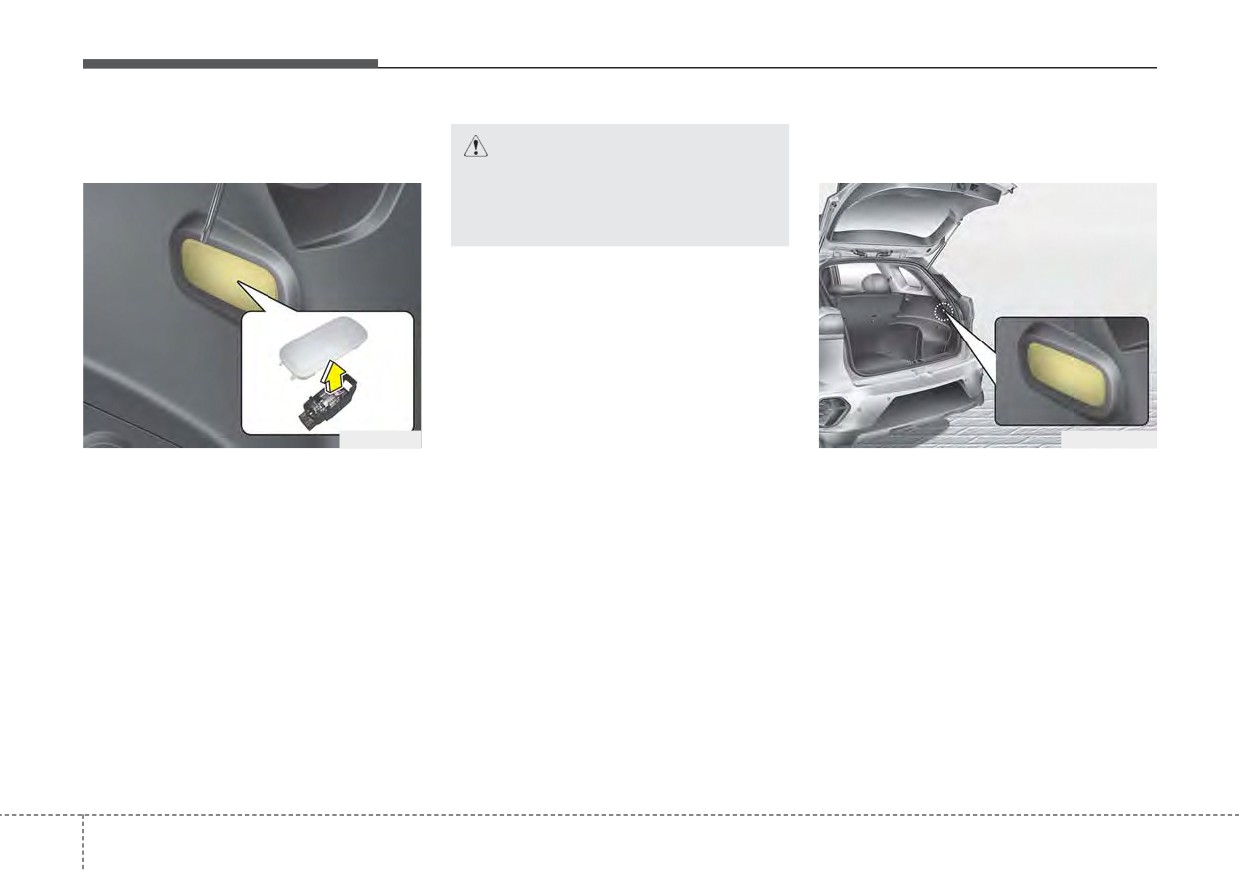
Maintenance
Liftgate room lamp (Bulb type)
Liftgate room lamp (LED type)
CAUTION
bulb replacement
bulb replacement
Be careful not to dirty or dam-
age the lens, lens tab, and plas-
tic housings.
ODE076050
ODEP079109
1. Using a flat-blade screwdriver,
If the liftgate room lamp (LED type)
gently pry the lens cover from
(1) does not operate, have the vehicle
lamp housing.
checked by an authorized Kia dealer.
2. Remove the bulb by pulling it
The LED lamp cannot be replaced
straight out.
as a single component because it is
an integrated unit. The LED lamp has
3. Install a new bulb in the socket.
to be replaced with the unit.
4. Align the lens cover tabs with the
lamp housing notches and snap
A skilled technician should check or
repair the liftgate room lamp (LED
the lens into place.
type), for it may damage related
parts of the vehicle.
7 104
Maintenance
APPEARANCE CARE
Exterior care
Finish maintenance
After washing the vehicle, test the
brakes while driving slowly to see if
Exterior general caution
Washing
they have been affected by water. If
To help protect your vehicle’s finish
It is very important to follow the label
braking performance is impaired, dry
directions when using any chemical
from rust and deterioration, wash it
the brakes by applying them lightly
thoroughly and frequently at least
cleaner or polish. Read all warning
while maintaining
a
slow
forward
and caution statements that appear
once a month with lukewarm or cold
speed.
water.
on the label.
If you use your vehicle for off-road
driving, you should wash it after each
✽ NOTICE
off-road trip. Pay special attention to
If you park the vehicle around a
the removal of any accumulation of
stainless signboard or windshield
salt, dirt, mud, and other foreign mate-
building etc., the plastic exterior
rials. Make sure the drain holes in the
trim
(bumper, spoiler, garnish,
lower edges of the doors and rocker
lamp, outside mirror etc.) may be
panels are kept clear and clean.
damaged by reflected sunlight from
Insects, tar, tree sap, bird droppings,
the external structure. To avoid
industrial pollution and similar
damaging the plastic exterior trim,
deposits can damage your vehicle’s
park the vehicle away from the
finish if not removed immediately.
areas where the reflected light may
Even prompt washing with plain water
occur or use a vehicle cover
(Depending on the vehicle, the type
may not completely remove all these
deposits. A mild soap, safe for use on
of exterior trim applied such as
spoiler may differ).
painted surfaces, may be used.
After washing, rinse the vehicle thor-
oughly with lukewarm or cold water.
Do not allow soap to dry on the finish.
7
105
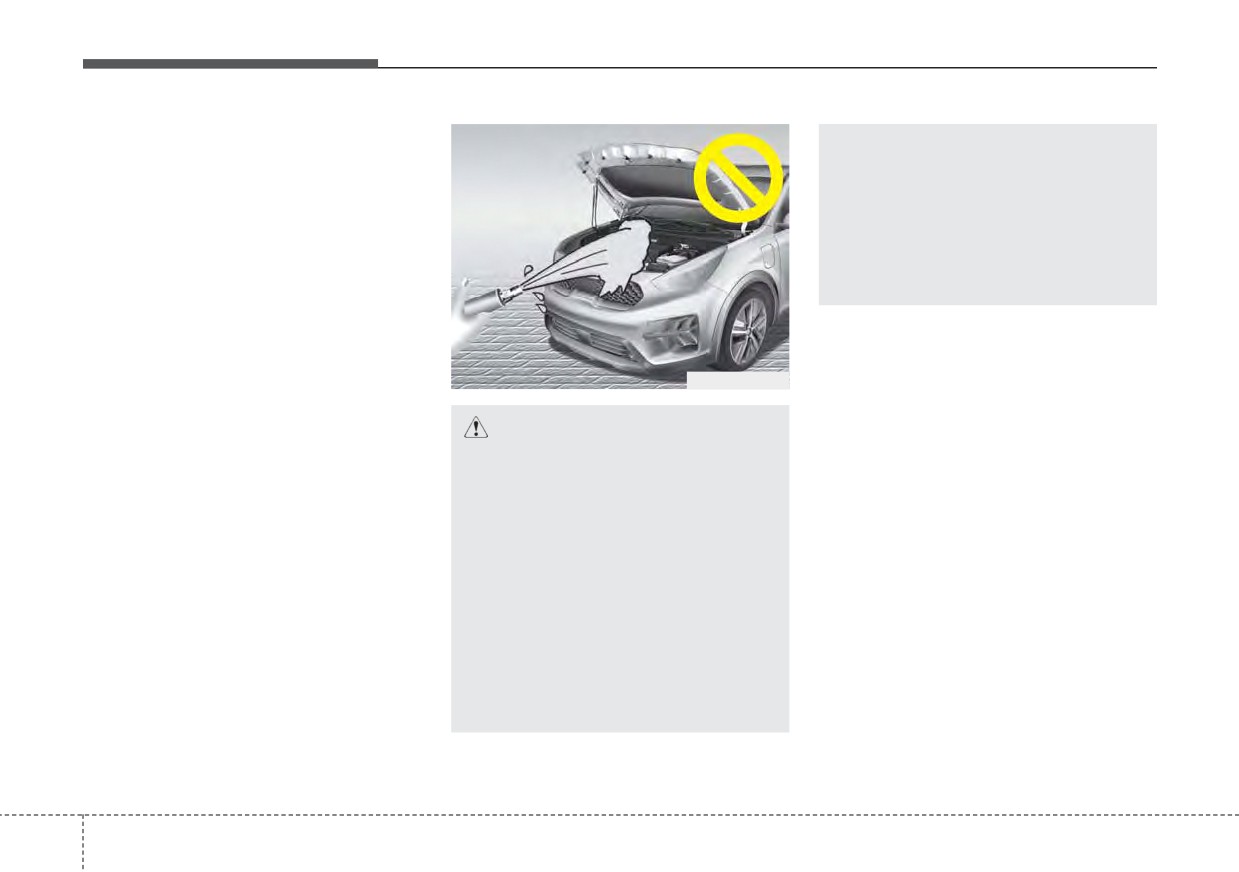
Maintenance
High-pressure washing
(Continued)
•
When using high-pressure wash-
•
To prevent damage to the
ers, make sure to maintain suffi-
charging door, make sure to
cient distance from the vehicle.
close and lock the vehicle
Insufficient clearance or excessive
doors when washing (high-
pressure can lead to component
pressure washing, automatic
damage or water penetration.
car washing, etc.) the vehicle.
•
Do not spray the camera, sensors
or its surrounding area directly with
a high pressure washer. Shock
applied from high pressure water
ODEP079071L
may cause the device to not oper-
ate normally.
CAUTION - Wet engine
•
Do not bring the nozzle tip close to
boots (rubber or plastic covers) or
•
Water washing in the engine
connectors as they may be dam-
compartment including high
aged if they come into contact with
pressure water washing may
high pressure water.
cause the failure of electrical
circuits located in the engine
compartment.
•
Never allow water or other liq-
uids to come in contact with
electrical/electronic compo-
nents inside the vehicle as
this may damage them.
(Continued)
7
106
Maintenance
Waxing
Finish damage repair
CAUTION - Drying vehicle
Wax the vehicle when water will no
Deep scratches or stone chips in the
longer bead on the paint.
•
Wiping dust or dirt off the
painted surface must be repaired
body with a dry cloth will
promptly. Exposed metal will quickly
Always wash and dry the vehicle
scratch the finish.
rust and may develop into a major
before waxing. Use a good quality
liquid or paste wax, and follow the
•
Do not use steel wool, abra-
repair expense.
manufacturer’s instructions. Wax all
sive cleaners, acid detergents
If your vehicle is damaged and
metal trim to protect it and to main-
or strong detergents contain-
requires any metal repair or replace-
tain its luster.
ing high alkaline or caustic
ment, be sure the body shop applies
agents on chrome-plated or
anti-corrosion materials to the parts
Removing oil, tar, and similar materi-
anodized aluminum parts.
repaired or replaced.
als with a spot remover will usually
This may result in damage to
strip the wax from the finish. Be sure
the protective coating and
to re-wax these areas even if the rest
cause discoloration or paint
of the vehicle does not yet need wax-
deterioration.
ing.
Do not apply wax on embossed
unpainted unit, as it may tarnish the
unit.
7
107
Maintenance
Bright-metal maintenance
Underbody maintenance
•
Immediately seek an inspection of
your vehicle if you become visually
•
To remove road tar and insects,
Road salt and other corrosive chemi-
aware of corrosion flaking or scal-
use a tar remover, not a scraper or
cals are used in cold weather states to
ing or if you become aware of a
other sharp object.
melt snow and prevent ice accumula-
change in vehicle performance,
tion. If these chemicals are not regu-
•
To protect the surfaces of bright-
such as soft or spongey brakes,
larly removed, they will corrode the
metal parts from corrosion, apply a
fluids leaking, impairment of direc-
vehicle underbody and over time dam-
coating of wax or chrome preser-
tional control, suspension
noises
age fuel lines, the fuel tank retention
vative and rub to a high luster.
or rattling metal straps.
system, the vehicle suspension, the
•
During winter weather or in coastal
exhaust system, and even the body
areas, cover the bright metal parts
frame. The National Highway Traffic
with a heavier coating of wax or
Safety Administration has warned all
preservative. If necessary, coat the
vehicle owners of all brands of the
parts with non-corrosive petroleum
need to take the following steps:
jelly or other protective compound.
• Wash the undercarriage of your
vehicle regularly during the winter
and whenever your vehicle has
been exposed to such salts or
chemicals.
• Do a thorough washing of the
undercarriage at the end of the
winter.
• Use professional service techni-
cians or governmental inspection
stations to annually inspect for cor-
rosion.
7
108
Maintenance
Aluminum wheel maintenance
Corrosion protection
WARNING
The aluminum wheels are coated with
Protecting your vehicle from corrosion
a clear protective finish.
After washing the vehicle, test
By using the most advanced design
the brakes while driving slowly
•
Do not use any abrasive cleaner,
and construction practices to combat
to see if they have been affected
polishing compound, solvent, or wire
corrosion, we produce vehicles of
by water. If braking performance
brushes on aluminum wheels. They
the highest quality. However, this is
is impaired, dry the brakes by
may scratch the finish.
only part of the job. To achieve the
applying them
lightly while
•
Clean the wheel when it has cooled.
long-term corrosion resistance your
maintaining
a
slow
forward
vehicle can deliver, the owner's
•
Use only a mild soap or neutral
speed.
cooperation and assistance is also
detergent, and rinse thoroughly with
required.
water. Also, be sure to clean the
wheels after driving on salted roads.
This helps prevent corrosion.
Common causes of corrosion
•
Avoid washing the wheels with high-
The most common causes of corro-
speed vehicle wash brushes.
sion on your vehicle are:
•
Do not use any alkaline or acid
• Road salt, dirt and moisture that is
detergents It may damage and cor-
allowed to accumulate underneath
rode the aluminum wheels coated
the vehicle.
with a clear protective finish.
• Removal of paint or protective
coatings by stones, gravel, abra-
sion or minor scrapes and dents
which leave unprotected metal
exposed to corrosion.
7
109
Maintenance
High-corrosion areas
High temperatures can also acceler-
Keep your vehicle clean
ate corrosion of parts that are not
If you live in an area where your vehi-
The best way to prevent corrosion is
properly ventilated so the moisture
cle is regularly exposed to corrosive
to keep your vehicle clean and free
can be dispersed. For all these rea-
materials, corrosion protection is
of corrosive materials. Attention to
sons, it is particularly important to
particularly important. Some of the
the underside of the vehicle is partic-
keep your vehicle clean and free of
common causes of accelerated cor-
ularly important.
mud or accumulations of other mate-
rosion are road salts, dust control
rials. This applies not only to the vis-
chemicals, ocean air and industrial
ible surfaces but particularly to the
•
If you live in a high-corrosion area
pollution.
underside of the vehicle.
— where road salts are used, near
the ocean, areas with industrial
Moisture breeds corrosion
pollution, acid rain, etc.—, you
To help prevent corrosion
should take extra care to prevent
Moisture creates the conditions in
You can help prevent corrosion from
corrosion. In winter, hose off the
which corrosion is most likely to
beginning by observing the following:
underside of your vehicle at least
occur. For example, corrosion is
once a month and be sure to clean
accelerated by high humidity, partic-
the underside thoroughly when
ularly when temperatures are just
winter is over.
above freezing. In such conditions,
the corrosive material is kept in con-
•
When cleaning underneath the
tact with the vehicle’s surface by
vehicle, give particular attention to
moisture that evaporates slowly.
the components under the fenders
Mud is particularly corrosive
and other areas that are hidden
from view. Do a thorough job; just
because it dries slowly and holds
moisture in contact with the vehicle.
dampening the accumulated mud
rather than washing it away will
Although the mud appears to be dry,
it can still retain the moisture and
accelerate corrosion rather than
prevent it. Water under high pres-
promote corrosion.
sure and steam are particularly
effective in removing accumulated
mud and corrosive materials.
7
110
Maintenance
• When cleaning lower door panels,
Keep paint and trim in good con-
Interior care
rocker panels and frame members,
dition
Interior general precautions
be sure that drain holes are kept
Scratches or chips in the finish
open so that moisture can escape
Prevent chemicals such as perfume,
should be covered with "touch-up"
and not be trapped inside to accel-
cosmetic oil, sun cream, hand clean-
paint as soon as possible to reduce
erate corrosion.
er, and air freshener from contacting
the possibility of corrosion. If bare
the interior parts because they may
metal is showing through, the atten-
cause damage or discoloration. If
tion of a qualified body and paint
Keep your garage dry
they do contact the interior parts,
shop is recommended.
Don't park your vehicle in a damp,
wipe them off immediately. If neces-
poorly ventilated garage. This cre-
sary, use a vinyl cleaner, see product
ates a favorable environment for cor-
Bird droppings : Bird droppings are
instructions for correct usage.
rosion. This is particularly true if you
highly corrosive and may damage
wash your vehicle in the garage or
painted surfaces in just a few hours.
drive it into the garage when it is still
Always remove bird droppings as
wet or covered with snow, ice or
soon as possible.
mud. Even a heated garage can con-
tribute to corrosion unless it is well
Don't neglect the interior
ventilated so moisture is dispersed.
Moisture can collect under the floor
mats and carpeting and cause corro-
sion. Check under the mats periodi-
cally to be sure the carpeting is dry.
Use particular care if you carry fertil-
izers, cleaning materials or chemi-
cals in the vehicle.
These should be carried only in prop-
er containers and any spills or leaks
should be cleaned up, flushed with
clean water and thoroughly dried.
7
111
Maintenance
Taking care of leather seats
Cleaning the leather seats
CAUTION -
Electrical
•
Vacuum the seat periodically to
•
Remove all contaminations instant-
components
remove dust and sand on the seat.
ly. Refer to instructions below for
Never allow water or other liq-
It will prevent abrasion or damage of
removal of each contaminant.
uids to come in contact with
the leather and maintain its quality.
•
Cosmetic products(sunscreen,
electrical/electronic
compo-
•
Wipe the natural leather seat cover
foundation, etc.)
nents inside the vehicle as this
often with dry or soft cloth.
- Apply cleansing cream on a cloth
may damage them.
•
Sufficient use of a leather protec-
and wipe the contaminated point.
tive may prevent abrasion of the
Wipe off the cream with a wet
cover and helps maintain the color.
cloth and remove water with a dry
CAUTION - Leather
cloth.
Be sure to read the instructions
When cleaning leather products
and consult a specialist when
•
Beverages(coffee, soft drink, etc.)
(steering wheel, seats etc.), use
using leather coating or protective
- Apply a small amount of neutral
neutral detergents or low alco-
agents.
detergent and wipe until contami-
hol content solutions. If you use
•
Leather with bright colors(beige,
nations do not smear.
high alcohol content solutions
cream beige) is easily contaminat-
or acid/alkaline detergents, the
•
Oil
ed and clear in appearance. Clean
color of the leather may fade or
- Remove oil instantly with
the seats frequently.
the surface may get stripped off.
absorbable cloth and wipe with
•
Avoid wiping with wet cloth. It may
stain remover for natural leather
cause the surface to crack.
only.
•
Chewing gum
- Harden the gum with ice and
remove gradually.
7
112
Maintenance
Fabric seat cover using precau-
Cleaning the upholstery and inte-
Cleaning the lap/shoulder belt
tions (If equipped)
rior trim
webbing
Please clean the fabric seats regu-
Vinyl
Clean the belt webbing with any mild
larly with a vacuum cleaner in con-
soap solution recommended for
Remove dust and loose dirt from
sideration of fabric material charac-
cleaning upholstery or carpet. Follow
vinyl with a whisk broom or vacuum
teristics. If they are heavily soiled
the instructions provided with the
cleaner. Clean vinyl surfaces with a
with beverage stains, etc., use a suit-
soap. Do not bleach or re-dye the
vinyl cleaner.
able interior cleaner. To prevent dam-
webbing because this may weaken it.
age to seat covers, wipe off the seat
covers down to the seams with a
Fabric
Cleaning the interior window
large wiping motion and moderate
Remove dust and loose dirt from fab-
glass
pressure using a soft sponge or
ric with a whisk broom or vacuum
microfiber cloth.
cleaner. Clean with a mild soap solu-
If the interior glass surfaces of the
tion recommended for upholstery or
vehicle become fogged (that is, cov-
Velcro closures on clothing or sharp
carpets. Remove fresh spots imme-
ered with an oily, greasy or waxy
objects may cause snagging or
diately with a fabric spot cleaner. If
film), they should be cleaned with a
scratches on the surface of the
fresh spots do not receive immediate
glass cleaner. Follow the directions
seats. Make sure not to rub such
attention, the fabric can be stained
on the glass cleaner container.
objects against the surface.
and its color can be affected. Also, its
fire-resistant properties can be
CAUTION - Rear window
reduced if the material is not proper-
Do not scrape or scratch the
ly maintained.
inside of the rear window. This
Using anything but recommended
may result in damage of the rear
cleaners and procedures may affect
window defroster grid.
the fabric’s appearance and fire-
resistant properties.
7
113
Maintenance
Window tinting precaution
Window tint(especially metallic film)
might cause communication disorder
or poor radio reception, and malfunc-
tion of the automatic lighting system
due to excessive change of illumina-
tion inside the vehicle. The solution
used might also flow into electric,
electronic devices causing disorder
and failure.
7
114
Maintenance
EMISSION CONTROL SYSTEM
The emission control system of your
Caution for the Inspection and
1. Crankcase emission control
vehicle is covered by a written limited
Maintenance Test (With Electronic
system
warranty. Please see the warranty
Stability Control (ESC) system)
The positive crankcase ventilation
information contained in the
•
To prevent the vehicle from mis-
system is employed to prevent air
Warranty & Consumer Information
firing during dynamometer test-
pollution caused by blow-by gases
manual in your vehicle.
ing, turn the Electronic Stability
being emitted from the crankcase.
Your vehicle is equipped with an
Control
(ESC) system off by
This system supplies fresh filtered air
emission control system to meet all
pressing the ESC switch.
to the crankcase through the air
applicable emission regulations.
•
After dynamometer testing is
intake hose. Inside the crankcase,
There are three emission control
completed, turn the ESC system
the fresh air mixes with blow-by
systems, as follows.
back on by pressing
the
ESC
gases, which then pass through the
switch again.
PCV valve into the induction system.
(1) Crankcase emission control sys-
tem
2. Evaporative emission con-
(2) Evaporative emission control sys-
trol (including ORVR:
tem
Onboard Refueling Vapor
Recovery) system
(3) Exhaust emission control system
The Evaporative Emission Control
System is designed to prevent fuel
In order to assure the proper function
vapors from escaping into the atmos-
of the emission control systems, it is
phere.
recommended that you have your
(The ORVR system is designed to
vehicle inspected and maintained by
an authorized Kia dealer in accor-
allow the vapors from the fuel tank to
be loaded into a canister while refu-
dance with the maintenance sched-
ule in this manual.
eling at the gas station, preventing
the escape of fuel vapors into the
atmosphere.)
7
115
Maintenance
Canister
3. Exhaust emission control
Engine exhaust gas precautions
system
(carbon monoxide)
Fuel vapors generated inside the fuel
tank are absorbed and stored in the
• Carbon monoxide can be present
The Exhaust Emission Control
onboard canister. When the engine is
System is a highly effective system
with other exhaust fumes.
running, the fuel vapors absorbed in
Therefore, if you smell exhaust
which controls exhaust emissions
the canister are drawn into the surge
while maintaining good vehicle per-
fumes of any kind inside your vehi-
tank through the purge control sole-
cle, have it inspected and repaired
formance.
noid valve.
immediately. If you ever suspect
exhaust fumes are coming into
your vehicle, drive it only with all
Purge Control Solenoid Valve
the windows fully open. Have your
(PCSV)
vehicle checked and repaired
The purge control solenoid valve is
immediately.
controlled by the Engine Control
Module
(ECM); when the engine
WARNING - Exhaust
coolant temperature is low during
idling, the PCSV closes so that evap-
Engine exhaust gases contain
orated fuel is not taken into the
carbon monoxide (CO). Though
engine. After the engine warms up
colorless and odorless, it is
during ordinary driving, the PCSV
dangerous and could be lethal if
opens to introduce evaporated fuel to
inhaled. Follow the instructions
the engine.
on this page to avoid CO poi-
soning.
7
116
Maintenance
•
Do not operate the engine in con-
Operating precautions for catalyt-
fined or closed areas
(such as
ic converters (if equipped)
WARNING - Fire
garages) any more than what is
•
Do not park, idle or drive the
necessary to move the vehicle in or
vehicle over or near flamma-
WARNING - Catalytic
out of the area.
ble objects, such as grass,
converter
•
When the vehicle is stopped in an
vegetation, paper, leaves, etc.
Keep away from the catalytic
open area for more than a short
A hot exhaust system can
time with the engine running,
converter and exhaust system
ignite flammable items under
while the vehicle is running or
adjust the ventilation system
(as
your vehicle.
immediately thereafter. The
needed) to draw outside air into the
•
Also, do not remove the heat
exhaust and catalytic systems
vehicle.
sink around the exhaust sys-
are very hot and may burn you.
•
Never sit in a parked or stopped
tem, do not seal the bottom of
vehicle for any extended time with
the vehicle and do not coat
the engine running.
the vehicle for corrosion con-
trol. It may present a fire risk
•
When the engine stalls or fails to
under certain conditions.
start, excessive attempts to restart
the engine may cause damage to
the emission control system.
7
117
Maintenance
CALIFORNIA
Your vehicle is equipped with a cat-
Failure to observe these precautions
PERCHLORATE NOTICE
alytic converter emission control
could result in damage to the catalyt-
Perchlorate Material-special handling
device.
ic converter and to your vehicle.
may apply, See www.dtsc.ca.gov/haz-
Additionally, such actions could void
Therefore, the following precautions
ardouswaste/ perchlorate.
your warranties.
must be observed:
•
Use only UNLEADED FUEL for
Notice to California Vehicle Dismantlers:
gasoline engines.
Perchlorate containing materials,
•
Do not operate the vehicle when
such as air bag inflators, seatbelt
there are signs of engine malfunc-
pretensioners and keyless remote
tion, such as misfire or a noticeable
entry batteries, must be disposed of
loss of performance.
according to Title 22 California Code
•
Do not misuse or abuse the
of Regulations
Chapter
67384.10
engine. Examples of misuse are
(a).
coasting with the ignition off and
descending steep grades in gear
with the ignition off.
•
Do not operate the engine at high
idle speed for extended periods (5
minutes or more).
•
Do not modify or tamper with any
part of the engine or emission con-
trol system. All inspections and
adjustments must be made by an
authorized Kia dealer.
•
Avoid driving with an extremely low
fuel level. Running out of fuel could
cause the engine to misfire, dam-
aging the catalytic converter.
7
118
Specifications, Consumer information and Reporting safety defects
Dimensions
8-2
Reporting Safety Defects (U.S. only)
8-17
Engine
8-2
Online factory authorized manuals (U.S. only). . 8-17
Bulb wattage
8-3
• Service manual
8-17
• Electrical troubleshooting manual
8-17
Tires and wheels
8-5
• Owner's manual
8-17
Gross vehicle weight
8-6
Luggage volume
8-7
Air conditioning system
8-7
Recommended lubricants and capacities
8-8
• Recommended SAE viscosity number
8-9
Vehicle identification number (VIN)
8-10
Vehicle certification label
8-11
Tire specification and pressure label
8-11
Engine number
8-11
Air conditioner compressor label
8-12
Refrigerant label
8-12
Consumer assistance (U.S. only)
8-13
• Toll free consumer assistance
8-13
• Emergency roadside assistance
8-13
• Trip interruption
8-14
• Registering your vehicle in a foreign country
8-15
Electrical Equipment (U.S. only)
8-16
8
• Installation of a mobile two-way radio system
8-16
Specifications, Consumer information, Reporting safety defects
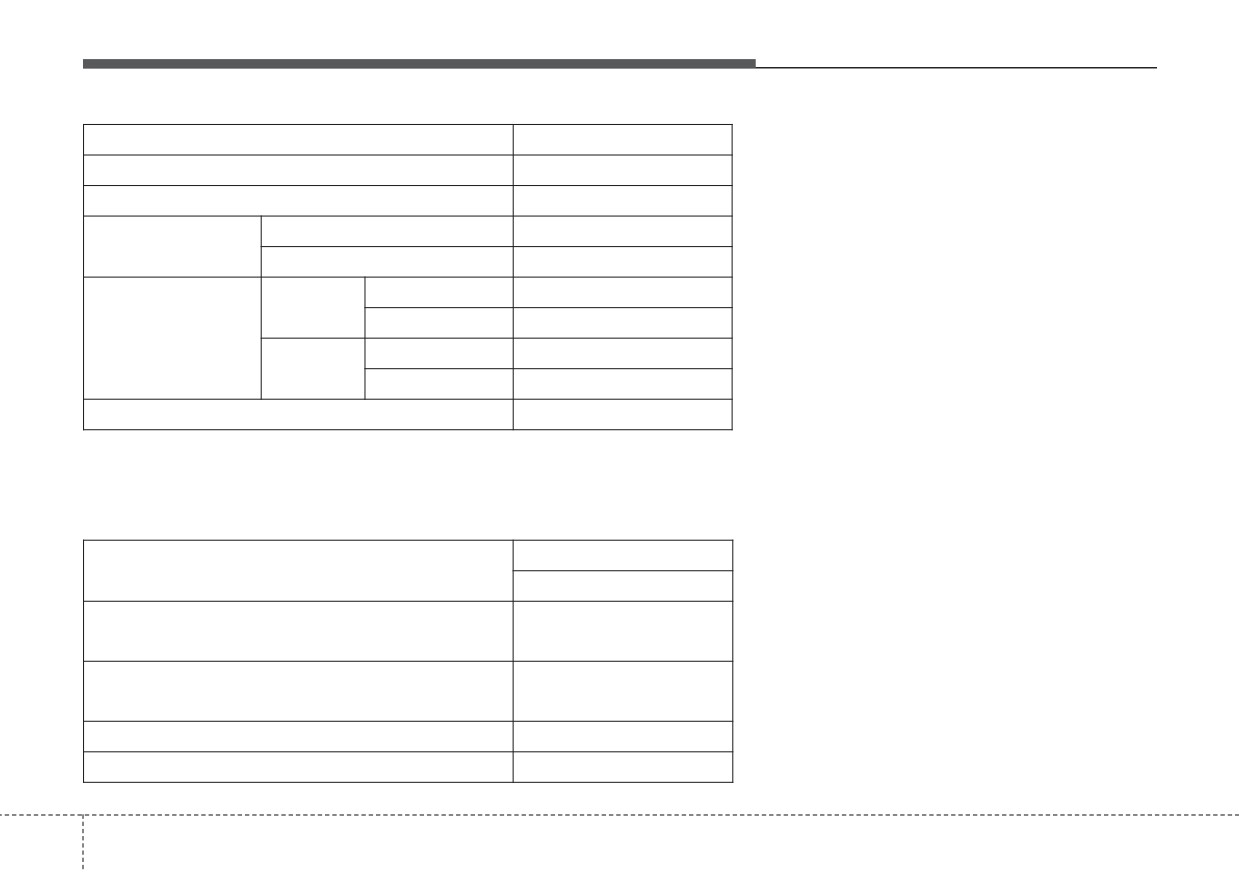
DIMENSIONS
Item
Unit : in (mm)
Overall length
171.4 (4,355)
Overall width
71.0 (1,805)
Without Roof rack
60.4 (1,535)
Overall height
With Roof rack
60.8 (1,545)
205/60R16
61.6 (1,565)
Front
225/45R18 *
61.2 (1,555)
Tread
205/60R16
62.2(1,579)
Rear
225/45R18 *
61.8 (1,569)
Wheelbase
106.3 (2,700)
* This tire is only for the HEV (Hybrid Electric Vehicle) system
ENGINE
Gasoline
Item
(Gasoline) 1.6 GDi
Displacement
96.4 (1,580)
[cu. in (cc)]
Bore x Stroke
2.8 X 3.8 (72 X 97)
[in. (mm)]
Firing order
1-3-4-2
No. of cylinders
4 In-line, DOHC
8
2
Specifications, Consumer information, Reporting safety defects
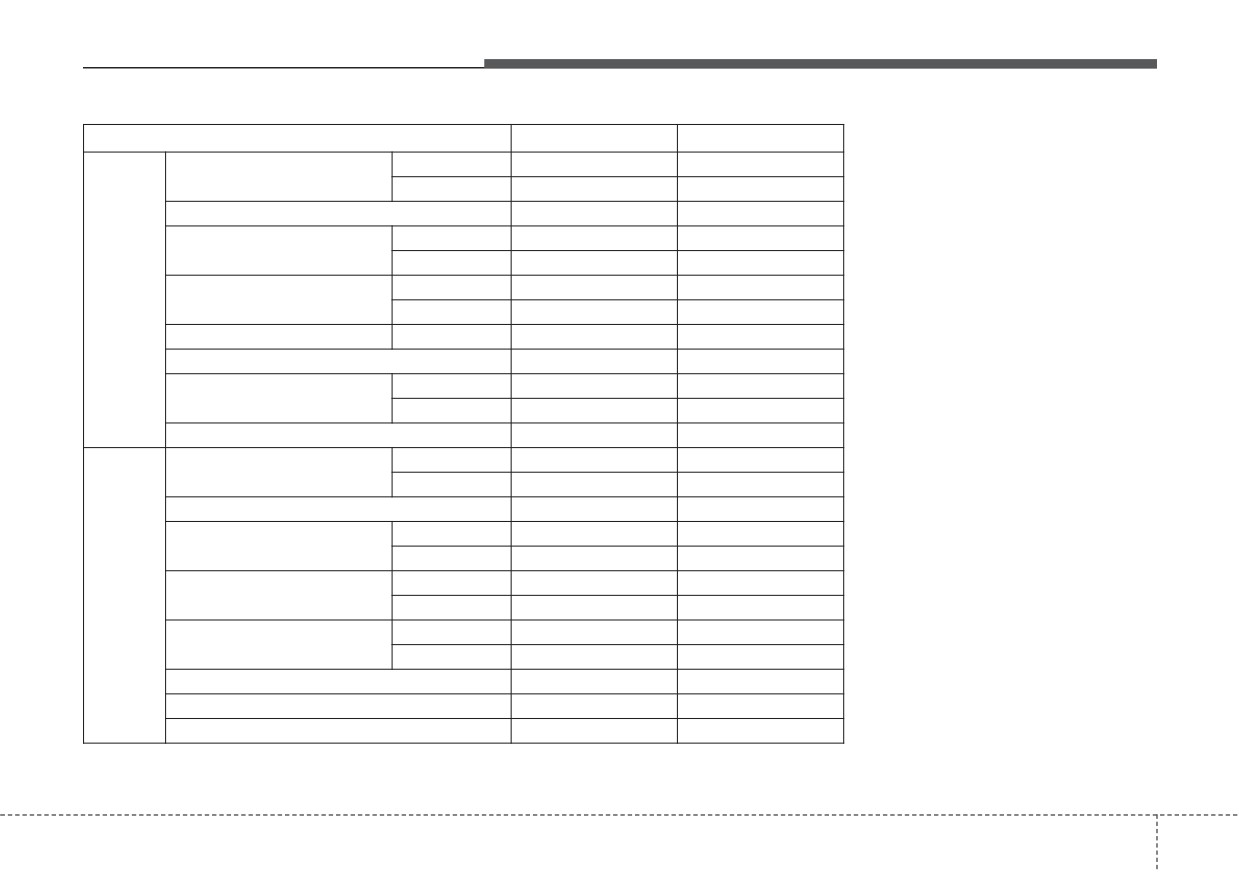
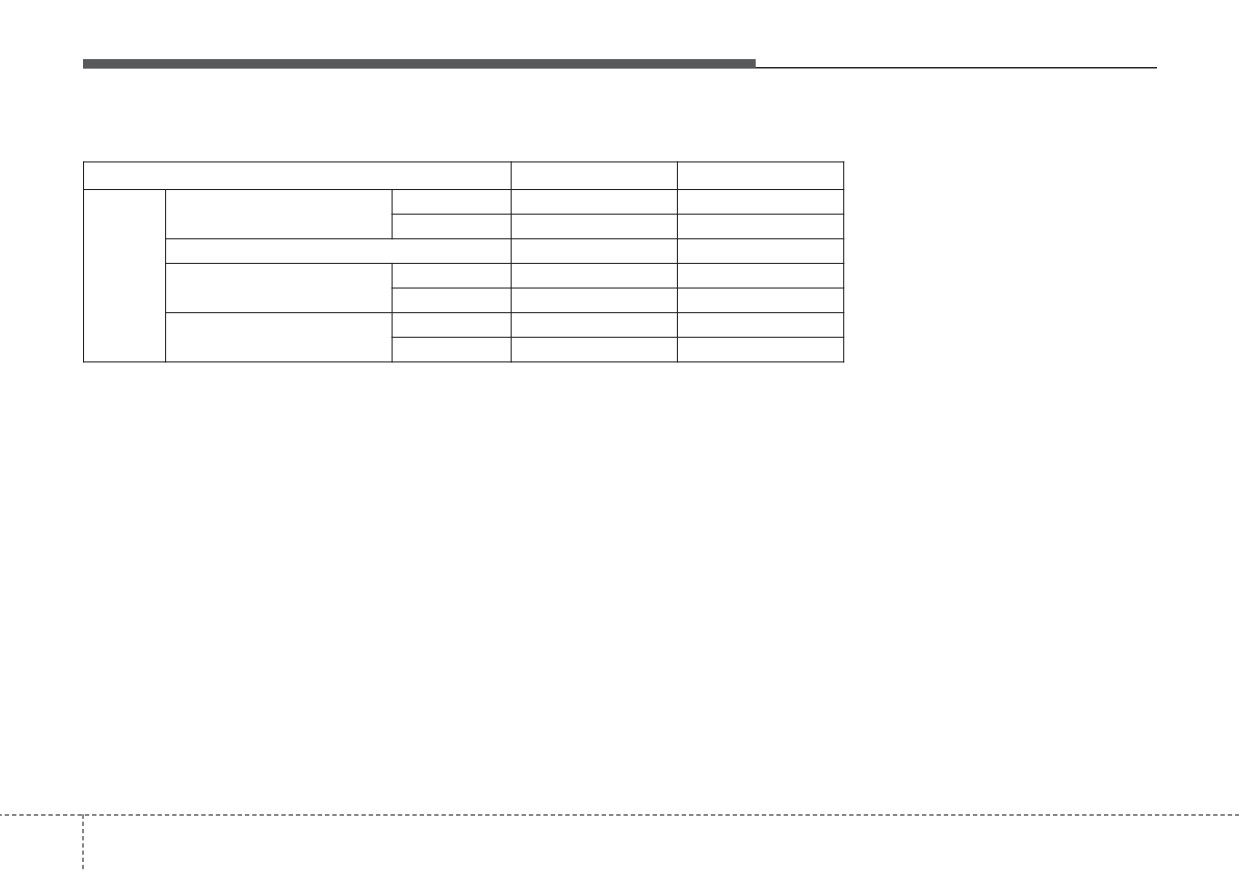
BULB WATTAGE
Light Bulb
Wattage (W)
Bulb type
Bulb type
60
HB3
Headlamps (Low/High)
LED type
LED
LED
Headlamps (Low)
LED
LED
Bulb type
28
2354NA
Turn signal lamps
LED type
LED
LED
Bulb type
5
W5W
Front
Front side marker
LED type
LED
LED
Position lamps
LED
LED
Daytime running lamps
LED
LED
Bulb type
51
HB4
Fog lamps
LED type
LED
LED
Side repeater lamps
LED
LED
Bulb type
21/5
P21/5W
Stop/Tail lamps
LED type
LED
LED
Stop lamps
LED
LED
Bulb type
7.6
W3.8W 2EA
Tail lamps
LED type
LED
LED
Bulb type
28
P28/8W
Rear
Turn signal lamps
LED type
21
P21W
Bulb type
5
W5W
Rear side marker
LED type
LED
LED
Back-up lamp
16
W16W
License plate lamp
5
W5W
High mounted stop lamp
LED
LED
(Continued)
8
3
Specifications, Consumer information, Reporting safety defects
(Continued)
Light Bulb
Wattage (W)
Bulb type
Bulb type
10
WEDGE
Map lamp
LED type
LED
LED
Vanity mirror lamps
5
FESTOON
Interior
Bulb type
10
FESTOON
Room lamp
LED type
LED
LED
Bulb type
10
FESTOON
Tailgate lamp
LED type
LED
LED
8
4
Specifications, Consumer information, Reporting safety defects
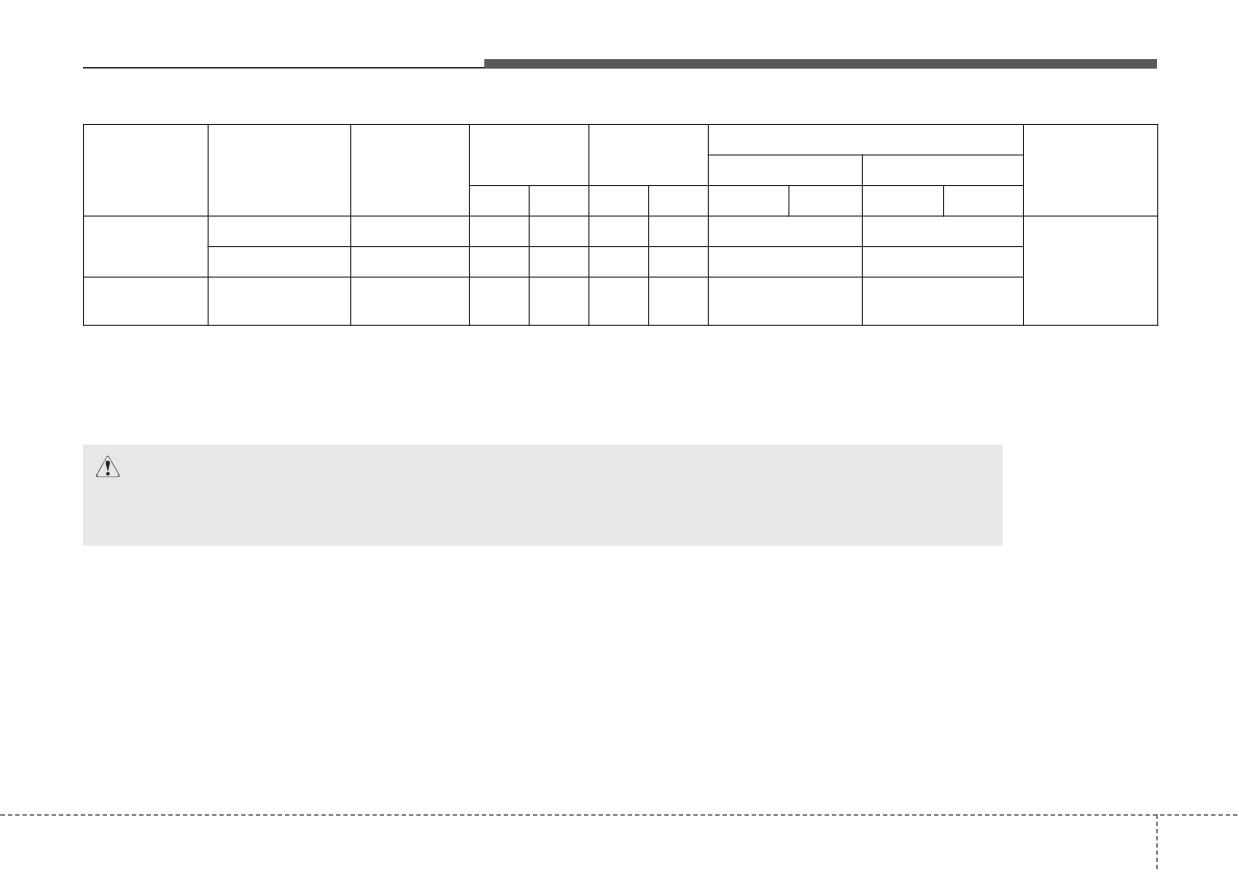
TIRES AND WHEELS
Load
Speed
Inflation pressure [bar(psi, kPa)]
Wheel lug nut
torque
Item
Tire size
Wheel size
Capacity
capacity
Normal load *3
Maximum load
[Kgf·m
LI *1
Kg
SS *2
Km/h
Front
Rear
Front
Rear
(lbf·ft, N·m)]
205/60 R16
6.5J X 16
92
630
H
210
2.5 (36, 250)
2.5 (36, 250)
Full size tire
11~13
225/45 R18 *4
7.5J X 18
91
615
V
240
2.5 (36, 250)
2.5 (36, 250)
(79 ~ 94,
Compact
107 ~ 127)
T125/80 D16 *4
4T X 16
97
730
M
130
4.2 (60, 420)
4.2 (60, 420)
Spare tire
*1: Load Index
*2: Speed Symbol
*3: Normal load : Up to 3 persons
*4: Only for Hybrid Electric Vehicle (HEV)
CAUTION
When replacing tires, use the same size originally supplied with the vehicle.
Using tires of a different size can damage the related parts or make them work irregularly.
✽ NOTICE
• It is permissible to add 3psi to the standard tire pressure specification if colder temperatures are expected soon.
Tires typically loose 1psi for every 12°F temperature drop. If extreme temperature variations are expected, re-
check your tire pressure as necessary to keep them properly inflated.
• We recommend that when replacing tires, use the same originally supplied with the vehicles. If not, that affects
driving performance.
• When driving in high altitude grades, it is natural for the atmospheric pressure to decrease. Therefore, please
check the tire pressure and add more air when necessary.
Additionally required tire air pressure per km above sea level: 1.5psi/km
8
5