Volvo XC40 (2019 year). Manual - part 23


  Index      Volvo     Volvo XC40 - service manual 2019 year in english


Search            


Content   ..  21  22  23  24   ..


Volvo XC40 (2019 year). Manual - part 23


||

STARTING AND DRIVING

396

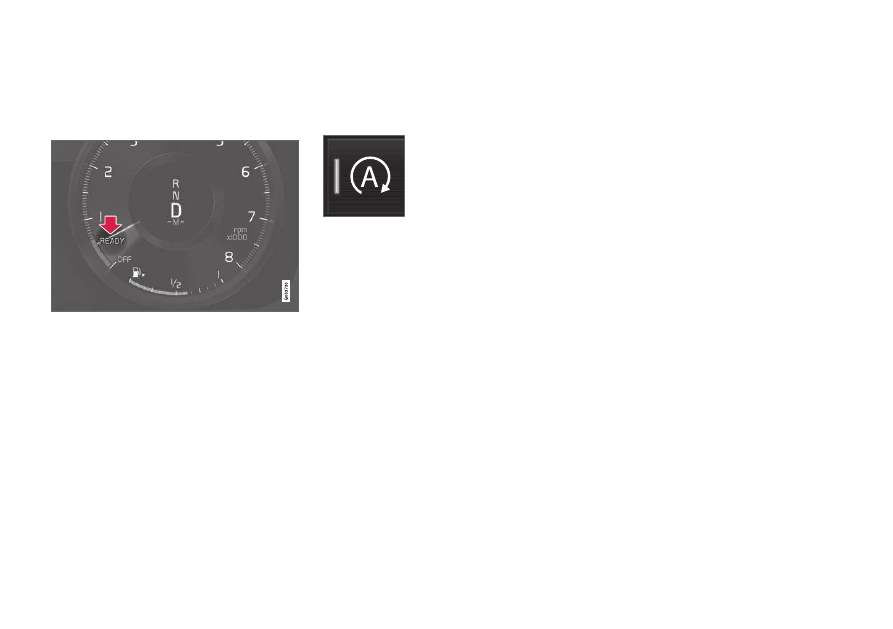
READY will be grayed-out when Start/Stop
is not available.

No message will be shown when the func-
tion is turned off.

The function is active and the engine has auto-stopped.

Related information

Temporarily deactivating the Start/Stop func-
tion (p. 396)

Conditions for the Start/Stop function
(p. 396)

Start/Stop function (p. 395)

Hill Start Assist (p. 384)

Auto-hold brakes (p. 383)

Temporarily deactivating the Start/

Stop function

In certain situations, it may be advisable to tem-
porarily turn the Start/Stop function off.

To turn off Start/Stop, tap the

Start/Stop

 function button in

the center display's Function
view. The indicator light in the
button will go out when the
function has been turned off.

The function will remain turned off until:

it is reactivated

the drive mode is changed to Eco or Comfort

the engine is restarted.

Related information

Driving with the Start/Stop function (p. 395)

Conditions for the Start/Stop function
(p. 396)

Conditions for the Start/Stop

function

Certain conditions must be met for Start/Stop to
function.

If any condition is not met, this will be indicated in
the instrument panel.

The engine does not auto-stop

The engine will not auto-stop if:

the vehicle has not reached a speed of
ca 10 km/h (6 mph) after starting.

after several auto-stops, the speed must
again exceed approximately ca 10 km/h
(6 mph) before the next auto-stop.

the driver's seat belt is unbuckled.

the start battery's charge is below the mini-
mum level.

the engine is not running at its normal oper-
ating temperature.

The ambient temperature is under approxi-
mately -5 °C (23 °F) or over approximately
37 °C (98 °F).

windshield heating is activated.

the climate system settings and the actual
climate in the passenger compartment differ.

the vehicle is backing up.

the start battery's temperature is above or
below the permitted limits.

the driver is turning the steering wheel hard.

STARTING AND DRIVING

397

the road gradient is very steep.

the hood is open.

driving at high altitude and the engine has
not reached its normal operating tempera-
ture.

ABS has been activated.

hard braking (even if the ABS system has
not been activated).

many starts during a short period of time
have triggered the starter motor's overheat-
ing protection.

a trailer's electrical system is connected to
the vehicle's electrical system.

the transmission is not running at its normal
operating temperature.

The gear selector is in mode M (

±).

The engine does not auto-start

The engine will not auto-start after an auto-stop
if:

the driver is not wearing a seat belt, the gear
selector is in the P position and the driver's
door is open. The engine must be started
normally.

The engine auto-starts while the brake
pedal is depressed

In the following situations, the engine will auto-
start even if the brake pedal is depressed:

High levels of condensation on the inside of
the windows.

the climate system settings and the actual
climate in the passenger compartment differ.

Electrical current consumption is temporarily
high or the start battery's charge is below the
minimum level.

The brake pedal is pumped repeatedly.

The hood is open.

The vehicle begins to roll or increases speed
slightly if the engine auto-stopped before the
vehicle was at a standstill.

The driver's seat belt is unbuckled with the
gear selector in the D or N positions.

The gear selector is moved from D to R or M
(

±).

The driver's door is opened with the gear
selector in D. An audible signal and a text
message informs the driver that the ignition
is on.

WARNING

Do not open the hood if the engine has auto-

stopped. Turn off the engine by switching off

the ignition before lifting the hood.

Related information

Start/Stop function (p. 395)

Driving with the Start/Stop function (p. 395)

Temporarily deactivating the Start/Stop func-
tion (p. 396)

STARTING AND DRIVING

* Option/accessory.

398

Leveling control

* and suspension

Self-leveling and suspension functions are con-
trolled automatically.

Shock absorbers (Four-C)

*

The shock absorbers are adapted to the selected
drive mode and vehicle speed. The shock absorb-
ers are normally set to provide the best possible

comfort and are adjusted continuously according
to the road surface and the vehicle's acceleration,
braking and cornering.

Symbols and messages in driver display

Symbol

Message

Meaning

Suspension

Deactivated by user

Level control has been switched off manually by the user.

Suspension

Temporarily reduced performence

Level control performance has been temporarily reduced due to extensive system use. If this
message appears frequently (e.g. several times in one week) contact a workshop

A

.

Suspension

Service required

A fault has occurred. Visit a workshop

A

 as soon as possible.

STARTING AND DRIVING

* Option/accessory.

399

Symbol

Message

Meaning

Suspension failure

Stop safely

A critical fault has occurred. Stop safely, have the car towed to a workshop

A

.

Suspension

Slow down Vehicle too high

A fault has occurred. If the message appears while driving, contact a workshop

A

.

Suspension

Auto adjusting vehicle level

A

An authorized Volvo workshop is recommended.

Related information

Drive modes

* (p. 390)

STARTING AND DRIVING

* Option/accessory.

400

Low Speed Control

*

The low-speed function, Low Speed Control
(LSC), facilitates and improves control and trac-
tion on rough roads and slippery surfaces, e.g.
when towing a trailer on grass or up boat ramps.

In vehicles equipped with drive mode button

*,

the function is included in the Off Road drive
mode.

Low Speed Control is designed for driving on
rough roads and when towing trailers at low
speeds, up to approximately 40 km/h (25 mph).

When driving at low speeds, LSC prioritizes low
gears and all-wheel drive to help avoid wheel spin
and improve traction on all wheels. The accelera-
tor pedal will be less responsive to improve trac-
tion and speed control at low speeds.

The function is activated together with Hill
Descent Control (HDC), which makes it possible
to control speed going down steep hills using the
accelerator pedal and reduces the need to use
the brake pedal. The system makes it possible to
maintain a low and uniform speed when driving
down steep hills.

NOTE

When LSC with HDC is activated, the feel of
the accelerator pedal and engine response
will change.

NOTE

This drive mode is not designed to be used
for normal street driving.

NOTE

The function is deactivated when driving at
high speeds and must be reactivated at lower
speeds if so desired.

Related information

Activating and deactivating Low Speed Con-
trol

* using the function button (p. 400)

Changing drive mode

* (p. 392)

Hill Descent Control

* (p. 401)

All Wheel Drive (AWD) (p. 390)

Activating and deactivating Low

Speed Control

* using the function

button

Vehicles that are not equipped with a drive
mode button in the center console have a func-
tion button for Low Speed Control with 

Hill

Descent Control

 in the center display's Func-

tion view.

Selecting Low Speed Control in the
center display's Function view

Tap the 

Hill Descent Control

 button to

activate or deactivate the function.

> An indicator light in the button will illumi-

nate when the function is activated.

When the engine is switched off, the function will
be automatically deactivated.

NOTE

The function is deactivated when driving at
high speeds and must be reactivated at lower
speeds if so desired.

STARTING AND DRIVING

}}

* Option/accessory.

401

Related information

Low Speed Control

* (p. 400)

Changing drive mode

* (p. 392)

Hill Descent Control

*

The function for assisting when driving downhill,
Hill Descent Control (HDC), is a low-speed
function with increased engine braking. The
function makes it possible to increase or
decrease the vehicle's speed on steep downhill
gradients by only using the accelerator pedal,
without applying the brakes.

In vehicles equipped with drive mode button

*,

the function is included in the Off Road drive
mode.

HDC is designed for driving on rough roads at
low speeds and downhill gradients with slippery
or otherwise difficult road surfaces. The driver
does not need to use the brake pedal but can
instead focus on steering.

WARNING

HDC is only intended to be a supplementary

braking aid and it does not function in all sit-

uations.
The driver is always ultimately responsible for

operating the vehicle in a safe manner.

Function

Hill Descent Control allows the vehicle to move
forward or backward at very low speeds assisted
by the brake system. The driver can increase the
speed by pressing the accelerator pedal. When
the accelerator pedal is released, the vehicle will

return to very low speed regardless of how steep
the hill is and without the brakes needing to be
applied. The brake lights will illuminate when the
function is activated.

The driver can brake to stop or slow the vehicle
at any time by depressing the brake pedal.

HDC is activated along with Low Speed Control
(LSC), which facilitates and improves traction and
control on rough and slippery surfaces. The sys-
tem is intended to be used at low speeds, up to
approximately 40 km/h (25 mph).

To keep in mind when using HDC

If the function is switched off while driving on
a steep downhill gradient, braking effect will
be gradually reduced.

HDC can be used in gear positions D and R,
and in manual gears 1 or 2.

It is not possible to manually shift to third
gear or higher when HDC is active.

||

STARTING AND DRIVING

* Option/accessory.

402

NOTE

When LSC with HDC is activated, the feel of
the accelerator pedal and engine response
will change.

NOTE

This drive mode is not designed to be used
for normal street driving.

NOTE

The function is deactivated when driving at
high speeds and must be reactivated at lower
speeds if so desired.

Related information

Activating and deactivating Hill Descent Con-
trol

* using the function button (p. 402)

Changing drive mode

* (p. 392)

Low Speed Control

* (p. 400)

All Wheel Drive (AWD) (p. 390)

Activating and deactivating Hill

Descent Control

* using the function

button

Vehicles that are not equipped with a drive
mode button in the center console have a func-
tion button for Hill Descent Control with 

Hill

Descent Control

 in the center display's Func-

tion view.

Selecting Hill Descent Control in the
center display's Function view

HDC only works at low speeds.

Tap the 

Hill Descent Control

 button to

activate or deactivate the function.

> An indicator light in the button will illumi-

nate when the function is activated.

When the engine is switched off, the function will
be automatically deactivated.

NOTE

The function is deactivated when driving at
high speeds and must be reactivated at lower
speeds if so desired.

Related information

Hill Descent Control

* (p. 401)

Changing drive mode

* (p. 392)

STARTING AND DRIVING

403

Economical driving

Drive economically and environmentally con-
scious by thinking ahead, avoiding rapid starts
and stops and adapting driving style and speed
to the current traffic conditions.

Driving economically conserves natural
resources

Observe the following rules:

Do not warm up the engine by idling. It is
better to begin driving normally immediately
after starting the engine. A cold engine uses
more fuel than a warm engine and is subject
to increased wear.

Whenever possible, avoid using the vehicle to
drive short distances. The engine does not
have time to reach a normal operating tem-
perature and this leads to increased fuel
consumption.

Maintain a steady speed and a generous fol-
lowing distance to traffic ahead to minimize
braking.

For lower fuel consumption, activate Eco
drive mode.

Use the Eco Coast function in drive mode
Eco - engine braking is deactivated, allowing
the vehicle's kinetic energy to be used to roll
greater distances.

Use gear D as often as possible and avoid
using the kick-down function.

Fuel consumption is increased at high
speeds - air resistance increases with speed.

Remove unnecessary items from the vehicle
- the heavier the load, the higher the fuel
consumption.

Maintain the correct pressure in the tires and
check pressure regularly.

The type of tires used could affect fuel con-
sumption - consult a retailer for advice on
suitable tires.

Do not use winter tires after the winter sea-
son has ended.

Roof loads increase air resistance and
increase fuel consumption. Remove roof
boxes, ski racks, etc. that are not in use.

Avoid driving with the windows open.

Using the trip computer's fuel consumption
indicators can help you learn how to drive
more economically.

Other factors that decrease fuel
consumption

Dirty air cleaner.

Dirty engine oil and clogged oil filter.

Incorrect front-end alignment.

Incorrect wheel alignment.

Some of the above items and others are checked
as part of Volvo's standard maintenance sched-
ule.

Related information

Drive-E 

‒ purer driving pleasure (p. 27)

ECO drive mode (p. 392)

Checking tire pressure (p. 499)

STARTING AND DRIVING

404

Preparing for a long trip

It is important to have the vehicle's systems and
equipment checked carefully before driving long
distances.

Check that:

the engine is running properly and that fuel
consumption is normal

there are no leaks (fuel, oil or other fluid)

the brake pedal is functioning optimally

all lights are working 

‒ adjust the headlight

height if the vehicle is carrying a heavy load

tire tread depth and air pressure are at cor-
rect levels. Change to snow tires when driv-
ing in areas where there is a risk of snowy or
icy roads.

the start battery is sufficiently charged

the wiper blades are in good condition

Related information

Checking tire pressure (p. 499)

Filling washer fluid (p. 590)

Winter driving (p. 404)

Economical driving (p. 403)

Vehicle modem settings (p. 474)

Loading recommendations (p. 529)

Driving with a trailer (p. 414)

Pilot Assist (p. 279)

Speed limiter (p. 250)

Tire sealing system (p. 515)

Winter driving

It is important to check the vehicle before driving
in cold/snowy conditions to make sure it can be
driven safely.

Before the cold season arrives:

Make sure the engine coolant contains 50%
antifreeze. This mixture helps protect the
engine from frost erosion down to
approx. -35 °C (-31 °F). Do not mix different
types of antifreeze as this could pose a
health risk.

Keep the fuel tank well filled to prevent con-
densation from forming.

Check the viscosity of the engine oil. Oil with
low viscosity (thinner oil) improves cold-
weather starting and reduces fuel consump-
tion when driving with a cold engine.

CAUTION

Low-viscosity oil should not be used with hard
driving or in hot weather.

Check the condition and charge level of the
start battery. Cold weather places greater
demands on the start battery and reduces its
capacity.

Use washer fluid containing antifreeze to
help prevent ice from forming in the washer
fluid reservoir.

STARTING AND DRIVING

* Option/accessory.

405

Slippery driving conditions

For optimal traction and roadholding, Volvo rec-
ommends using snow tires on all wheels when-
ever there is a risk of snow or ice on the road.

NOTE

Certain countries require use of winter tires
by law. Not all countries permit the use of
studded tires.

Practice driving on slippery surfaces under con-
trolled conditions to learn how the vehicle reacts.

Related information

Snow tires (p. 513)

Snow chains (p. 514)

Braking on salted roads (p. 379)

Braking on wet roads (p. 378)

Filling washer fluid (p. 590)

Start battery (p. 559)

Replacing windshield wiper blades (p. 588)

Changing rear window wipers (p. 587)

Refilling coolant (p. 552)

Driving through standing water

Driving the vehicle through a deep pool of stand-
ing water on a water-covered roadway is called
fording. This must be done with great caution.

The vehicle can be driven through water up to a
depth of 45 cm (17.7 in) at no more than walking
speed. Be particularly careful when driving
through flowing water.

When driving through standing water, drive slowly
and do not stop the vehicle. When you have
passed the water, press lightly on the brake pedal
and check that the brakes are functioning prop-
erly. Water, mud, slush, etc. can make the brake
linings slippery, resulting in delayed braking
effect.

If the vehicle is equipped with contacts for an
electric heater or trailer coupling, clean these
after driving in water or mud.

Do not allow the vehicle to stand in water up
to the sills any longer than absolutely neces-
sary. This could result in electrical malfunc-
tions.

CAUTION

Engine damage could occur if water
enters the air cleaner.

If water enters the transmission, the lubri-
cating ability of the oils is reduced and
the service life of these systems is short-
ened.

Damage to any component, engine,
transmission, turbocharger, differential or
its internal components caused by flood-
ing, vapor lock or insufficient oil is not
covered under warranty.

If the engine stalls while the vehicle is in
water, do not attempt to restart it. Have
the vehicle towed out of the water to a
workshop. An authorized Volvo workshop
is recommended. Risk of engine failure.

Related information

Recovery (p. 420)

Low Speed Control

* (p. 400)

STARTING AND DRIVING

406

Opening/closing the fuel filler door

The vehicle must be unlocked before the fuel
filler door can be opened

5

.

An arrow next to the fuel pump
symbol in the instrument panel
indicates the side of the vehicle
on which the fuel filler door is
located.

1. Open the fuel filler door by pressing lightly

on its rear edge.

2. After refueling, press the fuel filler door

lightly to close it.

Related information

Refueling (p. 406)

Refueling

The fuel tank is equipped with a fuel filling sys-
tem without a cover.

Refueling the vehicle at a service
station

Refueling is done as follows.

1. Turn off the engine and open the fuel filler

door.

2. Select a fuel approved for use in the vehicle.

For more information on approved fuels, see
the section on "Gasoline".

3. Insert the pump's nozzle into the fuel filler

pipe's opening. There are two flaps just
inside the fuel filler pipe and the pump's noz-
zle must push both of these flaps open
before fuel can be added.

4. Avoid overfilling the tank. Do not press the

handle on the filler nozzle again after it has
initially stopped pumping.
> The fuel tank is now filled.

NOTE

An over-full tank may overflow in hot weather.

CAUTION

Avoid spilling gasoline during refueling. In
addition to causing damage to the environ-
ment, gasolines containing alcohol can cause
damage to painted surfaces, which may not
be covered under the New Vehicle Limited
Warranty.

Refueling from a fuel container

When filling from a fuel container, use the funnel
provided in a foam block under the floor hatch in
the cargo compartment.

1. Open the fuel filler door.

2. Insert the funnel into the fuel filler pipe's

opening. There are two flaps just inside the
fuel filler pipe and the tube section of the
funnel must push both of these flaps open
before fuel can be added.

5

Only locking and unlocking using the remote key, Passive Entry or Volvo On Call will affect the status of the fuel filler door.

STARTING AND DRIVING

}}

407

Related information

Opening/closing the fuel filler door (p. 406)

Fuel

Volvo recommends the use of detergent gaso-
line to control engine deposits.

Deposit control gasoline (gasoline with
detergent additives)

Detergent gasoline is effective in keeping injec-
tors and intake valves clean. Consistent use of
deposit control gasolines will help ensure good
driveability and fuel economy. If you are not sure
whether the gasoline contains deposit control
additives, check with the service station operator.

NOTE

Volvo recommends not using external fuel
injector cleaning systems, e.g. do not add
detergent additives to gasoline before or after
refueling.

Unleaded fuel

All Volvo vehicles have a three-way catalytic con-
verter and must only use unleaded gasoline. US
and Canadian regulations require that pumps
delivering unleaded gasoline are labeled
"UNLEADED". Only the nozzles of these pumps
will fit in your vehicle's fuel filler inlet. It is unlaw-
ful to dispense leaded fuel into a vehicle labeled
"unleaded gasoline only". Leaded gasoline dam-
ages the three-way catalytic converter and the
heated oxygen sensor system. Repeated use of
leaded gasoline will lessen the effectiveness of

the emission control system and could result in
loss of emission warranty coverage. State and
local vehicle inspection programs will make
detection of misfueling easier, possibly resulting
in emission test failure for misfueled vehicles.

NOTE

Some U.S. and Canadian gasolines contain an
octane enhancing additive called methyl-
cyclopentadienyl manganese tricarbonyl
(MMT). If such fuels are used, your Emission
Control System performance may be affected,
and the Check Engine Light (malfunction
indicator light) located on your instrument
panel may light. If this occurs, please return
your vehicle to a trained and qualified Volvo
service technician for service.

Gasoline containing alcohol and ethers,
"Oxygenated fuels"

Some fuel suppliers sell gasoline containing
"oxygenates" which are usually alcohols or
ethers. In some areas, state or local laws require
that the service pump be marked indicating use
of alcohols or ethers. However, there are areas in
which the pumps are unmarked. If you are not
sure whether there is alcohol or ethers in the
gasoline you buy, check with the service station
operator. To meet seasonal air quality standards,
some areas require the use of "oxygenated" fuel.

||

STARTING AND DRIVING

408

Volvo permits the use of the following "oxygen-
ated" fuels. However, the specified octane ratings
must still be met.

Alcohol - Ethanol

Fuels containing up to 10% ethanol by volume
may be used. Ethanol may also be referred to as
Ethyl alcohol, or "Gasohol".

Ethers - MTBE/ETBE: Fuels containing up to
15% MTBE/ETBE may be used.

Methanol

Do not use gasolines containing methanol
(methyl alcohol, wood alcohol). This practice can
result in vehicle performance deterioration and
can damage critical parts in the fuel system. Such
damage may not be covered under the New
Vehicle Limited Warranty.

Related information

Octane rating (p. 408)

Opening/closing the fuel filler door (p. 406)

Refueling (p. 406)

Emission controls (p. 410)

Octane rating

Volvo demands premium fuel (91 octane

6

 or

higher) for all T5, T6 and T8 engines. See both
supplied decal examples.

Minimum octane

Decals

Sample fuel pump octane label

6

.

Decal on the inside of the fuel filler flap on cars that
require premium fuel

7

.

TOP TIER Detergent Gasoline

Volvo endorses the use of "TOP TIER Detergent
Gasoline" where available to help maintain
engine performance and reliability. TOP TIER
Detergent Gasoline meets a new standard jointly
established by leading automotive manufactures
to meet the needs of today's advanced engines.
Qualifying gasoline retailers (stations) will, in
most cases, identify their gasoline as having met
the "TOP TIER Detergent Gasoline" standards.

NOTE

Information about TOP TIER Detergent Gaso-
line is available at www.toptiergas.com.

6

AKI (Anti Knock Index) is an average value of RON (Research Octane Number) and MON (Motor Octane Number) - (RON)+(MON)/2

7

For supplementary information - see the car's Service and Warranty Booklet.

STARTING AND DRIVING

409

NOTE

When switching to higher octane fuel or
changing gasoline brands, it may be neces-
sary to fill the tank more than once before a
difference in engine operation is noticeable.

Fuel Formulations

Do not use gasoline that contains lead or manga-
nese as a knock inhibitor, and do not use lead
additives. Besides damaging the exhaust emis-
sion control systems on your vehicle, lead has
been strongly linked to certain forms of cancer.

Many fuels contain benzene as a solvent.
Unburned benzene has been strongly linked to
certain forms of cancer. If you live in an area
where you must fill your own gas tank, take pre-
cautions. These may include:

standing upwind away from the filler nozzle
while refueling

refueling only at gas stations with vapor
recovery systems that fully seal the mouth of
the filler neck during refueling

wearing neoprene gloves while handling a
fuel filler nozzle.

Use of Additives

With the exception of gas line antifreeze during
winter months, do not add solvents, thickeners, or

other store-bought additives to your vehicle's
fuel, cooling, or lubricating systems. Overuse may
damage your engine, and some of these additives
contain organically volatile chemicals. Do not
needlessly expose yourself to these chemicals.

WARNING

Never carry a cell phone that is switched on

while refueling your vehicle. If the phone rings,

this may cause a spark that could ignite gaso-

line fumes, resulting in fire and injury.

WARNING

Carbon monoxide is a poisonous, colorless,

and odorless gas. It is present in all exhaust

gases. If you ever smell exhaust fumes inside

the vehicle, make sure the passenger com-

partment is ventilated, and immediately return

the vehicle to a trained and qualified Volvo

service technician for correction.

Demanding driving

In demanding driving conditions, e.g. when driving
in a hot climates, driving with a trailer or driving
for longer periods at higher altitudes (mountain
landscapes) than normal, it is recommended
switching to a higher octane fuel than AKI 91

6

 or

changing gasoline brand to take full advantage of
your car's engine capacity and obtain the opti-
mum driving force.

Related information

Fuel (p. 407)

Emission controls (p. 410)

6

AKI (Anti Knock Index) is an average value of RON (Research Octane Number) and MON (Motor Octane Number) - (RON)+(MON)/2

STARTING AND DRIVING

410

Emission controls

Three-way catalytic converter

Keep your engine properly tuned. Certain
engine malfunctions, particularly involving the
electrical, fuel or distributor ignition systems,
may cause unusually high three-way catalytic
converter temperatures. Do not continue to
operate your vehicle if you detect engine
misfire, noticeable loss of power or other
unusual operating conditions, such as engine
overheating or backfiring. A properly tuned
engine will help avoid malfunctions that
could damage the three-way catalytic con-
verter.

Do not park your vehicle over combustible
materials, such as grass or leaves, which can
come into contact with the hot exhaust sys-
tem and cause such materials to ignite under
certain wind and weather conditions.

Excessive starter cranking (in excess of one
minute), or an intermittently firing or flooded
engine can cause three-way catalytic con-
verter or exhaust system overheating.

Remember that tampering or unauthorized
modifications to the engine, the Engine Con-
trol Module, or the vehicle may be illegal and
can cause three-way catalytic converter or
exhaust system overheating. This includes:
altering fuel injection settings or compo-
nents, altering emission system components

or location or removing components, and/or
repeated use of leaded fuel.

NOTE

Unleaded fuel is required for vehicles with
three-way catalytic converters.

Heated oxygen sensors

The heated oxygen sensors monitor the oxygen
content of the exhaust gases. Readings are fed
into a control module that continuously monitors
engine functions and controls fuel injection. The
ratio of fuel to air into the engine is continuously
adjusted for efficient combustion to help reduce
harmful emissions.

Related information

Octane rating (p. 408)

Fuel (p. 407)

Overheating of engine and

transmission

In demanding driving conditions, such as driving
in mountainous areas or hot weather, there is a
risk of the engine or transmission overheating,
especially when carrying heavy loads.

Engine power may be temporarily limited.

Remove any auxiliary lights mounted in front
of the grille when driving in hot weather.

If the temperature in the engine's cooling
system becomes too high, a warning symbol
will appear in the instrument panel along with
the message 

Engine temperature


High

temperature Stop safely

. Pull over to a

safe location and let the engine idle for a few
minutes to cool down.

If the message 

Engine temperature


High

temperature Turn off engine

 or 

Engine

coolant


Level low, turn off engine

 is dis-

played, stop the vehicle and turn off the
engine.

If the transmission begins to overheat, an
alternative gear shifting program will be
selected. An integrated protective function
will also be activated, the warning symbol will
illuminate and the message 

Transmission

warm


Reduce speed to lower

temperature

 or 

Transmission hot


Stop

safely, wait for cooling

 will be displayed in

the instrument panel. Follow the recommen-
dations given by reducing speed or stopping

STARTING AND DRIVING

* Option/accessory.

411

the vehicle safely and letting the engine idle
for a few minutes to let the transmission
cool.

If the vehicle begins to overheat, the air con-
ditioning may be temporarily switched off.

After a prolonged period of driving in
demanding conditions, do not turn off the
engine immediately after stopping.

NOTE

It is normal for the engine's cooling fan to
operate for a short time after the engine is
switched off.

Symbols in the instrument panel

Symbol

Meaning

High engine temperature. Follow
the recommendations provided.

Low coolant level. Follow the rec-
ommendations provided.

Transmission hot/overheated/cool-
ing. Follow the recommendations
provided.

Related information

Refilling coolant (p. 552)

Driving with a trailer (p. 414)

Preparing for a long trip (p. 404)

Gear indicator

* (p. 389)

Battery drain

The electrical functions in the vehicle drain the
battery to varying degrees. Avoid using ignition
mode II when the engine is switched off. Use
ignition mode I instead, as this uses less electri-
cal current.

Note that certain accessories may also drain
power from the electrical system. Do not use
functions that use a lot of electrical current when
the engine is turned off. Examples of such func-
tions are:

blower

headlights

windshield wipers

audio system (especially at high volume).

If the starter battery voltage is low, a message is
shown in the driver display. The vehicle's energy-
saving function will then turn off or reduce certain
functions, such as the blower and/or the audio
system.

Charge the battery by starting the engine
and let it run for at least 15 minutes (driving
charges the battery faster than letting the
engine idle).

Related information

Start battery (p. 559)

Ignition modes (p. 374)


Content   ..  21  22  23  24   ..