Volkswagen Beetle Convertible (2015 year). Manual - part 6


  Index      Volkswagen     Volkswagen Beetle Convertible - service manual 2015 year in english


Search            copyright infringement  


Content   ..  4  5  6  7   ..


Volkswagen Beetle Convertible (2015 year). Manual - part 6


Installing and removing the wind blocker 


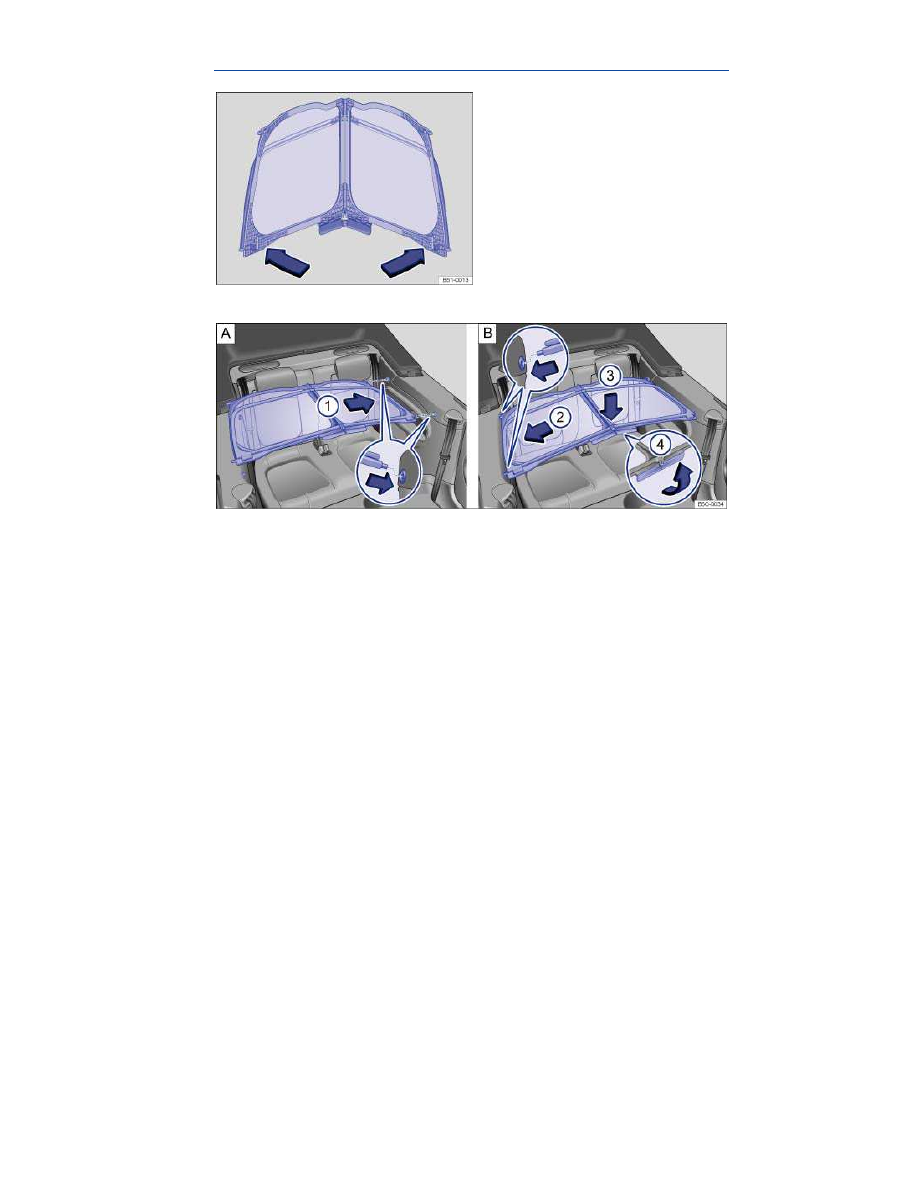
Fig. 38 Unfolding the wind blocker. 


Fig. 39 A: Sliding in the bars on the wind blocker. B: Sliding in the locking pins. 

The wind blocker, if equipped, is in a storage compartment in the vehicle's luggage compartment. 

You can close the convertible top even when the wind blocker is installed. 

Unfolding the wind blocker 

Folding the wind blocker outward before installing it is the easiest way to get it into the correct position 
for installation. 

  Remove the wind blocker from the luggage compartment 

⇒  Removing the wind blocker from the 

luggage compartment and storing

  Fold both side sections outward in the direction of the arrows 

⇒ 

fig. 38

 until they lock into place. 

Installing the wind blocker 

The wind blocker is installed correctly when the longer side faces toward the front and the wind block-
er frame is on top. 

  Insert both pins on the driver side of the wind blocker into the holes in the side trim panel above the 

rear seats 

⇒ 

fig. 39

 A 

(1)

 (magnified area). 

  Fold the handle 

⇒ 

fig. 39

 B 

(4)

 at the front center of the wind blocker upward in the direction of the 

arrow and hold it in place. 

  Pull the section of the wind blocker that is facing the front passenger side upward slightly. 


  Insert both pins on the wind blocker on the front passenger side into the holes in the side trim 

panel above the rear seats 

⇒ 

fig. 39

 B 

(2)

 (magnified area). 

  Press down lightly on the center of the wind blocker 

⇒ 

fig. 39

 B 

(3)

 until it locks into place. 

  Pull the top section of the wind blocker upward so it contacts the stops and snaps into place. 

Removing the wind blocker 

  Fold the upper section of the wind blocker down toward the rear of the vehicle. 

  Fold the handle 

⇒ 

fig. 39

 B 

(4)

 at the front center of the wind blocker upward in the direction of the 

arrow and hold it in place. 

  Pull the center of the wind blocker upward opposite the direction of the arrow 

⇒ 

fig. 39

 B 

(3)

  Remove both wind blocker retaining pins on the front passenger side from the holes in the side trim 

panel opposite the direction of the arrows 

⇒ 

fig. 39

 B 

(2)

  Remove both wind blocker retaining pins on the driver side from the holes in the side trim panel 

opposite the direction of the arrows 

⇒ 

fig. 39

 A 

(1)

Closing the wind blocker 

  Fold the handle 

⇒ 

fig. 39

 B 

(4)

 at the front center of the wind blocker upward in the direction of the 

arrow and hold it in place. 

  Fold both side sections inward opposite the direction of the arrow 

⇒ 

fig. 38

  Store the wind blocker in the luggage compartment 

⇒  Removing the wind blocker from the lug-

gage compartment and storing

  WARNING 

Installing or removing the wind blocker by the side of the road near moving traffic can cause 
accidents and serious personal injuries. 

  Always park the vehicle a safe distance from moving traffic when installing or removing 

the wind blocker. 

  Never install or remove the wind blocker while driving. 


  WARNING 

Incorrect seating positions in the vehicle increase the risk of serious of fatal injuries in the 
event of an accident or sudden driving and braking maneuvers. 

  Never let anyone sit on the rear seats when the wind blocker is installed. 


  WARNING 

Unsecured or improperly secured objects can cause severe injuries during sudden braking 
maneuvers or if the vehicle is involved in an accident while driving. 

  Never place unsecured objects underneath the wind blocker. 
  Never use the wind blocker as a storage shelf. Items on the wind blocker can be thrown 

around inside the vehicle by the wind and cause injuries. 

  Never use the wind blocker to secure objects. 


  WARNING 

Always make sure that hands, fingers, and other parts of the body are out of the way when 
moving the wind blocker up or down, or when folding it together. 

  Never fold the wind blocker upward while driving. 


  NOTICE 

  When moving a front seat forward or back, make sure the backrest does not press against 

the wind blocker. This can damage the wind blocker, especially its locking mechanism. 

  Always store the wind blocker in its storage compartment when not in use. 
  Never put objects (luggage, grocery bags, etc.) on top of the wind blocker. 

Installing and removing the convertible top cover (boot) 


Fig. 40 With the convertible top open: Convertible top cover. 

Your vehicle may be equipped with a convertible top cover (boot) that fits over the convertible top 
when it is down. 

Installing the convertible top cover 

  Remove the convertible top cover from the luggage compartment. 
  Unfold the convertible top cover and lay it over the open top. 

  Snap the clips on either side of the convertible top cover 

⇒ 

fig. 40

 A 

(1)

 into place on the rear side 

of the trim panels above the rear seats. 

  Insert each interior side of the convertible top cover 

⇒ 

fig. 40

 A (arrows), behind the trim panels. 

  Insert the front area of the convertible top cover 

⇒ 

fig. 40

 A 

(2)

 behind the Automatic Rollover 

Support System. 

  Pull the cover over the convertible top. 

  Insert the rear area of the convertible top cover 

⇒ 

fig. 40

 B 

(3)

 next to the seal above the luggage 

compartment lid until the edge of the convertible top cover is completely tucked under the seal and the 
seam is no longer visible. 

  Press the left and right sides of the cover into the retainer completely 

⇒ 

fig. 40

 B 

(4)


Removing the convertible top cover 

  Press the release buttons on each side of the cover 

⇒ 

fig. 40

 A 

(1)

 and lift the convertible top cover 

at the inner side (arrows). 

  Pull the convertible top cover out by the loop in area 

⇒ 

fig. 40

 A 

(2)

 (slide your other hand under 

the cover and lift area 

(2)

 up while pulling on the loop, if necessary). 

  Pull the left and right sides of the cover out of the retainer 

⇒ 

fig. 40

 B 

(4)

  Pull the rear area of the convertible top cover 

⇒ 

fig. 40

 B 

(3)

 next to the seal above the luggage 

compartment lid. 

  Remove the convertible top cover from the vehicle and fold it up. Clean the cover before folding, if 

necessary. 

  Store the convertible top cover securely in the luggage compartment. 

  NOTICE 

Dirt particles with sharp edges can cause abrasions and damage to the convertible top cover 
when it is folded.
 

  Clean the convertible top cover before folding it up. 

  The convertible top button does not work when the convertible top cover is installed. If the button 

is pressed anyway, the convertible top indicator light will blink as long as the button is pressed. 

Convertible top troubleshooting 


Description  

Possible solution  

The convertible top 
will not open or will 
not close.  

– Check to make sure all the preliminary and technical requirements for 
convertible top operation are met 
– If the convertible top still will not operate, use the emergency procedure to 
close the convertible top, if necessary  
– Have the system checked by an authorized Volkswagen dealer or an 
authorized Volkswagen Service Facility.  

The convertible top 
stops when opening 
or closing.  

– Check the instrument cluster display for information on what to do 

⇒ table  

– Pull the button 

⇒ 

fig. 35

 to completely close and latch the convertible top. 

– If the convertible top does not close completely and latch, try to close and 

latch it using the emergency closing procedure 

⇒   

– Get professional help if necessary and have the system checked by an 
authorized Volkswagen dealer, an authorized Volkswagen Service Facility, 
or another qualified workshop.  


Automatic Rollover Support System 


Fig. 41 Behind the rear bench seat backrest: Automatic Rollover Support System. 

The Automatic Rollover Support System

®

 works with the reinforced windshield frame, properly worn 

safety belts, and the airbag system, to help protect vehicle occupants in a rollover accident. 

If the Automatic Rollover Support System is triggered, 2 supports behind the rear seat backrest deploy 
upwards in a fraction of a second. 

The Automatic Rollover Support System works only when the ignition is switched on. It deploys when 
the convertible top is open as well as when it is closed. 

The Automatic Rollover Support System is electronically controlled together with the airbag system. A 
malfunction in the rollover support system is indicated by the airbag indicator light   in the instrument 

cluster 

⇒  Airbag system

The Automatic Rollover Support System can only deploy one time. After the Automatic Rollover Sup-
port System has deployed, you cannot slide it back into its original position. It must be replaced by an 
authorized Volkswagen dealer or an authorized Volkswagen Service Facility. 

The Automatic Rollover Support System may deploy in the following situations: 

  In driving situations in which the vehicle tips sharply to one side, consistent with the values pro-

grammed into the electronic control module. 

  In certain frontal, side, and rear-end collisions. 
  In rollovers. 
  If the vehicle briefly leaves the ground, for example when cresting a hill at a comparatively high 

speed. 

  WARNING 

The Automatic Rollover Support System can cause serious injuries if persons or objects are 
in the way when it deploys. 

  Never use accessory seat covers or protective covers that block the rollover protection 

deployment area. 

  Every rear seat passenger must be properly seated on a seat of his or her own and must 

stay in a proper seating position at all times. 

  Always keep the area around the supports free of anything that could interfere with their 

deployment or fly about and injure occupants when the supports deploy. 

  Never take the covers off the Automatic Rollover Support System. 
  Never attach a child seat, child restraints, straps, or anything else to the rollover protec-

tion supports. 


  WARNING 

If there is a system malfunction, the Automatic Rollover Support System may cause serious 
injuries by not deploying properly, by not deploying at all, or by deploying unexpectedly. 

  If a malfunction exists in the system, have it checked immediately by an authorized 

Volkswagen dealer or an authorized Volkswagen Service Facility. A malfunction exists in the 
system if the indicator light: 
 

–  does not come on when the ignition is turned on; 


–  does not go out about 5 seconds after you start the engine; 


–  goes out after switching on the ignition and then comes back on again; 


–  comes on or flickers when you are driving. 


  NOTICE 

If deployed, the Automatic Rollover Support System can damage the convertible top fabric 
when opening or closing the top.
 

  Do not open or close the convertible top if the Automatic Rollover Support System has 

deployed. 


Adjusting the seating position 

 Introduction 

In this section you’ll find information about: 

Examples of improper seating positions


Proper seating position


Manual controls on the driver and front passenger seats


Adjusting the front and rear head restraints


Removing and reinstalling the head restraints


Adjusting the steering wheel position


Center armrest


Number of seats 

The vehicle has a total of 4 seating positions: 2 in front and 2 in the rear. Each seating position has a 
safety belt. 

More information: 

  Seat functions  
  Safety belts  
  Airbag system 
  Child safety and child restraints 

  WARNING 

Improper seating positions increase the risk of severe or fatal injuries in a crash or other 
accidents, especially when the airbag deploys. 

  All occupants must sit properly and be properly restrained at all times. 
  Never let more people ride in the vehicle than there are seating positions with safety belts 

available. 

  Always secure children in the vehicle with an approved and suitable restraint system ap-

propriate for their age, weight, and height 

⇒  Child safety and child restraints⇒  Airbag sys-

tem

  Always keep your feet on the floor in front of the seat. Never rest them on the seat, in-

strument panel, out of the window, etc. The airbag system and safety belt will not be able to 
protect you properly and can even increase the risk of injury in a crash. 


  WARNING 

Always adjust seat, safety belts, and head restraints properly before driving and make sure 
that all passengers are properly restrained. 

  Push the passenger seat as far back as possible. Always be sure that there are at least 

10 inches (25 cm) between the front passenger's breastbone and the instrument panel. 

  Always adjust the driver's seat and the steering wheel so that there are at least 10 inches 

(25 cm) between your breastbone and the steering wheel. 

  Adjust the driver's seat so that you can easily push the pedals all the way to the floor 

while keeping your knee(s) slightly bent. The distance to the instrument panel in the knee 
area must be at least 4 inches (10 cm). 

  If these requirements cannot be met for physical reasons, contact an authorized 

Volkswagen dealer or an authorized Volkswagen Service Facility to see whether adaptive 
equipment is available. 

  Always hold the steering wheel on the outside of the steering wheel rim with your hands 

at the 9 o'clock and 3 o'clock positions to help reduce the risk of personal injury if the driv-
er's airbag inflates. 

  Never hold the steering wheel at the 12 o'clock position or with your hands at other places 

inside the steering wheel rim or on the steering wheel hub. Holding the steering wheel the 
wrong way can cause serious injuries to the hands, arms, and head if the driver's airbag in-
flates. 

  Pointing the steering wheel toward your face decreases the ability of the driver's airbag to 

help protect you in a collision. 

  Never drive with backrests reclined or tilted back farther than necessary to drive comfort-

ably. The farther back the backrests are tilted, the greater the risk of injury caused by incor-
rect positioning of the safety belts and improper seating position. 

  Never drive with the front seat passenger backrest tilted forward. If the front airbag de-

ploys, the front backrest can be forced backward and injure passengers on the rear seat. 

  Sit as far back as possible from the steering wheel and the instrument panel. 
  Always sit upright with your back against the backrest with the front seats properly ad-

justed. Never lean against or place any part of your body too close to the area where the air-
bags are located. 

  Rear seat passengers who are not properly seated and restrained are more likely to be 

seriously injured in a crash. 


  WARNING 

Improper adjustment of the seats can cause accidents and severe injuries. 

  Never adjust the seats while the vehicle is moving. Your seat may move unexpectedly and 

you could lose control of the vehicle. In addition, you will not be in the correct seating posi-
tion while adjusting the seats. 

  Adjust the front seat height, angle and longitudinal direction only if the seat adjustment 

area is clear. 

  The adjustment of the front seats must not be restricted by things in the footwell in front 

or behind the seats. 


  WARNING 

Some kinds of cigarette lighters can be lit unintentionally, or crushed causing a fire that can 
result in serious burns and vehicle damage. 

  Always make sure that there are no lighters in the seat tracks or near other moving parts 

before adjusting the seats. 

  Before closing a storage compartment, always make sure that no cigarette lighter can be 

activated, crushed, or otherwise damaged. 

  Never leave a cigarette lighter in a storage compartment, on the instrument panel, or in 

other places in the vehicle. Heat buildup in the passenger and luggage compartment of a 
parked vehicle can result in temperatures in the vehicle that are much higher than the outside 
temperatures, particularly in summer. High temperatures could cause the cigarette lighter to 
catch fire. 

Examples of improper seating positions 

 Please first read and note the introductory information and heed the WARNINGS 


Not wearing or improperly fastening safety belts increases the risk of severe or fatal injuries. Safety 
belts can work only when they are properly positioned on the body. An improper seating position 
significantly impairs the protection provided by safety belts. This can cause severe or even fatal inju-
ries. Improper seating positions also increase the risk of serious injury or death when an airbag de-
ploys and strikes an occupant who is not in the proper seating position. The driver is responsible for all 
passengers and especially children riding in the vehicle. 

The following are only some examples of seating positions that will increase the risk of serious injury 
or death. 

Therefore, whenever the vehicle is moving: 

  Never stand up in the vehicle. 
  Never stand on the seats. 
  Never kneel on the seats. 
  Never ride with the seat backrest reclined. 
  Never lean up against the instrument panel. 
  Never lie down on the rear seat. 
  Never sit on the edge of the seat. 
  Never sit sideways. 
  Never lean out the window. 
  Never put your feet out the window. 
  Never put feet on the instrument panel. 
  Never rest your feet on the seat cushion or back of the seat. 
  Never ride in the footwell. 
  Never sit or stand on an armrest. 
  Never ride without your safety belt properly fastened. 
  Never ride in the luggage compartment. 


  WARNING 

Contact with parts of the vehicle interior can cause serious personal injury in a crash. 

  Always make sure that all vehicle occupants stay in a proper seating position and are 

properly restrained whenever the vehicle is moving. 

  Improper seating positions increase the risk of serious and fatal injury, especially when an 

airbag deploys and strikes a passenger in an improper seating position. 

Proper seating position 


Fig. 42 The driver should never sit closer than 10 inches (25 cm) of the steering wheel. 


Fig. 43 Proper safety belt positioning and head restraint adjustment. 

 Please first read and note the introductory information and heed the WARNINGS 


The following describes the proper seating positions for the driver and passengers. 

If you have a physical impairment or condition that prevents you from sitting properly on the driver seat 
with the safety belt properly fastened and reaching the pedals, special modifications to your vehicle 
may be necessary. Only the proper seating position ensures optimum protection by the safety belt and 
airbag. 

Contact your authorized Volkswagen dealer or authorized Volkswagen Service Facility or call the 
Volkswagen Customer CARE Center at 1-800-822-8987 for information about possible modifications 
to your vehicle. 


For your own safety and to reduce injuries in the event of sudden braking maneuvers or accidents, 
Volkswagen recommends the following seating positions: 

Applies to all vehicle occupants: 

  Adjust head restraints so that the upper edge of the head restraint is at least at eye level or higher. 

Position the back of your head as close as possible to the head restraint 

⇒ 

fig. 42

 and 

⇒ 

fig. 43

  Push the head restraint completely down for short people, even if the top of the head is then below 

the upper edge of the head restraint. 

  Tall people should pull the head restraint all the way up. 
  Adjust the seat backrest angle to an upright position so that your back is in full contact with it when 

the vehicle is moving. 

  Always keep both feet on the floor and in the footwell whenever the vehicle is moving. 

  Always adjust and fasten safety belts properly 

⇒  Safety belts

Driver - seat and steering wheel adjustment: 

  Adjust the steering wheel so that there are at least 10 inches (25 cm) between the steering wheel 

and your breast bone 

⇒ 

fig. 42

. When adjusting the proper distance to the steering wheel, grasp the 

top of the steering wheel with your elbows slightly bent. 

  Always hold the steering wheel on the outside of the steering wheel rim with your hands at the 

9 o'clock and 3 o'clock positions to help reduce the risk of personal injury if the driver's airbag inflates. 

  Never hold the steering wheel at the 12 o'clock position or with your hands at other places inside 

the steering wheel rim or on the steering wheel hub. Holding the steering wheel the wrong way can 
cause serious injuries to the hands, arms, and head if the driver's airbag inflates. 

  Adjust the steering wheel so that the steering wheel cover points at your chest and not at your 

face. Pointing the steering wheel toward your face decreases the ability of the driver's airbag to help 
protect you in a collision. 

  Adjust the driver's seat so that you can easily push the pedals all the way to the floor while keeping 

your knee(s) slightly bent. 

  Adjust the seat height so that the top point of the steering wheel can be reached. 
  Always keep both feet in the footwell so that you are in control of the vehicle at all times. 

Passenger - front seat adjustment: 

  Push the passenger seat as far back as possible in order to ensure optimum protection if the 

airbag is deployed. 


Manual controls on the driver and front passenger seats 


Fig. 44 Controls on the left front seat. 

 Please first read and note the introductory information and heed the WARNINGS 


The controls on the front passenger seat mirror those on the driver seat. 
 

fig. 44


Function  

Action  

(1)


Move the front seat forward or 
back.  

Pull the lever up and move the front seat. The front 
seat must lock in place after the lever is released!  

(2)


Fold the backrest forward and 
back into the upright position  

Folding forward: Pull the handle and fold the 
backrest forward while pushing the seat forward.  

Folding back into the upright position: Push the seat 
all the way back, and fold the backrest back into the 
upright position. The backrest must lock in place!  

(3)


Lumbar support control (if 
equipped).  

Pull the lever up or push it down.  

(4)


Adjust the backrest angle.  

Lean forward and turn the adjuster wheel forward or 
backward.  

(5)


Adjust the seat height.  

Move the lever several times up or down.  


Adjusting the front and rear head restraints 


Fig. 45 Adjusting the head restraints. 

 Please first read and note the introductory information and heed the WARNINGS 


All seats are equipped with head restraints. 

There are notches in the head restraint guide rods so that the head restraint can lock into place. Only 
properly installed head restraints can lock into place at the adjustment range notches. In order to 
prevent inadvertent removal of the head restraints after installation, there are stops at the top and 
bottom of the adjustment range. 

Adjusting the height 

  Pull the head restraint up in the direction of the arrow, or push it down while pressing the button 

⇒ 

fig. 45


(1)


⇒  . 

  The head restraint must lock securely in the position selected. 

Proper head restraint adjustment 

Adjust head restraints so that the upper edge of the head restraint is at least at eye level or higher. 
Position the back of the head as close as possible to the head restraint. 

Adjusting the head restraint for short people 

Push the head restraint down as far as it will go, even if this means the person's head is still below the 
top edge of the head restraint. A small gap may remain between the head restraint and the backrest 
when the head restraint is all the way down. 

Adjusting the head restraint for tall people 

Pull the head restraint up as far as it will go. 


  WARNING 

Driving without head restraints or with improperly adjusted head restraints increases the risk 
of serious injuries in a collision. 

  Always drive with the head restraints in place and properly adjusted to help minimize the 

risk of neck injury in a crash. 

  Every person in the vehicle must have a properly adjusted head restraint to minimize the 

risk of neck injury in a crash. Each head restraint must be adjusted according to the occu-
pants' size so that the upper edge is even with the top of the person's head, but no lower than 
eye level. Always sit so that the back of your head is as close as possible to the head re-
straint. 

  Never adjust head restraint while driving. 

Removing and reinstalling the head restraints 


Fig. 46 Removing the front head restraints. 


Fig. 47 Removing the rear head restraints. 

 Please first read and note the introductory information and heed the WARNINGS 


All seats are equipped with head restraints. 


Removing the front head restraints 

  Sit in the back seat behind the head restraint you want to remove. Pull the head restraint all the 

way up 

⇒   in Adjusting the front and rear head restraints. Recline the backrest with the head re-

straint so that there is enough overhead clearance to remove it. 

  Slide a flat object, such as a plastic credit card, underneath the right side of the cap on the right-

hand seat guide rod 

⇒ 

fig. 46


(1)

 to unlock the head restraint. 

  Push the flat object (plastic card) in against the guide rod to depress a release button located 

under the cap (not visible). 

  Use one hand to hold the release button in with the flat object. With your other hand, lift the same 

guide rod slightly to expose a notch in the rod at the bottom (can be seen and felt with fingers). The 
right-hand guide rod is now released. 

  To release the left-hand guide rod, press button 

(2)

 in (towards guide rod) and hold. 

  Pull the head restraint out completely while holding button 

(2)

Installing the front head restraints 

  Position head restraint properly over the head restraint guides of the respective seat backrest and 

insert the head restraint into the guides. 

  Push the head restraint down while pressing button  

(2)

  Adjust the head restraint according to the occupant's size 

⇒  Adjusting the front and rear head 

restraints

Removing the rear head restraint 

  Unlock the backrest of the rear seat bench and fold it forward 

⇒  Luggage compartment

  Pull the head restraint all the way up 

⇒  . 

  If necessary, press the flat blade of the screwdriver from the vehicle tool kit into the slit of the trim 

cap 

⇒ 

fig. 47


(1)

 in the direction of the arrow and hold it in this position. 

  At the same time press button 

(2)

 while a second person pulls out the head restraint completely. 

  Fold the backrest of the rear seat bench back so that it locks securely. 

Reinstalling the rear head restraint 

  Unlock the backrest of the rear seat bench and fold it forward 

⇒  Luggage compartment

  Position head restraint properly over the head restraint guides of the respective seat backrest and 

insert the head restraint into the guides. 

  Push the head restraint down while pressing button  

(2)

  Fold the backrest of the rear seat bench back so that it locks securely. 

  Adjust the head restraint according to the occupant's size 

⇒  Adjusting the front and rear head 

restraints

  WARNING 

Driving without head restraints or with improperly adjusted head restraints increases the risk 
of serious injuries in a collision. 

  Always drive with the head restraints in place and properly adjusted to help minimize the 

risk of neck injury in a crash. 

  Always reinstall head restraints as soon as possible so that vehicle occupants are proper-

ly protected. 


  NOTICE 

When removing or reinstalling the head restraint, take care that the head restraint does not 
strike the headliner or other parts of the vehicle. The headliner or other parts of the vehicle 
could otherwise be damaged.
 

Adjusting the steering wheel position 


Fig. 48 Manual adjustment for the steering wheel position. 

 Please first read and note the introductory information and heed the WARNINGS 


Adjust the steering wheel only when the vehicle is not moving. 

  Push down on the lever 

⇒ 

fig. 48


(1)

  Adjust the steering wheel so that it can be held with hands at the 9 o'clock and 3 o'clock positions 

on the outside of the steering wheel rim and with the arms slightly bent at the elbow. 

  Pull the lever up firmly until it is flush with the steering column 

⇒  . 

  WARNING 

Improper use of the steering column adjustment feature can result in serious personal injury 
and even death. 

  Always pull the lever 

(1)

 firmly upward after adjusting the steering column so that the 

steering wheel does not change position suddenly while the vehicle is moving. 

  Never adjust the steering column while the vehicle is moving. If you find that you need to 

adjust the steering wheel while driving, stop the vehicle in a safe place and make the proper 
adjustment. 

  Never adjust the steering wheel so that it points toward your face. Always make sure that 

the steering wheel points toward your chest. Otherwise, the airbag system cannot protect 
you properly in the event of a crash. 

  Always hold the steering wheel on the outside of the steering wheel rim with your hands 

at the 9 o'clock and 3 o'clock positions to help reduce the risk of serious personal injury if the 
driver's airbag inflates. 

  Never hold the steering wheel at the 12 o'clock position or with your hands anywhere 

inside the steering wheel or on the steering wheel hub. Holding the steering wheel the wrong 
way increases the risk of severe injury to the arms, hands, and head if the driver airbag de-
ploys. 


Content   ..  4  5  6  7   ..