Volkswagen Golf / Golf GTI / Jetta. Service manual - part 991
 

  Index      Volkswagen     Volkswagen Golf / Golf GTI / Jetta - service and repair manual 1999-2005 year


Search            copyright infringement  


Content   ..  989  990  991  992   ..


Volkswagen Golf / Golf GTI / Jetta. Service manual - part 991


87-164


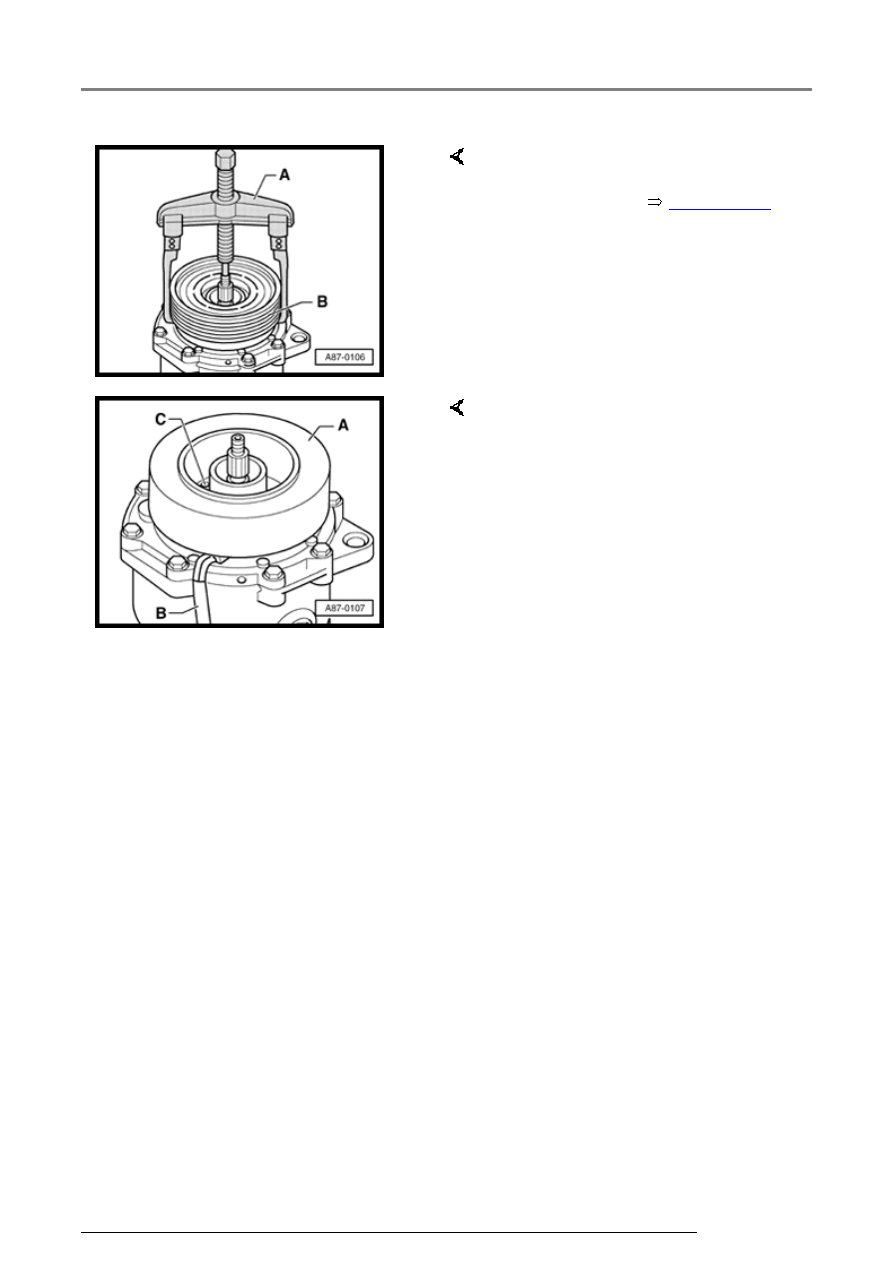
     Clutch pulley, removing  

-  Remove circlip 


Page 87-159

 , 

key - 4 - 

-  Attach commercially available 2 

arm puller -A- on shoulder -B- and 
pull off pulley. 

     Clutch coil, installing   

-  Install coil on compressor. 

-  Locate locking pin on coil coil -A- 

into recess -C-. 

Compressor bracket, removing and installing

13/2/2005

87-165


     Clutch plate gap, checking   

Determining "Dimension 1" 

Determining "Dimension 2" 

The allowable gap (0.4...0.8 mm) is 
the difference between "Dimension 
1" and "Dimension 2".  

Notes: 


 Gap: 0.4...0.6 mm 

(0.015...0.023 in) 

-  Using depth gauge -1-, measure 

gap between top of clutch plate -
3- and pulley -2- at three equally 
spaced locations (measurement 
must not deviate). Note result. 

-  If compressor is installed in 

vehicle, disconnect electrical 
connector -4- from vehicle wiring 
harness. 

-  Using a jumper wire, energize the 

clutch coil by applying 12V (B+) to 
connector -4-. If compressor is 
removed from vehicle, 
compressor must be grounded. 

-  With clutch energized, measure 

gap between belt pulley -2- and 
clutch plate -3- with depth gauge -
1-. Note result. 

 Gap must be within tolerance 

around entire circumference. 

 If the gap is outside the permitted 

tolerance range, remove clutch 
plate and adjust gap by adding or 
removing shims 


Page 87-159

 , 

key 3 . 

Compressor bracket, removing and installing

13/2/2005

87-166


A/C clutch -
N25- (Zexel), 
servicing 


Special tools 
and 
equipment 
needed 
 

Not illustrated:  

 3212 

Spanner 
wrench (or 
equivalent 
two-hole 
pin wrench) 

 VAG 1719 

A/C clutch 
set 

 VAG 

1719/1 
(included in 
VAG 1719) 

 VAG 

1719/2) 
(included in 
VAG 1719) 

 Torque 

wrench 5 - 
50 Nm 

 Two arm 

puller 
Kukko 20-
10 with 100 
mm fixtures 
(or 
equivalent). 

 Feeler 

gauge 
(locally 
available) 

Compressor bracket, removing and installing

13/2/2005

87-167


   Notes: 

 The 

compressor 
bracket and 
related 
components 
can be 
removed 
and 
installed 
without 
discharging 
the 
refrigerant 
circuit.
 

 Compressor 

can only be 
serviced or 
replaced 
after 
discharging 
refrigerant 
system. 
Use Kent 
Moore 
ACR4 or 
equivalent.
 

1 - Clutch 

plate 
bolt
 

 15 Nm 

(11 ft. 
lb.) 

 Removing 

and 
installing 


Fig. 1


2 - Clutch 

plate 

 Removing 


Fig. 2


Compressor bracket, removing and installing

13/2/2005


Content   ..  989  990  991  992   ..