Volkswagen Golf Variant / Jetta. Manual - part 819


  Index      Volkswagen     Volkswagen Golf Variant (2007), Jetta (2005) - service repair manual


Search            


Content   ..  817  818  819  820   ..


Volkswagen Golf Variant / Jetta. Manual - part 819


Continuation for all vehicles:

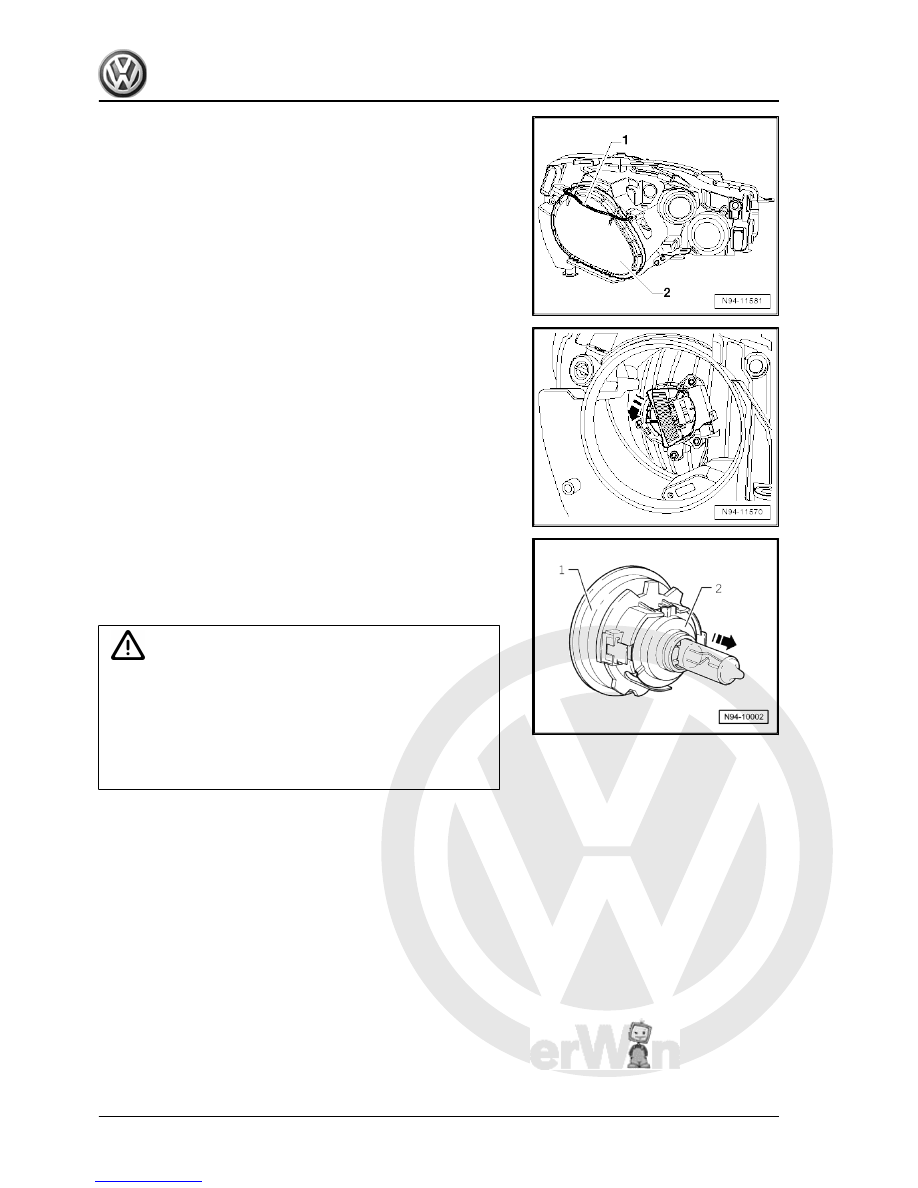
– Turn bulb holder with left headlight dipped beam bulb -M29-

in direction of -arrow- and remove from headlight.

– Pull left headlight dipped beam bulb -M29- -2- in

-direction of arrow- out of bulb holder -1-.

Bulb: 12 V/55 W
Installing

Caution

♦ Do not touch glass envelope when fitting bulb. Fingers

leave traces of grease on the glass envelope, which evap‐

orate when the bulb is switched on and cause the glass

envelope to cloud over.

♦ When installing cover cap, ensure that it seats properly.

The ingress of water will lead to permanent damage to the

headlight.

– Check headlight functions.
– Check headlight settings and adjust headlights if necessary

⇒ Maintenance ; Booklet  20.1 ; Descriptions of work .

242


running light

Note

The left main beam headlight bulb -M30- / right main beam

headlight bulb -M32- is a twin filament bulb and assumes si‐

multaneously the function of the left daytime running light -

L174- / right daytime running light -L175- .

The headlight does not have to be removed to change the

bulb.

The illustrations show the renewal of the left headlight main

beam bulb -M30- / left daytime running light bulb -L174- for the

left headlight.

Caution

♦ Switch off ignition and all electrical consumers.
♦ Remove the ignition key.

Removing
– Remove cover cap -1-.

2. Headlights with halogen bulbs (from MY2009)    

243


daytime running light bulb -L174- .

Note

The left headlight main beam bulb -M30- / left daytime running

light bulb -L174- is permanently attached to the bulb holder and

cannot be renewed separately.

Bulb: 12 V 15/55 W
Installing

Caution

♦ Do not touch glass envelope when fitting bulb. Fingers

leave traces of grease on the glass envelope, which evap‐

orate when the bulb is switched on and cause the glass

envelope to cloud over.

♦ When installing cover cap, ensure that it seats properly.

The ingress of water will lead to permanent damage to the

headlight.

Carry out installation in the reverse sequence, noting the follow‐

ing:
– Check headlight functions.
– Check headlight settings and adjust headlights if necessary

⇒ Maintenance ; Booklet  20.1 ; Descriptions of work .

2.5.3

Renewing side light bulb

Note

The headlight does not have to be removed to change the

bulb.

The diagrams show renewal of the left side light bulb -M1- for

the left headlight.

Caution

♦ Switch off ignition and all electrical consumers.
♦ Remove the ignition key.

244


holder -1- together with left side light bulb -M1- backwards out

of reflector.

– Pull left side light bulb -M1- -2- in -direction of arrow- out of

bulb holder -1-.

Bulb: wedge-base bulb 12 V/5 W
Installing

Caution

♦ Do not touch glass envelope when fitting bulb. Fingers

leave traces of grease on the glass envelope, which evap‐

orate when the bulb is switched on and cause the glass

envelope to cloud over.

♦ When installing cover cap, ensure that it seats properly.

The ingress of water will lead to permanent damage to the

headlight.

Carry out installation in the reverse sequence, noting the follow‐

ing:
– Check headlight functions.

2.5.4

Renewing front turn signal bulb

Note

The headlight does not have to be removed to change the

bulb.

The illustrations show the renewal of the front left turn signal

bulb -M5- for the left headlight.

2. Headlights with halogen bulbs (from MY2009)    

245


Content   ..  817  818  819  820   ..