Volkswagen Golf Variant / Jetta. Manual - part 516


  Index      Volkswagen     Volkswagen Golf Variant (2007), Jetta (2005) - service repair manual


Search            


Content   ..  514  515  516  517   ..


Volkswagen Golf Variant / Jetta. Manual - part 516


Relay Lever with Clip -arrow 1-.
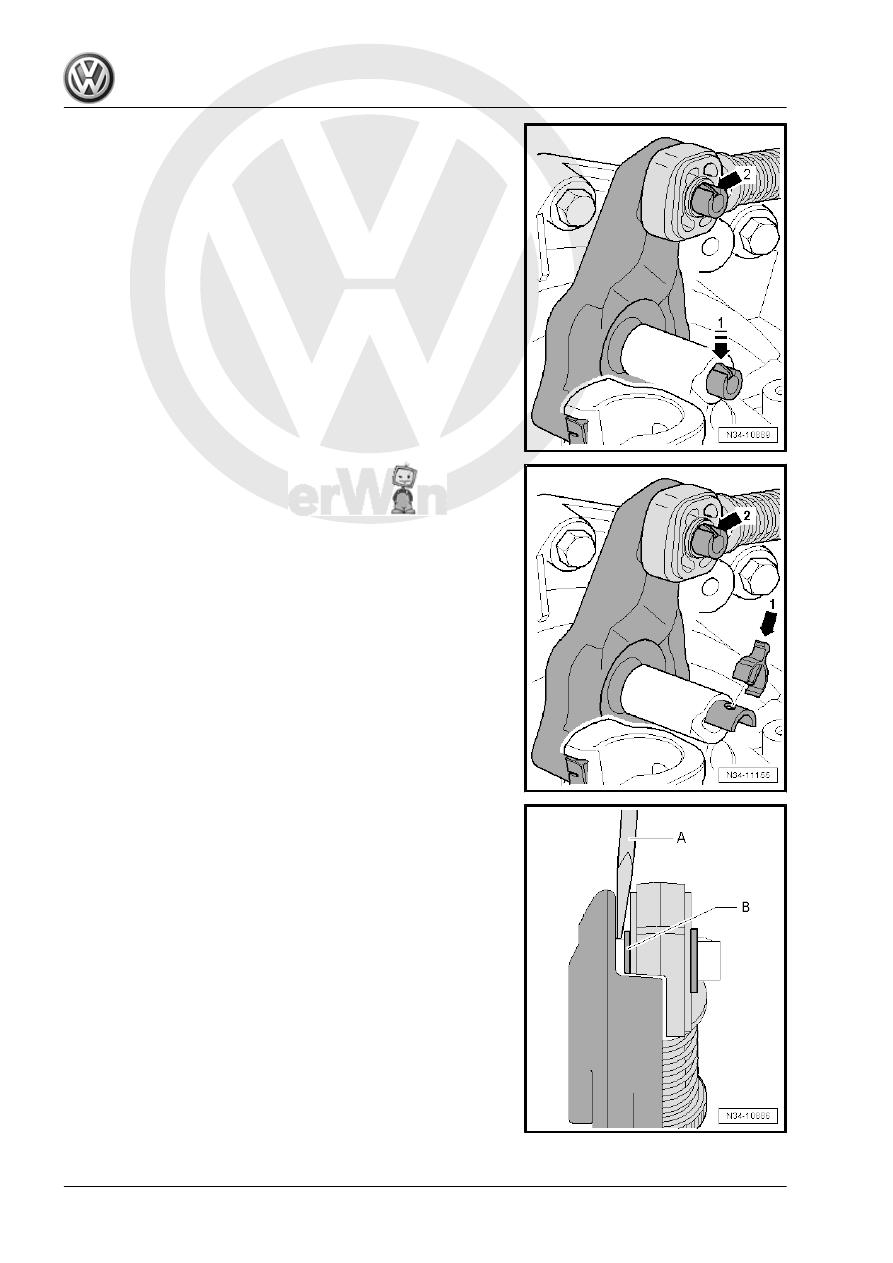
• The clip -arrow 1- secures the relay lever.
• Make sure the clips locks securely.
• The cable retainer must be behind the catch -arrow 2-.

Removing the Selector Cable Retainer from the Plastic Relay

Lever.
• The relay lever is removed.
– Insert a screwdriver -A- between the bushing -B- and the relay

lever.

80

• The relay lever is removed.
• The cable retainer may only be installed at the bushing

-arrow-.

• The cable retainer must move freely on the relay lever.
• It must be behind the tab -arrow 2-.

1. Shift Mechanism, Servicing    

81

Transmission, Removing and Instal‐

ling, Jetta from MY 2005 , Golf Wag‐

on from MY 2007 and Golf Wagon

from MY 2010

⇒ “2.1 Transmission, Removing”, page 82
⇒ “2.2 Transmission, Installing”, page 87
⇒ “2.3 Tightening Specifications”, page 94

2.1

Transmission, Removing

Special tools and workshop equipment required
♦ Engine Support Bridge - 10-222A-
♦ Engine Support Bridge - Engine Support Feet - 10-222A/8-
♦ Engine/Gearbox Support Shackle (2 pc.) - 10-222A/12-
♦ Transmission Support Jig - 3336-
♦ Transmission Support - 3282-
♦ Support Elements for transmission (determine when mounting

the Mounting Plate on the Transmission Support )

♦ Transmission Support - Mounting Plate 31 - 3282/31-
♦ Torque Wrench 1331 5-50Nm - VAG1331-
♦ Torque Wrench 1332 40-200Nm - VAG1332-
♦ Engine and Gearbox Jack - VAS6931-
♦ Grease for Clutch Disc Shaft Splines - G 000 100-
♦ Allocate the grease for gearshift mechanism. Refer to the

Parts Catalog.

– Determine whether a coded radio is installed. If so, obtain the

anti-theft code.

Disconnect the battery ground cable. Refer to ⇒  Electrical Equip‐

ment; Rep. Gr.  27 ; Battery; Battery, Disconnecting and Con‐

necting .
– Remove the engine cover, if the engine lifting eyes for the En‐

gine Support Bridge - 10-222A- are not accessible.

– Remove the air filter housing if it is located above the trans‐

Removing and Installing .

– Remove the battery and the battery tray. Refer to ⇒  Electrical

Equipment; Rep. Gr.  27 ; Battery; Battery, Removing and In‐

stalling .

82

shift lever -A-.

– Remove the shift cable from the pins.
Metal Relay Lever
– Remove the selector cable circlip -2- from the relay lever -B-.
– Remove the selector cable from the pins.
– Remove the lock washer -arrow 3- from the relay lever -B- and

then remove the relay lever.

Plastic Relay Lever
– Remove the relay lever together with the cable retainer. Refer

to 

⇒ “1.11 Plastic Relay Lever”, page 78

 .

Continuation for All
– Remove the nut -arrow 4- and then remove the transmission

shift lever -A-.

– Remove the cable bracket from the transmission -arrows-.
– Tie up the shift cable and the selector cable.

– Remove the hose/line assembly -A- from the bracket -B- on

the transmission.

– Remove clutch slave cylinder -arrows- and lay aside, secure

with wire, do not open wiring system.

Caution

Do not press the clutch pedal anymore.

– Disconnect the ground cable from the upper engine/transmis‐

sion bolt.

– Remove the upper engine/transmission bolts.
– Remove the upper bolt from the starter.
– Remove the left and right foam pieces from the upper edge of

the fender. Refer to ⇒  Body Exterior; Rep. Gr.  50 ; Fender .

2. Transmission, Removing and Installing, Jetta from MY 2005 , Golf Wagon from MY 2007 and Golf Wagon from MY 2010    

83


Content   ..  514  515  516  517   ..