Volkswagen Golf Variant / Jetta. Manual - part 214


  Index      Volkswagen     Volkswagen Golf Variant (2007), Jetta (2005) - service repair manual


Search            


Content   ..  212  213  214  215   ..


Volkswagen Golf Variant / Jetta. Manual - part 214


bracket/clutch pedal, if equipped.

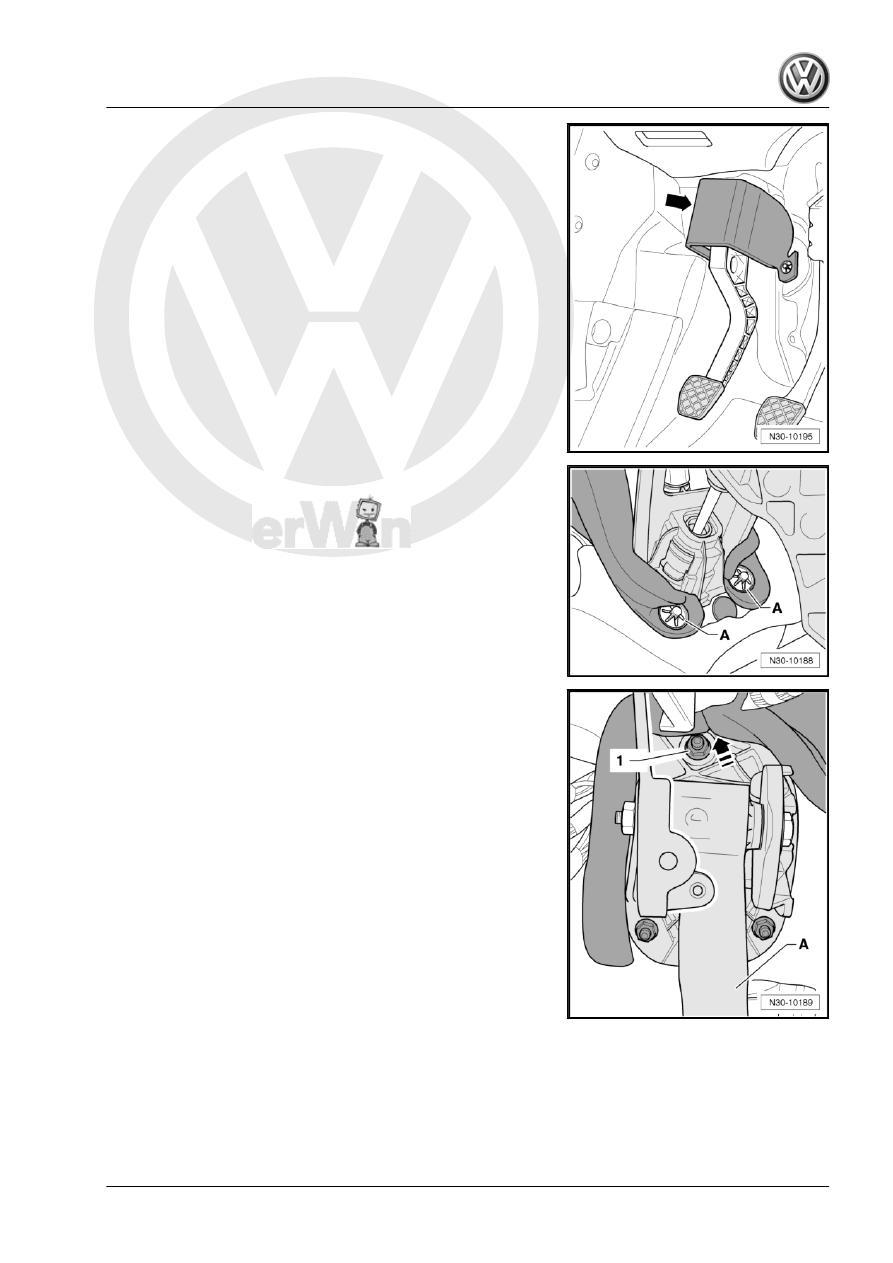
– Remove the washers -A- for the damper.
– Remove the damper.

– Push the damper near the upper nut -1- above the clutch pedal

-A- upward in the direction of -arrow-.

1. Clutch Mechanism, Servicing    

31

pedal -1- from the mounting bracket -3-.

– Move the clutch pedal foreword and remove the over-center

spring -4- from the mounting bracket.

– Release clutch pedal from clutch master cylinder with Clutch

Pedal Pliers - T10005- .

– Remove the clutch pedal.
Installing
Install in reverse order of removal while. Note the following:

Note

Replace the self-locking nuts.

– Install the mount -2- on the clutch master cylinder actuator rod

-1-.

– Press mount until it engages audibly in notch on clutch pedal

-3-.

32

from the top and hold the end of the spring in its installed po‐

sition using the Over-Center Spring Assembly Tool - T10178- .

• The mounting area -arrow- for the clutch pedal pivot pin -A-

must be positioned vertically.

– Insert the clutch pedal pivot pin -A- into the mounting cup of

the over-center spring.

– Press the clutch pedal slightly, push the bolt through and tight‐

en the self-locking nut to the tightening specification. Refer to

⇒ “1.4.1 Tightening Specifications”, page 34

 .

Some vehicles have a damper -arrow- on the mounting bracket/

clutch pedal.
– Bring the damper back into the installation position.
Vehicles without Knee Airbag

1. Clutch Mechanism, Servicing    

33

of the clutch pedal -2-.
Securing with Two Bolts
– Install the crash bolster -1- and tighten the 2 bolts to the tight‐

ening specification. Refer to

⇒ “1.4.1 Tightening Specifications”, page 34

 .

Securing with One Bolt
– Install the crash bolster -1- and tighten the bolt -2- to the tight‐

ening specification. Refer to

⇒ “1.4.1 Tightening Specifications”, page 34

 .

Continuation for All

– Attach the cable guide -2- to the steering column.
– Install the footwell vents -3-. Refer to ⇒  Heating, Ventilation

Removing, Jetta from MY 2011 .

Vehicles with Knee Airbag
– Install the knee airbag bracket and the impact bolster. Refer

to ⇒  Body Interior ; Rep. Gr.  69 .

Continuation for All
– Install the trim and the cover under the trim on the driver side.

and Covers; Steering Column Trim Panel, Removing and In‐

stalling .

– Connect the battery and follow the steps for after connecting

the battery. Refer to ⇒  Electrical Equipment; Rep. Gr.  27 ;

Battery; Battery, Disconnecting and Connecting .

1.4.1

Tightening Specifications

Component

Nm

Clutch pedal to mounting bracket

♦ Replace the self-locking nuts.

25

Impact bolster to mounting bracket/steering

column (secured with two bolts)

10

Impact bolster to mounting bracket/steering

column (secured with one bolt)

20

♦ Replace the impact bolster bolts

34


Content   ..  212  213  214  215   ..