Volkswagen Golf Variant / Jetta. Manual - part 116


  Index      Volkswagen     Volkswagen Golf Variant (2007), Jetta (2005) - service repair manual


Search            


Content   ..  114  115  116  117   ..


Volkswagen Golf Variant / Jetta. Manual - part 116


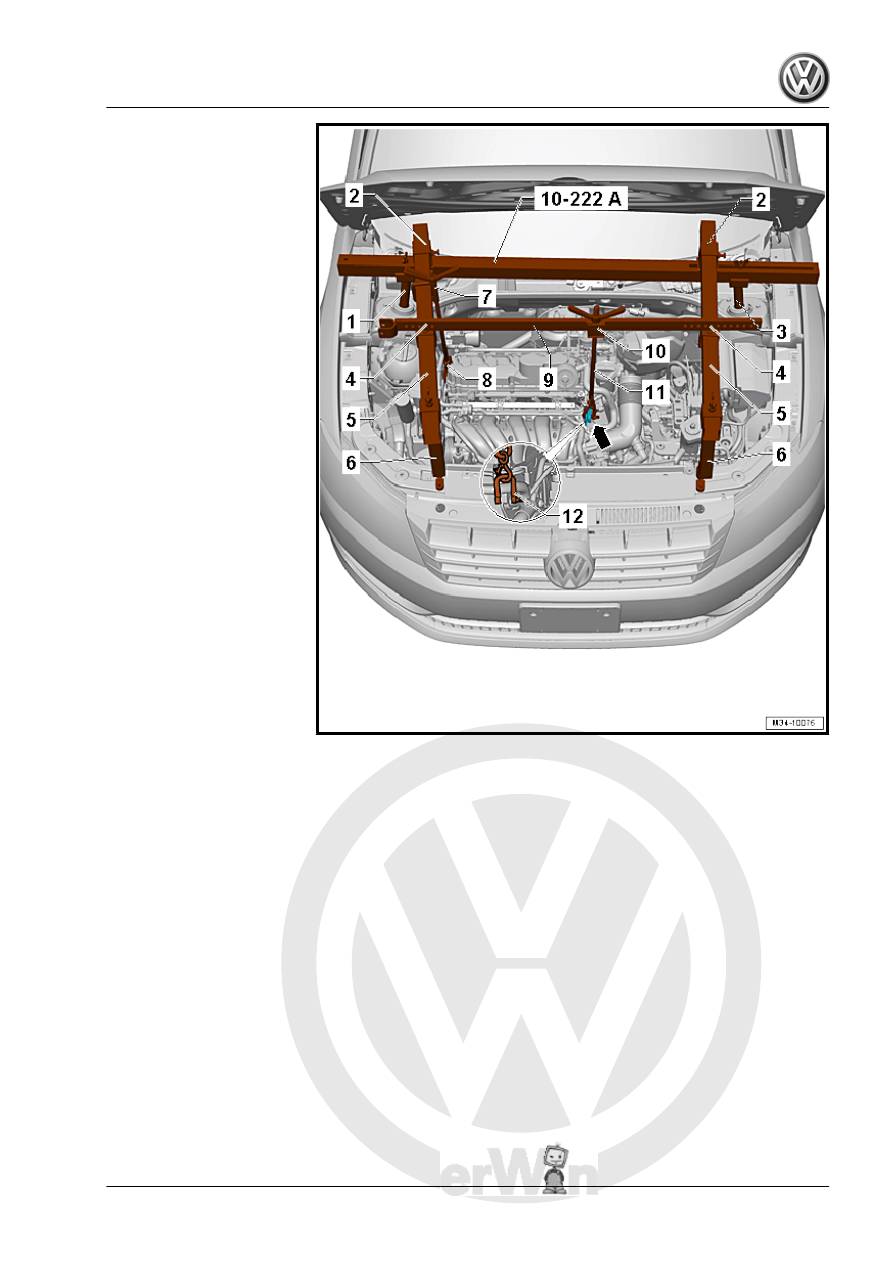
gine Support 31 - Adapter 2 -

10-222A/31-2-
2 - Engine Support - Basic Set

- Moveable Joint - T40091/3-
3 - Engine Support Bridge - En‐

gine Support 31 - Adapter 1 -

10-222A/31-1-
4 - Engine Support - Supple‐

ment Kit - Movable Joint -

T40093/4-
5 - Engine Support - Basic Set

- Square Pipe - T40091/1-
6 - Engine Support Bridge - En‐

gine Support 28 - 10-222A/28-

with Engine Support Bridge -

Engine Support 28-2 -

10-222A/28-2-
7 - Engine Support - Bracket w/

Spindle and Hook - 10-222A/

10-
8 - Engine Support - Automatic

Transmission Hook - 10-222A/

7-
9 - Engine Support - Basic Set

- Rail with Holes - T40091/2-
10 - Engine Support - Supple‐

ment Kit - Mount 5 - T40093/5-
11 - Engine Support Bridge -

Spindle - 10-222A/11-
12 - Engine/Gearbox Support

Shackle (2 pc.) - 10-222A/12-

❑ Engaged in the engine

lifting eye -arrow-.

– Extend the right Engine Support - Bracket w/Spindle and Hook

- 10-222A/10- -7- with the Engine Support - Automatic Trans‐

mission Hook - 10-222A/7- -8-.

The hook on the Engine Support - Automatic Transmission Hook

- 10-222A/7- points downward and will be engaged on cylinder

block later.
– Engage the left Engine Support Bridge - Spindle - 10-222A/

11- -11- in the Engine/Gearbox Support Shackle (2 pc.) -

10-222A/12- -12-.

7. Transmission, Removing and Installing, Jetta from MY 2011    

95

collar bolt -arrow- a maximum 90°, otherwise the wheel bear‐

ing will get damaged. Refer to ⇒  Suspension, Wheels, Steer‐

ing; Rep. Gr.  40 ; Drive Axles, Removing and Installing .

– Raise the vehicle and remove the front wheels.
– Remove the noise insulation. Refer to ⇒  Body Exterior; Rep.

Gr.  50 ; Noise Insulation .

– Remove the left front housing liner. Refer to ⇒  Body Exterior;

Rep. Gr.  66 ; Wheel Housing Liner; Front Wheel Housing Lin‐

er, Removing and Installing .

Vehicles with Power Steering
– Remove the brackets and the power steering lines from the

transmission -arrows-.

Continuation for All Vehicles

Caution

Risk of damaging the decoupling element.

♦ Do not bend the decoupling element more than 10°.
♦ Do not load the decoupling element.
♦ Do not damage the wire mesh on the decoupling element.

– Separate the exhaust system at the double clamp and remove

the front exhaust pipe bracket from the subframe. Refer to ⇒ 

Rep. Gr.  26

– Remove the control arms from the wheel bearing housing on

both sides.

Refer to ⇒  Suspension, Wheels, Steering; Rep. Gr.  40 ; Front

Suspension and Control Arm; Overview - Front Suspension and

Control Arm for the tightening specifications.

– If equipped, remove the heat shield above the right drive axle

-arrows-.

96

moving and Installing .

– Remove the left drive axle. Refer to ⇒  Suspension, Wheels,

– Lift the right drive axle as far as possible and then tie it up.

– Disconnect the connectors -1 and 2- from the transmission.

– Remove the connector from the bracket under the starter -1-

and then disconnect it.

– Remove bracket from lower starter bolt.
– Remove the lower starter bolt and the starter. Refer to ⇒ 

and Installing .

7. Transmission, Removing and Installing, Jetta from MY 2011    

97

– Turn the cap -1- in the direction of -arrow- and remove it.

– Remove the six converter nuts -arrow- with the Socket - Sw15

- V/175- .

Note

Carefully rotate the engine further!

– Engage the Engine Support - Automatic Transmission Hook -

10-222A/7- on the cylinder block.

Tension the right spindle one turn (more turns are not necessary).
– Support the engine and transmission with the left spindle. Do

not lift.

98


Content   ..  114  115  116  117   ..