Toyota Tundra (2019 year). Manual - part 26


  Index      Toyota     Toyota Tundra - service manual 2019 year in english


Search            copyright infringement  


Content   ..  24  25  26  27   ..


Toyota Tundra (2019 year). Manual - part 26


401

5-10. Using the voice command system

5

Mu
ltim

ed

ia

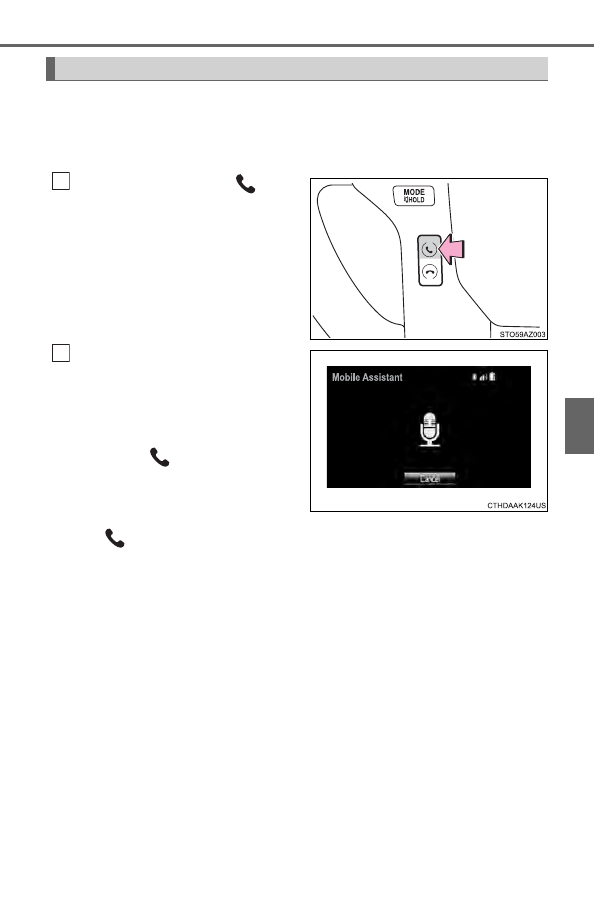
The  Mobile  Assistant  feature  will  activate  Apple’s  Siri

®

  Eyes  Free

mode  via  the  steering  wheel  switches. To operate the Mobile Assis-
tant, a compatible cellular phone must be registered and connected to
this system via Bluetooth

®

. (

P. 363)

Press  and  hold  the 

  until

you hear the beeps.

The  Mobile  Assistant  can  be
used  only  when  the  following
screen is displayed.
To cancel the Mobile Assistant,
select  “Cancel”,  or  press  and
hold  the 

  on  the  steering

wheel.
To  restart  the  Mobile Assistant
for additional commands, press
the 

 on the steering wheel.

• Mobile Assistant can only be restarted after the system responds

to a voice command.

• After  some  phone  and  music  commands,  the  Mobile Assistant

feature will automatically end to complete the requested action.

Adjusting the Mobile Assistant volume
The  volume  of  the  Mobile  Assistant  can  be  adjusted  using  the
“PWR/VOL”  knob  of  steering  wheel  volume  switches. The  Mobile
Assistant and phone call volumes are synchronized.

Mobile Assistant

1

2

402

5-10. Using the voice command system

Notes about Mobile Assistant

The  available  features  and  functions  may  vary  based  on  the  iOS  version
installed on the connected device.

Some

 Siri

®

 features are limited in Eyes Free mode. If you attempt to use an

unavailable function, 

Siri

®

 will inform you that the function is not available.

If 

Siri

®

 is not enabled on the cellular phone connected via Bluetooth

®

, an

error message will be displayed on the screen.

While a phone call is active, the Mobile Assistant cannot be used.

If using the navigation feature of the cellular phone, ensure the active audio
source  is  Bluetooth

®

  audio  or  iPod  in  order  to  hear  turn  by  turn  direction

prompts.

403

5-11. Bluetooth

®

5

Mu
ltim

ed

ia

Bluetooth

®

When using the Bluetooth

®

 audio system

In the following conditions, the system may not function.
• If the portable audio player is turned off
• If the portable audio player is not connected
• If the portable audio player’s battery is low

There  may  be  a  delay  if  a  cellular  phone  connection  is  made  during
Bluetooth

®

 audio play.

Depending on the type of portable audio player that is connected to the sys-
tem, operation may differ slightly and certain functions may not be available.

When using the hands-free system

The multimedia system is muted when making a call.

If both parties speak at the same time, it may be difficult to hear.

If the received call volume is overly loud, an echo may be heard. 
If the Bluetooth

®

 phone is too close to the system, quality of the sound may

deteriorate and connection status may deteriorate.

In the following circumstances, it may be difficult to hear the other party:
• When driving on unpaved roads
• When driving at high speeds
• If a window is open
• If the air conditioning is blowing directly on the microphone
• If there is interference from the network of the cellular phone

Conditions under which the system will not operate

If using a cellular phone that does not support Bluetooth

®

If the cellular phone is turned off

If you are outside of cellular phone service coverage

If the cellular phone is not connected

If the cellular phone’s battery is low

When outgoing calls are controlled, due to heavy traffic on telephone lines,
etc.

When the cellular phone itself cannot be used

When transferring contact data from the cellular phone

404

5-11. Bluetooth

®

Bluetooth

®

 antenna

The antenna is built into the display. 
If the portable audio player is behind the seat or in the glove box or console
box, or is touching or covered by metal objects, the connection status may
deteriorate. 
If the cellular phone is behind the seat or in the console box, or touching or
covered by metal objects, the connection status may deteriorate.

Battery charge/signal status

This display may not correspond exactly with the portable audio player or
cellular phone itself.

This system does not have a charging function.

The portable audio player or cellular phone battery will be depleted quickly
when the device is connected to Bluetooth

®

.

When  using  the  Bluetooth

®

  audio  and  hands-free  system  at  the  same

time
The following problems may occur.

The Bluetooth

®

 audio connection may be interrupted.

Noise may be heard during Bluetooth

®

 audio playback.

About the contact in this system
The  following  data  is  stored  for  every  registered  cellular  phone.  When
another phone is connecting, you cannot read the registered data.

Contact data

Call history

Favorite

Message

When removing a Bluetooth

®

 phone from the system, the above-mentioned

data is also deleted.

405

5-11. Bluetooth

®

5

Mu
ltim

ed

ia

Compatible models
The Bluetooth

®

 audio system supports portable audio players with the follow-

ing specifications

Bluetooth

®

 specifications: 

Ver. 2.0, or higher (Recommended: Ver. 3.0+EDR or higher)

Profiles:
• A2DP (Advanced Audio Distribution Profile) Ver. 1.0, or higher 

(Recommended: Ver. 1.2 or higher) 
This is a profile to transmit stereo audio or high quality sound to the multi-
media system.

• AVRCP (Audio/Video Remote Control Profile) Ver. 1.0 or higher 

(Recommended: Ver. 1.4 or higher) 
This is a profile to allow remote control the A/V equipment.

However, please note that some functions may be limited depending on the
type of portable audio player connected.
The hands-free system supports cellular phones with the following specifica-
tions.

Bluetooth

®

 specification: 

Ver. 2.0 or higher (Recommended: Ver. 3.0+EDR or higher)

Profiles:
• HFP (Hands Free Profile) Ver. 1.0 or higher (Recommended: Ver. 1.6 or

higher) 
This is a profile to allow hands-free phone calls using a cellular phone or
head set. It has outgoing and incoming call functions.

• OPP (Object Push Profile) Ver. 1.1 or higher (Recommended: Ver. 1.2) 

This is a profile to transfer contact data. When a Bluetooth

®

 compatible

cellular phone has both PBAP and OPP, OPP cannot be used.

• PBAP  (Phone  Book Access  Profile)  Ver.  1.0  or  higher  (Recommended:

Ver. 1.1) 
This is a profile to transfer contact data.

If  the  cellular  phone  does  not  support  HFP,  you  cannot  register  it  with  the
hands-free system. OPP, PBAP services must be selected individually.

406

5-11. Bluetooth

®

Reconnecting the portable audio player
If the portable audio player is disconnected due to poor reception when the
engine  switch  is  in  the  “ACC”  or  “ON”  position,  the  system  automatically
reconnects the portable audio player.
If you have switched off the portable audio player yourself, follow the instruc-
tions below to reconnect:

Select the portable audio player again

Enter the portable audio player

When you sell your car
Be sure to delete your personal data. (

P. 331)

WARNING

While driving
Do not use the portable audio player, cellular phone or connect a device to
the Bluetooth

®

 system.

Caution regarding interference with electronic devices

Your audio unit is fitted with Bluetooth

®

 antennas. People with implantable

cardiac  pacemakers,  cardiac  resynchronization  therapy-pacemakers  or
implantable  cardioverter  defibrillators  should  maintain  a  reasonable  dis-
tance between themselves and the Bluetooth

®

 antennas. The radio waves

may affect the operation of such devices.

Before  using  Bluetooth

®

  devices,  users  of  any  electrical  medical  device

other  than  implantable  cardiac  pacemakers,  cardiac  resynchronization
therapy-pacemakers or implantable cardioverter defibrillators should con-
sult  the  manufacturer  of  the  device  for  information  about  its  operation
under the influence of radio waves. Radio waves could have unexpected
effects on the operation of such medical devices.

407

5-11. Bluetooth

®

5

Mu
ltim

ed

ia

NOTICE

When leaving the vehicle
Do not leave your portable audio player or cellular phone in the vehicle. The
inside  of  the  vehicle  may  become  hot,  causing  damage  to  the  portable
audio player or cellular phone.

408

5-12. Antenna

Antenna

Place  the  included  wrench
around the antenna.

When  not  in  use,  the  wrench  is
stored in glove box.

Loosen  the  antenna  with  the
wrench and remove it.

Tighten  the  antenna  by  one
hand  until  it  will  not  turn  any
more.

Using  the  wrench,  tighten  the
antenna an additional 1/8th turn
(20  to  45  degrees)  to  secure  it
in place.

After  tightening  the  antenna,
remove the wrench.

Removing the antenna

1

2

Installing the antenna

1

2

409

5-12. Antenna

5

Mu
ltim

ed

ia

About the wrench
After using the included wrench, store it in the glove box for safekeeping.

NOTICE

To avoid damaging the antenna
Remove the antenna in the following situations.

When using an automatic carwash.

When the antenna will touch the ceiling of a garage, etc.

When covering the vehicle with a car cover.

Removing the antenna

For normal driving, make sure the antenna is installed.

When removing the antenna to use an automatic carwash, etc., be careful
not  to  lose  the  antenna. Also,  make  sure  to  reinstall  the  antenna  before
driving the vehicle.

Using the wrench

When installing or removing the antenna, use the included wrench.

Be careful not to scratch or damage the vehicle body with the wrench.

Do not over-tighten the antenna. 
Over-tightening may damage the antenna.

Do not use any tools other than the included wrench to install or remove
the antenna. 
Otherwise damage may result on the antenna’s finish.

410

5-12. Antenna

411

6

Interior features

6-1. Using the air conditioning 

system

Manual air conditioning 

system............................. 412

Automatic air conditioning 

system............................. 419

Seat heaters/

seat ventilators................ 426

6-2. Using the interior lights

Interior lights list ................ 429

• Personal/interior lights

main switch ................... 430

• Personal/interior 

lights ............................. 430

• Cargo lamp main 

switch............................ 431

6-3. Using the storage features

List of storage features ..... 432

• Glove box...................... 434
• Console box (front 

separated type seat) ..... 435

• Card holder ................... 436
• Map holder (front 

bench type seat) ........... 438

• Pen holder .................... 439
• Tissue pocket................ 440
• Overhead console......... 441
• Cup holders .................. 442
• Bottle holders................ 444
• Auxiliary boxes (front 

bench type seat) ........... 445

• Storage box .................. 447

Luggage compartment 

features........................... 449

6-4. Using the other interior features

Other interior features ....... 450

• Sun visors ..................... 450
• Vanity mirrors................ 450
• Clock............................. 451
• Power outlets ................ 452
• Armrest ......................... 454
• Assist grips ................... 455

Garage door opener.......... 456
Compass........................... 465

412

6-1. Using the air conditioning system

Manual air conditioning system

Adjusting the temperature setting
To  adjust  the  temperature  set-
ting,  turn  the  temperature  con-
trol  dial  clockwise  (warm)  or
counterclockwise (cool).

If 

  is  not  pressed,  the

system  will  blow  ambient  tem-
perature air or heated air. 
For  quick  cooling, turn the  tem-
perature control dial to the “MAX
A/C” position. 
The air conditioning will automatically turn on and the air intake selector
will be set to recirculated air mode.

: If equipped

Air conditioning controls

413

6-1. Using the air conditioning system

6

Interio

r features

Fan speed setting
To  adjust  the  fan  speed,  turn
the fan speed control dial clock-
wise (increase) or counterclock-
wise (decrease).

Turning  the  dial  to  “OFF”  turns
off the fan.

Change the airflow mode
To select the airflow, set the air
outlet  selector  dial  to  the
desired position.

The  positions  between  the  air
outlet  selections  can  also  be
selected  for  more  delicate
adjustment.

Other functions
● Switching between outside air and recirculated air modes 

(

P. 414)

● Defogging the windshield (P. 414)
● Defogging the back window (CrewMax models) (P. 414)
● Defogging the outside rear view mirrors (if equipped) (P. 414)
● Windshield wiper de-icer (if equipped) (P. 415)

414

6-1. Using the air conditioning system

Switching between outside air and recirculated air modes
Press 

.

The mode switches between outside air mode (introduces air from
outside the vehicle) (indicator off) and recirculated air mode (recy-
cles  air  inside  the  vehicle)  (indicator  on)  each  time  the  button  is
pressed.

Defogging the windshield
Defoggers  are  used  to  defog  the  windshield  and  front  side  win-
dows. 
Set the air outlet selector dial to 

 position.

Set the outside/recirculated air mode button to outside air mode if the recir-
culated air mode is used. (It may switch automatically.) 
To defog the windshield and the side windows early, turn the air flow and
temperature up.

Defogging the back window (CrewMax models)
Defogger is used to defog the back window.
Press 

.

The defogger will automatically turn off after approximately 15 minutes.

Defogging the outside rear view mirrors (if equipped)
Defogger is used to defog to remove raindrops, dew and frost from
the outside rear view mirrors.
Press 

 or 

.

The defogger will automatically turn off after approximately 15 minutes. 
CrewMax models: Turning the back window defogger on will turn the out-
side rear view mirror defoggers on.

Other functions

415

6-1. Using the air conditioning system

6

Interio

r features

Windshield wiper de-icer (if equipped)
This  feature  is  used  to  prevent  ice  from  building  up  on  the  wind-
shield and wiper blades.
Press 

 or 

.

The defogger will automatically turn off after approximately 15 minutes. 
Double Cab models: Turning the outside rear view mirror defoggers on will
turn the windshield wiper de-icer on. 
CrewMax models: Turning the back window defogger on will turn the wind-
shield wiper de-icer on.

Location of air outlets
Air  outlets  and  air  volume
changes  according  to  the
selected airflow mode.

*

: CrewMax models

Adjusting the position and opening and closing the air outlets

Front

Direct air flow to the left or right,
up or down.

Air outlets

*

416

6-1. Using the air conditioning system

Open the vent
Close the vent

Rear (CrewMax models)

Direct air flow to the left or right,
up or down.
Turn the knob to open or close
the vent.

1

2

1

2


Content   ..  24  25  26  27   ..