Toyota Tundra (2019 year). Manual - part 7


  Index      Toyota     Toyota Tundra - service manual 2019 year in english


Search            copyright infringement  


Content   ..  5  6  7  8   ..


Toyota Tundra (2019 year). Manual - part 7


97

2. Instrument cluster

2

Instrument cluster

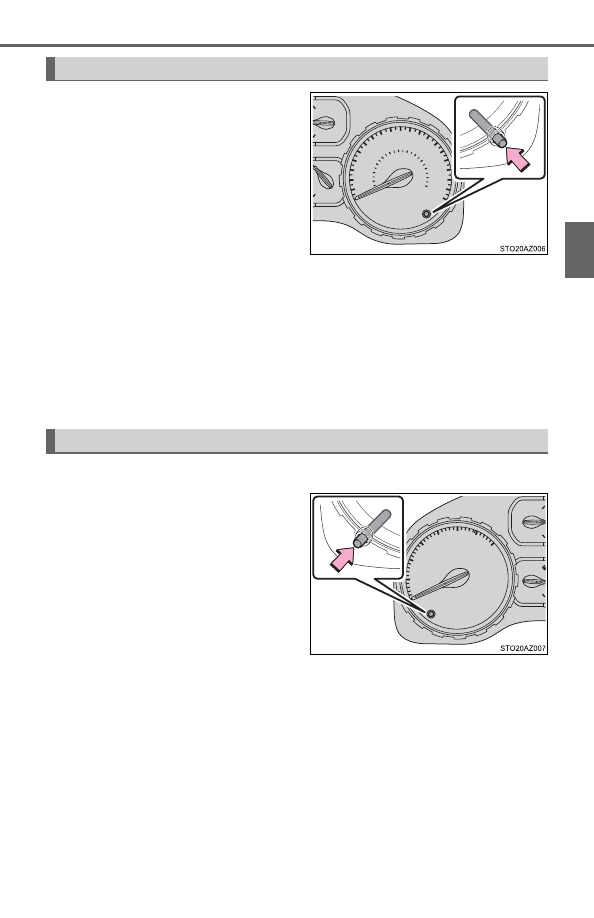
Pressing  the  button  switches
between odometer and trip meter.

Odometer
Displays the total distance the vehicle has been driven.

Trip meter A*/trip meter B*
Displays the distance the vehicle has been driven since the meter
was last reset. Trip meters A and B can be used to record and dis-
play different distances independently.

*

: Press and hold the display change button to reset.

The brightness of the instrument panel lights can be adjusted.
Pressing  the  button  will  adjust
brightness of the instrument panel
light.

The  brightness  of  the  instrument
panel  lights  can  be  adjusted  by
pressing the button.
Short  press:  1  step  change  of
brightness level.
Long  press:  continues  change  of
brightness level until released.

Changing the odometer/trip meter display

Instrument panel light control

98

2. Instrument cluster

The multi-information display illuminate when
The engine switch is in the “ON” position.

The brightness of the instrument panel lights
When  the  tail  lights  are  turned  on,  the  display’s  brightness  will  be  reduced
slightly  unless  the  meter  brightness  level  adjustment  is  set  to  the  brightest
setting.

Outside temperature display

In the following situations, the correct outside temperature may not be dis-
played, or the display may take longer than normal to change.
• When stopped, or driving at low speeds (less than 12 mph [20 km/h])
• When the outside temperature has changed suddenly (at the entrance/

exit of a garage, tunnel, etc.)

When “--” or “E” is displayed, the system may be malfunctioning. 
Take your vehicle to your Toyota dealer.

Liquid crystal display
Small  spots  or  light  spots  may  appear  on  the  display. This  phenomenon  is
characteristic of liquid crystal displays, and there is no problem continuing to
use the display.

WARNING

The information display at low temperatures
Allow the interior of the vehicle to warm up before using the liquid crystal
information display. At extremely low temperatures, the information display
monitor may respond slowly, and display changes may be delayed. 
For example, there is a lag between the driver’s shifting and the new gear
number appearing on the display. This lag could cause the driver to down-
shift  again,  causing  rapid  and  excessive  engine  braking  and  possibly  an
accident resulting in personal death or injury.

99

2. Instrument cluster

2

Instrument cluster

NOTICE

To prevent damage to the engine and its components

Do not let the indicator needle of the tachometer enter the red zone, which
indicates the maximum engine speed.

The engine may be overheating if the engine coolant temperature gauge is
in  the  red  zone  (H).  In  this  case,  immediately  stop  the  vehicle  in  a  safe
place, and check the engine after it has cooled completely. (

P. 585)

Voltmeter
When the voltmeter indicates 19 V or higher or 9 V or lower while the engine
is running, there may be a battery or charging system malfunction. Have the
vehicle inspected at your Toyota dealer.

Engine oil pressure gauge
When the value of the engine oil pressure gauge drops while the engine is
running, stop the vehicle in a safe place immediately and check the amount
of engine oil. (

P. 486) 

When  the  oil  pressure  drops  even  though  the  engine  oil  amount  has  not
decreased,  or  if  the  oil  pressure  does  not  increase  when  engine  oil  is
added, contact your Toyota dealer, as there may be a problem with the lubri-
cation system.

100

2. Instrument cluster

Multi-information display

The multi-information display presents the driver with a variety of vehi-
cle data.
● Menu icons

Displays  the  following  informa-
tion when an icon is selected. 
Some of the information may be
displayed 

automatically

depending on the situation.

Drive information

Select to display various drive data. (

P. 101)

Navigation system-linked display

*

Select to display the following navigation system-linked information.

• Route guidance
• Compass display (north-up display/heading-up display)

Audio system-linked display

Select to enable selection of an audio source or track on the meter
using the meter control switches.

Vehicle information

Select to display the operational status of the following systems:

• LDA (Lane Departure Alert)

*

 (

P. 243)

• Dynamic radar cruise control

*

 (

P. 251)

• Tire inflation pressure (

P. 496)

• Trailer brake controller

(

P. 307)

Display contents

101

2. Instrument cluster

2

Instrument cluster

Warning message display

Select to display warning messages and measures to be taken if a
malfunction is detected. (

P. 555)

Settings display

Select to change the meter display settings. (

P. 102)

*

: If equipped

Operating the meter control switches

Select an item/change pages
Press: Enters/Sets
Press and hold: Resets
Switch  menu/Displays  the
top screen
Returns  to  the  previous
screen

● Total Average

*

/Tank Average/Trip Average

Displays  the  average  fuel  consumption  since  the  function  was
reset, the vehicle was refueled, or the engine was started, respec-
tively

Use the displayed average fuel consumption as a reference.

● Range

Displays the estimated maximum distance that can be driven with
the quantity of fuel remaining, the distance driven after the engine
was  started  or  the  distance  since  the  function  was  reset,  respec-
tively.

• This distance is computed based on your average fuel consumption. As

a result, the actual distance that can be driven may differ from that dis-
played. 

• When only a small amount of fuel is added to the tank, the display may

not be updated. 
When refueling, turn the engine switch off. If the vehicle is refueled with-
out turning the engine switch off, the display may not be updated.

1

2

3

4

Drive information

102

2. Instrument cluster

● Current

Displays the current rate of fuel consumption

● Average Speed

*

/Trip Average Speed

Displays the average since engine was started or the average since
the function was reset, respectively

● Total Time

*

/Trip Time

Displays the engine was started or the elapsed time since the func-
tion was reset, respectively

● Trip distance

Displays the distance since the engine was started

● Digital speedometer
● Display off

A blank screen is displayed

*

: Resetting procedures:

• Select  a  function  to  be  reset  using  the  meter  control  switch  and  then

press and hold the center button to reset.

• If there is more than one function that can be reset, check boxes will be

displayed next to the functions.

The settings of the following items can be changed, refer to P. 623.

For  functions  that  can  be  enabled  or  disabled,  the  function  switches
between on and off each time is 

 pressed.

● LDA (Lane Departure Alert)

*

1

 (→P. 626)

• LDA Sensitivity

Select to set up the LDA (Lane Departure Alert) sensitivity.

• Sway warning

Select to enable/disable the Sway warning function.

• Sway warning sensitivity

Select to set up the sway warning sensitivity.

● PCS (Pre-Collision System)

*

1

 (→P. 626)

• PCS

Select to enable/disable the PCS (Pre-Collision System) function.

• Sensitivity

Select to set up the PCS (Pre-Collision System) sensitivity.

Settings display

103

2. Instrument cluster

2

Instrument cluster

● BSM (Blind Spot Monitor)

*

1

 (→P. 626)

Select to enable/disable the Blind Spot Monitor function.

● RCTA (Rear Cross Traffic Alert)

*

1

 (→P. 626)

Select to enable/disable the Rear Cross Traffic Alert function.

● Vehicle Settings

• BSM Brightness

*

1

 (

P. 626)

Select to set up the BSM (Blind Spot Monitor) outside rear view mirror
indicators brightness.

• RCTA volume

*

1

 (

P. 626)

Select to set up the RCTA (Rear Cross Traffic Alert) warning buzzer vol-
ume.

• TBC Trailer Type

*

1

 (

P. 627)

Select to set up the trailer brake type.

• Maintenance reset

*

2

 (

P. 477)

Select  to  reset  the  message  after  the  required  maintenance  is  per-
formed.

104

2. Instrument cluster

● Meter setting

• Language

Select to change the language on the display.

• Units

Select to change the unit of measure for fuel consumption and tempera-
ture.

• Switch settings

You can register 1 screen as the top screen. To register, press and hold

 while the desired screen is displayed.

There are also screens that cannot be setup as the Top Screen.

• Drive information 1 and 2

Select to select up to 2 items that will be displayed on a Drive informa-
tion screen, up to 2 Drive information screens can be set.

• Pop-up display

Select to set the following pop-up displays, which may appear in some
situations, on/off.

• Route  guidance  display  of  the  navigation  system-linked  system  (if

equipped)

• Incoming call display of the hands-free phone system
• Instrument panel brightness adjustment display

• Accent color

Select  to  change  the  accent  colors  on  the  screen,  such  as  the  menu
icon color.

• Default settings

Registered or changed meter settings will be deleted or returned to their
default setting.

*

1

: If equipped

*

2

: For vehicles sold in the U.S.A.

105

2. Instrument cluster

2

Instrument cluster

Setting items

“Vehicle  Settings”  and  “Meter  Settings”  setting  items  are  not  selectable
during driving and cannot be operated.
Also, the settings screen is temporarily canceled in the following situations.
• When a warning message appears.
• When the vehicle begins to move.

Settings for functions not equipped to the vehicle are not displayed.

When a function is turned off, the related settings for that function are not
selectable.

Pop-up display
In some situations, such as when a switch operation is performed, a pop-up
display will be temporarily displayed on the multi-information display.

When disconnecting and reconnecting battery terminals
The drive information will be reset.

Trip summary display
When the engine switch is turned off, each of the following will be displayed
on  the  multi-information  display,  and  will  clear  after  approximately  30  sec-
onds.

Distance traveled

Average fuel consumption

Driving range

Tire inflation pressure

It  may  take  a  few  minutes  to  display  the  tire  inflation  pressure  after  the
engine switch is turned to the “ON” position. It may also take a few minutes
to  display  the  tire  inflation  pressure  after  inflation  pressure  has  been
adjusted.

“---” may be displayed if the tire position information cannot be determined
due to unfavorable radio wave conditions.

Tire inflation pressure changes with temperature. The displayed values may
also be different from the values measured using a tire pressure gauge.

Liquid crystal display
Small  spots  or  light  spots  may  appear  on  the  display. This  phenomenon  is
characteristic of liquid crystal displays, and there is no problem continuing to
use the display.

106

2. Instrument cluster

WARNING

Caution for use while driving

When  operating  the  multi-information  display  while  driving,  pay  extra
attention to the safety of the area around the vehicle.

Do not look continuously at the multi-information display while driving as
you  may  fail  to  see  pedestrians,  objects  on  the  road,  etc.  ahead  of  the
vehicle.

Cautions during setting up the display
As the engine needs to be running during setting up the display, ensure that
the vehicle is parked in a place with adequate ventilation. In a closed area
such as a garage, exhaust gases including harmful carbon monoxide (CO)
may  collect  and  enter  the  vehicle.  This  may  lead  to  death  or  a  serious
health hazard.

NOTICE

During setting up the display
To prevent battery discharge, ensure that the engine is running while setting
up the display features.

107

2. Instrument cluster

2

Instrument cluster

Fuel consumption information

Entune Audio

Press the “TRUCK” button.

Entune Premium Audio and Entune Audio Plus

Press the “APPS” button, and then select “Eco” on the screen.

Trip information
If the “Past Record” screen is displayed, select “Trip Information”.

Resetting  the  consumption
data
Average vehicle speed since
the engine was started
Elapsed  time  since  the
engine was started
Fuel consumption in the past
15 minutes
Cruising range (

P. 108)

Current fuel consumption

Average  fuel  consumption  for  the  past  15  minutes  is  divided  by
color  into  past  averages  and  averages  attained  since  the  engine
switch was last turned to the “ON” position. Use the displayed aver-
age fuel consumption as a reference.

These images are examples only.

: If equipped

The  fuel consumption information can be displayed on Entune
Audio, Entune Premium Audio and Entune Audio Plus screen.

Display the trip information or past record screen

Fuel consumption

1

2

3

4

5

6

108

2. Instrument cluster

Past record

If the “Trip Information” screen is displayed, select “Past Record”.

Resetting  the  past  record
data
Best recorded fuel consump-
tion
Average fuel consumption (if
equipped)
Previous  fuel  consumption
record
Current fuel economy
Update the average fuel consumption data

The average fuel consumption history is divided by color into past
averages and the average fuel consumption since the last updated.
Use the displayed average fuel consumption as a reference.

These images are examples only.

Resetting the data
The fuel consumption data can be deleted by selecting “Clear”.

Updating the past record data
Update the average fuel consumption by selecting “Update” to measure the
current fuel consumption again.

Cruising range
Displays the estimated maximum distance that can be driven with the quan-
tity of fuel remaining.
This  distance  is  computed  based  on  your  average  fuel  consumption. As  a
result, the actual distance that can be driven may differ from that displayed.

1

2

3

4

5

6

109

3

Operation of

each component

3-1. Key information

Keys .................................. 110

3-2. Opening, closing and 

locking the doors

Side doors ......................... 114
Tailgate ............................. 118

3-3. Adjusting the seats

Front seats ........................ 123
Rear seats......................... 126
Driving position memory 

(driver’s seat) .................. 128

Head restraints.................. 132

3-4. Adjusting the steering 

wheel and mirrors

Steering wheel .................. 136
Inside rear view mirror....... 139
Outside rear view 

mirrors............................. 142

3-5. Opening, closing the 

windows and moon roof

Power windows ................. 147
Back window ..................... 150
Power back window .......... 151
Moon roof.......................... 154

110

3-1. Key information

Keys

The following keys are provided with the vehicle.

Vehicles without wireless remote control

Keys
Key number plate

Vehicles with wireless remote control

Keys

Operating the wireless remote con-
trol function

Key number plate

Locks all the doors (

P. 114)

Unlocks all the doors (

P. 114)

Pressing  the  button  unlocks  the
driver’s  door.  Pressing  the  button
again within 3 seconds unlocks the
other doors.

Sounds  the  alarm  (press  and
hold) (

P. 111)

The keys

1

2

1

2

Wireless remote control (if equipped)

1

2

3

111

3-1. Key information

3

Opera

tion of e

ach compon

ent

If you lose your keys
New genuine key can be made by your Toyota dealer using the other key and
the key number stamped on your key number plate. 
Keep the plate in a safe place such as your wallet, not in the vehicle.

Panic mode (vehicles with wireless remote control)

When riding in an aircraft (vehicles with wireless remote control)
When bringing a wireless key onto an aircraft, make sure you do not press
any buttons on the wireless key while inside the aircraft cabin. If you are car-
rying a wireless key in your bag, etc., ensure that the buttons are not likely to
be  pressed  accidentally.  Pressing  a  button  may  cause  the  wireless  key  to
emit radio waves that could interfere with the operation of the aircraft.

Conditions affecting operation (vehicles with wireless remote control)
The wireless remote control function may not operate normally in the following
situations.

Near a TV tower, radio station, electric power plant, airport or other facility
that generates strong radio waves

When carrying a portable radio, cellular phone or other wireless communi-
cation device

When multiple wireless keys are in the vicinity

When the wireless key has come into contact with, or is covered by a metal-
lic object

When a wireless key (that emits radio waves) is being used nearby

When the wireless key has been left near an electrical appliance such as a
personal computer

Key battery depletion (vehicles with wireless remote control)
If the wireless remote control function does not operate, the battery may be
depleted. Replace the battery when necessary. (

P. 516)

Replacing the battery (vehicles with wireless remote control)
P. 516

When 

 is pressed for longer than about

1  second,  an  alarm  will  sound  intermit-
tently  and  the  vehicle  lights  will  flash  to
deter any person from trying to break into
or damage your vehicle.
To stop the alarm, press any button on the
wireless remote control.

112

3-1. Key information

Certification for wireless remote control (vehicles with wireless remote
control)

For vehicles sold in the U.S.A.

FCC ID: GQ4-52T
FCC ID: GQ4-49R
NOTE:
This device complies with part 15 of the FCC Rules. Operation is subject to
the following two conditions: (1) This device may not cause harmful interfer-
ence,  and  (2)  this  device  must  accept  any  interference  received,  including
interference that may cause undesired operation.
FCC WARNING:
Changes or modifications not expressly approved by the party responsible for
compliance could void the user’s authority to operate the equipment.
<For 52T>
The FCC ID/IC Certification number is affixed inside the equipment. You can
find the ID/number when replacing the battery.

For vehicles sold in Canada

NOTE:
This device  complies with Industry Canada’s  license-exempt RSSs. Opera-
tion is subject to the following two conditions: (1) This device may not cause
interference;  and  (2)  This  device  must  accept  any  interference,  including
interference that may cause undesired operation of the device.
<For 52T>
The FCC ID/IC Certification number is affixed inside the equipment. You can
find the ID/number when replacing the battery.
NOTE:
Le  présent  appareil  est  conforme  aux  CNR  d’Industrie  Canada  applicables
aux appareils radio exempts de licence. L’exploitation est autorisée aux deux
conditions suivantes:(1) l’appareil ne doit pas produire de brouillage; (2) l’util-
isateur de l’appareil doit accepter tout brouillage radioélectrique subi, même
si le brouillage est susceptible d’en compromettre le fonctionnement.
<Pour 52T>
L’identification  FCC/Ie  numéro  d’accréditation  IC  est  apposé(e)  à  l’intérieur
de l’appareil.


Content   ..  5  6  7  8   ..