Toyota Sienna (2019 year). Manual - part 29


  Index      Toyota     Toyota Sienna - service manual 2019 year in english


Search            copyright infringement  


Content   ..  27  28  29  30   ..


Toyota Sienna (2019 year). Manual - part 29


SIENNA_OM_OM08025U_(U)

449

6-3. Do-it-yourself maintenance

6

Mainten

ance an

d ca

re

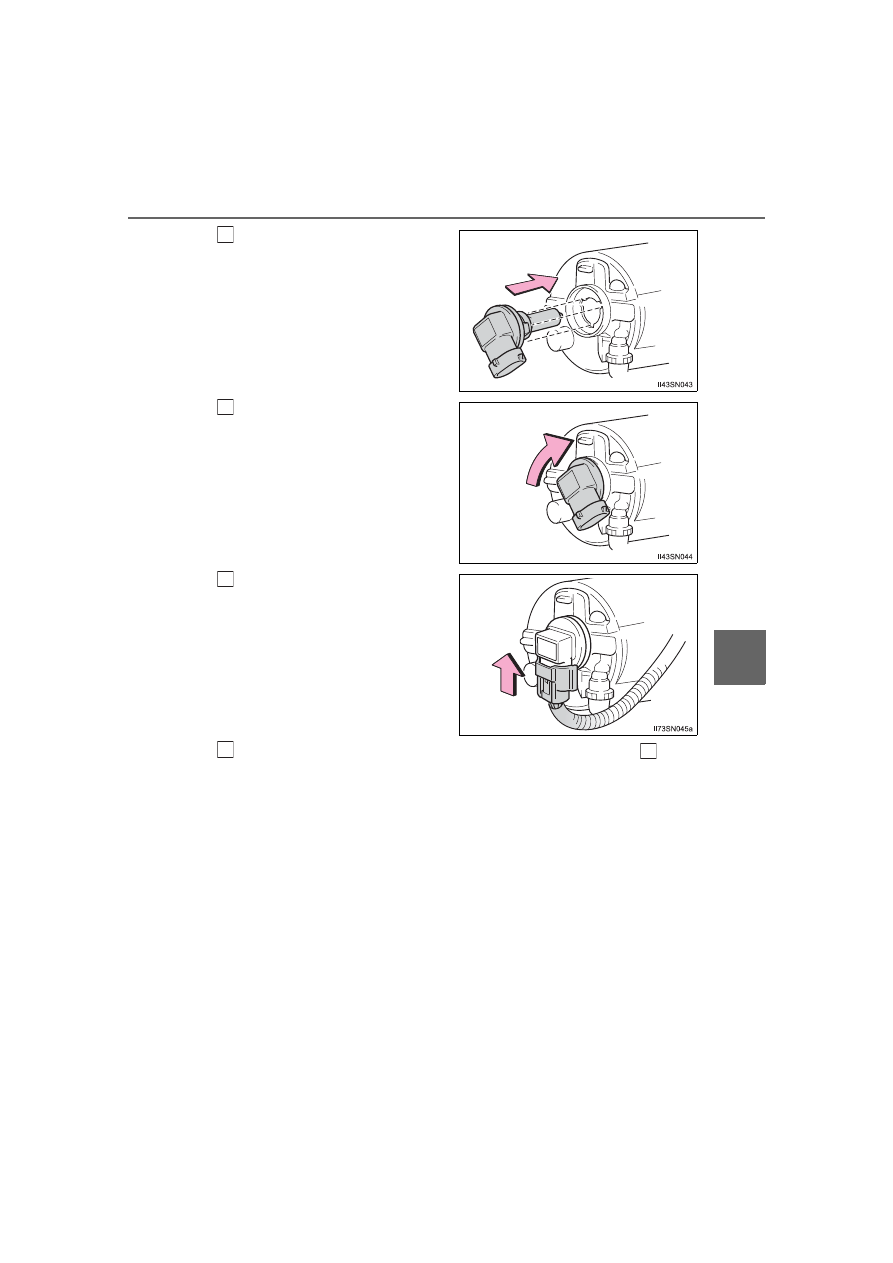
Install a new light bulb.

Align the 3 tabs on the light bulb
with the mounting and insert.

Turn  clockwise  and  secure
the bulb base.

Install the connector.

Shake  the  connector  gently  to
check  that  it  is  not  loose,  turn
the fog lights on once and visu-
ally confirm that no light is leak-
ing through the mounting.

When installing the engine under cover, reverse the step 

.

4

5

6

7

1

450

SIENNA_OM_OM08025U_(U)

6-3. Do-it-yourself maintenance

?

Front turn signal/parking and front side marker lights (vehicles
without daytime running lights or with bulb type daytime run-
ning lights)

For left side only: 
Open the fuse box cover. (

P. 439)

Turn  the  bulb  base  counter-
clockwise.

Remove the light bulb.

1

2

3

SIENNA_OM_OM08025U_(U)

451

6-3. Do-it-yourself maintenance

6

Mainten

ance an

d ca

re

?

Front  turn  signal  lights  (vehicles  with  LED  type  daytime  run-
ning lights)

For left side only: 
Open the fuse box cover. (

P. 439)

Turn  the  bulb  base  counter-
clockwise.

Remove the light bulb.

1

2

3

452

SIENNA_OM_OM08025U_(U)

6-3. Do-it-yourself maintenance

?

Front side marker lights (vehicles with LED type daytime run-
ning lights)

For left side only: 
Open the fuse box cover. (

P. 439)

Turn  the  bulb  base  counter-
clockwise.

Remove the light bulb.

1

2

3

SIENNA_OM_OM08025U_(U)

453

6-3. Do-it-yourself maintenance

6

Mainten

ance an

d ca

re

?

Rear turn signal lights (vehicles with LED type stop/tail lights)

Remove  the  securing  bolts
and remove the unit.

Turn  the  bulb  base  counter-
clockwise.

Remove the light bulb.

1

2

3

454

SIENNA_OM_OM08025U_(U)

6-3. Do-it-yourself maintenance

?

Rear turn signal lights and stop/tail lights (vehicles with bulb
type stop/tail lights)

Remove  the  securing  bolts
and remove the unit.

Unplug  the  connector  while
pushing the lock release.

Turn  the  bulb  base  counter-
clockwise.

Rear turn signal lights
Stop/tail lights

Remove the light bulb.

Rear turn signal lights
Stop/tail lights

1

2

3

1
2

4

1
2

SIENNA_OM_OM08025U_(U)

455

6-3. Do-it-yourself maintenance

6

Mainten

ance an

d ca

re

?

Tail and back-up lights

Remove  the  back  door  trim
board.

Turn the bulb base counterclockwise.

Remove the light bulb.

1

2

Vehicles  with  bulb  type
stop/tail lights

Vehicles with LED type stop/tail
lights

Back-up light
Tail light

Tail light
Back-up light

1
2

1
2

3

Vehicles  with  bulb  type
stop/tail lights

Vehicles with LED type stop/tail
lights

Back-up light
Tail light

Tail light
Back-up light

1
2

1
2

456

SIENNA_OM_OM08025U_(U)

6-3. Do-it-yourself maintenance

?

License plate lights

Remove  the  back  door  trim
board.

Turn  the  bulb  base  counter-
clockwise.

Remove the light bulb.

?

Replacing the following bulbs
If any of the lights listed below has burnt out, have it replaced by
your Toyota dealer.

?

Headlight low beams (discharge bulbs)

?

Parking lights (LED type)

?

Daytime running lights (LED type)

?

Side turn signal light (if equipped)

?

Stop/tail lights (LED type) and rear side marker lights

?

High mounted stoplight

?

Outer foot lights (if equipped)

1

2

3

SIENNA_OM_OM08025U_(U)

457

6-3. Do-it-yourself maintenance

6

Mainten

ance an

d ca

re

?

Discharge headlights (if equipped)
If voltage to the discharge bulbs is insufficient, the bulbs may not come on, or
may  go  out  temporarily.  The  discharge  bulbs  will  come  on  when  normal
power is restored.

?

LED lights
The  daytime  running  lights  (LED  type),  parking  lights  (LED  type),  stop/tail
(LED type), side turn signal light, rear side marker lights and high mounted
stoplight consists of a number of LEDs. If any of the LEDs burn out, take your
vehicle to your Toyota dealer to have the light replaced.

?

Condensation build-up on the inside of the lens
Temporary condensation build-up on the inside of the headlight lens does not
indicate a malfunction. Contact your Toyota dealer for more information in the
following situations:

?

Large drops of water have built up on the inside of the lens.

?

Water has built up inside the headlight.

458

SIENNA_OM_OM08025U_(U)

6-3. Do-it-yourself maintenance

WARNING

?

Replacing light bulbs

?

Turn  off  the  lights.  Do  not  attempt  to  replace  the  bulb  immediately  after
turning off the lights.
The bulbs become very hot and may cause burns.

?

Do not touch the glass portion of the light bulb with bare hands. When it is
unavoidable to hold the glass portion, use and hold with a clean dry cloth
to avoid getting moisture and oils on the bulb. Also, if the bulb is scratched
or dropped, it may blow out or crack.

?

Fully install light bulbs and any parts used to secure them. Failure to do so
may result in heat damage, fire, or water entering the headlight unit. This
may damage the headlights or cause condensation to build up on the lens.

?

Do not attempt to repair or disassemble the bulb, socket, electrical wiring,
or sub components. This may cause serious injury due to electric shock.

?

Vehicles with discharge headlights: 
While  the  low  beam  headlights  are
turned on, and for a short time after they
have  been  turned  off,  metal  compo-
nents  at  the  rear  of  the  headlight
assembly will be extremely hot. To pre-
vent  burns,  do  not  touch  these  metal
components  until  you  are  certain  they
have cooled down.

Metal components

SIENNA_OM_OM08025U_(U)

459

6-3. Do-it-yourself maintenance

6

Mainten

ance an

d ca

re

WARNING

?

Discharge headlights (if equipped)

?

Contact  your  Toyota  dealer  before  replacing  the  discharge  headlights
(including light bulbs).

?

Do not touch the discharge headlight’s high voltage socket when the head-
lights are turned on.
An extremely high voltage of 30000 V will be discharged and could result
in serious injury or death by electric shock.

?

Do not attempt to take apart or repair the low beam headlight bulbs, con-
nectors, power supply circuits, or related components.
Doing so could result in electric shock and death or serious injury.

?

When replacing the rear turn signal lights or stop/tail lights
Inspect the gasket for any damage (rip, tear, hole, etc.). If there is any dam-
age,  please  contact  your  Toyota  dealer  and  have  the  gasket  replaced.
Improper installation of the gasket may result in water entering the rear light
unit.

?

To prevent damage or fire

?

Make sure bulbs are fully seated and locked.

?

Check the wattage of the bulb before installing to prevent heat damage.

NOTICE

?

When installing the back door trim
To  prevent  damage,  be  careful  not  to  pinch  any  of  the  wire  harnesses  or
connectors with the back door trim.

460

SIENNA_OM_OM08025U_(U)

6-3. Do-it-yourself maintenance

461

SIENNA_OM_OM08025U_(U)

7

When trouble arises

7-1. Essential information

Emergency flashers .......... 462
If your vehicle has to 

be stopped in an 
emergency ...................... 463

7-2. Steps to take in an

emergency

If your vehicle needs to 

be towed ......................... 465

If you think something is 

wrong .............................. 469

Fuel pump shut off 

system ............................ 470

If a warning light turns on 

or a warning buzzer 
sounds ............................ 471

If a warning message is 

displayed......................... 481

If you have a flat tire 

(vehicles with a compact 
spare tire)........................ 485

If you have a flat tire 

(vehicles with 
run-flat tires).................... 499

If the engine will not 

start................................. 501

If the electronic key does 

not operate properly 
(vehicles with a smart 
key system)..................... 503

If the battery is 

discharged ...................... 505

If your vehicle 

overheats ........................ 509

If the vehicle becomes 

stuck ............................... 512

462

SIENNA_OM_OM08025U_(U)

7-1. Essential information

Emergency flashers

Press the switch.

All the turn signal lights will flash. 
To  turn  them  off,  press  the  switch
once again.

?

Emergency flashers
If  the  emergency  flashers  are  used  for  a  long  time  while  the  engine  is  not
operating, the battery may discharge.

The emergency flashers are used to warn other drivers when the
vehicle has to be stopped in the road due to a breakdown, etc.

463

SIENNA_OM_OM08025U_(U)

7-1. Essential information

7

Wh
en tro

uble

 a

ris

es

If your vehicle has to be stopped in an emergency

Steadily step on the brake pedal with both feet and firmly depress it.

Do  not  pump  the  brake  pedal  repeatedly  as  this  will  increase  the  effort
required to slow the vehicle.

Shift the shift lever to N.

If the shift lever is shifted to N
After slowing down, stop the vehicle in a safe place by the road.
Stop the engine.

If the shift lever cannot be shifted to N
Keep depressing the brake pedal with both feet to reduce vehicle
speed as much as possible.
Vehicles  without  a  smart  key
system:  Stop  the  engine  by
turning the engine switch to the
“ACC” position.

Vehicles  with  a  smart  key  sys-
tem: To  stop  the  engine,  press
and hold the engine switch for 2
consecutive  seconds  or  more,
or  press  it  briefly  3  times  or
more in succession.

Stop the vehicle in a safe place by the road.

Only in an emergency, such as if it becomes impossible to stop
the vehicle in the normal way, stop the vehicle using the follow-
ing procedure:

1

2

3

4

3

4

Press and hold for 2 seconds or 
more or press briefly 3 times or 
more

5

464

7-1. Essential information

SIENNA_OM_OM08025U_(U)

WARNING

?

If the engine has to be turned off while driving

?

Power  assist  for  the  brakes  and  steering  wheel  will  be  lost,  making  the
brake  pedal  harder  to  depress  and  the  steering  wheel  heavier  to  turn.
Decelerate as much as possible before turning off the engine.

?

Vehicles without a smart key system: Never attempt to remove the key, as
doing so will lock the steering wheel.


Content   ..  27  28  29  30   ..