Toyota MR2 Spyder (2005 year). Manual - part 5

4. To remove the infant seat, press the
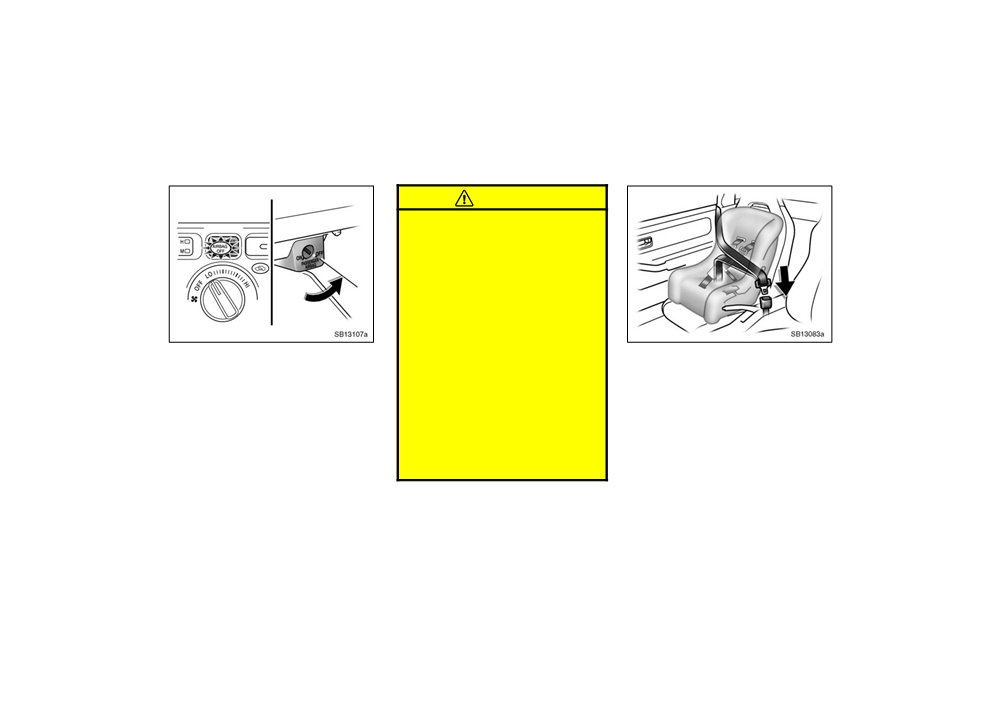
(B) CONVERTIBLE SEAT INSTALLATION
buckle release button and allow the
CAUTION
A convertible seat must be used in for-
belt to retract completely. The belt will
ward−facing or rear−facing position de-
Rear−facing child restraint system:
move freely again and be ready to
pending on the age and size of the
work for an adult or older child passen-
Never install a rear−facing child re-
child. When installing, follow the
ger.
manufacturer’s instruction about the ap-
straint system on the passenger seat
with the passenger airbag manual on−
plicable age and size of the child as
well as directions for installing the
off switch in the
“ON” position. In
child restraint system.
the event of an accident, the force of
the rapid inflation of the passenger
airbag can cause death or serious in-
jury to the child.
52
2005 MR2 from Aug. ’04Prod. (OM17527U)
CAUTION
D If you must install a rear−facing
child restraint system on the pas-
senger seat, make sure the passen-
ger airbag manual on−off switch is
in the
“OFF” position and that the
indicator light is on.
D Forward−facing child restraint sys-
tem: A forward−facing child re-
straint system which belongs to a
passenger risk group should never
be installed on the passenger seat
When you put a forward−facing or a
with the passenger airbag manual
1.
Run the lap and shoulder belt through
rear−facing child restraint system which
on−off switch in the “ON” position,
or around the convertible seat following
belongs to a passenger risk group on
because the passenger airbag could
the instructions
provided by its
the passenger seat, turn the passenger
inflate with considerable speed and
manufacturer and insert the tab into
airbag manual on−off switch counter-
force. Otherwise the child may be
the buckle taking care not to twist the
clockwise to the
“OFF” position.
(For
killed or seriously injured in for-
belt. Keep the lap portion of the belt
details, see “SRS driver airbag and pas-
ward seating position.
(For details,
tight.
senger airbag” on page 37 in this Sec-
see “SRS driver airbag and passen-
tion.)
ger airbag” on page 37 in this Sec-
tion.)
The indicator comes on when the system
is off.
53
2005 MR2 from Aug. ’04Prod. (OM17527U)

CAUTION
D After inserting the tab, make sure
the tab and buckle are locked and
that the lap and shoulder portions
of the belt is not twisted.
D Do not insert coins, clips, etc. in
the buckle as this may prevent your
child from properly latching the tab
and buckle.
D If the seat belt does not function
normally, it cannot protect your
child from death or serious injury.
2. Fully extend the shoulder belt to put it
3. While pressing the convertible seat
Contact your Toyota dealer immedi-
in the lock mode. When the belt is
firmly against the seat cushion and
ately. Do not install the child
then retracted slightly, it cannot be ex-
seatback, let the shoulder belt retract
restraint system on the seat until
tended.
as far as it will go to hold the convert-
the seat belt is fixed.
ible seat securely.
To hold the convertible seat securely,
make sure the belt is in the lock mode
before letting the belt retract.
54
2005 MR2 from Aug. ’04Prod. (OM17527U)

4. To remove the convertible seat, press
(C) BOOSTER SEAT INSTALLATION
CAUTION
the buckle release button and allow the
A booster seat must be used in for-
belt to retract completely. The belt will
ward−facing position only.
Push and pull the child restraint sys-
move freely again and be ready to
tem in different directions to be sure
work for an adult or older child passen-
it is secure. Follow all the installation
ger.
instructions provided by its manufac-
turer.
55
2005 MR2 from Aug. ’04Prod. (OM17527U)

CAUTION
A forward−facing child restraint
system which belongs to a passenger
risk group should never be installed
on the passenger seat with the
passenger airbag manual on−off
switch in the “ON” position, because
the passenger airbag could inflate
with considerable speed and force.
Otherwise the child may be killed or
seriously injured in forward seating
position. (For details, see “SRS driver
airbag and passenger airbag” on page
When you put a forward−facing child
1. Sit the child on a booster seat. Run
37 in this Section.)
restraint system which belongs to pas-
the lap and shoulder belt through or
senger risk group on the passenger
around the booster seat and across the
seat, turn the passenger airbag manual
child following the instructions provided
on−off switch counterclockwise to the
by its manufacturer and insert the tab
“OFF” position.
(For details, see
“SRS
into the buckle, taking care not to twist
driver airbag and passenger airbag” on
the belt.
page 37 in this Section.)
Make sure the shoulder belt is correctly
The indicator comes on when the system
across the child’s shoulder and that the
is off.
lap belt is positioned as low as possible
on the child’s hips. See “Seat belts—” on
page 31 in this Section for details.
56
2005 MR2 from Aug. ’04Prod. (OM17527U)

CAUTION
D If the seat belt does not function
normally, it cannot protect your
D Always make sure the shoulder belt
child from death or serious injury.
is positioned across the center of
Contact your Toyota dealer immedi-
child’s shoulder. The belt should be
ately. Do not install the child
kept away from child’s neck, but
restraint system on the seat until
not falling off child’s shoulder.
the seat belt is fixed.
Otherwise, the child may be killed
or seriously injured in case of sud-
den braking or a collision.
D Both high−positioned lap belts and
loose−fitting belts could cause
death or serious injuries due to
sliding under the lap belt during a
2.
To remove the child restraint system,
collision or other unintended event.
press the buckle release button and
Keep the lap belt positioned as low
allow the belt to retract.
on a child’s hips as possible.
D For child’s safety, do not place the
shoulder belt under child’s arm.
D After inserting the tab, make sure
the tab and buckle are locked and
that the lap and shoulder portions
of the belt are not twisted.
D Do not insert coins, clips, etc. in
the buckle as this may prevent your
child from properly latching the tab
and buckle.
57
2005 MR2 from Aug. ’04Prod. (OM17527U)

—Using a top strap
Follow the procedure below for a child
Use the anchor bracket on the luggage
TO USE THE ANCHOR BRACKET
restraint system that requires the use
trim to attach the top strap.
1. Lightly push up the anchor bracket
of a top strap.
Anchor brackets are installed for a pas-
cover, then pull it forward to re-
senger seating position.
move.
This symbol indicates the location of the
anchor bracket.
58
2005 MR2 from Aug. ’04Prod. (OM17527U)

—Installation with child
restraint lower anchorages
CAUTION
D Do not slide the seat after securing
the child restraint system.
D Make sure the top strap is securely
latched, and check that the child
restraint system is secure by push-
ing and pulling it in different direc-
tions.
Follow all the installation instructions
provided by its manufacturer.
2. Fix the child restraint system with
Store a removed cover in a safe place
The lower anchorages for the child re-
the seat belt.
such as the glove box.
straint system interfaced with the
Be sure to replace a cover when the an-
FMVSS225 specification are installed in
Latch the hook onto the anchor
chor bracket is not in use.
the passenger seat.
bracket and tighten the top strap.
The anchorages are installed in the gap
For instructions to install the child
between the seat cushion and seatback of
restraint system, see
“—Types of child
passenger seat.
restraint system” on page 48.
Child restraint system interfaced with the
FMVSS213 specification can be fixed with
these anchorages. In this case, it is not
necessary to fix the child restraint system
with a seat belt on the vehicle.
59
2005 MR2 from Aug. ’04Prod. (OM17527U)

1st lock
position
9th lock
position
More than
3 notches
Rearmost
position
CHILD
RESTRAINT
SYSTEM
2. Raise the seatback back to the
1st
INSTALLATION
lock position (most upright position)
until it locks into place. Adjust the
1. Fold down the seatback and slide
seatback to the 9th lock position.
the seat backward into the rearmost
position. Then slide it forward by
Make sure the seatback is locked se-
more than 3 notches.
curely.
Type A
60
2005 MR2 from Aug. ’04Prod. (OM17527U)

3. Type A—Latch the hooks of lower
straps onto the lower anchorages lo-
CAUTION
cated between the seat cushion and
D When using the lower anchorages
seatback, and tighten the lower
for the child restraint system, be
straps.
sure that there are no irregular ob-
Type B—Latch the buckles onto the
jects around the anchorages or that
lower anchorages located between
the seat belt is not caught.
the seat cushion and seatback.
D Push and pull the child restraint
If your child restraint system has a top
system in different directions to be
strap, it should be anchored.
(For the
sure it is secure. Follow all the
installation of the top strap, see
“—Using
installation instructions provided by
a top strap” on page 58.)
its manufacturer.
For installation details, refer to the instruc-
D After securing the child restraint
tion manual equipped with each product.
system, never slide the seat or
change the seatback angle.
Type B
61
2005 MR2 from Aug. ’04Prod. (OM17527U)
62
2005 MR2 from Aug. ’04Prod. (OM17527U)
SECTION 1− 4
OPERATION OF INSTRUMENTS AND
CONTROLS
Steering wheel and Mirrors
Tilt steering wheel
64
Outside rear view mirrors
64
Anti−glare inside rear view mirror
66
63
2005 MR2 from Aug. ’04Prod. (OM17527U)

Tilt steering wheel
Outside rear view mirrors—
CAUTION
D Do not adjust the steering wheel
while the vehicle is moving. Doing
so may cause the driver to mishan-
dle the vehicle and an accident may
occur resulting in death or serious
injuries.
D After adjusting the steering wheel,
try moving it up and down to make
sure it is locked in position.
To change the steering wheel angle,
Adjust the mirror so that you can see
hold the steering wheel, push the lock
the side of your vehicle in the mirror.
release lever, tilt the steering wheel to
Be careful when judging the size or dis-
the desired angle and return the lever
tance of any object seen in the outside
to its original position.
rear view mirror on the passenger’s side
because it is a convex mirror. Any object
seen in a convex mirror will look smaller
and farther away than when seen in a flat
mirror.
64
2005 MR2 from Aug. ’04Prod. (OM17527U)

—Power rear view mirror control
CAUTION
NOTICE
If ice should jam the mirror, do not
Do not adjust the mirror while the
operate the control or scrape the mir-
vehicle is moving. Doing so may
ror face. Use a spray de−icer to free
cause the driver to mishandle the ve-
the mirror.
hicle and an accident may occur re-
sulting in death or serious injuries.
To adjust a mirror, use the switches.
1. Master switch—To select the mirror to
be adjusted
Push the switch to
“L”
(left) or
“R”
(right).
2. Control switch—To move the mirror
Push the switch in the desired direc-
tion.
Mirrors can be adjusted when the key is
in the
“ACC” or “ON” position.
65
2005 MR2 from Aug. ’04Prod. (OM17527U)

Anti−glare inside rear view
—Folding rear view mirrors
mirror
CAUTION
Do not adjust the mirror while the
vehicle is moving. Doing so may
cause the driver to mishandle the ve-
hicle and an accident may occur re-
sulting in personal death or injuries.
The rear view mirrors can be folded
Adjust the mirror so that you can just
backward for parking in compact areas.
see the rear of your vehicle in the mir-
ror.
To fold the rear view mirror, push back-
ward.
To reduce glare from the headlights of
the vehicle behind you during night
CAUTION
driving, operate the lever on the lower
edge of the mirror.
Do not drive with the mirrors folded
Daylight driving—Lever at position
1
backward. Both the driver and pas-
The reflection in the mirror has greater
senger side rear view mirrors must
clarity at this position.
be extended and properly adjusted
before driving.
Night driving—Lever at position 2
Remember that by reducing glare you also
lose some rear view clarity.
66
2005 MR2 from Aug. ’04Prod. (OM17527U)