Renault Megane Coupe (2016 year). Manual - part 7


  Index      Renault     Renault Megane Coupe - service manual 2016 year in english


Search            


Content   ..  5  6  7  8   ..


Renault Megane Coupe (2016 year). Manual - part 7


2.8

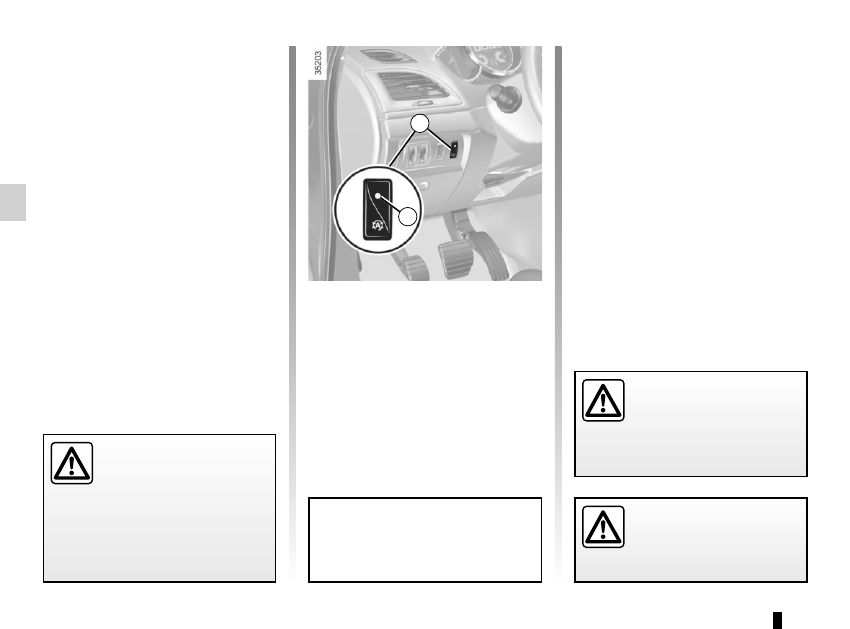
Deactivating, activating the 

function

Press switch 1 to deactivate the func-

tion. The message “Stop & Start deac-

tivated” will appear on the instrument 

panel and the integrated warning light 2 

on the switch will light up.

Pressing again will reactivate the 

system. The message “Stop & Start ac-

tivated” will appear on the instrument 

panel and the integrated warning light 2 

on the switch 1 will go out.

FUNCTION STOP AND START 

(3/3)

Deactivate the Stop and 

Start function when perfor-

ming any operations in the 

engine compartment.

Special feature of the automatic 

engine re-start
Under certain conditions, the engine 

can restart on its own in order to gua-

rantee your safety and comfort.

This can occur especially when:
–  the outdoor temperature is too low or 

too high (less than around 0 °C or 

higher than around 30 °C);

–  the “Clear View” function is activated 

(please see “Automatic Climate 

Control” in Section 3);

–  the battery is not sufficiently char-

ged;

–  the vehicle speed is above 4.34 mph 

(7 km/h) (downhill slope etc.) ;

– repeated pressing on the brake 

pedal or braking system require-

ment;

– ...

Before getting out of the 

vehicle, you must switch 

off the ignition by pressing 

the engine stop (please see 

“Starting, stopping the engine”).

1

2

Note: With the engine on standby, 

press switch 1 to automatically re-

start the engine.

The system reactivates automati-

cally each time the vehicle is started 

using the start button (please refer 

to “Starting, stopping the engine” in 

Section 2).

Operating faults

When the message “Check Stop & 

Start” appears on the instrument panel 

and the integrated warning light 2 lights 

up on the switch 1, the system is deac-

tivated.

Please consult an authorised dealer.

In the event of an emer-

gency, the engine can be 

restarted by pressing on the 

clutch pedal if the Stop and 

Start function is activated.

2.9

SPECIAL FEATURES OF PETROL VERSIONS

The following operating conditions:
–  driving for long periods when the low 

fuel level warning light is lit;

–  using leaded petrol;
–  using fuel or lubrication additives 

which are not approved.

Or operating faults such as:
–  faulty ignition system, running out of 

fuel or disconnected spark plugs re-

sulting in the engine misfiring or cut-

ting out when driving;

–  loss of power,
as they may cause the catalytic con-

verter to overheat and thus reduce its 

efficiency,  or damage it irreparably 

and cause heat damage to the vehi-

cle.

If you notice any of the above operating 

faults, have the necessary repairs car-

ried out as soon as possible by an ap-

proved Dealer.
These faults may be avoided by regu-

larly taking your vehicle to an approved 

Dealer at the intervals specified in the 

Maintenance Service Booklet.

Starting problems

To avoid damaging the catalytic con-

verter, do not keep trying to start the 

engine (using the start button, or by 

pushing or towing the vehicle) without 

having identified and corrected the 

starting fault.
If the fault cannot be identified, do not 

keep trying to start the engine, but con-

tact an approved Dealer.

Do not park the vehicle or 

run the engine in locations 

where combustible sub-

stances or materials such 

as grass or leaves can come into 

contact with the hot exhaust system.

2.10

SPECIAL FEATURES OF DIESEL VERSIONS

Diesel engine speed

Diesel engines are fitted with injection 

equipment which prevents the engine 

speed being exceeded irrespective of 

the gear selected.
If the message “Check anti-pollution 

system” is displayed along with warn-

ing lights 

Ä

 and 

©

, consult an 

authorised dealer immediately.
When driving, depending on the fuel 

grade used, it is possible that white 

smoke may be emitted.
This is due to the exhaust particle filter 

being cleaned automatically, and does 

not affect the way the vehicle runs.

Running out of fuel

If the tank has been completely 

drained, the system must be reprimed 

after the tank is refilled: see information 

on the “fuel tank” in section 1 before re-

starting the engine.

Do not park the vehicle or 

run the engine in locations 

where combustible sub-

stances or materials such 

as grass or leaves can come into 

contact with the hot exhaust system.

Precautions to be taken in 

winter

To avoid any faults in icy weather:
–  ensure that the battery is always fully 

charged,

–  always keep the diesel tank rela-

tively full to avoid water vapour con-

densing in it and accumulating at the 

bottom of the tank.

2.11

GEAR LEVER/HANDBRAKE

Selecting reverse gear

Vehicles with manual gearbox: follow 

the grid drawn on knob 1, and depend-

ing on the vehicle, lift ring against the 

gear lever knob to select reverse.
Vehicle with automatic gearbox: refer 

to the information on the “Automatic 

gearbox” in Section 2.
The reversing lights will come on as 

soon as reverse gear is selected with 

the ignition on.

1

Handbrake

To release:
Pull lever 2 up slightly, press button 3 

and then lower the lever to the floor.

To apply:
Pull the lever 2 upwards and make sure 

the vehicle is immobilised.

When stationary and de-

pending on the slope and/or 

vehicle load, it may be nec-

essary to pull up the hand-

brake at least two extra notches and 

engage a gear (1

st

 or reverse gear) 

for vehicles with a manual gearbox 

or position P for vehicles with an au-

tomatic transmission.

3

2

An impact to the under-

side of the vehicle while 

manoeuvring (e.g.: strik-

ing a post, raised kerb or 

other street furniture) may result in 

damage to the vehicle (e.g.: defor-

mation of the rear axle).
To avoid any risk of accident, have 

your vehicle checked by an ap-

proved Dealer.

Make sure that the hand-

brake is properly released 

when driving (red indicator 

light off), otherwise over-

heating, or even damage, may 

occur.

2.12

Before leaving the vehicle, 

check that the electronic 

parking brake is fully ap-

plied. Indicator light 2 on 

switch 3 and indicator light 

}


on the instrument panel light up to 

show that the parking brake is ap-

plied but go out when the doors are 

locked.

Note:
To indicate that the electronic parking 

brake is released, a beep sounds and 

the message “Apply parking brake” ap-

pears on the instrument panel:
–  with the engine running: when the 

driver’s door is opened;

–  with the engine switched off (eg. 

when the engine stalls): when a front 

door is opened.

In this case, pull and release switch 3 to 

apply the electronic parking brake.

Automatic releasing of the 

electronic parking brake
The brake will be released as soon as 

the vehicle moves, by accelerating with 

a gear selected and the engine running.

Automatic operation

The electronic parking brake en-

sures vehicle immobilisation when the 

engine is stopped and engine Start/

Stop button 1 is pressed.
In all other instances, e.g. engine stal-

ling, the electronic parking brake is not 

applied automatically. Manual mode 

must be used.
For certain country-specific model ver-

sions, the automatic brake application 

function is not activated. Refer to the in-

formation on “Manual operation”.

ELECTRONIC PARKING BRAKE 

(1/3)

To confirm that the electronic parking 

brake is applied, the message “Parking 

brake on” and warning light 

}


on the instrument panel and warning 

light 2 on the switch 3 light up.
After the engine is switched off, indi-

cator light 2 goes out several minutes 

after the electronic parking brake has 

been applied and indicator light 

}


goes out when the vehicle is locked.

1

2

3

2.13

Special cases

When parking on a slope or towing a 

trailer, pull switch 3 for a few seconds 

to obtain the maximum braking effect.
To park the vehicle without applying the 

electronic parking brake (if there is a 

risk of freezing, for example):
– with the engine running and 

RENAULT card in reader 4, switch 

off the engine by pressing engine 

Start/Stop button 1;

–  remove the RENAULTcard from the 

Reader  4 and insert it again in the 

reader;

–  select a gear (manual gearbox) or 

position P (automatic gearbox);

–  depress the brake pedal and press 

switch 3 at the same time;

–  remove the RENAULT card from the 

card reader.

Brief stop

To manually activate the electronic par-

king brake, (when stopping at a red 

light, or stopping when the engine is 

running, etc.): pull and release switch 3

The brake is released as soon as the 

vehicle is started up again.

ELECTRONIC PARKING BRAKE 

(2/3)

4

1

3

Manual operation

You can control the electronic parking 

brake manually.

Applying the electronic parking 

brake

Pull switch 3. Indicator lights 2 and 

}

 light up on the instrument panel.

Releasing the electronic parking 

brake

With the ignition on, depress the brake 

pedal then press button 3: indicator 

lights 2 and 

}

 go out.

2

2.14

–  If there is an electronic parking brake 

fault, warning lights 

®

 light up 

accompanied by the “Parking brake 

fault” message, a beep and, in cer-

tain cases, warning light 

}

.

This means that you must stop as 

soon as traffic conditions allow.

Operating faults

–  If there is a fault, the 

©

 warning 

light illuminates on the instrument 

panel accompanied by the “Check 

parking brake” message and, in 

some cases, the 

}

 warning 

light.
Contact an approved Dealer as soon 

as possible.

ELECTRONIC PARKING BRAKE 

(3/3)

It is therefore essential to 

immobilise the vehicle by 

engaging first gear (manual 

gearbox) or position P (au-

tomatic gearbox). If the slope re-

quires it, chock the vehicle.

Versions with an automatic 

gearbox

For safety reasons, automatic release 

is deactivated when the driver’s door 

is open or not shut properly and the 

engine is running (in order to prevent 

the vehicle from moving without the 

driver). The “Release parking brake 

manually” message appears on the 

instrument panel when the driver de-

presses the accelerator.

Never leave your vehicle 

without moving the selec-

tor lever to position P or N

This is because when the 

vehicle is stationary with the engine 

running and a gear engaged, the 

vehicle may begin to move if you 

accelerate.
There is a risk of accidents.

If no lights or sounds are 

apparent, this indicates 

a fault in the instrument 

panel. This indicates that 

it is essential to stop immediately 

(as soon as traffic conditions allow). 

Ensure that the vehicle is correctly 

immobilised and contact an appro-

ved Dealer.

2.15

DRIVING ADVICE, ECO-DRIVING 

(1/3)

Fuel consumption is accredited in ac-

cordance with a standard regulatory 

method. Identical for all manufactur-

ers, this enables vehicles to be com-

pared with one another. Consumption 

in real time depends on vehicle usage 

conditions, the equipment fitted and the 

user’s driving style. To optimise fuel 

consumption, please refer to the follow-

ing advice.
Depending on the vehicle, you will have 

various functions which enable you to 

lower your fuel consumption:
–  gear change indicator;

–  the journey record and eco-driving 

advice via the multimedia display;

If fitted on the vehicle, the navigation 

system provides additional information.

Gear change indicator

To optimise consumption, a warning 

light on the screen 1 tells you the best 

time to change gear:

\

 or 


 to shift up a gear;

[

 or 


 to shift down a gear.

Journey record

Once the engine is switched off, you 

will see “Journey record” displayed on 

the screen 1, enabling you to view in-

formation relating to your last journey.
This indicates: 
–  average fuel consumption;

–  number of miles/kilometres travelled;

–  number of miles/kilometres saved.

1

2.16

DRIVING ADVICE, ECO-DRIVING 

(2/3)

An overall rating from 0 to 100 is dis-

played to let you assess your eco driv-

ing performance. The higher the score, 

the better your eco-driving perform-

ance.

Eco advice is given to help improve 

your performance.

With your favourite journeys saved, you 

can evaluate your performance.

For more information, please see the 

multimedia system instructions.

Obstructions to the driver

On the driver’s side, only 

use mats suitable for the 

vehicle, attached with the 

pre-fitted components, and check 

the fitting regularly. Do not lay one 

mat on top of another.

There is a risk of wedging the 

pedals

Driving advice, Eco-driving

Behaviour
–  Drive carefully for the first few miles 

until the engine reaches its normal 

operating temperature, rather than 

let it warm up while the vehicle is sta-

tionary.

–  Speed is expensive.
–  Sporty driving uses a lot of fuel: drive 

with a light right foot.

–  Do not overrev the engine in the in-

termediate gears.

  You should always use the highest 

gear possible.

–  Avoid sudden acceleration.
–  Brake as little as possible. If you an-

ticipate an obstacle or bend in ad-

vance, you may then simply release 

the accelerator pedal.

– Do not try to maintain the same 

speed up a hill, accelerate no more 

than you would on the level. Keep 

your foot in the same position on the 

accelerator pedal.

–  Double declutching and accelerating 

before switching off are unnecessary 

in modern vehicles.

–  Bad weather, flooded roads:

Do not drive through floods 

if the water is above the 

lower edge of the wheel 

rims.

2.17

DRIVING ADVICE, ECO-DRIVING 

(3/3)

Tyres
–  An underinflated tyre increases fuel 

consumption.

–  The use of non-recommended tyres 

can increase fuel consumption.

Advice on use
–  Electricity is fuel; switch off all the 

electrical components which are 

not really needed. However (safety 

first), keep your lights on when the 

visibility is bad (“see and be seen”).

–  Use the air vents. Driving with the 

windows open at 60 mph (100 km/h) 

will increase fuel consumption by 

4%.

–  Never fill the fuel tank right to the 

brim to avoid overflow.

–  In vehicles fitted with air condi-

tioning, it is normal to observe an 

increase in fuel consumption (espe-

cially in urban conditions) when it is 

used. For vehicles fitted with manual 

air conditioning, switch off the system 

when it is not required.
Advice for reducing consumption 

and therefore helping to preserve 

the environment:
If the vehicle has been parked in the 

sun, open the doors for a few mo-

ments to let the hot air escape before 

starting the engine.

– Do not leave an empty roof rack 

fitted to the vehicle.

–  It is better to fit a trailer for bulky ob-

jects.

–  When towing a caravan, fit a wind 

deflector and adjust it carefully.

–  Avoid using the car for door-to-door 

calls (short journeys with long waits 

in between) because the engine 

never reaches its normal operating 

temperature.

2.18

MAINTENANCE AND ANTI-POLLUTION ADVICE

Your vehicle complies with criteria for 

recycling and recovering vehicles at the 

end of their service life, which will come 

into force in 2015.
Some of the parts on your vehicle have 

been designed to be recycled later.
These parts are easily removable in 

order to be collected and reprocessed 

in recycling networks.
Furthermore, by virtue of its design, 

moderate fuel consumption and initial 

settings, your vehicle also conforms 

to current anti-pollution regulations. 

The manufacturer is actively striving 

to reduce pollutant exhaust gas emis-

sions and to save energy. However, 

the fuel consumption of your vehicle 

and the level of pollutant exhaust gas 

emissions are also your responsibility. 

Ensure that it is maintained and used 

correctly.

Maintenance

It is important to remember that fail-

ure to respect anti-pollution regulations 

could lead to legal action being taken 

against the vehicle owner.
In addition, replacing engine, fuel 

supply system and exhaust compo-

nents with parts other than those origi-

nally recommended by the manufac-

turer may alter your vehicle so that it 

no longer complies with anti-pollution 

regulations.
Have your vehicle adjusted and 

checked by an authorised dealer, in ac-

cordance with the instructions given in 

your maintenance schedule: they will 

have all the equipment necessary for 

ensuring that your vehicle is maintained 

to its original standard.

Engine adjustments

  Air filter, fuel filter: a choked ele-

ment will reduce efficiency. It must 

be replaced.

 Idle  speed: no adjustment is 

needed.

Exhaust gas monitoring 

system

The exhaust gas monitoring system will 

detect any operating faults in the vehi-

cle’s antipollution system.

If this system malfunctions, toxic sub-

stances may be released into the at-

mosphere or damage may occur.

Ä

This warning light on the in-

strument panel will indicate if 

there are any faults in the system:

This lights up when the ignition is 

switched on and goes out when the 

engine is started.
–  If it lights up continuously, consult an 

approved Dealer as soon as possi-

ble;

–  if it flashes, reduce the engine speed 

until the light stops flashing. Contact 

an authorised dealer as soon as pos-

sible.

2.19

ENVIRONMENT

Emissions

Your vehicle has been designed to 

emit fewer greenhouse gases (CO2) 

while in use, and therefore to consume 

less fuel (eg. 140 g/km, equivalent to 

5.3 l/100 km for a diesel vehicle).
Our vehicles are also equipped with a 

particle filter system including a cata-

lytic converter, an oxygen sensor and 

an active carbon filter (the latter pre-

vents vapour from the fuel tank being 

released into the open air).
For certain diesel vehicles, this system 

also has a particle filter to reduce the 

volume of soot particles emitted.

Please make your own 

contribution towards 

protecting the environment 

too

–  Worn parts replaced in the course of 

routine vehicle maintenance (vehi-

cle battery, oil filter, air filter, batter-

ies, etc.) and oil containers (empty or 

filled with used oil) must be disposed 

of through specialist organisations.

–  At the end of the vehicle’s service 

life, it should be sent to approved 

centres to ensure that it is recycled.

–  In all cases, comply with local legis-

lation.

Recycling

Your vehicle is 85% recyclable and 

95% recoverable.
To achieve these objectives, many of 

the vehicle components have been de-

signed to enable them to be recycled. 

The materials and structures have 

been carefully designed to allow these 

components to be easily removed and 

reprocessed by specialist companies.
In order to preserve raw material re-

sources, this vehicle incorporates nu-

merous parts made from recycled plas-

tics or renewable materials (vegetable 

or animal-derived materials such as 

cotton or wool).

Your vehicle has been designed with 

respect for the environment in mind for 

its entire service life: during production, 

use and at the end of its life.

This commitment is illustrated by the 

Renault eco² signature.

Manufacture

Your vehicle has been manufactured at 

a factory which complies with a policy 

to reduce the environmental impact 

on the surrounding areas (reduction of 

water and energy consumption, visual 

and noise pollution, atmospheric emis-

sions and waste water; sorting and re-

using waste).

2.20

If the vehicle is equipped with the func-

tion, this system monitors the tyre pres-

sure.

Operating principle

Each wheel (except for the emergency 

spare wheel) has a sensor in the infla-

tion valve which periodically measures 

the tyre pressure. The system informs 

the driver via the display 1 and on-

board computer 2 that the tyres are suf-

ficiently inflated and warns if they are 

underinflated or leaking. The warning 

light 4 


 on the instrument panel 

comes on to warn the driver if the pres-

sure is too low.

It should always be done after checking 

the tyre pressure of all four tyres when 

cold.

Tyre pressures must correspond to the 

current usage of the vehicle (empty, 

carrying a load, motorway driving, etc.).
With the ignition on:

–  Make short presses on the control 3 

to select the tyre pressure display 

(see “On-board computer: settings” 

in Section 1);

–  press and hold (around 3 seconds) 

the button 3 to launch the reset. A 

flashing tyre followed by the mes-

sage “Pressure ref Ongoing” indi-

cates that the request to learn the 

reference pressure has been taken 

into account;

–  reset can take several minutes of 

driving.

TYRE PRESSURE MONITORING SYSTEM 

(1/4)

1

2

3

Resetting the standard level 

for the tyre pressures

This should be done:
– when the standard tyre pressure 

needs to be changed to adapt to 

usage conditions (empty, carrying a 

load, motorway driving, etc.);

–  after swapping wheels over (how-

ever this practice is not recom-

mended);

–  after changing a wheel.

This function is an additio-

nal driving aid.

However, the function does 

not take the place of the 

driver. It cannot, therefore, under 

any circumstances replace the vig-

ilance or the responsibility of the 

driver.

Check the tyre pressures, including 

the emergency spare wheel, once a 

month.

4

2.21

Display

The warning light 4 


 on the in-

strument panel along with the display 1

and messages on the display 2 indicate 

any tyre pressure faults (flat tyre, punc-

tured tyre, system fault, etc.).

TYRE PRESSURE MONITORING SYSTEM 

(2/4)

1

“Puncture”

The wheel A, together with the warn-

ing light 4 


, indicates that the af-

fected wheel is punctured or severely 

underinflated. Replace it or contact an 

authorised dealer if it is punctured. Top 

up the tyre pressure if the wheel is de-

flated.

This message appears along with the 

®

 warning light.

“Adjust tyre pressure”

A coloured wheel A, together with the 

warning light 4 


, indicates a flat 

tyre.

Check and, if necessary, readjust the 

pressures of the four wheels when cold.

While driving the warning light 4 


goes off after a few minutes.

A

2

Warning light 

®

 re-

quires you to stop immedi-

ately, for your own safety, 

as soon as traffic conditions allow.

The sudden loss of pressure in a 

tyre (burst tyre, etc.) cannot be de-

tected by the system.

4

2.22

TYRE PRESSURE MONITORING SYSTEM 

(3/4)

“CHECK TYRE PRESSURE 

SENSORS”

The warning light 


 flashes for 

several seconds, then stays on, along 

with the message “CHECK TYRE 

PRESSURE SENSORS” and a missing 

wheel B.

This message appears along with the 

©

 warning light.

This message appears when at least 

one wheel fitted on the vehicle does not 

have sensors (e.g. emergency spare 

wheel). In other cases, contact an au-

thorised dealer.

Replacing wheels/tyres

This system requires specific equip-

ment (wheels, tyres, sensors, etc.).
Contact an authorised dealer to replace 

the tyres and to find out about avail-

able accessories compatible with the 

system: the use of any other accessory 

could affect the correct operation of the 

system or damage a sensor.

Changing a wheel

The system may take sev-

eral minutes depending on 

use for the new wheel po-

sitions and pressures to be recog-

nised; check the tyre pressures after 

all operations.

5

5

6

Interchangeability of wheels

If you wish to swap the wheels around, 

please consult an approved dealer to 

reinitialise the system.

Each of the sensors incor-

porated in the valves 5 is 

dedicated to a single wheel: 

under no circumstances 

should you swap the wheels, with-

out resetting the system.
There is a risk of incorrect informa-

tion which could have serious con-

sequences.

B

2.23

Readjustment of tyre 

pressures

The tyre pressures must be adjusted 

when cold (please refer to the label lo-

cated on the edge of the driver’s door).
If tyre pressures cannot be checked 

when the tyres are cold, the recom-

mended pressures must be increased 

by 0.2 to 0.3 bar (3 PSI).

Never deflate a hot tyre.

Emergency spare wheel

If the vehicle is equipped with an emer-

gency spare wheel, it will not have 

a sensor. When it is fitted to the ve-

hicle, the message “CHECK TYRE 

PRESSURE SENSORS” is displayed 

on the instrument panel.

TYRE PRESSURE MONITORING SYSTEM 

(4/4)

C

D

E

F

Depending on the vehicle, to mark the 

correct position of the wheel, note the 

colour of the ring 6 (after cleaning, if ne-

cessary) on each valve:
C yellow ring
D black ring
E red ring
F green ring

Each of the sensors incorporated in the valves 5 is dedicated to a single 

wheel: under no circumstances should you swap the wheels, without re-

setting the system.
There is a risk of incorrect information which could have serious conse-

quences.

Tyre repair product and 

inflation kit

Because the valves are specially de-

signed, only use equipment approved 

by the approved network.

5

5

6


Content   ..  5  6  7  8   ..