Renault Fluence Z.E. (2012 year). Manual - part 2


  Index      Renault     Renault Fluence Z.E. - service manual 2012 year in english


Search            


Content   ..   1  2  3   ..


Renault Fluence Z.E. (2012 year). Manual - part 2


1.18

ENG_UD20061_2

Ouverture et fermeture des portes (L38 - X38 - Renault)

ENG_NU_914-4_L38e_Renault_1

OPeNiNg AND clOSiNg the DOOrS 

(2/2)

Driver’s responsibility 

when parking or stopping 

the vehicle
Never  leave  an  animal, 

child or adult who is not self-suffi-

cient alone on your vehicle, even for 

a short time.

They may pose a risk to themselves 

or to others by starting the engine, 

activating  equipment  such  as  the 

electric  windows  or  by  locking  the 

doors.

Also, in hot and/or sunny weather, 

please remember that the tempera-

ture inside the passenger compart-

ment increases very quickly.

riSK  OF  DeAth  Or  SeriOUS 

iNJUrY.

child safety

Ç

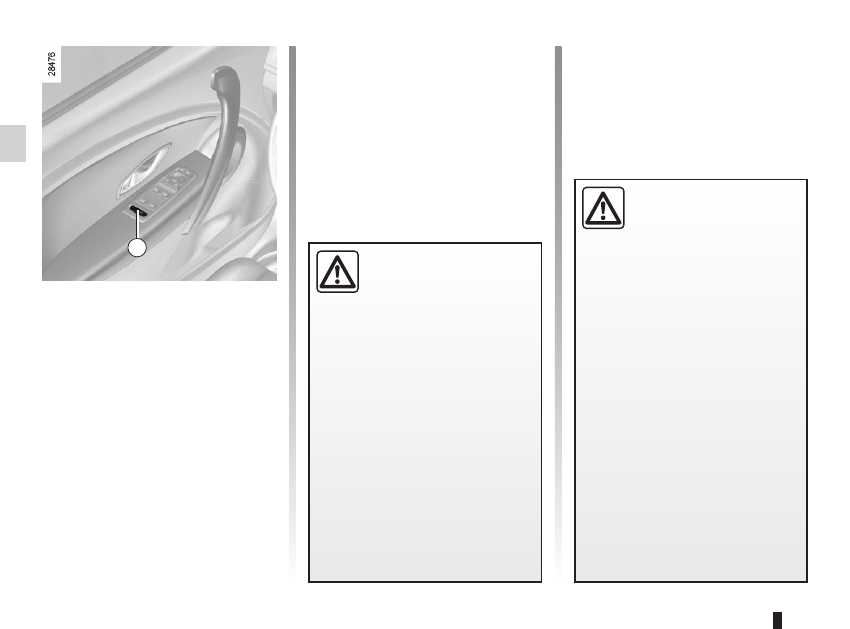
vehicle with switch 3

Press  switch  3  to  enable  the 

rear doors to be opened. If the vehicle 

is equipped with electric rear windows, 

this action will also enable their use.

The indicator light in the switch lights up 

to confirm that the locks have been ac-

tivated.

Safety of rear occupants

The  driver  can  enable  op-

eration  of  the  rear  doors 

and, depending on the ve-

hicle, the electric windows by press-

ing switch 3 on the side with the il-

lustration.
Depending  on  the  vehicle,  in  the 

event of a fault:

–  a beep sounds;

–  a message is displayed on the in-

strument panel;

–  the integrated indicator does not 

light up.

If  the  battery  has  been  discon-

nected, press switch 3 on the side 

with  the  symbol  to  lock  the  rear 

doors.

3

opening the doors .................................(up to the end of the DU)

closing the doors ..................................(up to the end of the DU)

unlocking the doors ..............................(up to the end of the DU)

central door locking ..............................(up to the end of the DU)

1.19

ENG_UD20063_2

Verrouillage / Déverrouillage des portes (L38 - X38 - Renault)

ENG_NU_914-4_L38e_Renault_1

lOcKiNg/UNlOcKiNg the DOOrS 

(1/2)

locking/Unlocking the doors 

from the outside

Please refer to the information on the 

“Key/Radio frequency remote control” 

in Section 1.
in  some  cases,  the  radio  frequency 

remote  control  will  not  operate,  or  its 

access area will be modified:

–  the  remote  control  battery  is  old 

or  the  vehicle  12  V  battery  is  dis-

charged.

–  the vehicle is located in a high elec-

tromagnetic radiation zone.

It is then possible:

–  to use the key integrated in the radio 

frequency remote control to unlock 

the front left-hand door;

–  to lock each of the doors manually;

–  to  use  the  interior  door  locking/un-

locking control (refer to the following 

pages).

Using the key

Insert key 1 into the lock A of the driv-

er’s door to lock or unlock the door.

locking the doors manually

Turn screw 2 with the door open (using 

the end of the key) and close the door.
This  means  that  the  doors  are  then 

locked from the outside.
The  doors  may  then  only  be  opened 

from the inside or by using the key in 

the driver’s door.

A

2

1

1.20

ENG_UD20063_2

Verrouillage / Déverrouillage des portes (L38 - X38 - Renault)

ENG_NU_914-4_L38e_Renault_1

lOcKiNg/UNlOcKiNg the DOOrS 

(2/2)

interior locking/unlocking 

door control

Switch  3  simultaneously  controls  the 

doors and the boot.
If a door or the tailgate is open or not 

closed properly, the doors and tailgate 

lock/unlock quickly.
If you need to transport objects with the 

boot open, the other opening elements 

can  still  be  locked: 

with  the  engine 

stopped,  press switch 3 for more than 

five seconds to lock the other opening 

elements.

locking the opening 

elements without the radio 

frequency remote control

For  example,  in  the  event  of  a  dis-

charged battery or the radio frequency 

remote control temporarily not working.
With  the  engine  switched  off  and 

an  opening  element  (door  or  boot) 

open, press and hold switch 3 for more 

than five seconds.
When the door is closed, all the doors 

and the tailgate will be locked.

The  vehicle  can  only  be  locked  from 

the outside using the radio frequency 

remote control.

Door and tailgate status 

indicator

With the 

ignition on, the indicator light 

integrated in the switch 3 informs you 

of the status of the opening elements:
–  when the light is on, the opening ele-

ments are locked;

–  indicator light off, the doors and tail-

gate are unlocked.

When you lock the doors, the indicator 

light remains lit and then goes out.

3

Driver’s responsibility
Never  leave  your  vehicle 

with the key or remote con-

trol inside.

If  you  decide  to  keep  the  doors 

locked  when  you  are  driving,  re-

member  that  it  may  be  more  diffi-

cult for those assisting you to gain 

access to the passenger compart-

ment in the event of an emergency.

RENAULT ANTI-INTRUDER DEVICE (RAID) (up to the end of the DU)

central door locking ..............................(up to the end of the DU)

doors.....................................................(up to the end of the DU)

locking the doors ..................................(up to the end of the DU)

doors/tailgate ........................................(up to the end of the DU)

1.21

ENG_UD21529_3

Condamnation automatique des ouvrants en roulage (L38 - X38 - Renault)

ENG_NU_914-4_L38e_Renault_1

Automatic locking of opening elements when driving

AUtOmAtic lOcKiNg WheN DriviNg

Activating/deactivating the 

function

Depending on the vehicle:
–  Please  refer  to  the  information  on 

the  “Vehicle  settings  customisation 

menu” in Section 1; “Auto door lock-

ing while driving”:

 =

 function activated

 <

 function deactivated.

– 

With  the  engine  running,  press 

button 1 for approximately 5 seconds 

until you hear a beep.

Operating principle

After the vehicle is started, the system 

automatically locks the doors when you 

are driving at approximately 6 mph  (10 

km/h) and over.
The door can be unlocked:
–  by  pressing  the  door  unlocking 

button 1.

–  by opening a front door (vehicle sta-

tionary).

NB:  if  a  door  is  opened  or  closed,  it 

will automatically lock again when the 

vehicle reaches a speed of 6 mph (10 

km/h).

Operating faults

If  you  experience  an  operating  fault 

(no  automatic  locking,  the  indicator 

light incorporated in button 1 does not 

light up when trying to lock the open-

ing elements, etc.), firstly check that the 

opening elements are properly closed. 

If they are properly closed, contact an 

authorised dealer.

1

Driver’s responsibility
If  you  decide  to  keep  the 

doors locked when you are 

driving,  remember  that  it 

may be more difficult for those as-

sisting  you  to  gain  access  to  the 

passenger  compartment  in  the 

event of an emergency.

headrest................................................(up to the end of the DU)

front seats

adjustment ......................................(up to the end of the DU)

adjusting your driving position ..............(up to the end of the DU)

1.22

ENG_UD29257_1

Appuis-tête avant (L38 électrique - Renault)

ENG_NU_914-4_L38e_Renault_1

Headrests - Seats

FrONt heADreStS 

(1/2)

headrestA

to raise the headrest
Pull  the  headrest  upwards  to  the  de-

sired height.

to lower the headrest
Press button 2 and guide the headrest 

down to the desired height.

to adjust the angle of the headrest
Depending on the vehicle, push back or 

draw the headrest 4 nearer to you until 

the desired position.

to remove the headrest
Raise  the  headrest  to  its  highest  po-

sition  (tilt  the  seatback  backwards  if 

necessary). Press button 1 and lift the 

headrest to release it.

to refit the headrest
Pull out the headrest rods 3 as far as 

possible by pulling from the top. Take 

care to ensure they are clean and cor-

rectly aligned and, if there are any prob-

lems, check that the notches are facing 

forwards.

Insert the headrest rods into the holes 

(tilt the seatback backwards if neces-

sary).

Lower the headrest until it locks, press 

button 1 and lower the headrest as far 

as possible.

Check that each headrest rod 3 is se-

curely locked in the seatback by trying 

to pull them up or push them down.

The  headrest  is  important 

for safety. Ensure that it is in 

place and in the correct po-

sition: The top of the head-

rest should be as close as possible 

to the crown of the head and the dis-

tance  between  your  head  and  the 

headrest  should  be  the  least  pos-

sible.

2

3

A

1

The  three  upper  positions  can 

be  manipulated  without  pressing 

button 2. However, it is preferable to 

press this button to lower the head-

rest.

4

1.23

ENG_UD29257_1

Appuis-tête avant (L38 électrique - Renault)

ENG_NU_914-4_L38e_Renault_1

headrest B

to raise the headrest
Pull  the  headrest  upwards  to  the  de-

sired height.

to lower the headrest
Press button 5 and guide the headrest 

down to the desired height.

to remove the headrest
Raise  the  headrest  to  its  highest  po-

sition  (tilt  the  seatback  backwards  if 

necessary). Press button 5 and lift the 

headrest to release it.

to refit the headrest
Pull the headrest rods fully out 6 by pull-

ing from the top. Take care to ensure 

they  are  clean  and  correctly  aligned 

and, if there are any problems, check 

that the notches are facing forwards.

Insert the headrest rods into the holes 

(tilt the seatback backwards if neces-

sary).

Lower the headrest until it locks, press 

button 5 and lower the headrest as far 

as it will go.

Check that each headrest rod 6 is se-

curely locked in the seatback by trying 

to pull them up or push them down.

FrONt heADreStS 

(2/2)

B

5

6

The  headrest  is  important 

for safety. Ensure that it is in 

place and in the correct po-

sition: The top of the head-

rest should be as close as possible 

to the crown of the head and the dis-

tance  between  your  head  and  the 

headrest  should  be  the  least  pos-

sible.

headrest................................................(up to the end of the DU)

1.24

ENG_UD23709_3

Appuis-tête arrière (L38 - X38 - Renault)

ENG_NU_914-4_L38e_Renault_1

reAr heADreStS

Position for use

Raise or lower the headrest while pull-

ing it towards the front of the vehicle.

to remove the headrest

Press tabs A on catches 1 and 2 and 

remove the headrest.

to refit the headrest

Insert  the  headrest  rods  into  the 

sleeves, and lower the headrest to the 

first notch.

Storage position

Lower  the  headrest  as  far  as  possi-

ble, then press tab 2 and lower it com-

pletely.
When  the  headrest  is  set  at  the 

lowest position (position B), this is 

for  storage  only:  it  should  not  be  in 

this position when a seat is occupied.

The  headrest  is  a  safety 

component, check that it is 

fitted and in the correct po-

sition.

B

1

2

A

front seat adjustment ............................(up to the end of the DU)

front seats

adjustment ......................................(up to the end of the DU)

front seats

with manual controls ........................................(current page)

1.25

ENG_UD23710_3

Sièges avant à commandes manuelles (L38 - X38 - Renault)

ENG_NU_914-4_L38e_Renault_1

FrONt SeAtS With mANUAl cONtrOl

to move the seat forwards or 

back

Lift  handle  1  to  unlock.  Release  the 

handle once the seat is in the correct 

position and ensure that the seat is fully 

locked into position.

to raise or lower the seat 

base

Move lever 2 as many times as neces-

sary upwards or downwards.

to tilt the seatback

Turn control knob 3 to the required po-

sition.

For safety reasons, carry out any adjustments when the vehicle is not 

being driven.
We would advise you not to recline the seatbacks too far to ensure that 

the effectiveness of the seat belts is not reduced.

No object should be placed on the floor (in front of the driver). Nothing should be 

placed around the driver’s feet as such objects may slide under the pedals during 

sudden braking manoeuvres and obstruct their use.

1

3

2

4

to adjust the lumbar support 

on the driver’s seat

(depending on vehicle)
Lower handle 4 to increase the support 

and lift it to decrease it.

seat belts ..............................................(up to the end of the DU)

driving position

settings ...........................................(up to the end of the DU)

adjusting your driving position ...............................(current page)

front seats

adjustment ......................................(up to the end of the DU)

1.26

ENG_UD25350_3

Ceintures de sécurité (L38 - X38 - Renault)

ENG_NU_914-4_L38e_Renault_1

Always wear your seat belt when trav-

elling  in  your  vehicle.  You  must  also 

comply with the legislation of the par-

ticular country you are in.

Seat belts

Incorrectly  adjusted  or 

twisted  seat  belts  may 

cause injuries in the event 

of an accident.

Use  one  seat  belt  per  person, 

whether child or adult.
Even pregnant women should wear 

a seat belt. In this case, ensure that 

the lap belt is not exerting too much 

pressure  on  the  abdomen,  but  do 

not allow any slack.

Before starting, first adjust your driv-

ing position, then ask all occupants 

to adjust their seat belts to ensure 

optimum protection.

Adjusting your driving 

position

–  Sit well back in your seat  (having 

removed  your  coat  or  jacket  etc.). 

This is essential to ensure your back 

is positioned correctly;

–  adjust  the  distance  between  the 

seat  and  the  pedals.  Your  seat 

should  be  as  far  back  as  possible 

while  still  allowing  you  to  fully  de-

press  the  pedals.  The  seatback 

should be adjusted so that your arms 

are slightly bent when you hold the 

steering wheel;

–  adjust the position of your head-

rest. For maximum safety, your head 

must be as close as possible to the 

headrest;

–  Adjust the height of the seat. This 

adjustment allows you to select the 

seat  position  which  offers  you  the 

best possible view.

  adjust the position of the steering 

wheel.

Adjusting the seat belts

Sit  with  your  back  firmly  against  the 

seatback.
The shoulder strap 1 should be as close 

as possible to the base of the neck but 

not on it.
Lap belt 2 should be worn flat over the 

thighs and against the pelvis.
The seat belt must be worn as close to 

the body as possible. Eg: avoid wearing 

heavy clothing or keeping bulky objects 

under the belts, etc.

SeAt BeltS 

(1/3)

1

2

1.27

ENG_UD25350_3

Ceintures de sécurité (L38 - X38 - Renault)

ENG_NU_914-4_L38e_Renault_1

Unfastening

Press button 4 and the seat belt will be 

rewound by the inertia reel. Guide the 

belt into position.

Front  seat  belt  reminder 

warning light

It lights up on the central display when 

the  engine  is  started  and,  if  the  driv-

er’s seat belt is not fastened, the light 

flashes  and  a  beep  sounds  for  about 

two minutes when the vehicle reaches 

a  speed  of  approximately  12  mph 

(20 km/h).
NB: an object placed on the passenger 

seat cushion may activate the warning 

light in some cases.

SeAt BeltS 

(2/3)

locking

Unwind the belt 

slowly and smoothly 

and  ensure  that  buckle  3  locks  into 

catch 5 (check that it is locked by pull-

ing on buckle 3). If the belt jams, allow 

it to return slightly before attempting to 

unwind it again.
If your seat belt is completely jammed, 

pull slowly, but firmly, so that just over 

3 cm unwinds. Allow it to return slightly 

before attempting to unwind it again.
If there is still a problem, contact an ap-

proved dealer.

1

5

3

4

5

Adjusting the front seat belt 

height

Press button 6 to adjust the seat belt 

height so that the shoulder strap 1 is 

worn as shown previously:

–  to lower the seat belt, press button 6 

and lower the seat belt at the same 

time;

–  to raise the seat belt, press button 6 

and raise the seat belt at the same 

time.

Make sure that the seat belt is locked 

in position correctly after you have ad-

justed it.

6

1.28

ENG_UD25350_3

Ceintures de sécurité (L38 - X38 - Renault)

ENG_NU_914-4_L38e_Renault_1

rear seat belt guide

Seat belt guide 7 can be used to obtain 

a better seat belt position.

SeAt BeltS 

(3/3)

the following information applies to the vehicle’s front and rear seat belts.

–  No modification may be made to the component parts of the originally 

fitted restraint system: belts, seats and their mountings. For special op-

erations (e.g. fitting child seats) contact an authorised dealer.

– Do not use devices which allow any slack in the belts (e.g. clothes 

pegs, clips, etc.): a seat belt which is worn too loosely may cause injury in the 

event of an accident.

–  Never wear the shoulder strap under your arm or behind your back.

–  Never use the same belt for more than one person and never hold a baby or 

child on your lap with your seat belt around them.

–  The belt should never be twisted.

–  Following an accident, have the seat belts checked and replaced if necessary. 

Always replace your seat belts as soon as they show any signs of wear.

–  Make sure that the buckle is inserted into the appropriate catch.

–  Ensure that no objects are placed in the area around the seat belt catch as 

they could prevent it from being properly secured.

–  Make sure the seat belt catch is properly positioned (it should not be hidden 

away, crushed or flattened by people or objects).

7

seat belts ..............................................(up to the end of the DU)

additional methods of restraint .............(up to the end of the DU)

additional methods of restraint

to the front seat belts ......................(up to the end of the DU)

additional methods of restraint

to the rear seat belts .......................(up to the end of the DU)

air bag...................................................(up to the end of the DU)

air bag...................................................(up to the end of the DU)

pretensioners ........................................(up to the end of the DU)

seat belt pretensioners

front seat belt ..................................(up to the end of the DU)

seat belt pretensioners .........................(up to the end of the DU)

methods of restraint in addition to the seat belts (up to the end of the DU)

1.29

ENG_UD23032_2

Dispositifs complémentaires à la ceinture avant (L38 électrique - Renault)

ENG_NU_914-4_L38e_Renault_1

Methods of restraint in addition to the child seat belts

methODS OF reStrAiNt iN ADDitiON tO the FrONt SeAt BeltS 

(1/4)

Depending  on  the  vehicle,  they  are 

composed of:

–  seat  belt  inertia  reel  pretension-

ers;

–  lap belt pretensioners;
–  chest-level load limiters;
–  front airbags for driver and front 

passenger.

These systems are designed to act in-

dependently or together when the vehi-

cle is subjected to a frontal impact.
Depending  on  the  severity  of  the 

impact, the system can trigger:
–  seat belt locking;
–  the seat belt inertia reel pretensioner 

(which engages to correct seat belt 

slack);

–  the low volume front air bag;
–  the  lap  seat  belt  pretensioners  to 

hold the occupant in his seat;

–  the large volume front air bag.

Pretensioners

The  pretensioners  hold  the  seat  belt 

against the body, holding the occupant 

more securely against the seat, thus in-

creasing the seat belt’s efficiency.
In the event of a severe frontal impact 

and if the ignition is switched on, the 

system may engage the following de-

pending on the force of the impact:
–  seat belt inertia reel pretensioner 1 

which instantly retracts the seat belt;

–  the  lap  pretensioner 2  on  the  front 

seats.

–  Have  the  entire  restraint 

system checked following 

an accident.

– No  operation  whatso-

ever is permitted on any part of 

the  system  (pretensioners,  air 

bags, computers, wiring) and the 

system  components  must  not 

be reused on any other vehicle, 

even if identical.

–  To  avoid  incorrect  triggering  of 

the  system  which  may  cause 

injury,  only  qualified  personnel 

from  an  approved  dealer  may 

work on the pretensioner and air 

bag system.

–  The electric trigger system may 

only  be  tested  by  a  specially 

trained  technician  using  special 

equipment.

–  When  the  vehicle  is  scrapped, 

contact  an  approved  dealer  for 

disposal of the pretensioner and 

air bag gas generators.

1

2

1.30

ENG_UD23032_2

Dispositifs complémentaires à la ceinture avant (L38 électrique - Renault)

ENG_NU_914-4_L38e_Renault_1

methODS OF reStrAiNt iN ADDitiON tO the FrONt SeAt BeltS 

(2/4)

load limiter

Above a certain severity of impact, this 

mechanism is used to limit the force of 

the belt against the body so that it is at 

an acceptable level.

Air bags for driver and front 

passenger

Fitted to the driver and passenger side.
Depending  on  the  vehicle,  the  pres-

ence  of  this  equipment  is  indicated 

by  the  word  “Airbag”  on  the  steering 

wheel, dashboard (air bag zone A) and 

a  symbol  on  the  lower  section  of  the 

windscreen.
Each air bag system consists of:
–  an air bag and gas generator fitted 

on the steering wheel for the driver 

and  in  the  dashboard  for  the  front 

passenger;

–  an electronic unit for system monitor-

ing which controls the gas generator 

electrical trigger system;

–  remote sensors;

–  a single warning light 

å

 on the 

instrument panel.

A

The  air  bag  system  uses 

pyrotechnic principles. This 

explains why, when the air 

bag  inflates,  it  will  gener-

ate heat, produce smoke (this does 

not mean that a fire is about to start) 

and make a noise upon detonation. 

In  a  situation  where  an  air  bag  is 

required, it will inflate immediately 

and this may cause some minor, su-

perficial grazing to the skin or other 

problems.

1.31

ENG_UD23032_2

Dispositifs complémentaires à la ceinture avant (L38 électrique - Renault)

ENG_NU_914-4_L38e_Renault_1

methODS OF reStrAiNt iN ADDitiON tO the FrONt SeAt BeltS 

(3/4)

Operation

This system is only operational when 

the ignition is switched on.
In a severe 

frontal impact, the air bags 

inflate  rapidly,  cushioning  the  impact 

of the driver’s head and chest against 

the steering wheel and the front pas-

senger against the dashboard. The air 

bags then deflate immediately so that 

the passengers are not in any way hin-

dered from leaving the vehicle.

Special feature of the front air 

bag

After a violent impact, it has two deploy-

ment volumes and integrates a ventila-

tion system:
–  small volume air bag, this is the first 

stage of operation;

–  large  volume  air  bag,  the  air  bag 

seams rip so that a larger volume of 

gas is released into the bag (for the 

most severe impacts).

1.32

ENG_UD23032_2

Dispositifs complémentaires à la ceinture avant (L38 électrique - Renault)

ENG_NU_914-4_L38e_Renault_1

methODS OF reStrAiNt iN ADDitiON tO the FrONt SeAt BeltS 

(4/4)

Warnings concerning the driver’s air bag
– Do not modify the steering wheel or the steering wheel boss.
– Do not cover the steering wheel boss under any circumstances.

–  Do not attach any objects (badge, logo, clock, telephone holder, etc.) to the steering wheel boss.
–  The steering wheel must not be removed (except by qualified personnel from our Network).
–  When driving, do not sit too close to the steering wheel. Sit with your arms slightly bent (see the information on “Adjusting 

your driving position” in Section 1). This will allow sufficient space for the air bag to deploy correctly and be fully effective.

Warnings concerning the passenger air bag
–  Do not attach or glue any objects (badge, logo, clock, telephone holder, etc.) to the dashboard on or near the air bag.
–  Do not place anything between the dashboard and the passenger (pet, umbrella, walking stick, parcels, etc.).
–  The passenger must not put his or her feet on the dashboard or seat as there is a risk that serious injuries may occur. In 

general, parts of the body should be kept away from the dashboard (knees, hands, head, etc.).

–  The devices in addition to the front passenger seat belt should be reactivated as soon as a child seat is removed, to ensure 

the protection of the passenger in the event of an impact.

A reAr-FAciNg chilD SeAt mUSt NOt Be FitteD tO the FrONt PASSeNger SeAt UNleSS 

the ADDitiONAl reStrAiNt SYStemS, i.e. the PASSeNger Air BAg, Are DeActivAteD.

(refer to the information on “Child safety: deactivating/activating the front passenger air bag” in Section 1)

All of the warnings below are given so that the air bag is not obstructed in any way when it is inflated and also to prevent 

the risk of serious injuries caused by items which may be dislodged when the air bag inflates.

additional methods of restraint

to the rear seat belts .......................(up to the end of the DU)

methods of restraint in addition to the seat belts (up to the end of the DU)

air bag...................................................(up to the end of the DU)

1.33

ENG_UD13820_2

Dispositifs complémentaires aux ceintures arrière (X95 - J95 - R95 - Renault)

ENG_NU_914-4_L38e_Renault_1

to the rear seat belts

methODS OF reStrAiNt iN ADDitiON tO the reAr SeAt BeltS

Force limiter

Above a certain severity of impact, this 

mechanism is used to limit the force of 

the belt against the body so that it is at 

an acceptable level.

–  Have  the  entire  restraint 

system checked following 

an accident.

– No operation whatsoever 

is  permitted  on  any  part  of  the 

system (air bags, electronic con-

trol units, wiring) and the system 

components must not be reused 

on any other vehicle, even if iden-

tical.

–  Only  qualified  personnel  from 

our Network may work on the air 

bags; otherwise the system may 

trigger  accidentally  and  cause 

injury.


Content   ..   1  2  3   ..