Dacia SuperNova (engine E7J). Service manual - part 95


  Index      Dacia     Dacia SuperNova (engine E7J) - service and repair manual 2004 year


Search            


Content   ..  93  94  95  96   ..


Dacia SuperNova (engine E7J). Service manual - part 95


    WINDOWS

54

54 - 1

WINDSCREEN AND HATCHBACK GLASS REPLACEMENT

The replacement of these glasses is performed in case they are broken, when they are not

according to the required overall dimensions or when they have manufacturing defects (image
distortions, cracks,  etc).

PREPARING FOR MOUNTING

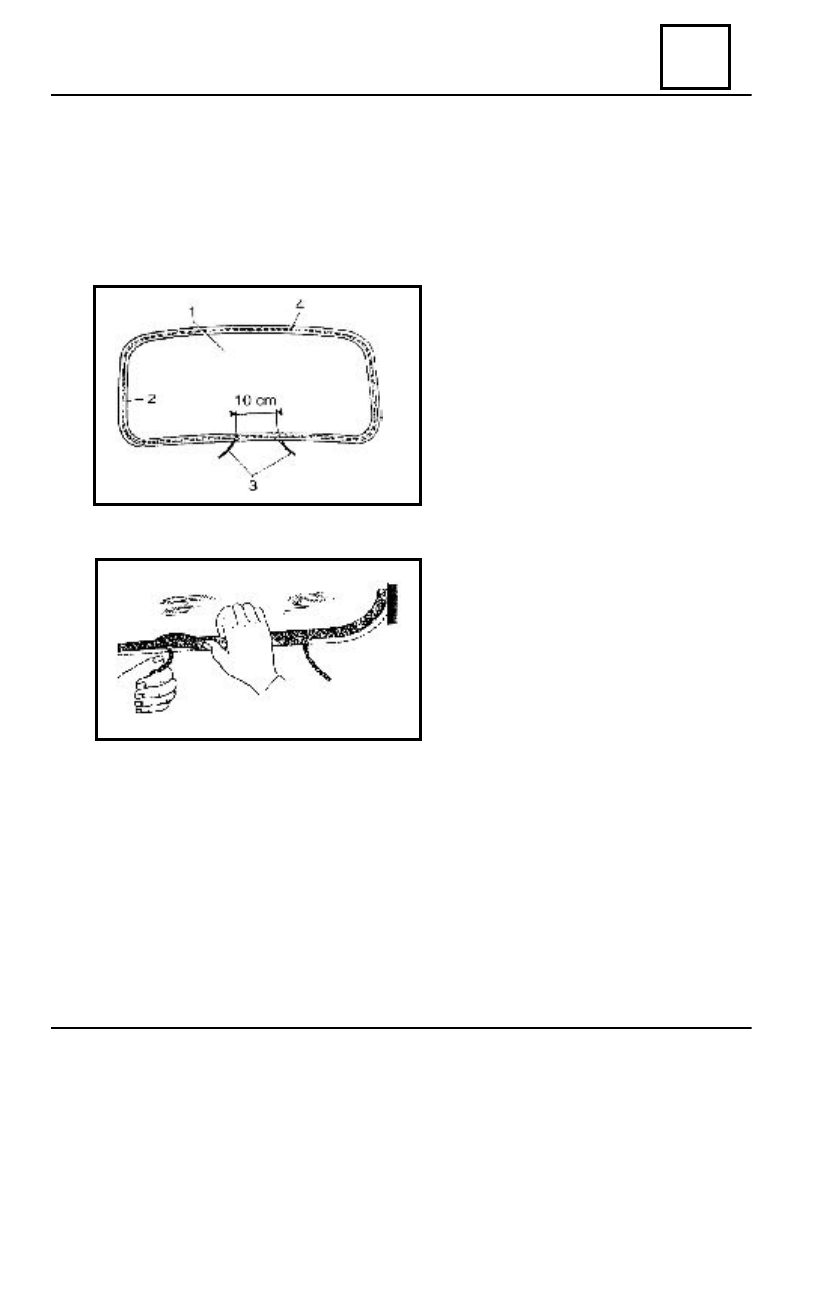
Position the gasket (2) around the  glass (1)

and place the assembly on a protection plate.

Place in  the gasket channel all around the

gasket frame; a cotton cord ( 4 ) of 3 – 4
mm diameter, leaving at its free ends(3)
about 20 cm of cord, and between the ends,
the distance shall not be more than  10 cm.

MOUNTING OF  THE WINDSCREEN

Mount on the carriage body, the windscreen – cord - glass gasket assembly, so that the cord

ends are placed towards the inside of carriage body.

From the inside of the vehicle, successively draw each end of the cord, the drawing direction

being parallel with the glass surface, towards the surface inner part, perpendicular on the frame,
beginning with the lower part, in this way the gasket edge is lifted and then lowered on the frame.

At the outside, the gasket is seated by slightly and successively pressing it on glass, so that the

tightening is uniform on the whole windscreen contour and frame.

DISMOUNTING OF  A BROKEN

GLASS

If the glass or part of it did not fall, the

dismounting and the cleaning of the window
gaskets by the pieces of the broken glass
will be easier to be made by sticking a sheet
of paper on each surface.

WINDSCREEN AND HATCHBACK GLASS

  WINDOWS

54

54 - 2

54

WINDSCREEN AND HATCHBACK GLASS

The cord must be always removed through the upper part of the windscreen.
Each time a windscreen is mounted, ensure the uniform setting of the whole assembly on the

carriage body by tapping several times with a rubber hammer, on the edge of the glass frame.

NOTE
Do not tap the glass on corners and on the two vertical sides.

After the windscreen mounting check out carefully the uniformity of the whole assembly and

then its water-proofing by splashing with a jet of  water.

    WINDOWS

54

54 - 3

Dismount the luggage compartment  table.
Disconnect the mass connection and the

hatchback defrosting supply connection.

Remove the glass together with the gasket,

by pushing it from the inside of the vehicle.

Clean the gasket and place the glass in its

new gasket.

The mounting of the hatchback glass – gasket

assembly, is performed in the same way with
the windscreen mounting.

HATCHBACK GLASS REPLACEMENT

      EXTERNAL PROTECTIONS

55

55 - 1

REMOUNTING

Perform in the reverse order the dismounting operations.

DISMOUNTING

Disconnect the fog  projectors.
Dismount:

-the attachment nut  (1) of the front bumper  (2) on the carriage body
-the attachment  screws (3) and the cage nuts (5) of the bumper on the front cross bar.
-the lateral supports (4) are fixed by nuts on the iron core mounted in the front bumper.

FRONT BUMPER

1

5

4

1

3

2


Content   ..  93  94  95  96   ..