Peugeot 508 (2016 year). Manual - part 16


  Index      Peugeot     Peugeot 508 - service manual 2016 year in english


Search            


Content   ..  14  15  16  17   ..


Peugeot 508 (2016 year). Manual - part 16


239

8

In the event of a breakdown

508_en_Chap08_en-cas-de-pannes_ed01-2016

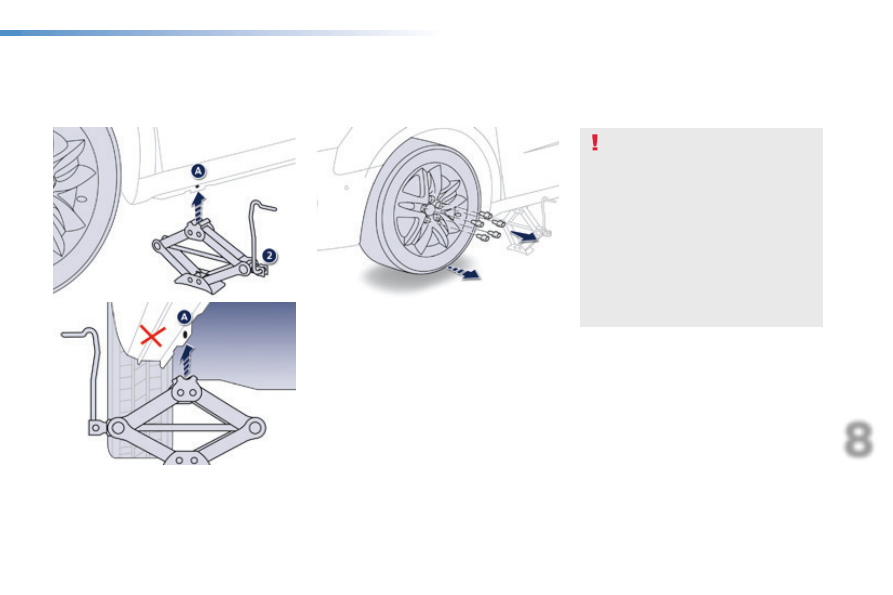
F  Raise the vehicle until there is sufficient 

space between the wheel and the ground 
to admit the spare (not punctured) wheel 
easily.

F  Remove the bolts and store them in a clean 

place.

F  Remove the wheel.

F  extend the jack 2 until its head comes into 

contact with the jacking point A or B used; 
the vehicle's contact surface at A or B must 
engage with the central part of the head of 
the jack.

ensure that the jack is stable. If the 
ground is slippery or loose, the jack 
might slip or drop - Risk of injury!
take care to position the jack only at 
one of the vehicle's jacking points A 
or B under the vehicle, ensuring that the 
contact surface of the vehicle's jacking 
point is centred on the head of the jack. 
Otherwise there is a risk of damage to 
the vehicle and/or that the jack might 
drop - Risk of injury!

240

In the event of a breakdown

508_en_Chap08_en-cas-de-pannes_ed01-2016

Fitting a wheel

Fitting the "space-saver" 
spare wheel

If your vehicle is fitted with alloy wheels, 
when tightening the bolts on fitting, it 
is normal to notice that the washers 
do not come into contact with the 
"space-saver" spare wheel. the wheel 
is secured by the conical surface of 
each bolt.

After changing a wheel

to store the punctured wheel in the 
boot correctly, first remove the central 
cover.
When using the "space-saver" type 
spare wheel, do not exceed 50 mph 
(80 km/h).
Have the tightening of the bolts and the 
pressure of the spare wheel checked 
by a PeugeOt dealer or a qualified 
workshop without delay.
Have the punctured wheel repaired 
and refitted to the vehicle as soon as 
possible.

F  Put the wheel in place on the hub.
F  Screw in the bolts fully by hand.
F  Pre-tighten the security bolt using the 

wheelbrace 1 fitted with the security 
socket  4.

F  Pre-tighten the other bolts using the 

wheelbrace 1 only.

241

8

In the event of a breakdown

508_en_Chap08_en-cas-de-pannes_ed01-2016

F  Lower the vehicle fully.
F  Fold the jack 2 and detach it.

F  tighten the security bolt using the 

wheelbrace 1 fitted with the security 
socket 4.

F  tighten the other bolts using the 

wheelbrace 1 only.

F  Refit the wheel bolt cover to each of the 

bolts (according to equipment).

F  Store the tools in the box.

242

In the event of a breakdown

508_en_Chap08_en-cas-de-pannes_ed01-2016

Changing a bulb

Front lamps

Model with "full LED" technology 
headlamps

1.  Additional lighting.
2.
  Dipped beam headlamps.
3.
  Main beam headlamps.
4.
  Daytime running lamps.
5.
  Direction indicators / Sidelamps.
6.
  Front foglamps.

In some weather conditions (e.g. low 
temperature or humidity), the presence 
of misting on the internal surface of the 
glass of the headlamps and rear lamps 
is normal; it disappears after the lamps 
have been on for a few minutes.

For the replacement of these light-
emitting diode (LeD) lamps, contact 
a PeugeOt dealer or a qualified 
workshop.

All of these lamps use light-emitting 
diodes - LeDs.

Model with halogen headlamps

1.  Dipped beam headlamps (H7-55W).
2.
  Main beam headlamps (H7-55W).
3.
  Daytime running lamps (LEDs).
4.
  Direction indicators / Sidelamps (LEDs).
5.
  Foglamps (LEDs).

For H7 type bulbs with lugs, take care to 
observe their correct installation so as to 
ensure the best lighting performance.

243

8

In the event of a breakdown

508_en_Chap08_en-cas-de-pannes_ed01-2016

Non-hybrid RHX model (lower 
part)

1.  Daytime running lamps / sidelamps 

(LEDs).

2.  Direction indicators (LEDs).

the headlamps have polycarbonate 
lenses with a protective coating:
F  do not clean them using a dry 

or abrasive cloth, nor with a 
detergent or solvent product,

F  use a sponge and soapy water or a 

pH neutral product,

F  when using a high pressure washer 

on persistent marks, do not keep 
the lance directed towards the 
lamps or their edges for too long, 
so as not to damage their protective 
coating and seals.

Changing a bulb should only be done 
after the headlamp has been switched 
off for several minutes (risk of serious 
burns).
F  Do not touch the bulb directly with 

your fingers, use a lint-free cloth.

It is imperative to use only anti-
ultraviolet (uV) type bulbs to avoid 
damaging the headlamp.
Always replace a failed bulb with a 
new bulb with the same type and 
specification.

244

In the event of a breakdown

508_en_Chap08_en-cas-de-pannes_ed01-2016

Main beam headlamps

F  Remove the protective plastic cover by 

pulling on the tab.

F  unclip the bulb connector.
F  Remove the bulb by pulling it out and 

change it.

Integrated direction 
indicator side repeaters

Door mirror spotlamps

You should contact a PeugeOt dealer or a 
qualified workshop for the replacement of the 
light emitting diode - LeD.

For reassembly, carry out these operations in 
reverse order.

Dipped beam headlamp

Halogen model

F  Remove the protective plastic cover by 

pulling on the tab.

F  unclip the bulb connector.
F  extract the bulb by pulling and change it.

For reassembly, carry out these operations in 
reverse order.

For the left hand headlamp, it is 
necessary to remove the battery.
Refer to the corresponding section.

You should contact a PeugeOt dealer or a 
qualified workshop for the replacement of these 
bulbs.

245

8

In the event of a breakdown

508_en_Chap08_en-cas-de-pannes_ed01-2016

1.  Brake lamps 
  

(light emitting diodes - LEDs).

2.  Sidelamps 
  

(light emitting diodes - LEDs).

3.  Direction indicators 
  

(PY21W amber).

4.  Foglamps 
  

(light-emitting diodes) / 


Reversing lamps (W16W).

Rear lamps (Saloon)

Direction indicators and reversing lamp

Direction indicators

Reversing lamp

Light emitting diodes-LEDs

For replacement, contact a PeugeOt 
dealer or qualified workshop.

F  Open the boot, then the plastic cover.
F  Remove the two lamp unit fixing nuts.
F  extract the lamp unit carefully from the 

outside.

F  Disconnect the electrical connector.
F  Spread the tabs and remove the bulb 

holder.

F  turn the bulb a quarter of a turn and pull it 

out.

For reassembly, carry out these operations in 
reverse order.

Remove the direction indicator bulb holder, 
as described above.

turn the bulb a quarter of a turn and 
change it.

to reassemble, carry out these operations in 
reverse order.

246

In the event of a breakdown

508_en_Chap08_en-cas-de-pannes_ed01-2016

1.  Brake lamps (light emitting diodes - 

LEDs).

2.  Reversing lamps (W19W).
3.
  Direction indicators (PY21W amber).
4.
  Sidelamps (light emitting diodes - 

LEDs).

5.  Foglamps (light emitting diodes - LEDs).

Rear lamps (SW and non-hybrid RXH)

F  Open the boot then remove the access 

cover.

F  Remove the sealing foam.
F  Disconnect the lamp connector.
F  Remove the lamp fixing nut.

Direction indicators 
(on the wings)

F  Carefully remove the lamp unit from 

outside.

F  Remove the sealing foam.
F  unclip the bulb holder.
F  turn the bulb a quarter of a turn and pull 

it out.

For reassembly, carry out these operations in 
reverse order.

Light emitting diodes-LEDs

For replacement, contact a PeugeOt 
dealer or qualified workshop.

247

8

In the event of a breakdown

508_en_Chap08_en-cas-de-pannes_ed01-2016

Reversing lamp (tailgate)

F  Open the tailgate and then remove the 

access cover.

F  Disconnect the lamp connector.
F  Remove the lamp fixing nut.

F  Carefully remove the lamp from the 

outside.

F  Remove the sealing foam.

F  turn the bulb holder a quarter of a turn and 

pull it out.

For reassembly, carry out these operations in 
reverse order.

248

In the event of a breakdown

508_en_Chap08_en-cas-de-pannes_ed01-2016

Third brake lamp (light emitting 
diodes - LEDs)

Contact a PeugeOt dealer or qualified 
workshop.

Number plate lamps

F  Insert a thin screwdriver into one of the 

outer holes of the lens.

F  Push it outwards to unclip.
F  Disconnect the lamp connector.
F  Remove the lens.
F  Pull the bulb out and change it.

249

8

In the event of a breakdown

508_en_Chap08_en-cas-de-pannes_ed01-2016

Changing a fuse

Procedure for replacing a failed fuse with a new fuse to rectify a failure of the corresponding function.

the extraction tweezer and spare fuses are 
located in the glove box.

Access to the tools

Before changing a fuse, the cause of the failure 
must be identified and rectified.
F  Identify the failed fuse by checking the 

condition of its filament.

Changing a fuse

Good

Failed

F  use the special tweezer to extract the fuse 

from its housing.

F  Always replace the faulty fuse with a fuse 

of the same rating.

F  Check that the number marked on the 

fusebox, the rating marked on the fuse and 
the following tables all agree.

PeugeOt will not accept responsibility 
for the cost incurred in repairing your 
vehicle or for rectifying malfunctions 
resulting from the installation of 
accessories not supplied and not 
recommended by PeugeOt and 
not installed in accordance with its 
instructions, in particular when the 
combined consumption of all of the 
additional equipment connected 
exceeds 10 milliamperes.

Installing electrical 
accessories

Your vehicle's electrical system is 
designed to operate with standard or 
optional equipment.
Before installing other electrical 
equipment or accessories on your 
vehicle, contact a PeugeOt dealer or 
a qualified workshop.

250

In the event of a breakdown

508_en_Chap08_en-cas-de-pannes_ed01-2016

Dashboard fuses

the fusebox is placed in the lower dashboard 
(left-hand side).

Access to the fuses

F  Open the hinged panel, then apply light 

force to bypass the stops.

Fuse 

Rating 

(A)

Functions

F6 A or B

15

Audio system.

F8

3

Alarm.

F13

10

Front cigar lighter.

F14

10

Front 12 V socket.

F16

3

Rear courtesy lamp, rear map reading lamps.

F17

3

Front courtesy lamp, courtesy mirror.

F28 A or B

15

Audio system.

F30

20

Rear wiper.

F32

10

Audio amplifier.

251

8

In the event of a breakdown

508_en_Chap08_en-cas-de-pannes_ed01-2016

Fuse 

Rating 

(A)

Functions

F3

15

Driver's electric window panel, 12 V socket for rear seats.

F4

15

12 V socket in boot.

F5

30

One-touch rear window.

F6

30

One-touch front window.

F11

20

trailer unit.

F12

20

Audio amplifier.

F15

20

Panoramic sunroof blind  
(SW and non-hybrid RXH).

F16

5

Driver's electric window switch panel.

Fuses behind the glove box

252

In the event of a breakdown

508_en_Chap08_en-cas-de-pannes_ed01-2016

Engine compartment fuses

Access to the fuses

F  unclip the cover.
F  Change the fuse (see corresponding 

paragraph).

F  When you have finished, close the cover 

carefully to ensure correct sealing of the 
fusebox.

Fuse 

Rating 

(A)

Functions

F20

15

Front / rear screenwash pump.

F21

20

Headlamp wash pump.

F22

15

Horn.

F23

13

Right-hand main beam headlamp.

F24

15

Left-hand main beam headlamp.

the fusebox is placed in the engine 
compartment near the battery.

253

8

In the event of a breakdown

508_en_Chap08_en-cas-de-pannes_ed01-2016

12 V battery

Versions equipped with Stop & Start are 
fitted with a 12 V lead-acid battery of 
specific technology and specification.
Its replacement should be carried 
out only by a PeugeOt dealer or a 
qualified workshop.

the battery is located under the bonnet.
to gain access to it:
F  open the bonnet using the interior release 

lever, then the exterior safety catch,

F  remove the plastic cover on the (+) 

terminal,

F  if necessary, unclip the fusebox to remove 

the battery.

Access to the battery

Procedure for starting the engine using another battery or charging a discharged battery.

Protect your eyes and face before 
handling the battery.
All operations on the battery must be 
carried out in a well ventilated area and 
away from naked flames and sources 
of sparks, so as to avoid the risk of 
explosion or fire.
Wash your hands afterwards.

Batteries contain harmful substances 
such as sulphuric acid and lead.
they must be disposed of in 
accordance with regulations and must 
not, in any circumstances, be discarded 
with household waste.
take used remote control batteries and 
vehicle batteries to a special collection 
point.

General points

Lead-acid starter batteries

If your vehicle has an automatic 
gearbox, do not try to start the engine 
by pushing the vehicle.

254

In the event of a breakdown

508_en_Chap08_en-cas-de-pannes_ed01-2016

Some functions, including Stop & Start, 
are not available if the battery is not 
sufficiently charged.

F  Connect the other end of the green or black 

cable to the earth point C on the broken 
down vehicle.

F  Start the engine of the vehicle with the 

good battery and leave it running for a 
few minutes.

F  Operate the starter on the broken down 

vehicle and let the engine run.


If the engine does not start straight away, 
switch off the ignition and wait a few 
moments before trying again.

When your vehicle's battery is discharged, the 
engine can be started using a slave battery 
(external or on another vehicle) and jump lead 
cables or a battery booster.

Starting using another 
battery

Never try to start the engine by 
connecting a battery charger.
Never use a 24 V or higher battery 
booster.
First check that the slave battery has a 
nominal voltage of 12 V and a capacity 
at least equal to that of the discharged 
battery.
the two vehicles must not be in contact 
with each other.
Switch off the electrical consumers on 
both vehicles (audio system, wipers, 
lighting, ...).
ensure that the jump lead cables do 
not pass close to moving parts of the 
engine (cooling fan, belts, ...).
Do not disconnect the (+) terminal when 
the engine is running.

F  Raise the plastic cover on the (+) terminal, 

if your vehicle has one.

F  Connect the red cable to the positive 

terminal (+) of the flat battery A (at 
the metal elbow) then to the positive 
terminal (+) of the slave battery B or the 
booster.

F  Connect one end of the green or black 

cable to the negative terminal (-) of the 
slave battery B or the booster (or earth 
point on the other vehicle).

F  Wait until the engine returns to idle then 

disconnect the jump lead cables in the 
reverse order.

F  Refit the plastic cover to the (+) terminal, if 

your vehicle has one.

F  Allow the engine to run for at least 

30 minutes, by driving or with the vehicle 
stationary, so that the battery reaches an 
adequate state of charge.


Content   ..  14  15  16  17   ..