Peugeot 508 (2016 year). Manual - part 5


  Index      Peugeot     Peugeot 508 - service manual 2016 year in english


Search            


Content   ..  3  4  5  6   ..


Peugeot 508 (2016 year). Manual - part 5


63

2

Access

508_en_Chap02_ouvertures_ed01-2016

Do not throw the remote control 
batteries away, they contain metals 
which are harmful to the environment.
take them to an approved collection 
point.

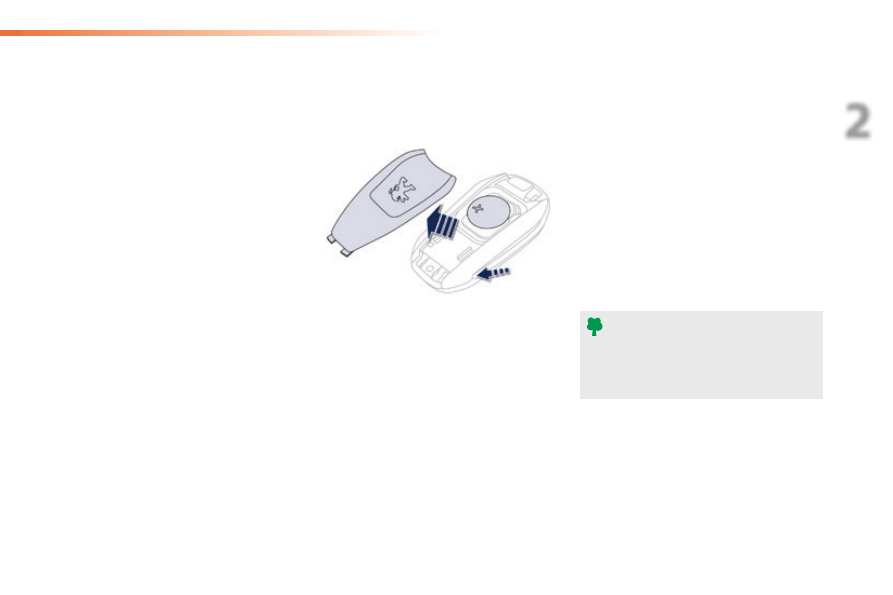
Changing the battery of the 
electronic key

Battery ref.: CR2032 / 3 volts.
this replacement battery is available from a 
PeugeOt dealer or a qualified workshop.
A message is displayed in the instrument panel 
screen when replacement of the battery is 
needed.
F  unclip the cover using a pointed object at 

the key ring.

F  Slide the flat battery out of its location.
F  Slide the new battery into its location 

observing the original direction of fitment.

F  Clip the cover in place starting at the front.
F  Reinitialise the electronic key.

Electronic key fault

Following disconnection of the vehicle battery, 
replacement of the remote control battery or 
in the event of a fault with the remote control, 
you can no longer unlock, lock or locate your 
vehicle.
F  First of all, use the key in the door lock to 

unlock or lock your vehicle.

F  then, reinitialise the remote control.
If the problem persists, contact a PeugeOt 
dealer or a qualified workshop as soon as 
possible.

Reinitialisation

F  Switch the ignition off.
F  Immediately press one of the remote 

control buttons for a few seconds.

F  Switch the ignition on.
the electronic key is fully operational again.

64

Access

508_en_Chap02_ouvertures_ed01-2016

Locking/ unlocking from the inside

Driving with the doors locked may make 
access to the passenger compartment 
by the emergency services more 
difficult in an emergency.

If the vehicle is deadlocked or locked 
with the remote control or the door 
handles, the button is not active. In this 
case, use the key or the remote control 
to unlock.

F  Press the button.
this allows the doors and the boot to be locked 
or unlocked.

When carrying large objects with the 
boot open, you can press this button to 
lock just the doors.
When locking from inside, the door 
mirrors do not fold.

Automatic central locking of the 
doors

the doors can lock automatically while driving 
(speed above 6 mph (10 km/h)).
to activate or deactivate this function, press 
and hold the button until a message appears in 
the screen.

After unlocking, if no door is opened 
within 30 seconds, the doors lock again 
automatically.

65

2

Access

508_en_Chap02_ouvertures_ed01-2016

Boot

Saloon

F  After unlocking the vehicle totally or after 

pressing the boot opening button using the 
remote control or the key, press this button.

SW and non-hybrid RXH

F  After unlocking the vehicle totally or after 

pressing the boot opening button using the 
remote control or the key, press the lever A 
and raise the tailgate.

Opening from inside

Opening

Hold this button down until the boot is heard to 
unlock.

when the engine is running
this warning lamp and a message 
in the instrument panel screen 
appear for a few seconds,

when the vehicle is moving (speed 
above 6 mph (10 km/h)), this warning 
lamp and a message, accompanied by an 
audible signal, appear in the instrument 
panel screen for a few seconds.

Closing

F  Lower the tailgate using the interior grab 

handle.

If the tailgate is not closed correctly:

66

Access

508_en_Chap02_ouvertures_ed01-2016

Motorised tailgate (SW and non-hybrid RHX)

Opening using the 
electronic key

Vehicle locked / deadlocked

F  If you are not in the recognition 

zone, press and hold button A 
on the electronic key. the action 
first unlocks the vehicle and then 
triggers opening of the tailgate.

Vehicle unlocked

F  Press and hold button A on the electronic 

key or press the tailgate button B to trigger 
its opening.

Opening from inside

F  Press this button to unlock and trigger 

opening of the tailgate.

Check that there are no obstacles 
before opening the tailgate remotely.

F  With the electronic key on your person, 

in the recognition zone, press the tailgate 
button B. the action first unlocks the 
vehicle and then triggers opening of the 
tailgate.

67

2

Access

508_en_Chap02_ouvertures_ed01-2016

Motorised closing

F  Press this button C to close the 

tailgate electrically.

Do not hinder closing of the tailgate: any 
obstacle to closing causes the tailgate to stop 
and rise a few centimetres automatically.
to close the tailgate manually: move the 
tailgate slightly up then down to disengage it 
from its drive then lower it until closed.

To avoid the risk of injury, ensure 
that no one is close to the rear of the 
vehicle when opening or closing the 
tailgate.

While electric opening or closing of the tailgate 
is in progress, you can stop its movement at 
any time:
F  press the interior button or button A on the 

remote control or B or C tailgate buttons.

Stopping the opening or 
closing

Never put a finger into the tailgate 
locking system: risk of serious injury!

68

Access

508_en_Chap02_ouvertures_ed01-2016

Back-up release (Saloon, 
SW and non-hybrid RHX)

System for mechanically unlocking the boot in 
the event of a battery or central locking fault.

Unlocking

F  Fold the rear seats to gain access to the 

lock from inside the boot.

F  Insert a small screwdriver into hole A of 

the lock, then move the lever to the left to 
unlock the boot.

"Boot open" warning

With the engine running or when the vehicle is moving, 
if the tailgate is not properly closed, a message 
accompanied by an audible signal (from 6 mph 
(10 km/h)) is displayed in the instrument panel screen.

Locking again after closing

Once closed again, the boot will remain locked 
if the problem persists.

Adjusting the opening 
height

the maximum opening height of the tailgate 
can be set and memorised (restricted overhead 
clearance, ...).
this memorisation is done in two steps, by 
successive presses on button C:

during opening, a first press stops the 
tailgate at the desired height,

a second maintained press memorises the 
position of the tailgate; an audible signal 
confirms the memorisation.


to delete this memorisation, make a new 
maintained press until the audible signal is 
heard.

the tailgate is not designed to support 
a bicycle carrier.
If fitting a bicycle carrier to a towbar, 
the automatic operation must be 
deactivated.

Precautions in use
If snow has accumulated on the 
tailgate, remove the snow before any 
automatic operation of the tailgate.
Ice can prevent opening of the tailgate: 
wait until the ice has melted following 
heating of the passenger compartment.
When washing the vehicle in an 
automatic car wash, don't forget to 
lock your vehicle to prevent any risk of 
unwanted opening.
Repeated opening and closing of the 
tailgate can overheat the electric motor; 
neither closing nor opening is then 
possible.
Allow the motor to cool down for 
ten minutes before operating the 
tailgate again.

69

2

Access

508_en_Chap02_ouvertures_ed01-2016

Lost keys, remote control, electronic key

Visit a PeugeOt dealer with the vehicle's registration certificate, your personal identification documents and if possible, the label bearing the 
key code.
the PeugeOt dealer will be able to retrieve the key code and the transponder code required to order a new key.

Remote control

the high frequency remote control is a sensitive system; do not operate it while it is in your pocket as there is a possibility that it may unlock the 
vehicle, without you being aware of it.
Do not repeatedly press the buttons of your remote control out of range and out of sight of your vehicle. You run the risk of stopping it from 
working and the remote control would have to be reinitialised.
the remote control does not operate when the key is in the ignition, even when the ignition is switched off.

Locking the vehicle

Driving with the doors locked may make access to the passenger compartment by the emergency services more difficult in an emergency.
As a safety precaution (with children on board), remove the key from the ignition or take the electronic key when you leave the vehicle, even for 
a short time.

Electrical interference

the Keyless entry and Starting electronic key may not operate if close to certain electronic devices: telephone, laptop computer, strong 
magnetic fields, ...

Anti-theft protection

Do not make any modifications to the electronic engine immobiliser system; this could cause malfunctions.
Don't forget to turn the steering to engage the steering lock.

When purchasing a second-hand vehicle

Have the key codes memorised by a PeugeOt dealer, to ensure that the keys in your possession are the only ones which can start the vehicle.

70

Access

508_en_Chap02_ouvertures_ed01-2016

System which protects and provides a deterrent 
against theft and break-ins. It provides the 
following types of monitoring:

Alarm

-  Exterior perimeter

the system checks for opening of the vehicle.
the alarm is triggered if anyone tries to open a 
door, the boot or the bonnet...

-  Interior volumetric

the system checks for any variation in the 
volume in the passenger compartment.
the alarm is triggered if anyone breaks a 
window, enters the passenger compartment or 
moves inside the vehicle.

- Tilt

the system checks for any change in the 
attitude of the vehicle.
the alarm is triggered if the vehicle is lifted, 
moved or knocked.

Self-protection function

the system checks for the putting out of 
service of its components.
the alarm is triggered if the battery, the 
central control unit or the siren wiring is 
put out of service or damaged.

For all work on the alarm system, 
contact a PeugeOt dealer or a 
qualified workshop.

Locking the vehicle with full 
alarm system

Activation

F  Switch off the ignition and get out of the vehicle.

F  Press the locking button on the 

remote control or lock the vehicle 
using the Keyless entry and 
Starting system.

the monitoring system is active: the indicator 
lamp on the button flashes once per second.
After the locking button on the remote control 
is pressed or the vehicle locked using the 
Keyless entry and Starting system, the exterior 
perimeter monitoring is activated after a delay 
of 5 seconds, the interior volumetric monitoring 
after 45 seconds and anti-tilt monitoring after 
90 seconds.
If an opening (door, boot...) is not closed 
fully, the vehicle is not locked but the exterior 
perimeter monitoring will be activated after a 
delay of 45 seconds.

71

2

Access

508_en_Chap02_ouvertures_ed01-2016

Locking the vehicle 
with exterior perimeter 
monitoring only

Deactivate the interior volumetric and anti-lift 
monitoring to avoid unwanted triggering of the 
alarm in certain cases such as:

leaving a window partially open,

washing your vehicle,

changing a wheel,

having your vehicle towed,

transportation by sea.

Deactivation of the interior 
volumetric and anti-tilt monitoring

F  Switch of the ignition and within 

ten seconds, press this button 
until the indicator lamp is on 
continuously.

F  get out of the vehicle.

F  Press the locking button on 

the remote control immediately 
or lock the vehicle using the 
Keyless entry and Starting 
system.

to be effective, this deactivation must be carried 
out each time the ignition is switched off.

Reactivation of the interior 
volumetric and anti-tilt monitoring

F  Press the unlocking button on 

the remote control or unlock the 
vehicle using the Keyless entry 
and Starting system to deactivate 
the exterior perimeter monitoring.

F  Press the locking button on the 

remote control or lock the vehicle 
using the Keyless entry and 
Starting system to activate all the 
monitoring functions.

the indicator lamp in the button 
again flashes once per second.

F  Press the unlocking button on 

the remote control or unlock the 
vehicle using the Keyless entry 
and Starting system.

Deactivation of the volumetric 
monitoring

the volumetric protection system is 
deactivated: the indicator lamp in the 
button goes off.

the exterior perimeter monitoring alone is 
activated: the indicator lamp in the button 
flashes once per second.

72

Access

508_en_Chap02_ouvertures_ed01-2016

Triggering of the alarm

this is indicated by sounding of the siren 
and flashing of the direction indicators for 
thirty seconds.
the monitoring functions remain active until 
the alarm has been triggered eleven times in 
succession.

When the vehicle is unlocked using 
the remote control or unlocked 
using the Keyless entry and Starting 
system, rapid flashing of the indicator 
lamp in the button informs you that 
the alarm was triggered during 
your absence. When the ignition 
is switched on, this flashing stops 
immediately.

Failure of the remote control

to deactivate the monitoring functions:
F  unlock the vehicle using the key in the 

driver's door lock.

F  Open the door; the alarm is triggered.
F  Switch on the ignition; the alarm stops. the 

indicator lamp in the button switches off.

Locking the vehicle without 
activating the alarm

F  Lock or deadlock the vehicle using the key 

in the driver's door lock.

Operating fault

When the ignition is switched on, fixed 
illumination of the indicator lamp in the button 
indicates a fault in the system.
Have it checked by a PeugeOt dealer or a 
qualified workshop.

* According to country.

Automatic activation*

2 minutes after the last door or the boot is 
closed, the system is activated automatically.
F  to avoid triggering the alarm on entering 

the vehicle, first press the unlocking button 
on the remote control or unlock the vehicle 
using the Keyless entry and Starting 
system.

73

2

Access

508_en_Chap02_ouvertures_ed01-2016

electric windows

1.  Left hand front electric window switch.
2.
  Right hand front electric window 

switch.

3.  Right hand rear electric window switch.
4.
  Left hand rear electric window switch.
5.
  Deactivating the rear electric window 

switches, locking the rear doors 
(child lock).

Manual operation
to open or close the window, press or pull the 
switch gently. the window stops as soon as the 
switch is released.

Automatic operation 
(depending on version)
to open or close the window, press or pull 
switch fully: the window opens or closes 
completely when the switch is released. 
Pressing the switch again stops the movement 
of the window.
the electric window switches remain 
operational for approximately one minute after 
the key has been removed from the ignition.
Once this time has elapsed, the electric 
windows will not operate. to reactivate them, 
switch the ignition on again.

Safety anti-pinch

When the window rises and meets an obstacle, 
it stops and immediately partially lowers again.
In the event of unwanted opening of the 
window on closing, press the switch until the 
window opens completely, then pull the switch 
immediately until the window closes. Continue 
to hold the switch for approximately one second 
after the window has closed.
the safety anti-pinch function is not active 
during this operation.

Deactivating the rear window 
controls

For the safety of your children, press switch 5 
to prevent operation of the rear windows 
irrespective of their position.
the interior controls for the rear doors are also 
deactivated.
When the button is pressed down, the warning 
lamp is on, the switches are deactivated. When 
the button is raised, the switches are active, the 
warning lamp is off.

74

Access

508_en_Chap02_ouvertures_ed01-2016

Reinitialising the electric 
windows

Always remove the key from the ignition 
when leaving the vehicle, even for a 
short time.
In the event of contact during operation 
of the windows, you must reverse the 
movement of the window. to do this, 
press the switch concerned.
When operating the passenger electric 
window switches, the driver must 
ensure that no one is preventing correct 
closing of the windows.
the driver must ensure that the 
passengers use the electric windows 
correctly.
Be aware of children when operating 
the windows.

Following reconnection of the battery, the 
safety anti-pinch function must be reinitialised.
the safety anti-pinch function is not active 
during these operations:

lower the window completely, then raise 
it, it will rise in steps of a few centimetres 
each time the switch is pressed. Repeat 
the operation until the window closes 
completely,

continue to press the switch for at least 
one second after reaching this position, 
window closed.

75

3

Ease of use and comfort

508_en_Chap03_ergonomie-et-confort_ed01-2016

Front seats

Manual adjustments

1.  Adjustments to the height and angle of 

the head restraint 


to raise it, pull upwards.


to lower it, hold the button in and press on 
the head restraint (pushing to go past the 
stiff point of the button).

2.  Adjustment of the backrest angle 
 

Operate the control lever and adjust 
the position of the backrest to the front 
or to the rear.

3.  Adjustment of the seat height 
 

Raise or lower the control lever the 
number of times required to obtain 
the desired position.

4.  Adjustment of the lumbar support 
 

this system allows the height and 
depth of the lumbar support to be 
adjusted separately.
F Forwards or backwards to increase 

or decrease the lumbar support.

F upwards or downwards to raise or 

lower the lumbar contact zone.

5.  Forwards-backwards adjustment of 

the seat position 


Lift the control bar and slide the seat 
forwards or backwards.

6.  Adjusting the cushion 
 

Pull the handle to adjust the length of the 
cushion.

Before moving the seat backwards, ensure that there is nothing that might prevent the full 
travel of the seat, so as to avoid the risk of of jamming the seat caused by the presence of 
objects on the floor behind the seat or rear passengers. If the seat jams, stop the movement 
immediately.

76

Ease of use and comfort

508_en_Chap03_ergonomie-et-confort_ed01-2016

Electric adjustments

1.  Adjustment of the seat cushion angle 

and height, and forwards-backwards 
adjustment
F Raise or lower the front of the control to 

adjust the seat cushion angle.

F Raise or lower the rear of the control to 

raise or lower the seat.

F Simultaneously raise or lower the front 

and rear of the control in order to raise or 
lower the entire seat.

2.  Adjustment of the backrest angle 
 

Move the control forwards or backwards to 
adjust the backrest angle.

3.  Adjustment of lumbar support 
 

this function allows you to independently 
adjust the height and level of lumbar 
support.

Move the control:
F  Forwards or backwards to increase or 

reduce the lumbar support.

F  upwards or downwards to raise or lower 

the lumbar support zone.

Before moving the seat backwards, ensure that there is nothing that might prevent the full 
travel of the seat, so as to avoid the risk of of jamming the seat caused by the presence of 
objects on the floor behind the seat or rear passengers. If the seat jams, stop the movement 
immediately.

Switch on the ignition or start the engine if the vehicle has gone into economy mode.

the electric functions of the driver's seat are active for about a minute after opening the 
front door. they are deactivated about a minute after switching off the ignition and in 
economy mode.
to reactivate them, switch on the ignition.

77

3

Ease of use and comfort

508_en_Chap03_ergonomie-et-confort_ed01-2016

Storing driving positions

System which stores the electrical settings of 
the driver's seat and door mirrors as well as 
the head-up display settings. It enables you to 
store up to two positions using the buttons on 
the side of the driver's seat.

Storing a position
using buttons M / 1 / 2

F  Switch on the ignition.
F  Adjust your seat, the door mirrors and the 

head-up display.

F  Press button M, then press button 1 or 2 

within four seconds. 


An audible signal indicates that the position 
has been stored.

Storing a new position cancels the previous 
position.

Recalling a stored position

Ignition on or engine running

F  Briefly press button 1 or 2 to recall the 

corresponding position.

An audible signal indicates the end of the 
adjustment.
You can interrupt the current movement by 
pressing button M1 or 2 or by using one of the 
seat controls.
A stored position cannot be recalled while 
driving.
Recalling stored positions is deactivated 
45 seconds after switching off the ignition.

Welcome function

the welcome function assists entry and leaving 
the vehicle.
After switching off the ignition and opening 
the driver’s door, the seat moves back 
automatically and then stays in this position, 
ready for the next entry to the vehicle.
When switching on the ignition, the seat moves 
forward to the stored driving position.
When moving the seat, take care that no 
person or object hinders the automatic 
movement of the seat.

this function can be activated 
or deactivated via the vehicle 
configuration menu.

78

Ease of use and comfort

508_en_Chap03_ergonomie-et-confort_ed01-2016

Head restraint height and angle 
adjustment

F  to lower the head restraint, press the lug A 

and, going beyond the stiff point, guide the 
head restraint downwards, then release the 
button at the desired position.

F  to raise the head restraint, guide it 

upwards to the desired position.

F  to remove the head restraint, press the 

two lugs B and pull the head restraint 
upwards.

F  to put the head restraint back in place, 

engage the head restraint stems in the 
openings keeping them in line with the seat 
back. Check that it has engaged by pulling 
it upwards.

the head restraint is fitted with a 
locking mechanism which prevents it 
from lowering; this is a safety device in 
case of impact.
The adjustment is correct when the 
upper edge of the head restraint is 
level with the top of the head.
Never drive with the head restraints 
removed; they must be in place and 
adjusted correctly.

Heated seats control

F  use the adjustment wheel to switch on and 

select the level of heating required:

With the engine running, the front seats can be 
heated separately.

0: Off.
1: Low.
2: Medium.
3: High.


Content   ..  3  4  5  6   ..