Peugeot 307 (2007.5). Manual - part 4


  Index      Peugeot     Peugeot 307 2007.5 - service manual in english


Search            


Content   ..  2  3  4  5   ..


Peugeot 307 (2007.5). Manual - part 4


COMFORT

48

 The  air  conditioning  only  operates 
when the engine is running.  

 When  the  engine  is  cold,  to  prevent 
too great a distribution of cold air, the 

air  l ow  will  reach  its  optimum  level 

gradually. 

 The  driver  and  his  front 
passenger can each adjust 
the temperature to their re-
quirements. 
 The  value  indicated  on  the 

display  corresponds  to  a  level  of 
comfort  and  not  to  a  temperature  in 
degrees Celsius or Fahrenheit.  
 Turn  control   2   or   3   to  the  left  or  to 
the  right  respectively  to  decrease  or 
increase this value. 
 A setting around the  

value 21  provides 

optimum  comfort.  However,  depend-
ing on your requirements, a setting be-
tween 18 and 24 is normal. 

 For  optimum  comfort,  you  are  ad-
vised  to  avoid  a  left/right  setting  dif-
ference of more than 3. 
 For maximum cooling or heating of the 
passenger compartment, it is possible 
to go below the value 15 by turning un-
til  "LO"  is displayed or above the value 
27 by turning until  "HI"  is displayed. 

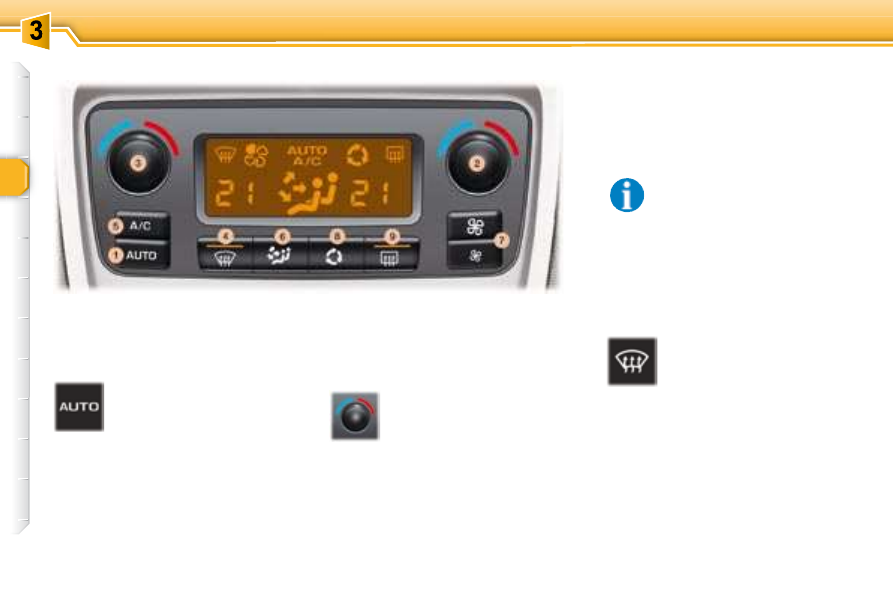
4. Automatic visibility programme

 The automatic comfort pro-
gramme  may  not  be  suf-

i cient  to  quickly  demist  or 

de-ice  the  windscreen  and 
side 

windows 

(humidity, 

several passengers, ice, etc.).  
 In this case, select the automatic vis-
ibility programme. 
 The  system  automatically  controls 

the air conditioning, the air l ow and 

the  air  intake  and  provides  optimum 
distribution  of  the  ventilation  to  the 
windscreen and side windows. 
 To switch it off, press button   again 
or  press  the   "AUTO"   button,  the 
button"s  indicator  light  switches  off 
and  "AUTO"  is displayed.    

Automatic operation

1. Automatic comfort programme

 Press  the   "AUTO"   button. 
The  "AUTO"  symbol is dis-
played. 
 We  recommend  the  use  of 
this  mode:  it  permits  auto-

matic  and  optimised  adjustment  of 
all  of  the  functions,  passenger  com-

partment  temperature,  air  l ow,  air 

distribution  and  air  recirculation,  in 
accordance  with  the  comfort  value 
that you have chosen. This system is 
designed to operate effectively in all 
seasons, with the windows closed. 


2. Driver's side adjustment
3. Passenger side adjustment

 On  entering  the  vehicle,  if 
the  interior  temperature  is 
much colder or warmer than 
the comfort value, there is no 

need  to  change  the  value  displayed 
in  order  to  obtain  the  comfort  re-
quired.  The  system  corrects  the  dif-
ference in temperature automatically 
and as quickly as possible.   

  DUAL ZONE AUTOMATIC AIR CONDITIONING 

49

COMFORT

Manual operation

 If you wish, you can make a different 
choice  from  that  offered  by  the  sys-
tem by changing a setting. The other 
functions will still be controlled auto-
matically. Pressing the  "AUTO"  but-
ton returns the system to completely 
automatic operation.  

 Press this button to stop air 
cooling. 
 Avoid prolonged use of this 
mode (risk of condensation, 
odour, humidity). 

 Press  this  button  again  as  soon  as 
possible  to  return  to  automatic  op-
eration  of  the  air  conditioning.  The 
symbol  "A/C"  is displayed.   

6. Air distribution adjustment

 Pressing  this  button  sev-
eral  times  in  succession 

enables  the  air  l ow  to  be 

directed in turn towards: 

   -  

the windscreen and side windows 
(de-icing or demisting), 

  -  

the windscreen, the side windows 
and the footwells, 

  -  

the footwells, 

  -  

the  centre  vents,  the  side  vents 
and the footwells, 

  -  

the centre and side vents.    

7. Air l ow adjustment

 Press the  

"small fan"  or  "large fan"

 button respectively to decrease or in-

crease the l ow of air. 

 The air l ow symbol, the fan, i lls pro-

gressively in relation to the value re-
quired.   

8. Air intake/Air recirculation

9. Demisting the rear screen and

the mirrors

 Press  this  button  for  recir-
culation  of  the  interior  air. 
The air recirculation symbol 
  is displayed. 
 Air recirculation enables the 

passenger compartment to be isolat-
ed from exterior odours and smoke. 
 Avoid prolonged recirculation of inte-
rior air (risk of condensation and de-
terioration of the air quality).  
 As  soon  as  possible,  press  this  but-
ton again to permit the intake of out-
side air and prevent condensation.   

5. Air conditioning On/Off

 Press  this  button  to demist 
the rear screen and the ex-
terior mirrors. The button  
 indicator light comes on.  
 Demisting  switches  off  au-

tomatically  to  prevent  an  excessive 
consumption of current. It is possible 
to stop operation of the demisting be-
fore it is switched off automatically by 
pressing the button again. 


10. Switching the system off
 Press  the   

"small fan"  button of the 

air l ow  7  until the fan symbol disap-

pears. 
 This  action  switches  off  all  of  the 
functions of the air conditioning sys-
tem, with the exception of the demist-
ing of the rear screen  9 . 
 Temperature  related  comfort  is  no 

longer guaranteed but a slight l ow of 

air,  due  to  the  movement  of  the  ve-
hicle, can still be felt. 
   Pressing  the   

"large  fan"   button  of 

the air l ow  7  again or the  AUTO  but-

ton  reactivates  the  system  with  the 
values set before it was switched off. 

COMFORT

50

 In  certain  cases  of  particu-
larly arduous use (towing the 
maximum  load  on  a  steep 
gradient  in  high  tempera-

tures), switching off the air condition-
ing  permits  the  recovery  of  engine 
power  and  therefore  an  increase  in 
the towing capacity. 
 In order for the air conditioning to be 
fully  effective,  the  windows  must  be 
closed. 
 The air conditioning system does not 
contain  chlorine  and  does  not  pres-
ent any danger to the ozone layer. 
 Operate  the  air  conditioning  for  5  to 
10 minutes, once or twice a month, to 
keep it in good working order.  
 The  water  produced  by  the  air  con-
ditioning condensation is discharged 
through an opening provided for this 
purpose. Therefore, a puddle of wa-
ter may form underneath the vehicle 
when stationary. 
 In  order  to  ensure  that  the  air  condi-
tioning system operates correctly, reg-
ular checks are also recommended. 
 If the system does not produce cold air, 
do not use it and contact a PEUGEOT 
dealer.    

51

COMFORT

Electric exterior mirrors

Adjustment
      Slide  switch   A   to  the  right  or  to 

the  left to select  the  correspond-
ing mirror. 

     Move knob  B  in all four directions 

to adjust. 

     Return switch  A  to the centre po-

sition.  


Folding
   -  

from inside: 

     with the ignition on, pull switch 

 A  rearwards.  

  -  

from outside: 

     lock  the  vehicle  using  the  re-

mote control or the key.   

    Note:  if the mirrors are folded using 
switch   A ,  they  will  not  unfold  when 
the  vehicle  is  unlocked  using  the 
remote  control  or  the  key.  Switch   A  
must be pulled again.   

Unfolding
   -  

from inside: 

     with the ignition on, pull switch 

 A  rearwards.  

  -  

from outside: 

     unlock the vehicle using the re-

mote control or the key.   

 The  folding  and  unfolding  of 
the  exterior  mirrors  can  be 
deactivated  by  a  PEUGEOT 
dealer.    

  MIRRORS  

 Move  the  lever  in  all  four  directions 
to adjust. 
 When  the  vehicle  is  parked,  the  ex-
terior  mirrors  can  be  folded  back 
manually. 

 The  exterior  mirror  on  the 
driver"s  side  is  convex  (out-

er edge dei ned by a dotted 

line) in order to eliminate the 

"blind spot". 
 As  a  result,  objects  observed  in  the 
driver"s and passenger"s mirrors are 
in reality closer than they appear. 
 This  must  be  taken  into  account  to 
correctly  judge  the  distance  of  vehi-
cles approaching from behind.   

Manual exterior mirrors

COMFORT

52

 This  automatically  and  gradually 
changes  between  the  day  and  night 
positions.  To  prevent  dazzling,  the 
glass  of  the  mirror  darkens  auto-
matically  depending  on  the  intensity 
of  the  light  from  behind.  It  clears  as 
the light (headlamps of following ve-
hicles, sunlight) decreases, ensuring 
maximum visibility.  

Manual interior mirror

 The interior mirror has two positions: 
   -  

day (normal), 

  -  

night (anti-dazzle).  

 To  change  from  one  to  the  other, 
push  or  pull  the  lever  on  the  lower 
edge of the mirror.   

   Operation 
 Switch  on  the  ignition  and  press 
switch  1 : 
   -  

Indicator 

light 

 2  

lit 

(switch 

pressed): automatic operation. 

  -  

Indicator  light   2   off:  automatic 
system off. The mirror remains at 
its most clear.    

Special feature
 To  ensure  maximum  visibility  during 
manoeuvres,  the  mirror  clears  auto-
matically  when  reverse  gear  is  en-
gaged.    

 When  the  vehicle  is  stationary,  unlock 
the steering wheel by pulling handle  A . 
 Adjust  the  height  and  depth  of  the 
steering wheel. 
 Lock  it  by  pushing  handle   A   down 
fully.  

Automatic day/night interior

mirror

TEERING WHEEL HEIGHT 
AND DEPTH ADJUSTMENT  

53

COMFORT

  FRONT SEATS   

1. Forwards-backwards

adjustment

 Lift the control and slide the seat for-
wards or backwards.   

2. Driver's or passenger's seat

height adjustment

 Pull  the  handle  upwards  or  push  it 
downwards as many times as neces-
sary to obtain the required position.   

3. Seat back angle adjustment
 Push the handle towards the rear.   

4. Access to rear seats (3 door)
 Pull the handle to fold the seat back 
and move the seat forwards. 
 On repositioning, the seat returns to 
its initial position. 
  Note:   you  can  also  use  control   3 . 
Then adjust the angle. 

 No person or object must pre-
vent  the  seat  slide  from  re-
turning to its initial position; a 
return  to  this  position  is  nec-

essary for the seat to lock in place.   

COMFORT

54

5. Head restraint height and angle

adjustment

 To raise the head restraint, pull it up-
wards. 
 To  remove  the  head  restraint,  press 
the lug  A  and pull the head restraint 
upwards. 
 To put the head restraint back in po-
sition,  locate  the  stems  of  the  head 
restraint  in  the  holes,  taking  care  to 
keep them in line with the seat back. 
 To lower the head restraint, press the 
lug  A  and the head restraint. 
 The head restraint frame has a catch 
which  prevents  it  from  lowering;  this 
safety  device  provides  protection  in 
the event of an impact. 

 To tilt the head restraint, tilt the lower 
part forwards or backwards.   

  REAR HEAD RESTRAINTS 

 Never  drive  with  the  head 
restraints 

removed; 

they 

should  be  in  place  and  cor-
rectly adjusted.  

 These have a high position for when 
they are in use and a low position for 
when they are stored. 
 The head restraints are removable.  
 To remove them, pull upwards as far 
as the stop then press the lug.  

6. Armrests
 These  can  be  folded  down  and  are 
removable. 
 To remove them, press the button lo-
cated  between  the  armrest  and  the 
side of the seat and pull it.   

7. Storage drawers
 There is a storage drawer under each 
front seat. 
   -  

To open it, lift it and pull. 

  -  

To take it out, open it to its full ex-
tent, press the ends of the slides 
and  lift  it,  then  remove  it  com-
pletely. 

  -  

To put it back in place, at the end 
of  its  travel,  press  on  the  top  of 
the drawer to secure it.  

 Under  the  front  passenger  seat,  the 

layout of the l oor allows for storage 

of a i rst aid kit and a warning triangle 

(small version). 


The adjustment is correct when

the  upper  edge  of  the  head  re-

straint is level with the top of the

head.  

 Do  not  place  heavy  objects 
in the drawers.    

55

COMFORT

 To  fold  down  the  rear  left  seat  (2/3 
part) or the  right seat  (1/3  part),   

al-

ways start with the seat, never with

the seat back (risk of damage) : 
   -  

move  the  front  seat(s)  forward  if 
necessary, 

  -  

lift the front of the seat cushion  1 , 

  -  

tilt the seat cushion   against the 
front seat(s), 

  -  

check  that  the  seat  belt  is  cor-
rectly  positioned  on  the  side  of 
the seat back, 

  -  

pull  control   2   forwards  to  unlock 
the seat back  3 , 

  -  

place  the  head  restraints  in  the 
low position,  

  -  

fold down the seat back  3 .  

  Note:  the seat cushion  1  can be re-
moved to increase the volume of the 
load space. 
 Squeeze the seat cushion i xings to 

detach them from their fastenings. 

 When repositioning: 
   -  

fold  up  the  seat  back  and  lock 
it  (the  red  marker  of  control   2  
should no longer be visible), 

  -  

fold up the seat.  


Take care not to trap the seat belts

and to position the stalks correctly.   

REAR SEATS (SALOON)

COMFORT

56

Removing the seat cushion

(position against the front seats):

 Take hold of the seat cushion  1  at the 

bottom  to  remove  it  from  its  i xings 

and pull upwards.   

  -  

pull control  2  forwards to release 
the seat back  3 , 

  -  

place  the  head  restraints  in  the 
low position, 

  -  

tilt the seat back  3 .  

  Note:  the seat cushion  1  can be re-
moved to increase the volume of the 
load space.   

Folding the seats:

 To fold the rear left seat (2/3 section) 
or the rear right seat (1/3 section),  

al-

ways  start  with  the  seat  cushion,

never  with  the  seat  back  (risk  of

damage) : 
   -  

move  the  front  seat(s)  forward  if 
necessary, 

  -  

pull the handle  A  located between 
the  seat  cushion   1   and  the  seat 
back   3   forwards,  then  pull  it  up-
wards to lift the seat cushion and 
tilt it against the front seat(s), 

  -  

check  that  the  seat  belt  is  pos-
itioned correctly on the side of the 
seat back, 

REAR SEATS (ESTATE)

Refitting the seat cushion

(position against the front

seats):

   -   i t  the  seat  cushion   1   in  its  i x-

ings, 

  -  

to lock it, press on the top of the 
seat cushion  1 .    

Putting the seats back in

position:

   -  

fold the seat back and lock it (the 
red  indicator  on  control   2   should 
no longer be visible), 

  -  

fold the seat cushion.  


Take care not to trap the seat belts

and to position the stalks correctly.     

57

COMFORT

"Forwards-facing"
 When  a  "forwards-facing"  child  seat 
is  installed  on  the   

front  passenger

seat , adjust the vehicle"s seat to the 

intermediate 

longitudinal 

position 

with the seat back upright and leave 
the passenger air bag armed.    

   INSTALLING A CHILD SEAT 
USING A THREE POINT SEAT 
BELT  

GENERAL POINTS RELATING 
TO CHILD SEATS  

  Although  one  of  PEUGEOT"s  main 
criteria when designing your vehicle, 
the  safety  of  your  children  also  de-
pends on you. 
 For  maximum  safety,  please  follow 
these precautions: 
   -  

in 

accordance 

with 

Directive 

2003/20,   

all  children  under  the

age of 12 or less than one metre

i fty * tall must travel in approved

child seats suited to their weight , 

on  seats  i tted  with  a  seat  belt  or 

ISOFIX mountings   * , 

  -  


statistically, the safest seats in

your  vehicle  for  the  transpor-

tation  of  children  are  the  rear

seats,  

  -  


a child weighing less than 9 kg

must  travel  in  the  "rearwards-

facing"  position  both  in  the

front and in the rear.   


PEUGEOT  recommends   that  chil-

dren  should  travel  in  the   

rear seats  

of your vehicle: 
   -  


"rearwards-facing"   up  to  the 

age of 2, 

  -  


"forwards-facing"   over  the  age 

of 2.   

   *    The  rules  for  transporting  chil-

dren are specii c to each country. 

Consult  the  current  legislation  in 
your country.

Intermediate longitudinal

position


"Rearwards-facing"
 When a "rearwards-facing" child seat 
is  installed  on  the   

front  passenger

seat , it is essential that the passen-

ger  air  bag  is  disarmed.  Otherwise, 
 

the  child  would  risk  being  seri-

ously injured or killed if the air bag

were to inl ate.    

COMFORT

58

 CHILD SEATS RECOMMENDED BY PEUGEOT 

 PEUGEOT offers a complete range of recommended child seats which are se-
cured using a  

three point seat belt : 

Passenger air bag OFF


Group 0: from birth to 10 kg   


Group 0+: from birth to 13 kg   

   L1   

"ROMER 

Baby-Safe Plus"   

  Installed in the rear-facing position.  


Groups 1, 2 and 3: from 9 to 36 kg   

   L2   

"KIDDY Life"  

  For the safety of young children (from 9 to 18 kg), 

PEUGEOT recommends use of the restraining cushion.  


Groups 2 and 3: from 15 to 36 kg   

   L3   

"RECARO Start"    

   L4   

"KLIPPAN 

Optima"  

  From the age of 

6 years (approxi-

mately 22 kg), the 

booster is used 

on its own.  

59

COMFORT

 LOCATION OF CHILD SEATS SECURED USING THE SEAT BELT 

 In accordance with the European regulation (Directive 2000/3), this table indicates the options for the installation of child seats 
secured using the seat belt and universally approved (a) depending on the weight of the child and the seat in the vehicle: 

 (a) Universal child seat: child seat which can be installed in all vehicles using the seat belt. 
 (b) Group 0: from birth to 10 kg. 
 (c)  Consult the current legislation in your country before installing your child on this seat. 
  U :  seat suitable for the installation of a child seat secured using the seat belt and universally approved, "rear facing" and/or 

"forwards facing". 


U (R) : identical to  U , but the vehicle seat must be adjusted to the highest position. 

Seat

Weight of the child /indicative age 

Below 13 kg

(groups 0 (b) and 0+)  

Up to 1 year approx  

9 to 18 kg  

(group 1)  

1 to 3 years approx 

15 to 25 kg  

(group 2)  

3 to 6 years approx 

22 to 36 kg  

(group 3)  

6 to 10 years approx

Front passengerseat (c) 
   -  

i xed 

  -   height adjustable (R)  

  U 


U (R)  

  U 


U (R)  

  U 


U (R)  

  U 


U (R)  

 Rear side seats 

  U  

  U  

  U  

  U  

 Rear centre seat 

  U  

  U  

  U  

  U  

COMFORT

60

  ADVICE ON CHILD 
SEATS 

 Children under the age of 10 must not 
travel in the "forward facing" position 
on  the  front  passenger  seat,  unless 
the  rear  seats  are  already  occupied 
by other children, cannot be used or 
are absent. 
 Disarm  the  passenger  air  bag  when 
a  "rear  facing"  child  seat  is  installed 
on the front seat. Otherwise, the child 
would  risk  being  seriously  injured  or 

killed if the air bag were to inl ate.   

Installing a booster seat
 The  chest  part  of  the  seat  belt  must 
be positioned on the child"s shoulder 
without touching the neck. 
 Ensure  that  the  lap  part  of  the  seat 
belt passes correctly over the child"s 
thighs. 
 PEUGEOT  recommends  the  use  of 

a booster seat which has a back, i t-

ted with a seat belt guide at shoulder 
level. 

 As a safety precaution, do not leave: 
   -  

one  or  more  children  alone  and 
unsupervised in a vehicle, 

  -  

a  child  or  an  animal  in  a  vehicle 
which is exposed to the sun, with 
the windows closed, 

  -  

the  keys  within  reach  of  children 
inside the vehicle.  

 To prevent accidental opening of the 
doors, use the "Child lock". 
 Take  care  not  to  open  the  rear  win-
dows by more than one third. 
 To  protect  young  children  from  the 

rays of the sun, i t side blinds on the 

rear windows.    

 The  incorrect  installation  of  a  child 
seat  in  a  vehicle  compromises  the 
child"s  protection  in  the  event  of  an 
accident. 
 Remember  to  fasten  the  seat  belts 
or the child seat harnesses  

keeping

the  slack   in  relation  to  the  child"s 

body  to  a  minimum,  even  for  short 
journeys. 
 For  optimum  installation  of  the  "for-
ward  facing"  child  seat,  ensure  that 
the back of the child seat is in contact 
with  the  back  of  the  vehicle"s  seat 
and that the head restraint does not 
cause any discomfort. 
 If the head restraint has to be removed, 
ensure that it is stored or attached se-
curely to prevent it from being thrown 
around  the  vehicle  in  the  event  of 
sharp braking. 

61

COMFORT

 These are two rings located between 
the seat back and the seat cushion. 
  

The  ISOFIX  child  seats   are  i tted 

with  two  locks  which  are  secured 
easily on these rings.  

  These  seats  are  i tted  with  ISOFIX 

mountings. 

 This  ISOFIX  mounting  system  guar-

antees reliable, safe and fast i tting of 

the child seat in your vehicle. 


Content   ..  2  3  4  5   ..