Peugeot 301 (2017 year). Manual - part 3


  Index      Peugeot     Peugeot 301 - service manual 2017 year in english


Search            


Content   ..  1  2  3  4   ..


Peugeot 301 (2017 year). Manual - part 3


31

1

Instruments

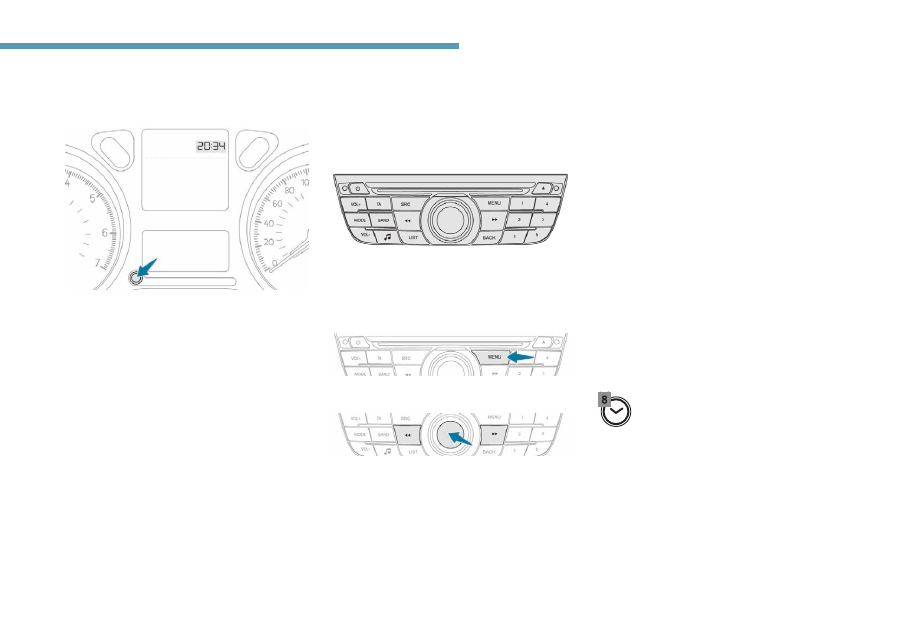
Date and time adjustment

Instrument panel

Audio system / Bluetooth

With PEUGEOT Connect 

Radio

Operate the left-hand button on the instrument 
panel in the following order:
F

  Press the button for more than two 

seconds: the minutes flash.

F

  Press the button to increase the minutes.

F

  Press the button for more than two 

seconds: the hours flash.

F

  Press the button to increase the hours.

F

  press the button for more than two 

seconds: 24H or 12H is displayed,

F

  Press the button to select 24H or 12H.

F

  Press the button for more than two 

seconds to complete the adjustments.

The usual screen displays again when the 
button hasn't been pressed for approximately 
30 seconds.

F

  Press the "MENU" button.

Operate the audio system buttons in the 
following order:

F

  Using the arrows, select the 

"Personalisation- Configuration" menu and 
confirm by pressing the control knob.

F

  Using the arrows, select the "Screen 

configuration" menu then confirm.

F

  Using the arrows, select the "Set date and 

time" menu then confirm.

F

  Select the setting then confirm.

F

  Modify the setting then confirm again to 

save the change.

F

  Adjust the settings one by one, confirming 

each time.

F

  Select the "OK" tab in the screen and 

confirm to exit the "Set date and time" 
menu.

F

  Select the 

Settings menu.

F

  Select "

Date" or "Time".

F

  Choose the display formats.

F

  Change the date and/or time using the 

numeric keypad. 

F

  Confirm with "

OK".

F

  Select "

Date and time".

32

Instruments

With PEUGEOT Connect 

Nav

Adjustment of the time and date is only 
available if synchronisation when the GPS is 
deactivated.

F

  Select the 

Settings menu.

F

  Press the "

OPTIONS" button to go to the 

secondary page.

F

  Select "

Setting the time-date".

F

  Select the "

Date" or "Time" tab.

F

  Adjust the date and/or time using the 

numeric keypad.

F

  Confirm with "

OK".

Additional adjustments

You can choose:

To change the display format of the date and 
time (12h/24h).
To change the time zone.
Activate or deactivate the synchronisation with 
the GPS (UTC).

The system does not automatically 
manage the change between winter and 
summer time (depending on country).
The change between winter and summer 
time is done by changing the time zone.

33

1

Instruments

Trip computer

System that gives you information on the 
current journey (range, fuel consumption, ...).

Instrument panel display screen

Monochrome screen C

Display of information

F

  Press the button located at the end of the 

wiper control stalk, to display the various 

trip computer data. The on-board computer 
information is the following:
- Range.
-  Current fuel consumption.
-  Distance travelled.
-  Average fuel consumption.
-  Average speed.

F

  The next press then returns you to the 

normal display.

Zero reset

F

  Hold the control down for more than two 

seconds to reset to zero the distance 
travelled, the average fuel consumption 
and the average speed.

34

Instruments

Touch screen

The information is accessible in the "

Driving

menu.

Display of information in the 

touch screen

Permanent display:
F

  Select the "

Applications" menu, then "Trip 

computer".

The current fuel consumption tab with:
- Range.
-  The current instantaneous fuel 

consumption.

-  The Stop & Start time counter,
The trip "

1" tab with:

-  Distance travelled.
-  Average fuel consumption.
-  Average speed for the first trip.

The trip "

2" tab with:

-  Distance travelled.
-  Average fuel consumption.
-  Average speed for the second trip.

Reset trip

The information of the trip computer isdisplayed 
in tabs.
F

  Press one of the buttons to display the 

desired tab.

Temporary display in a new window:
F

  Press the end of the wiper control lever for 

access to the information and display the 
different tabs.

F

  When the desired trip is displayed, press 

the reset button or on the end of the wiper 
control lever.

Trips "

1" and "2" are independent and are used 

identically.
Trip "

1" allows daily calculations to be carried 

out, for example, and trip "

2" allows monthly 

calculations.

35

1

Instruments

On-board computer, some definitions

Range

(km)
The number of kilometres which 
can be covered with the fuel 
remaining in the tank. Related 
to the average fuel consumption 
over the last few kilometres 
travelled.

This value may vary following a change in 
the style of driving or the relief, resulting 
in a significant change in the current fuel 
consumption.

When the range falls below 20 miles (30 km), 
dashes are displayed. After filling with at least 
5 litres of fuel, the range is recalculated and is 
displayed if it exceeds 60 miles (100 km).

If dashes are displayed continuously while 
driving in place of the digits, contact a 

PEUGEOT dealer or a qualified workshop.

Current fuel consumption

(l/100 km or km/l)
Calculated over the last few 
seconds.

This function is only displayed from  
20 mph (30 km/h).

Average fuel consumption

(l/100 km or km/l)
Calculated since the last time the 
trip was reset.

Average speed

(km/h)
Calculated since the last time the 
trip was reset.

Distance travelled

(km)
Calculated since the last time the 
trip was reset.

Time counter Stop & Start

If your vehicle is fitted with Stop & 
Start, a time counter calculates the 
time spent in STOP mode during a 
journey.
It resets to zero every time the 
ignition is switched on.

(minutes / seconds or hours / minutes)

36

Access

Remote control

System which permits central unlocking or locking of the vehicle using the door lock or from a distance. It is ensures the localisation and starting of the 
vehicle, as well as theft protection.

Unfolding / Folding the key

Opening the vehicle

Unlocking using the remote 

control

F

  Press the open padlock to unlock 

the vehicle.

Unlocking is confirmed by rapid flashing 
of the direction indicators for around two 
seconds.

Unlocking with the key

F

  Turn the key in the driver's door lock 

towards the front of the vehicle to unlock.

Unlocking and partial opening of 

the boot

F

  Press this button for more  

than one second to unlock  
the boot. The boot opens  
slightly.

This action unlocks the vehicle first.

Closing the vehicle

Locking with the remote control

F

  Press the closed padlock button 

to lock the vehicle.

If one of the doors or the boot is still 
open, the central locking does not work; 
the vehicle locks, then immediately 
unlocks, identifiable by the locks making 
a rebound sound.
When the vehicle is locked, if it is 
unlocked inadvertently, it will lock again 
automatically after thirty seconds unless 
a door or the boot is open.

Locking is confirmed by the fixed illumination of 
the direction indicators for approximately two 
seconds.

F

  Press this button to unfold or fold the key.

37

2

Access

Locking with the key

F

  Turn the key in the driver's door lock, 

towards the rear of the vehicle to lock it.

Check that the doors and boot are fully 
closed.

Locating your vehicle

This function allows you to identify your vehicle 
from a distance, particularly in poor light. Your 
vehicle must be locked.

F

  Press the closed padlock button 

on the remote control.

This will switch on the courtesy lights and the 
direction indicators will flash for a few seconds.

Fault with the remote control

In the event of a malfunction with the remote 
control, you can no longer unlock, lock or 
locate your vehicle.
F

  First of all, use the key in the door lock to 

unlock or lock your vehicle.

F

  Then reinitialise the remote control.

Reinitialisation

F

  Switch off the ignition and remove the key 

from the switch.

F

  Press the closed padlock button for a few 

seconds.

F

  Return the key to position 

2 (ignition on).

F

  Switch off the ignition and remove the key 

from the switch.

The remote control is now fully operational 
again.

Changing the battery

Reference: CR2032 / 3 Volts.

If the problem persists, contact a 

PEUGEOT dealer as soon as possible.

 or 

If the battery is dead, you are 
informed by illumination of this 
warning light, an audible signal and 
a message in the screen.

F

  Unclip the cover using a small screwdriver 

at the cut-out.

F

  Lift off the cover.

F

  Extract the dead battery from its location.

F

  Place the new battery into its location 

observing the original direction.

F

  Clip the cover onto the casing.

38

Access

Lost keys

Go to a PEUGEOT dealer with the vehicle's 

registration document, your personal 

identification documents and if possible the 

key code label.

The PEUGEOT dealer will be able to look 

up the key code and the transponder code 

required to order a new key.

Remote control

The high frequency remote control is a 

sensitive system; do not operate it while it is 

in your pocket as there is a possibility that 

it may unlock the vehicle, without you being 

aware of it.

Do not repeatedly press the buttons of 

your remote control out of range and out 

of sight of your vehicle. You risk making 

it inoperative. It will then be necessary to 

reinitialise it again.

No remote control can operate when the 

key is in the ignition switch, even when 

the ignition is switched off, except for 

reinitialisation.

Stopped vehicle

Driving with the doors locked may render 
access by the emergency services to the 
interior difficult in an emergency.
As a safety precaution, never leave children 
alone in the vehicle, except for a very short 
period.
In all cases, it is essential to remove the key 
from the ignition switch when leaving the 
vehicle.

Anti-theft protection

Do not make any modifications to the 
electronic engine immobiliser system; this 
could cause malfunctions.

Second-hand vehicle

Have the pairing of all of the keys in your 
possession checked by a PEUGEOT dealer, 
to ensure that only your keys can be used to 
open and start the vehicle.

Do not throw the remote control 
batteries away, they contain metals 
which are harmful to the environment.
Take them to an approved collection 
point.

39

2

Access

Alarm

Perimeter protection

The system checks for opening of the vehicle.
The alarm is triggered if anyone tries to open a 
door, the boot, the bonnet...

Self-protection function

The system checks for the putting out of 
service of its components.
The alarm is triggered if the battery, the 
central control or the siren wiring are put 
out of service or damaged.

For all work on the alarm system, 
contact a PEUGEOT dealer or a qualified 
workshop.

Locking the vehicle with 

alarm

Activation

F

  Turn the vehicle off and exit.

Deactivation

F

  Press the unlocking button on 

the remote control.

F

  Press the locking button on the 

remote control.

The alarm is activated: an indicator 
light in the switch panel to the left of 
the steering wheel flashes once per 
second.

The alarm is deactivated: the 
indicator lamp goes off.

Theft and break-in protection and deterrent 
system. It provides perimeter protection as well 
as a self-protection function.

The perimeter protection is activated 5 seconds 
after pressing the locking button on the remote 
control.
If an opening (door, boot...) is not closed 
fully, the vehicle is not locked but the alarm is 
activated.

40

Access

Triggering of the alarm

This is indicated by sounding of the siren and 
flashing of the direction indicators for thirty 
seconds.

When the vehicle is unlocked using 
the remote control, rapid flashing of 
the indicator lamp informs you that 
the alarm was triggered during your 
absence. Upon ignition, this flashing 
stops immediately.

Locking the vehicle without 

activating the alarm

F

  Lock the vehicle using the key.

Failure of the remote 

control

Operating fault

When the ignition is switched on, continuous 
illumination of the indicator light indicates a 
fault with the system.
Have it checked by a PEUGEOT dealer or a 
qualified workshop.

To deactivate the monitoring functions:
F

  Unlock the vehicle using the key.

F

  Open the door; this sets off the alarm.

F

  Switch on the ignition; this stops the alarm.

41

2

Access

Doors

Opening

From outside

From inside

Closing

F

  After unlocking the vehicle using the 

remote control or the key, pull the door 
handle.

F

  Pull the interior opening control for the 

door. This action unlocks completely the 
vehicle.

When a door is not closed correctly:

when the engine is running

this warning light comes on, 
accompanied by a message in 
the multifunction screen for a few 
seconds,

when the vehicle is moving 

(speed higher than 6 mph  
(10 km/h)), this warning light 
comes on, accompanied by an 
audible signal and a message in 
the multifunction screen for a few 
seconds.

42

Access

Back-up release

For mechanically locking and unlocking the 
doors in the event of a fault with the central 
locking system or a battery failure.

Driver's door

Insert the key in the door lock to lock or unlock 
the door.

Passenger doors

F

  On the rear doors, check that the child lock 

is not on.

F

  Remove the black cap on the edge of the 

door, using the key.

F

  Insert the key in the socket without forcing 

it, then without turning it, move the latch 
sideways towards the inside of the door.

F

  Remove the key and refit the cap.

43

2

Access

Boot

Opening

Unlocking and releasing the boot 

using the remote control

F

  Hold the centre button on the 

remote control down for more 
than one second.

Releasing the boot from the 

inside

Opening the boot

F

  Raise the boot lid to its fully open position.

Closing

F

  Lower the boot lid using one of the interior 

grab handles.

F

  Then press the boot to close it.

If the tailgate is not fully closed:

when the engine is running

this warning light comes on, 
accompanied by a message in 
the multifunction screen for a few 
seconds,

when the vehicle is moving 

(speed higher than 6 mph  
(10 km/h)), this warning light 
comes on, accompanied by an 
audible signal and a message in 
the multifunction screen for a few 
seconds.

The boot lid is released and opens slightly.

F

  Press the boot opening button located on 

the left of the dashboard.

The boot lid is released and opens slightly.

44

Access

Back-up release

System for mechanically unlocking the boot in 
the event of a battery or central locking fault.

Unlocking

F

  Fold back the rear seats to gain access to 

the lock from inside the boot.

F

  Insert a small screwdriver into hole 

A of the 

lock to unlock the tailgate.

If your vehicle is fitted with a fixed bench 
seat, contact a PEUGEOT dealer or a 
qualified workshop.

Locking / unlocking from inside

F

  Press this button to lock or unlock the 

doors and boot.

If one of the doors is open, the centralised 
locking did not work.

Locking from outside

When the vehicle is locked from outside, 
the button does not work.
F

  To unlock the vehicle, pull the interior 

door lever.

Automatic central locking 

of the doors

The doors can lock automatically while driving 
(speed above 6 mph [10 km/h]).

Driving with the doors locked may render 
access by the emergency services to the 
interior difficult in an emergency.

F

  To activate or deactivate this 

function (activated by default), 
press this button until a buzzer 
sounds and/or a message 
appears in the screen.

45

2

Access

Electric Windows

Manual controls

Turn the window handle located on the door 
trim panel.

Electric controls

Model with front electric windows

Model with front and rear electric windows

Left-hand front.
Right-hand front.
Right-hand rear.
Left-hand rear.
Deactivating the rear electric window 

switches.

To open or close the window, press or pull 
the switch. The window stops as soon as you 
release the switch.

The electric window controls remain 
active for approximately 45 seconds after 
ignition is turned off, or until a front door is 
opened. During this period of 45 seconds, 
if you open a door while operating a 
window, the window stops. Any new 
electric window command will be ignored 
until ignition is switched back on.

With the warning light on, the switches are 
deactivated. With the warning light off, the 
switches are active.

Deactivating the rear window 

controls

For the safety of your children, press 
this button to deactivate all the rear 
window controls, irrespective of their 
positions.

Always remove the key from the ignition 
when leaving the vehicle, even for a short 
time.
If an electric windows meets an obstacle 
during operation, you must reverse the 
movement of the window. To do this, press 
the appropriate switch.
When operating the passenger electric 
window switches, the driver must ensure 
that no one is preventing the windows 
from closing correctly.
The driver must ensure that the 
passengers use the electric windows 
correctly.
Be particularly aware of children when 
operating the windows.

46

Ease of use and comfort

Front seats

As a safety measure, adjustments to the driver's seat must only be done when stationary.

Forwards-backwards

F

  Raise the control and slide the seat 

forwards or backwards.

Before moving the seat backwards, ensure that there is nothing that might prevent the full 
travel of the seat.
There is a risk of trapping or pinching passengers if present in the rear seats or jamming the 
seat if large objects are placed on the floor behind the seat.

Tilting the backrest

F

  Press the control backwards.

Height (driver only)

F

  Pull the control upwards to raise or push 

it downwards to lower, as many times as 
necessary, to obtain the position required.


Content   ..  1  2  3  4   ..