Peugeot 106 Dag (2001.5). Manual - part 5


  Index      Peugeot     Peugeot 106 Dag 2001.5 - service manual in english


Search            copyright infringement  


Content   ..  3  4  5  6   ..


Peugeot 106 Dag (2001.5). Manual - part 5


Switching off the side lights
switches off the rear fog lamp or
returns to the front fog lamps only
position if the vehicle is fitted with
them.

Horn

Press the end of the stalk.

Dipped/main beam.

Light off.

Rear fog lamp lit. 

Lights off.

Front fog lamps.

Front and rear fog lamps.

Lights off.

Side light on.

In both clear and rainy
weather, in daylight and
at night, the rear fog
lamp dazzles and is the-
refore prohibited.  

Do not forget to switch it off as
soon as it is no longer needed.
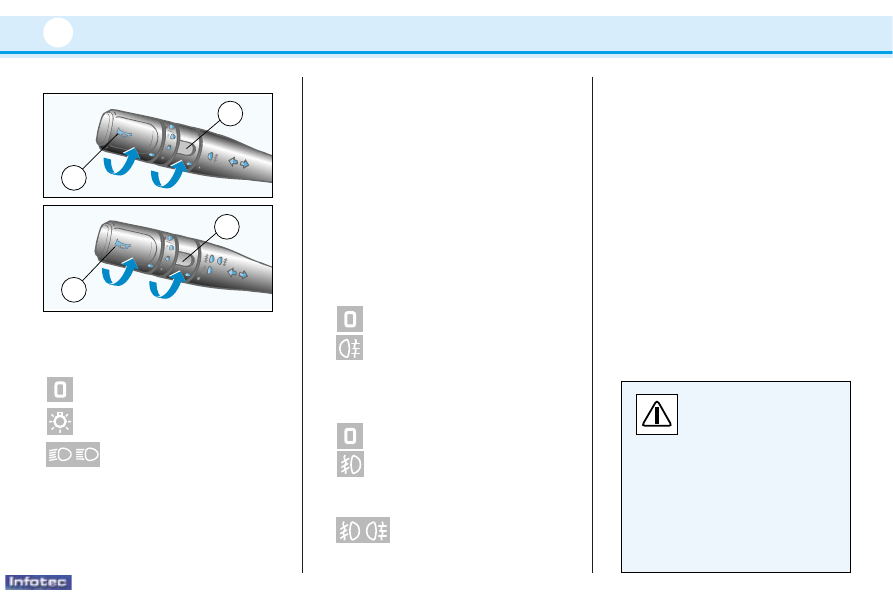
LIGHTS STALK

Front lights

Selection is by turning ring A.

Changing between dipped/main
beam: 
Pull the stalk fully towards you.
When your vehicle is equipped with
long range light* these operate
simultaneously with the main beam.

To flash the headlamps:
Flick the stalk towards you and
release it.
N.B.:  If the lights are left on when
you switch off the engine and open
a front door, a buzzer will sound.
Direction indicators (flashers) 
Left, 
downwards.
Right, upwards.

Fog lamps  

Operation is by turning ring B. The
position is shown by the warning
lamps on the fascia.

It operates with the dipped/main
beam headlamps.

These operate with the side lights,
dipped and main beam headlamps.

These operate with the side lights,
dipped and main beam headlamps.

Rear

Front and rear

Y OU R 1 0 6  I N  DETAI L

62

A

B

A

B

06-05-2002

FRONT WINDSCREEN

WIPER

Windscreen wiper stalk positions:

High speed wipe
Normal speed wipe
Intermittent wipe
Stop
A single wipe

To operate the windscreen wash:
Pull the wiper stalk towards you.

REAR WINDSCREEN WIPER

To operate the rear screen

wiper*:

- Turn the wiper stalk 1/8 turn

forwards for intermittent or conti-
nuous wipe*.

To operate the rear screen

wash:

- Turn the wiper stalk a further 1/8

turn forwards.

Headlamp wash*
To operate the headlamp wash*:
- Switch the headlamps to dipped

or main beam.

- Pull the wiper stalk towards you.
This operates simultaneously with
the windscreen wash/wipe.

* According to specification

Digital clock

The time is set with the ignition on,
engine off, by pressing button for
more than 3 seconds. The hours
will then flash.

To set the hours

- A short press, the hours change

slowly.

- Press and hold, the hours

change swiftly. To memorise the
hour displayed, release the
button for 5 seconds, the minutes
will then flash.

To set the minutes

- A short press, the minutes change

slowly.

- Press and hold, the minutes

change swiftly. To memorise the
minutes displayed, release the
button for 5 seconds.

Y OU R 1 0 6  I N  DETAI L

63

0

4

1

2

3

A

B

06-05-2002

Y OU R 1 0 6  I N  DETAI L

64

A

B

Front electric windows*

To open or shut the windows:

Ignition key in position “A” or “M”. Press the appro-
priate button:  
– A: for the driver’s window
– B: for the passenger’s window
Operation is cancelled when the ignition is switched off.

* According to specification

06-05-2002

Interior mirror

The interior mirror has two posi-
tions:
- Day (normal)
- Night (anti-dazzle)
To change from one to the other:
push or pull the lever on the bottom
edge.

Manually controlled mirrors

To adjust:
move the adjustment lever in all
four directions.

Electrically controlled
mirrors*

To adjust:
- Select the mirror using the two way

switch 1.

- Adjust the mirror using control 2.
- Return the two-way switch to

its central position.

* According to specification

When the vehicle is parked, the mirrors can be folded back manually.

Warning: The mirror on the driver’s side is aspherical to eliminate the «blind spot». Therefore, objects viewed in the mirror
are, in reality, closer than they appear. This must be taken into account in order to correctly judge the distance of vehicles
approaching from behind.

Y OU R 1 0 6  I N  DETAI L

65

1

2

06-05-2002

Y OU R 1 0 6  I N  DETAI L

66

4

1

2

5

3

6

AUDIO

RDS

TA

2

12

11

10

9

8

7

5

6

3

1

4

CENTRAL PANEL

1

Passenger airbag disarming switch.

2

Radio cassette player.

3

Central adjustable vents for heating, ventilation 

and air flow.

4

Heating and ventilation controls.

5

Interior air recirculation or right-hand heated seat 

control*.

6

Ashtray.

7

Demisting control for rear screen and mirrors*.

8

Hazard warning switch.

9

Lighter.

10 - Air conditioning* or left-hand heated seat*

control.

11 - Headlamps height adjustment.

12 - Lighting rheostat.

* According to specification

06-05-2002

Heated seats*

Press the switch to operate the seat
heating.
Pressing it again stops the opera-
tion.

* According to specification

Lighting rheostat

Adjustment can only be done with
the engine running and the side-
lights on, by pressing button 12 on
the instrument panel, to increase or
decrease the instrument panel ligh-
ting level.

Adjusting the
headlamps

Depending on the load in your
vehicle, it is recommended that the
headlamp beam is adjusted.

0 - 1 or 2 people in the front seats.
– - 3 people.
1 - 5 people.
2 - 5 people + maximum authori-

sed load.

3 - Driver + maximum authorised 

load.

This adjustment can only be carried
out when the lighting control is in
the dipped/main beam position.

Initial setting is position 0.

Hazard warning lights

The switch and the direction indica-
tors flash.
Controls the direction indicators
simultaneously and continuously.
Use only in cases of danger, for an
emergency stop or for driving in
unusual conditions.
Can operate with the ignition swit-
ched off.

Rear screen demister

Control for demisting the rear
screen (and exterior mirrors)*.
Goes out automatically after
approximately twelve minutes in
order to avoid excessive current
consumption.
Pushing it again restarts the opera-
tion for twelve minutes.

Y OU R 1 0 6  I N  DETAI L

67

06-05-2002

Front ashtray:

To empty:
- press tab 1, pulling on the housing
- detach the assembly upwards.

To refit:
- engage the lower part,
- press tab 1,
- push downwards and close the

assembly.

Rear ashtray*:

On 5-door:  
- To empty: pull the ashtray pres-

sing downwards.

- To refit: push the ashtray while

pressing downwards.

On 3-door:  
- to empty, pull the assembly

upwards.

Rear parcel shelf

To remove:
– Unhook the two cords 1.
– Lift the shelf and remove it.

Fixing a warning triangle

The two restraining straps* located
inside the boot enable a warning tri-
angle to be fixed.

* According to specification.

Y OU R 1 0 6  I N  DETAI L

69

1

1

1

06-05-2002

Handbrake

Application:

When you have completed your
parking manoeuvre, pull up the
handbrake to apply it.
To make application and release of
the handbrake easier, press the
brake pedal and pull the handbrake
with the engine running.

Release:

Press the button before releasing
the handbrake.

Anti-lock brake system

(ABS)*

In conjunction with approved tyres
in good condition, the anti-lock
brake system improves the stability
and handling of your 106, particu-
larly on poor or slippery surfaces.
The anti-lock brake system ope-
rates automatically if there is a risk
of wheel locking.
Lighting of the ABS warning lamp
may be due to the turning of a
wheel during an operation on the
vehicle (changing a wheel, for
example) with the ignition on (posi-
tion M).
Note: In certain conditions, normal
operation of the system can be
recognised by a light vibration of
the brake pedal.
Should an emergency stop be
necessary, press the brake pedal
firmly and continuously.

Power steering*

This is a driving aid which offers the
best compromise when parking and
when driving at high speeds.

Manual gearbox

The gear positions are indicated on
the gear lever knob.
1 -

Reverse gear can only be
engaged with the vehicle
stationary and the engine
idling. 

* According to specification.

Y OU R 1 0 6  I N  DETAI L

70

1

06-05-2002

AIR BAGS*

The airbag system has been desi-
gned to maximise the safety of the
occupants in the event of serious
collisions. It works in conjunction
with the seat belts.
The electronic detectors register and
analyse any abrupt deceleration of
the vehicle; if the triggering threshold
is reached the airbags inflate instant-
ly and come between the occupants
and the vehicle.
Immediately after the impact, the air-
bags deflate rapidly, so that they do
not hinder the visibility of the occu-
pants and their exit if necessary from
the vehicle.
The airbags are not deployed in the
case of collisions which are not
serious, for which the seat belt is suf-
ficient to ensure maximum protec-
tion. The seriousness of a collision
depends on the nature of the obs-
tacle and the speed of the vehicle at
the moment of the collision.
Airbags only operate when the
ignition is switched on.
Note:  
the gas escaping from the
cushion can be a minor irritant.

FRONT AIR BAGS*

These are folded in the centre of the
steering wheel for the driver and in
the fascia for the front passenger.
They are deployed simultaneously
(except in cases where the airbag is
disarmed), for frontal impacts where
there is a risk of injury to the head or
chest.

- Remove the ignition key, insert it

into the passenger airbag switch 1
and turn it to the “OFF” position.

- One of these two warning

lights* on the instrument
panel is lit throughout the
disarming process.

In the “OFF” position, the passenger
airbag will not be triggered in the
event of an impact.
As soon as you remove the
rearwards-facing child seat from the
front passenger seat, turn the airbag
switch to the “ON” position, to arm
the airbag and thus ensure the
safety of your passenger in an
impact.

* According to specification.

Disarming the passenger
airbag*

To ensure the safety of your child,
it is essential to disarm the pas-
senger airbag when you install a
rearwards-facing child seat on the
front passenger seat.

Y OU R 1 0 6  I N  DETAI L

71

1

AIR

BAG

06-05-2002

Passenger airbag precautions

Vehicle fitted with a passenger
airbag disarming switch:

- disarm the airbag

if you install a
rearwards-facing
child seat on the
front passenger
seat,

- arm the airbag

when you trans-
port an adult on
the front pas-
senger seat.

Vehicle not fitted with a passenger
airbag disarming switch:

- do not install a rear-

wards-facing child seat
on the front passenger
seat.

Never place your feet or any object
on the fascia.

Front* and side* airbag operational check

Operation of the airbags is indicated by the warning light on the instrument
panel.
If the passenger airbag is armed (passenger airbag switch in the "ON" posi-

tion), the warning light will come on for six seconds when the ignition is switched on.
If the warning light:
- does not come on when the ignition is switched on or,
- does not switch off after six seconds or,
- flashes for five minutes then remains on.
Consult your PEUGEOT dealer.

SIDE AIR BAGS*

The side airbags are incorporated in the backrest frames of the front seat, on the
side nearest the door.
They are triggered independently of each other depending on the side on which the
collision occurs, in the case of side impacts which could cause injury to the thorax,
the abdomen and the head.

* According to specification

Y OU R 1 0 6  I N  DETAI L

72

06-05-2002

Y OU R 1 0 6  I N  DETAI L

73

WARNING

For the front and side airbags to be fully effective, observe the following safety rules:

Wear a correctly adjusted seat belt.

Sit in a normal upright position.

Do not leave an accessory, or any other object between the occupants of the front seats and the airbags. It could hamper
the operation of the airbags or injure the occupants.

All work on the airbag system is strictly forbidden unless it is carried out by qualified personnel of the PEUGEOT network.

After an accident or if the vehicle has been stolen or broken into, have the airbag systems checked.

The airbag systems have been designed to be fully operational for 10 years after the vehicle has been registered. Have
them replaced by a PEUGEOT dealer after this period.

Front airbags*

Do not drive holding the steering wheel by its spokes or resting your hands on the centre part of the wheel.

Smoke as little as possible; deployment of the airbags can cause burns or the risk of injury from a cigarette or pipe.

Never remove or pierce the steering wheel or hit it violently.

Side airbags*

Never put covers on the front seats.

Do not fix or glue anything to the front seat backrests. This could cause injury to the chest or arms when the side airbag
inflates.

Do not sit with the upper part of the body any nearer to the door than necessary.

* According to specification

06-05-2002

PRACT I CAL I N FORM AT I ON

74

74

4

1

3

5

6

8

7

2

1124 cm

3

injection engine

. Air filter
. Brake fluid
. Battery
. Power steering
. Dipstick
. Engine oil filler
. Coolant
. Reservoir for front/rear screen and 

headlamp wash-wipe*

06-05-2002

PRACT I CAL I N FORM AT I ON

75

4

1

3

5

6

8

7

2

9

75

1360 cm

3

injection engine

. Air filter
. Brake fluid
. Battery
. Power steering
. Dipstick
. Engine oil filler
. Coolant
. Reservoir for front/rear screen and 

headlamp wash-wipe*

. Automatic gearbox

06-05-2002

PRACT I CAL I N FORM AT I ON

76

76

4

1

3

6

8

7

2

5

16-valves 1587 cm

3

engine

. Air filter
. Brake fluid
. Battery
. Power steering
. Dipstick
. Engine oil filler
. Coolant
. Reservoir for front/rear screen and 

headlamp wash-wipe*

06-05-2002


Content   ..  3  4  5  6   ..