Nissan Rogue Sport (2018 year). Manual - part 14


  Index      Nissan     Nissan Rogue Sport - service manual 2018 year in english


Search            copyright infringement  


Content   ..  12  13  14  15   ..


Nissan Rogue Sport (2018 year). Manual - part 14


4-40

Heater, air conditioner, audio and phone systems

SAA0480

Compact Disc (CD) player

Do not force a Compact Disc (CD)

into the CD insert slot. This could
damage the CD and/or CD player.

During cold weather or rainy days,

the player may malfunction due to
the humidity. If this occurs, remove

the CD and dehumidify or ventilate
the player completely.

The player may skip while driving on

rough roads.

The CD player sometimes cannot

function when the passenger com-
partment temperature is extremely
high. Decrease the temperature be-
fore use
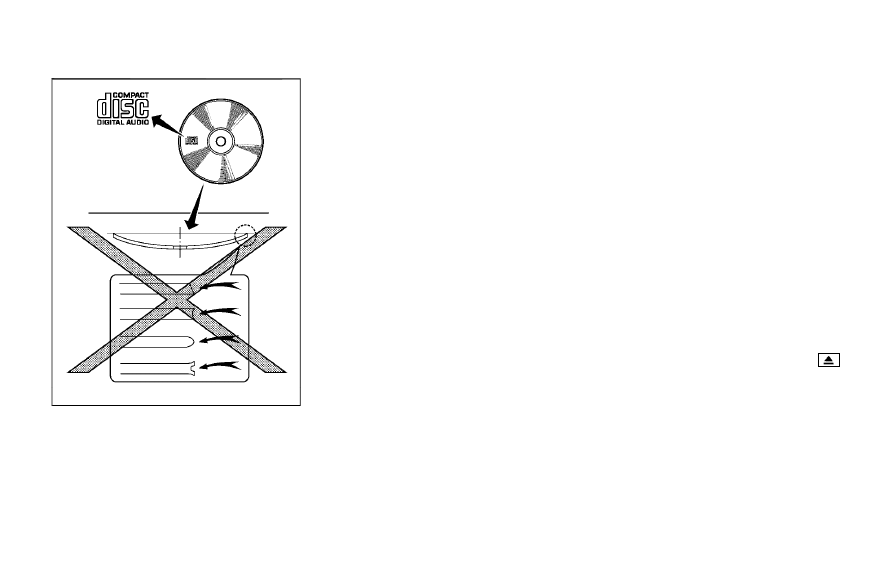
.

Only use high quality 4.7 in (12 cm)

round discs that have the “COMPACT
disc DIGITAL AUDIO” logo on the disc
or packaging.

Do not expose the CD to direct sun-

light.

CDs that are of poor quality, dirty,

scratched, covered with fingerprints,
or that have pin holes may not work
properly.

The following CDs may not work

properly:
— Copy Control Compact Discs

(CCCD)

— Recordable Compact Discs (CD-R)
— Rewritable Compact Discs (CD-

RW)

Do not use the following CDs as they

may cause the CD player to mal-
function.
— 3.1 in (8 cm) discs

— CDs that are not round
— CDs with a paper label
— CDs that are warped, scratched, or

have abnormal edges

This audio system can only play

prerecorded CDs. It has no capabil-
ities to record or burn CDs.

If the CD cannot be played, error

messages as the following examples
will be displayed.
Check Disc:
— Confirm that the CD is inserted

correctly (the label side is facing
up, etc.).

— Confirm that the CD is not bent or

warped and it is free of scratches.

Push Eject:
This is an error due to the tempera-
ture inside the player is too high.
Remove the CD by pushing the
(CD eject) button, and after a short
time reinsert the CD. The CD can be
played when the temperature of the
player returns to normal.
Unplayable Track:
The file is unplayable in this audio
system (only MP3 or WMA CD).

USB (Universal Serial Bus) Connec-
tion Port

WARNING

Do not connect, disconnect or oper-
ate the USB device while driving.
Doing so can be a distraction. If
distracted you could lose control of
your vehicle and cause an accident
or serious injury.

CAUTION

Do not force the USB device into

the USB connection port. Insert-
ing the USB device tilted or up-
side-down into the port may da-
mage the port. Make sure that
the USB device is connected cor-
rectly into the USB connection
port.

Do not grab the USB connection

port cover (if so equipped) when
pulling the USB device out of the
port. This could damage the port
and the cover.

Do not leave the USB cable in a

place where it can be pulled

unintentionally. Pulling the cable
may damage the port.

The vehicle is not equipped with a USB
device. USB devices should be purchased
separately as necessary.
This system cannot be used to format
USB devices. To format a USB device, use
a personal computer.
In some states/area, the USB device for
the front seats plays only sound without
images for regulatory reasons, even when
the vehicle is parked.
This system supports various USB mem-
ory devices, USB hard drives and iPod®
players. Some USB devices may not be
supported by this system.
. Partitioned USB devices may not be

played correctly.

. Some characters used in other lan-

guages (Chinese, Japanese, etc.) are
not displayed properly on display.
Using English language characters
with a USB device is recommended.

General notes for USB use:

Refer to your device manufacturer’s own-
er information regarding the proper use
and care of the device.

Notes for iPod® use:

“Made for iPod®”, “Made for iPhone®”, and
“Made for iPad®” mean that an electronic
accessory has been designed to connect
specifically to iPod®, iPhone®, or iPad®,
respectively, and has been certified by the
developer to meet Apple performance
standards.
Apple is not responsible for the operation
of this device or its compliance with
safety and regulatory standards.
Please note that the use of this accessory
with iPod®, iPhone®, or iPad® may affect
wireless performance.
iPad®, iPhone®, iPod®, iPod classic®, iPod
nano®, iPod shuffle®, and iPod touch® are
trademarks of Apple Inc., registered in the
U.S. and other countries. Lightning is a
trademark of Apple Inc.
. Improperly plugging in the iPod® may

cause a checkmark to be displayed on
and off (flickering). Always make sure
that the iPod® is connected properly.

. An iPod nano® (1st Generation) may

remain in fast forward or rewind mode
if it is connected during a seek opera-
tion. In this case, please manually
reset the iPod®.

. An iPod nano® (2nd Generation) will

continue to fast-forward or rewind if it
is disconnected during a seek opera-

Heater, air conditioner, audio and phone systems

4-41

4-42

Heater, air conditioner, audio and phone systems

tion.

. An incorrect song title may appear

when the Play Mode is changed while
using an iPod nano® (2nd Generation)

. Audiobooks may not play in the same

order as they appear on an iPod®.

. Large video files cause slow responses

in an iPod®. The display may momen-
tarily black out, but will soon recover.

. If an iPod® automatically selects large

video files while in the shuffle mode,
the display may momentarily black
out, but will soon recover.

Compressed Audio Files (MP3/
WMA)

Explanation of terms:
. MP3 — MP3 is short for Moving Pic-

tures Experts Group Audio Layer 3.
MP3 is the most well known com-
pressed digital audio file format. This
format allows for near “CD quality”
sound, but at a fraction of the size of
normal audio files. MP3 conversion of
an audio track can reduce the file size
by approximately a 10:1 ratio (Sam-
pling: 44.1 kHz, Bit rate: 128 kbps) with
virtually no perceptible loss in quality.
The compression reduces certain
parts of sound that seem inaudible
to most people.

. WMA — Windows Media Audio (WMA) is

a compressed audio format created
by Microsoft as an alternative to MP3.
The WMA codec offers greater file
compression than the MP3 codec,
enabling storage of more digital audio
tracks in the same amount of space
when compared to MP3s at the same
level of quality.
This product is protected by certain
intellectual property rights of Micro-
soft Corporation and third parties. Use
or distribution of such technology
outside of this product is prohibited
without a license from Microsoft or an
authorized Microsoft subsidiary and
third parties.

. Bit rate — Bit rate denotes the number

of bits per second used by a digital
music file. The size and quality of a
compressed digital audio file is deter-
mined by the bit rate used when
encoding the file.

. Sampling frequency — Sampling fre-

quency is the rate at which the
samples of a signal are converted
from analog to digital (A/D conver-
sion) per second.

. Multisession — Multisession is one of

the methods for writing data to med-
ia. Writing data once to the media is
called a single session, and writing

more than once is called a multises-
sion.

. ID3/WMA Tag — The ID3/WMA tag is

the part of the encoded MP3 or WMA
file that contains information about
the digital music file such as song title,
artist, album title, encoding bit rate,
track time duration, etc. ID3 tag in-
formation is displayed on the Album/
Artist/Track title line on the display.

* Windows® and Windows Media® are
registered trademarks or trademarks of
Microsoft Corporation in the United
States of America and/or other countries.

SAA1025

Playback order chart

Playback order:

Music playback order of a CD with MP3 or
WMA files is as illustrated.
. The names of folders not containing

MP3 or WMA files are not shown in the
display.

. If there is a file in the top level of the

disc, “Root Folder” is displayed.

. The playback order is the order in

which the files were written by the
writing software. Therefore, the files
might not play in the desired order.

Heater, air conditioner, audio and phone systems

4-43

4-44

Heater, air conditioner, audio and phone systems

Specification chart (for models without navigation system):

Supported media

CD, CD-R, CD-RW, USB2.0

Supported file systems

CD, CD-R, CD-RW: ISO9660 LEVEL1, ISO9660 LEVEL2, Romeo, Joliet
* ISO9660 Level 3 (packet writing) is not supported.
* Files saved using the Live File System component (on a Windows Vista-based
computer) are not supported.
USB memory: FAT16, FAT32

Supported versions*1

MP3

Version

MPEG1 Audio Layer 3

Sampling frequency

32 kHz - 48 kHz

Bit rate

32 kbps - 320 kbps, VBR*4

WMA*2

Version

WMA7, WMA8, WMA9

Sampling frequency

32 kHz - 48 kHz

Bit rate

32 kbps - 192 kbps, VBR4, 32 kbps - 320 kbps (WMA9 only)

Tag information (Song title and Artist name)

ID3 tag VER1.0, VER1.1, VER2.2, VER2.3, VER2.4 (MP3 only)
WMA tag (WMA only)

Folder levels

CD, CD-R, CD-RW

Folder levels: 8, Folders: 255, Files: 999 (Max. 255 files for one folder)

USB

Folder levels: 8, Folders 255, Files: 2500 (Max. 255 files for one folder)
Memory size: 4GB

Displayable character codes*3

01: ASCII, 02: ISO-8859-1, 03: UNICODE (UTF-16 BOM Big Endian), 04: UNICODE (UTF-
16 Non-BOM Big Endian), 05: UNICODE (UTF-8)

*1

Files created with a combination of 48 kHz sampling frequency and 64 kbps bit rate cannot be played.

*2

Protected WMA files (DRM) cannot be played.

*3

Available codes depend on what kind of media, versions and information are going to be displayed.

*4

When VBR files are played, the playback time may not be displayed correctly.

Specification chart (for models with navigation system):

Supported media

CD, CD-R, CD-RW

Supported file systems

ISO9660 LEVEL1, ISO9660 LEVEL2, Apple ISO, Romeo, Joliet * ISO9660 Level 3 (packet writing) is not
supported.

Supported
versions*1

MP3

Version

MPEG1, MPEG2, MPEG2.5

Sampling fre-
quency

8 kHz - 48 kHz

Bit rate

8 kbps - 320 kbps, VBR

WMA*2

Version

WMA7, WMA8, WMA9

Sampling fre-
quency

32 kHz - 48 kHz

Bit rate

48 kbps - 192 kbps, VBR

Tag information

ID3 tag VER1.0, VER1.1, VER2.2, VER2.3 (MP3 only)

Folder levels

Folder levels: 8, Max folders: 255 (including root folder), Files: 512 (Max. 255 files for one folder)

Text character number limitation

128 characters

Displayable character codes*3

01: ASCII, 02: ISO-8859-1, 03: UNICODE (UTF-16 BOM Big Endian), 04: UNICODE (UTF-16 Non-BOM Big
Endian), 05: UNICODE (UTF-8), 06: UNICODE (Non-UTF-16 BOM Little Endian)

*1

Files created with a combination of 48 kHz sampling frequency and 64 kbps bit rate cannot be played.

*2

Protected WMA files (DRM) cannot be played.

*3

Available codes depend on what kind of media, versions and information are going to be displayed.

Heater, air conditioner, audio and phone systems

4-45

4-46

Heater, air conditioner, audio and phone systems

Troubleshooting guide:

Symptom

Cause and Countermeasure

Cannot play

Check if the disc or USB device was inserted correctly.
Check if the disc is scratched or dirty.
Check if there is condensation inside the player. If there is, wait until the condensation is gone (about one hour)
before using the player.
If there is a temperature increase error, the CD player will play correctly after it returns to the normal temperature.
If there is a mixture of music CD files (CD-DA data) and MP3/WMA files on a CD, only the music CD files (CD-DA data)
will be played.
Files with extensions other than “.MP3”, “.WMA”, “.mp3” or “.wma” cannot be played. In addition, the character codes
and number of characters for folder names and file names should be in compliance with the specifications.
Check if the finalization process, such as session close and disc close, is done for the disc.
Check if the disc or USB device is protected by copyright.

Poor sound quality

Check if the disc is scratched or dirty.
Bit rate may be too low.

It takes a relatively long time
before the music starts playing.

If there are many folders or file levels on the MP3/WMA disc, or if it is a multisession disc, or USB device, some time
may be required before the music starts playing.

Music cuts off or skips

The writing software and hardware combination might not match, or the writing speed, writing depth, writing
width, etc., might not match the specifications. Try using the slowest writing speed.

Skipping with high bit rate files Skipping may occur with large quantities of data, such as for high bit rate data.

Move immediately to the next
song when playing

When a non-MP3/WMA file has been given an extension of “.MP3”, “.WMA”, .“mp3” or “.wma”, or when play is prohibited
by copyright protection, there will be approximately five seconds of no sound and then the player will skip to the
next song.

Songs do not play back in the
desired order

The playback order is the order in which the files were written by the writing software. Therefore, the files might not
play in the desired order.

Bluetooth® Audio player

Bluetooth® is a trademark
owned by Bluetooth SIG, Inc.
and licensed to Robert Bosch
GmbH and Visteon Corpora-
tion.

. Some Bluetooth® audio devices may

not be recognized by the in-vehicle
audio system.

. It is necessary to set up the wireless

connection between a compatible
Bluetooth® audio device and the in-
vehicle Bluetooth® module before
using the Bluetooth® audio player.

. Operating procedure of the Blue-

tooth® audio player will vary depend-
ing on the device. Make sure it is
understood how to operate an audio
device before using it with this system.

. The Bluetooth® audio player may be

stopped under the following condi-
tions:
— Receiving a hands-free call.
— Checking the connection to the

hands-free phone.

. Do not place a Bluetooth® audio

device in an area surrounded by metal
or far away from the in-vehicle Blue-
tooth® module to prevent tone quality
degradation and wireless connection
disruption.

. While an audio device is connected

through a Bluetooth® wireless con-
nection, the battery power of the
device may discharge quicker than
usual.

. This system supports the Bluetooth®

Audio Distribution Profile (A2DP,
AVRCP).

. Wireless LAN (Wi-Fi) and the Blue-

tooth® functions share the same fre-
quency band (2.4 GHz). Using the
Bluetooth® and the wireless LAN func-
tions at the same time may slow down
or disconnect the communication and
cause undesired noise. It is recom-
mended that you turn off the wireless
LAN (Wi-Fi) when using the Bluetooth®
functions.

Heater, air conditioner, audio and phone systems

4-47

4-48

Heater, air conditioner, audio and phone systems

JVH1658X

1.

MEDIA button

2.

FM·AM button

3.

(CD eject) button

4.

CD button

5.

DISP (display) button

6.

Color display

7.

iPod® MENU button

8.

(Backward seek) button

9.

SCAN button

10.

(Forward seek) button

11.

BACK button

12.

Power/VOL (volume) dial

13.

RPT (repeat) button

14.

RDM (random) button

15.

Radio station preset buttons

16.

ENTER SETTING/TUNE·FOLDER dial

FM-AM RADIO WITH COMPACT DISC
(CD) PLAYER

For all operation precautions, see “Audio
operation precautions” (P.4-38).

Audio main operation

The audio system operates when the
ignition switch is placed in the ACC or
ON position.

Head unit:

The auto loudness circuit enhances the
low and high frequency ranges automa-
tically.

Power/VOL dial:

Push the Power/VOL dial to turn on and
off the audio system.
Turn the Power/VOL dial to adjust the
volume.

Audio settings:

The settings screen will appear when the
ENTER SETTING/TUNE·FOLDER dial is
pushed.
The following items are available in the
settings screen.
. Bluetooth

It is possible to set the Bluetooth®
settings. For details of the Bluetooth®

audio player operation, see “Blue-
tooth® audio player operation” (P.4-
54).

. Bass, Treble, Balance and Fade

Controls the sound of the audio
system. Balance adjusts the sound
between the left and right speakers.
Fade adjusts the sound between the
front and rear speakers.
Select the “Bass”, “Treble”, “Balance” or
“Fade” using the ENTER SETTING/
TUNE·FOLDER dial, and then push the
ENTER SETTING/TUNE·FOLDER dial.
T u r n

t h e

E N T E R

S E T T I N G /

TUNE·FOLDER dial to adjust the bass,
treble, balance and fade of the screen
to the preferred level. Push the ENTER
SETTING/TUNE·FOLDER dial to apply
the setting.

. Brightness and Contrast

Adjust the brightness and contrast of
the screen.
Select “Brightness” or “Contrast” using
the ENTER SETTING/TUNE·FOLDER dial
and then push the ENTER SETTING/
TUNE·FOLDER dial. Turn the ENTER
SETTING/TUNE·FOLDER dial to adjust
the brightness and contrast of the
screen to the preferred level. Push the
ENTER SETTING/TUNE·FOLDER dial to
apply the setting.

. Clock Adjust

Adjust the clock according to the
following procedure.
1) Select “Clock Adjust” using the

ENTER SETTING/TUNE·FOLDER dial
a n d t h e n p u s h t h e E N T E R
SETTING/TUNE·FOLDER dial.

2) Adjust the hour with the ENTER

SETTING/TUNE·FOLDER dial and
then push the ENTER SETTING/
TUNE·FOLDER dial.

3) Adjust the minute with the ENTER

SETTING/TUNE·FOLDER dial and
then push the ENTER SETTING/
TUNE·FOLDER dial.

24 hour clock is not available.

. On-Screen Clock

When this item is turned on, a clock is
always displayed in the upper right
corner of the screen.
Select the “On-Screen Clock” using the
ENTER SETTING/TUNE·FOLDER dial
and then push the ENTER SETTING/
TUNE·FOLDER dial. You can toggle
between “ON” and “OFF” using the
ENTER SETTING/TUNE·FOLDER dial.
P u s h

t h e

E N T E R

S E T T I N G /

TUNE·FOLDER dial to apply the setting.

. RDS Display

RDS (radio data system) information
can be shown on the display. Select

“RDS Display” using the ENTER
SETTING/TUNE·FOLDER dial and then
p u s h

t h e

E N T E R

S E T T I N G /

TUNE·FOLDER dial. You can toggle
between “ON” and “OFF” using the
ENTER SETTING/TUNE·FOLDER dial.
P u s h

t h e

E N T E R

S E T T I N G /

TUNE·FOLDER dial to apply the setting.

. Speed Sensitive Vol.

Select the “Speed Sensitive Vol.” using
the ENTER SETTING/TUNE·FOLDER dial
and then push the ENTER SETTING/
TUNE·FOLDER dial. To change the
Speed Sensitive Volume (Speed Sensi-
tive Vol.) level from off (0) to 5, turn the
ENTER SETTING/TUNE·FOLDER dial.
P u s h

t h e

E N T E R

S E T T I N G /

TUNE·FOLDER dial to apply the setting.

. AUX Vol.

Controls the volume level of incoming
sound when an auxiliary device is
connected to the system. Select the
“AUX Vol.” using the ENTER SETTING/
TUNE·FOLDER dial and then push the
ENTER SETTING/TUNE·FOLDER dial.
Choose a setting between +1 and +3
or choose 0 to disable the feature
entirely. Push the ENTER SETTING/
TUNE·FOLDER dial to apply the setting.

. Language Select

The language settings can be chan-
ged.

Heater, air conditioner, audio and phone systems

4-49

4-50

Heater, air conditioner, audio and phone systems

Select “Language Select” using the
ENTER SETTING/TUNE·FOLDER dial
and then push the ENTER SETTING/
TUNE·FOLDER dial. Use the ENTER
SETTING/TUNE·FOLDER dial to select
the preferred language. Push the
ENTER SETTING/TUNE·FOLDER dial to
apply the setting.

DISP button:

Display of the screen can be canceled by
pushing the

button. You can still

listen to music that is being played back
even while the screen display is turned
off. If you want to display the screen
again, push the

button once more.

Pushing some of the audio source but-
tons will also turn the screen back on and
display the screens of the corresponding
sources.

MEDIA button:

Pushing the

button will switch the

audio source as follows:
USB/iPod® ? Bluetooth Audio ? AUX ?
USB/iPod®

FM-AM Radio operation

radio (FM·AM) band select:

Push the

button to change the band

as follows:
AM ? FM1 ? FM2? AM
The FM stereo indicator (STEREO) is
shown on the screen during FM stereo
reception. When the stereo broadcast
signal is weak, the radio automatically
changes from stereo to monaural recep-
tion.

TUNE (Tuning):

Turn the ENTER SETTING/TUNE·FOLDER
dial for manual tuning.

Radio Data System (RDS):

RDS stands for Radio Data System, and is
a data information service transmitted by
some radio stations on the FM band (not
AM band) encoded within a regular radio
broadcast. Currently, most RDS stations
are in large cities, but many stations are
now considering broadcasting RDS data.
The station name, such as “The Groove”, is
displayed on the display.

SEEK tuning:

Push the

or

button to tune from

low to high or high to low frequencies

and to stop at the next broadcasting
station.

SCAN tuning:

Push the

button to tune from low to

high frequencies and stop at each broad-
casting station for several seconds. Push-
ing the

button again during this

several seconds period will stop SCAN
tuning and the radio will remain tuned to
that station.
If the

button is not pushed within this

period, SCAN tuning moves to the next
station.

to

Station memory opera-

tions:

Up to 12 stations can be set for the FM
band (6 each for FM1 and FM2) and 6
stations can be set for the AM band.
1.

Choose the radio band using the
button.

2. Tune to the desired station.
3. Push and hold the desired station

preset button

to

until beep

sounds.

4. The station indicator will then come

on. The station is now set to the
button memory.

5. Other buttons can be set in the same

manner.

If the battery cable is disconnected, or if
the fuse opens, the station memory will
be erased. In that case, reset the desired
stations.

CD player operation

Place the ignition switch in the ACC or ON
position. Insert the Compact Disc (CD)
into the slot with the label side facing up.
The CD will be guided automatically into
the slot and start playing.
After loading the CD, the number of
tracks on the CD and the play time will
appear on the display.
If another audio source is already operat-
ing, it will automatically turn off and the
CD will play.
If the system has been turned off while
the CD was playing, pushing the Power/
VOL dial will start the CD.

PLAY:

When the CD button is pushed while a CD
is loaded, the CD will start playing.

CD/MP3 display mode:

While listening to an MP3/WMA CD, cer-
tain text may be displayed on the screen
if the CD has been encoded with text

information. Depending on how the MP3/
WMA CD is encoded, information such as
Artist, Song and Folder will be displayed.
The track number and the total number
of tracks in the current folder or on the
current disc are displayed on the screen
as well.

SEEK/TRACK:

When the

or

button is pushed

and hold while the CD is being played, the
CD will play while fast forwarding or
rewinding. When the button is released,
the CD will return to normal play speed.
When the

or

button is pushed

while the CD is being played, the next
track or the beginning of the current
track on the CD will be played. Push the

button again to select the previous

track.

REPEAT (RPT):

When the

button is pushed while the

CD is played, the play pattern can be
changed as follows:
(CD)
(Normal) ⇔ 1 Track Repeat
(CD with compressed audio files)
(Normal) ? 1 Folder Repeat ? 1 Track
Repeat ? (Normal)

RANDOM (RDM):

When the

button is pushed while a CD

is being played, the play pattern can be
changed as follows:
(CD)
(Normal) ⇔ 1 Disc Random
(CD with compressed audio files)
(Normal) ? 1 Disc Random ? 1 Folder
Random ? (Normal)

CD eject:

When the

button is pushed with the

CD loaded, the CD will be ejected.
If the CD comes out and is not removed,
it will be pulled back into the slot to
protect it.

USB memory player operation

USB memory main operation:

The USB connection port is located on
the lower part of the instrument panel.
(See “USB (Universal Serial Bus) connec-
tion port” (P.4-74).) Connect a USB mem-
ory into the port. When the audio system
operates, the system will switch to the
USB memory mode automatically.
If the system has been turned off while
the USB memory was playing, pushing
the Power/VOL dial will start the USB

Heater, air conditioner, audio and phone systems

4-51

4-52

Heater, air conditioner, audio and phone systems

memory.

PLAY:

To change to the USB memory mode,
push the

button with a USB memory

connected until the USB memory mode is
selected.

Next/Previous File and Fast

Forward/Rewind:

When the

or

button is pushed

and hold while a USB memory is being
played, the USB memory will play while
forwarding or rewinding. When the but-
ton is released, the USB memory will
return to normal play speed.
When the

or

button is pushed

while the USB memory is being played,
the next track or the beginning of the
current track on the USB memory will be
played. Push the

button again to

select the previous track.

Folder selection:

To change to another folder in the USB
memory, choose a folder displayed on the
screen using the ENTER SETTING/
TUNE·FOLDER dial.

REPEAT (RPT):

When the

button is pushed while the

USB memory is played, the play pattern
can be change as follows.
(Normal) ? 1 Folder Repeat ? 1 Track
Repeat ? (Normal)

RANDOM (RDM):

When the

button is pushed while a

USB memory is being played, the play
pattern can be changed as follows.
(Normal) ? All Random ? 1 Folder Ran-
dom ? (Normal)

BACK button:

When the BACK button is pushed, it
returns to the previous display.

iPod® player operation

Connecting iPod®:

The USB connection port is located on
the lower part of the instrument panel.
(See “USB (Universal Serial Bus) connec-
tion port” (P.4-74).) Connect the iPod®
cable to the USB connection port. When
the audio system operates, the system
will switch to the iPod® mode automati-
cally. The battery of the iPod® is charged
while the cable is connected to the
vehicle.
Depending on the version of the iPod®,
the display on the iPod® shows a NISSAN

or Accessory Attached screen when the
connection is completed. When the iPod®
is connected to the vehicle, the iPod®
music library can only be operated by the
vehicle audio controls.

Compatibility:

The following models are compatible:
. iPod nano® 1G (Firmware version 1.3.1 -)

. iPod nano® 2G (Firmware version 1.1.3

-)

. iPod nano® 3G (Firmware version 1.0.0

-)

. iPod nano® 4G (Firmware version 1.0.2

-)

. iPod nano® 5G (Firmware version 1.0.1

-)

. iPod nano® 6G (Firmware version 1.0 -)

. iPod nano® 7G (Firmware version 1.0.0

-)

. iPod® 5G (Firmware version 1.2.1 -)

. iPod classic® (Firmware version 1.0.0 -)

. iPod Touch® (iOS 1.1 -)

. iPod Touch® 2G (iOS 2.1.1 -)

. iPod Touch® 3G (iOS 3.1 -)

. iPod Touch® 4G (iOS 4.1 -)

. iPod Touch® 5G (iOS 6.0.0 -)

. iPhone® (iOS 1.0.0 - 2.2.1)

. iPhone® 3G (iOS 2.1 -)

. iPhone® 3GS (iOS 3.0 -)

. iPhone® 4/4S (iOS 4.0 -)

. iPhone® 5 (iOS 6.0.0 -)
Operations attributable to firmware up-
date by Apple are not guaranteed.

iPod® main operation:

The system operates when the ignition
switch is placed in the ACC or ON position.
Push the

button repeatedly or push

the

button to switch to the iPod®

mode.
If the system was turned off while the
iPod® was playing, pushing the Power/
VOL dial will start the iPod®.
If another audio source is playing and the
iPod® is connected, push the

button

repeatedly or push the

button to

switch to the iPod® mode.
When the

button is pushed while the

iPod® is connected, the interface for iPod®
operation is shown on the display. The
items on the menu list can be scrolled by
t u r n i n g

t h e

E N T E R

S E T T I N G /

TUNE·FOLDER dial while the iPod® is
operating. To select an item, push ENTER
SETTING/TUNE·FOLDER dial. Items in the
iPod® menu appear on the display in the
following order.
. Now Playing

. Playlists

. Artists

. Albums

. Songs

. Podcasts

. Genres

. Composers

. Audiobooks

. Shuffle Songs
For more information about each item,
see the iPod® owner’s manual.

Next/Previous Track and

Fast Forward/Rewind:

When the

or

button is pushed

and hold while the iPod® is playing, the
iPod® will play while fast forwarding or
rewinding. When the button is released,
the iPod® will return to the normal play
speed.
When the

or

button is pushed

while the iPod® is playing, the next track
or the beginning of the current track on
the iPod® will be played. Push the
button again to select the previous track.

REPEAT (RPT):

When the

button is pushed while a

track is being played, the play pattern can
be changed as follows:
(Repeat Off) ? 1 Track Repeat? All Repeat

? (Repeat Off)

RANDOM (RDM):

When the

button is pushed while a

track is being played, the play pattern can
be changed as follows:
(Shuffle Off) ? Track Shuffle ? (Shuffle
Off)

BACK button:

The display will return to the previous
screen.

Heater, air conditioner, audio and phone systems

4-53

4-54

Heater, air conditioner, audio and phone systems

Bluetooth® audio player operation

If you have a compatible Bluetooth®
audio device that is capable of playing
audio files, the device can be connected
to the vehicle’s audio system so that the
audio files on the device play through the
vehicle’s speakers.

Regulatory information:

Bluetooth® trademark:

Bluetooth® is a trademark
owned by Bluetooth SIG, Inc.
and licensed to Visteon Cor-
poration.

Connecting Bluetooth® device:

To connect your Bluetooth® device to the
vehicle, follow the procedure below:
1.

P u s h

t h e

E N T E R

S E T T I N G /

TUNE·FOLDER dial.

JVH0620X

2. Select “Bluetooth” .
3. Select “Add Phone” . This same screen

can be accessed to remove, replace or
select a different Bluetooth® device.

4. The system acknowledges the com-

mand and asks you to initiate a
connection from the Bluetooth® de-
vice. The procedure for connecting a
Bluetooth® device varies according to
the cellular phone model. See the
owner’s manual of the Bluetooth®
device for details.

Bluetooth® audio main operation:

To switch to the Bluetooth® audio mode,
push the

button repeatedly until the

Bluetooth® audio mode is displayed on

the screen.
The controls for the Bluetooth® audio are
displayed on the screen. Use the Preset

button to play and use the Preset

button to pause.

AUX device player operation

The AUX input jack is located on the lower
part of the instrument panel. (See “AUX
(Auxiliary) input jack” (P.4-75).) The AUX
input jack accepts any standard analog
audio input such as from a portable
cassette tape/CD player, MP3 player or
laptop computer.
Push the

button repeatedly to play a

compatible device when it is plugged into
the AUX input jack.
NISSAN strongly recommends using a
stereo mini plug cable when connecting
your music device to the audio system.
Music may not play properly when a
monaural cable is used.

JVH1590X

1.

MEDIA button

2.

FM·AM button

3.

(CD eject) button

4.

XM button

5.

DISP (display) button

6.

Color display

7.

iPod® MENU button

8.

(Backward seek) button

9.

SCAN button

10.

(Forward seek) button

11.

BACK button

12.

Power/VOL (volume) dial

13.

RPT (repeat) button

14.

RDM (random) button

15.

Radio station preset buttons

16.

ENTER SETTING/TUNE·SCROLL dial

FM-AM-SAT RADIO WITH COMPACT
DISC (CD) PLAYER (Type A) (if so
equipped)

For all operation precautions, see “Audio
operation precautions” (P.4-38).
. No satellite radio reception is available

when the SAT band option is selected
unless the optional satellite receiver
and antenna are installed, and there is
an active SiriusXM Satellite Radio sub-
scription.

. The satellite radio mode requires an

active SiriusXM Satellite Radio sub-
scription. The satellite radio is not
available in Alaska, Hawaii and Guam.

. It may take some time to receive the

activation signal after subscribing the
SiriusXM Satellite Radio. After receiv-
ing the activation signal, an available
channel list will be automatically up-
dated in the radio. Place the ignition
switch from LOCK to ACC to update
the channel list.

Heater, air conditioner, audio and phone systems

4-55


Content   ..  12  13  14  15   ..