Nissan Rogue Hybrid (2019 year). Manual - part 10


  Index      Nissan     Nissan Rogue Hybrid - service manual 2019 year in english


Search            copyright infringement  


Content   ..  8  9  10  11   ..


Nissan Rogue Hybrid (2019 year). Manual - part 10


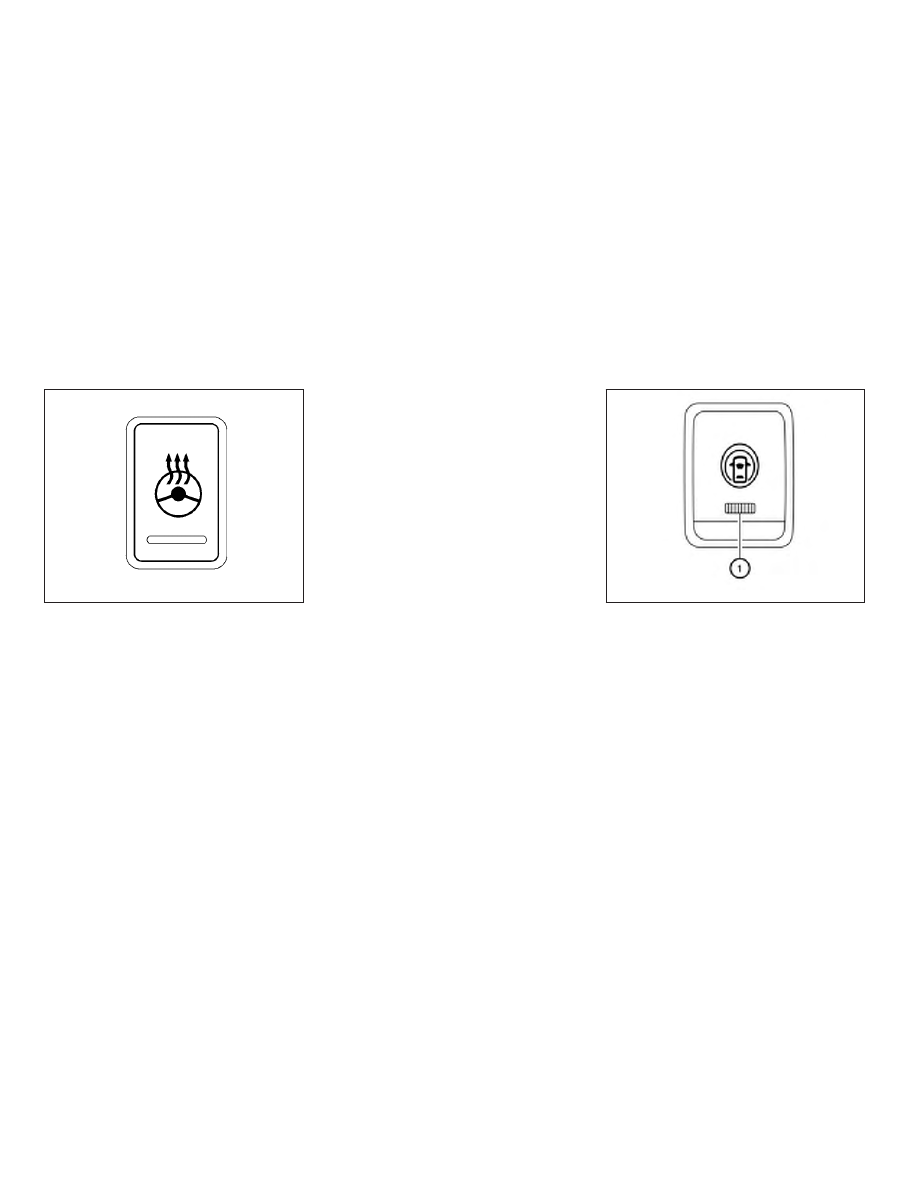
The heated steering wheel system is de-
signed to operate only when the surface
temperature of the steering wheel is below
68°F (20°C).

Push the heated steering wheel switch to
warm the steering wheel after the hybrid
system starts. The indicator light will come
on.

If the surface temperature of the steering
wheel is below 68°F (20°C), the system will
heat the steering wheel and cycle off and
on to maintain a temperature above 68°F
(20°C). The indicator light will remain on as
long as the system is on.

Push the switch again to turn the heated
steering wheel system off manually. The
indicator light will go off.

NOTE:

If the surface temperature of the steer-
ing wheel is above 68°F (20°C) when the
switch is turned on, the system will not
heat the steering wheel. This is not a
malfunction.

The dynamic driver assistance switch is
used to temporarily turn on and off the
Intelligent Lane Intervention (I-LI) system
that is activated using the settings menu of
the vehicle information display.

The I-LI system must be turned on with the
dynamic driver assistance switch every
time the ignition is placed in the ON posi-
tion.

When

the

dynamic

driver

assistance

switch is turned off, the indicator

1

on the

switch is off. The indicator will also be off if
the I-LI system is deactivated using the ve-
hicle information display.

LIC0421

LIC3681

HEATED STEERING WHEEL SWITCH (if
so equipped)

DYNAMIC DRIVER ASSISTANCE
SWITCH (if so equipped)

2-54

Instruments and controls

The I-LI system warns the driver with a
warning light and a chime, and helps assist
the driver to return the vehicle to the center
of the traveling lane by applying the brakes
to the left or right wheels individually (for a
short period of time). For additional infor-
mation, refer to “Intelligent Lane Interven-
tion (I-LI)” in the “Starting and driving” sec-
tion and “Vehicle information display” in the
“Instruments and controls” section of this
manual.

The vehicle should be driven with the VDC
system on for most driving conditions.

If the vehicle is stuck in mud or snow, the
VDC system reduces the engine output to
reduce wheel spin. The engine speed will
be reduced even if the accelerator is de-
pressed to the floor. If maximum engine
power is needed to free a stuck vehicle,
turn the VDC system off.

To turn off the VDC system, push the VDC
OFF switch. The

indicator and the Au-

tomatic Emergency Braking (AEB) or Auto-
matic Emergency Braking (AEB) with Pe-
destrian Detection system warning light
will come on.
Push the VDC OFF switch again or restart
the engine to turn on the system. For addi-
tional information, refer to “Vehicle Dy-
namic Control (VDC) system”, “Automatic
Emergency Braking (AEB) and “Automatic
Emergency Braking (AEB) with Pedestrian
Detection” in the “Starting and driving” sec-
tion of this manual.

LIC3344

VEHICLE DYNAMIC CONTROL (VDC)
OFF SWITCH

Instruments and controls

2-55

The All-Wheel Drive (AWD) LOCK switch is
located on the instrument panel. The AWD
LOCK indicator light will illuminate when
the switch is turned on. For additional infor-
mation, refer to “Warning lights, indicator
lights and audible reminders” in this sec-
tion and “AWD Lock Switch Operations” in
the “Starting and driving” section of this
manual.

Each time you push the switch, the AWD
mode will switch: AUTO

→LOCK → AUTO.

The Rear Door Alert system functions un-
der certain conditions to indicate there
may be an object or passenger in the rear
seat(s). Check the seat(s) before exiting the
vehicle.

The Rear Door Alert system is initially dis-
abled. The driver can enable the system
using the vehicle information display. For
additional information, refer to “Vehicle in-
formation display warnings and indicators”
in this section.

When the system is enabled:

∙ The system is activated when a rear

door is opened and closed approxi-
mately 10 minutes before the vehicle is
started. When the vehicle is started and
the system is activated, a visual mes-
sage appears in the vehicle information
display. For additional information, refer
to “Rear Door Alert is activated” in this
section.

∙ If a rear door is opened and closed but

the vehicle is not started within approxi-
mately 10 minutes, the system will not
be activated. A rear door must be
opened and closed and the car started
within 10 minutes for the system to ac-
tivate.

When the Rear Door Alert system is acti-
vated and a driver exits the vehicle after
arriving at a destination:

∙ When the driver puts the vehicle in the P

(Park) position, a message appears in
the vehicle information display for a
driver to “Dismiss Message” or “Disable
Alert” if desired.

∙ With the system enabled, when the

driver exits the vehicle, an audible alert
(horn sound) will occur unless a rear
door is opened and closed within a
short time to deactivate the alert.

∙ If the doors are locked before the alert is

deactivated by opening a rear door, the
horn will sound.

∙ If the system is activated but the rear

liftgate is opened before opening a rear
door, the horn will be delayed until after
the liftgate is closed.

∙ If the audible horn alert occurs, a mes-

sage will also appear in the vehicle in-
formation display that states, “Check
Rear Seat for All Articles”.

LIC2645

ALL-WHEEL DRIVE (AWD) LOCK
SWITCH (if so equipped)

REAR DOOR ALERT

2-56

Instruments and controls

WARNING

• If the driver selects “Disable Alert”, no
audible alert will be provided regard-
less of rear door open/close status.

• There may be times when there is an
object or passenger in the rear seat(s)
but the audible alert does not sound.
For example, this may occur if the en-
gine is turned off and then on again in a
short period of time during a trip, or if
rear seat passengers enter or exit the
vehicle during a trip.

• The system does not directly detect
objects or passengers in the rear
seat(s). Instead, it can detect when a
rear door is opened and closed, indicat-
ing that there may be something in the
rear seat(s).

NOTE:

There may be times when the horn
sounds but there are no objects or pas-
sengers in the rear seat(s).

For additional information, refer to “Rear
Door Alert is activated” in this section.

The E-call (SOS) button is used in combina-
tion with a NissanConnect® Services sub-
scription to call for assistance in case of an
emergency.

Pressing the button will (with a paid sub-
scription) reach a response specialist that
will provide assistance based on the situa-
tion described by the vehicle’s occupant. For
additional information, or to enroll your ve-
hicle, refer to www.NissanUSA.com/connect,
www.Nissan.ca/NissanConnect, or
www.Nissan.ca/NissanConnect/fr

or

call

855–426–6628.

12V OUTLETS

The power outlets are for powering electri-
cal accessories such as cellular tele-
phones. They are rated at 12 volt, 120W (10A)
maximum.

The front and center console power outlets
are powered only when the ignition switch
is in the ON position.

LIC3357

Instrument Panel

LIC3940

E-CALL (SOS) BUTTON (if so
equipped)

POWER OUTLETS

Instruments and controls

2-57

NOTE:

∙ When the ignition switch is in the OFF

position, the front and center console
power outlets stop delivering power
one minute after the door is opened
and stays open.

∙ If the door remains closed after the

ignition is placed in the OFF position,
the front and center console power
outlets continue to deliver power un-
til the accessory power timer has
elapsed.

∙ The cargo area power outlet(s) con-

tinues to deliver power normally.

CAUTION

∙ The outlet and plug may be hot during

or immediately after use.

∙ Only certain power outlets are de-

signed for use with a cigarette lighter
unit. Do not use any other power out-
let for an accessory lighter. It is rec-
ommended that you visit a NISSAN
dealer for additional information.

∙ Do not use with accessories that ex-

ceed a 12 volt, 120W (10A) power draw.

∙ Do not use double adapters or more

than one electrical accessory.

∙ Use power outlets with the engine

running to avoid discharging the ve-
hicle’s 12–volt battery.

∙ Avoid using power outlets when the

air conditioner, headlights or rear win-
dow defroster is on.

∙ Before inserting or disconnecting a

plug, be sure the electrical accessory
being used is turned off.

Center Console

LIC3909

Cargo Area

LIC2617

2-58

Instruments and controls

∙ Push the plug in as far as it will go. If

good contact is not made, the plug
may overheat or the internal tem-
perature fuse may open.

∙ When not in use, be sure to close the

cap. Do not allow water or any other
liquid to contact the outlet.

LIC3359

OFF position

LIC3266

EXTENDED STORAGE SWITCH

Instruments and controls

2-59

The extended storage switch is used when
shipping the vehicle. It is located in the fuse
panel on the driver’s side of the instrument
panel. If any electrical equipment does not
operate, ensure the extended storage
switch is pushed fully in place, as shown.

To inspect the extended storage switch,
ensure the ignition switch and headlight
switch are off, remove the fuse box cover

A

using a suitable tool in combination

with a cloth to avoid damaging the trim.

FRONT-DOOR POCKETS

SEATBACK POCKETS

There is one seatback pocket located on
the back of the driver and passenger seats.
The pockets can be used to store maps.

ON position

LIC3268

LIC2308

LIC2618

STORAGE

2-60

Instruments and controls

WARNING

To ensure proper operation of the pas-
senger’s NISSAN Advanced Air Bag Sys-
tem,

please

observe

the

following

items:

∙ Do not allow a passenger in the rear

seat to push or pull on the seatback
pocket or head restraint/headrest.

∙ Do not place heavy loads heavier than

9.1 lbs. (4 kg) on the seatback, head
restraint/headrest or in the seatback
pocket.

GLOVE BOX

Open the glove box by pulling the handle.

WARNING

Keep glove box lid closed while driving
to help prevent injury in an accident or a
sudden stop.

CONSOLE BOX

To open the console box, press in on the
lever

1

and raise the lid

2

.

To close, push the lid down until the lock
latches.

LIC3718

WIC1504

Instruments and controls

2-61

OVERHEAD SUNGLASSES
STORAGE

To open the sunglasses holder, push and
release.

Only store one pair of sunglasses in the
holder.

WARNING

Keep the sunglasses holder closed
while driving to avoid obstructing the
driver’s view and to help prevent an
accident.

CAUTION

∙ Do not use for anything other than

sunglasses.

∙ Do not leave sunglasses in the sun-

glasses holder while parking in direct
sunlight. The heat may damage the
sunglasses.

CUP HOLDERS

LIC2312

Front console

LIC2619

2-62

Instruments and controls

WARNING

∙ Do not recline the rear seatback when

you use the cup holders on the rear
armrest. Doing so may cause the bev-
erages to spill over, and if they are hot,
they may scald the passengers.

∙ Avoid abrupt starting and braking

when the cup holder is being used to
prevent spilling the drink. If the liquid
is hot, it can scald you or your
passenger.

CAUTION

Use only soft cups in the cup holder.
Hard objects can injure you in an
accident.

CAUTION

∙ Do not use bottle holder for any other

objects that could be thrown about in
the vehicle and possibly injure people
during sudden braking or an accident.

∙ Do not use bottle holder for open liq-

uid containers.

2nd row

LIC2656

Bottle holder — front

LIC2622

Instruments and controls

2-63

CARGO AREA STORAGE BIN

To access the floor storage area, pull up on
the handle to lift the luggage board.

LUGGAGE HOOKS

When securing items using luggage hooks
located on the back of the seat or side
finisher do not apply a load over more than
6.5 lbs. (29 N) to a single hook.

The luggage hooks that are located on the
floor should have loads less than 110 lbs.
(490 N) to a single hook.

The luggage hooks can be used to secure
cargo with ropes or other types of straps.

Bottle holder — rear

LIC2623

LIC2625

LIC3715

2-64

Instruments and controls

WARNING

∙ Properly secure all cargo with ropes or

straps to help prevent it from sliding
or shifting. Do not place cargo higher
than the seatbacks. In a sudden stop
or collision, unsecured cargo could
cause personal injury.

∙ Use suitable ropes and hooks to se-

cure cargo.

∙ Never allow anyone to ride in the lug-

gage area. It is extremely dangerous
to ride in a cargo area inside of a ve-
hicle. In a collision, people riding in
these areas are more likely to be seri-
ously injured or killed.

∙ Do not allow people to ride in any area

of your vehicle that is not equipped
with seats and seat belts.

∙ The child restraint top tether strap

may be damaged by contact with
items in the cargo area. Secure any
items in the cargo area. Your child
could be seriously injured or killed in a
collision if the top tether strap is
damaged.

∙ Be sure everyone in your vehicle is in a

seat and using a seat belt properly.

CARGO COVER (if so equipped)

WARNING

∙ Do not place objects on the cargo

cover while the vehicle is parked or in
motion, no matter how small. The ob-
ject on the cargo cover could cause an
injury in an accident or sudden stop,
and/or the cargo cover can become
damaged.

∙ Do not leave the cargo cover in the

vehicle with it disengaged from the
holder.

∙ Properly secure all cargo with ropes or

straps to help prevent it from sliding
or shifting. Do not place cargo higher
than the seatbacks. In a sudden stop
or collision, unsecured cargo could
cause personal injury.

∙ Properly secure cargo and do not al-

low it to contact the top tether strap
when it is attached to the top tether
anchor. Cargo that is not properly se-
cured or cargo that contacts the top
tether strap may damage the top
tether strap during a collision. If the
cargo cover contacts the top tether
strap when it is attached to the top
tether anchor, remove the cargo cover
from the vehicle or secure it on the
cargo floor below its attachment lo-
cation. If the cargo cover is not re-
moved, it may damage the top tether
strap during a collision. Your child
could be seriously injured or killed in a
collision if the child restraint top
tether strap is damaged.

Instruments and controls

2-65

The cargo cover keeps the luggage com-
partment contents hidden from the out-
side.

Only attach the hook and loop fastener on
the cargo cover privacy cloth to the area on
the rear seatback where it is supposed to
be attached. Otherwise, the seat surface
could be damaged.

To remove the cargo cover:

1

Remove the straps from the rear
hatch.

2

Remove the edge of the cargo cover
privacy cloth from the rear seatback.

3

Remove the cargo cover holders from
the rear pillar.

ROOF RACK (if so equipped)

Do not apply any load directly to the roof
side rails. Cross bars must be installed be-
fore applying load/cargo/luggage to the
roof of the vehicle. Genuine NISSAN acces-
sory cross bars are available through a
NISSAN dealer. It is recommended that you
visit a NISSAN dealer for additional informa-
tion.

The service load capacity for the roof side
rails is 165 lbs. (74 kg), however do not ex-
ceed the accessory cross bars load capac-
ity.

WIC1003

LIC2386

2-66

Instruments and controls

Be careful that your vehicle does not ex-
ceed the Gross Vehicle Weight Rating
(GVWR) or its Gross Axle Weight Rating
(GAWR front and rear). The GVWR and GAWR
are located on the F.M.V.S.S. or C.V.M.S.S. cer-
tification label (located on the driver’s door
pillar).

For additional information regarding GVWR
and GAWR, refer to “Vehicle loading infor-
mation” in the “Technical and consumer in-
formation” section of this manual.

WARNING

∙ Always install the cross bars onto the

roof side rails before loading cargo of
any kind. Loading cargo directly onto
the roof side rails or the vehicle’s roof
may cause vehicle damage.

∙ Drive extra carefully when the vehicle

is loaded at or near the cargo carrying
capacity, especially if the significant
portion of that load is carried on the
cross bars.

∙ Heavy loading of the cross bars has

the potential to affect the vehicle sta-
bility and handling during sudden or
unusual handling maneuvers.

∙ Roof rack cross bars should be evenly

distributed.

∙ Do not exceed maximum roof rack

cross bars load capacity.

∙ Properly secure all cargo with ropes or

straps to help prevent it from sliding
or shifting. In a sudden stop or colli-
sion, unsecured cargo could cause
personal injury.

POWER WINDOWS

WARNING

∙ Make sure that all passengers have

their hands, etc., inside the vehicle
while it is in motion and before closing
the windows. Use the window lock
switch to prevent unexpected use of
the power windows.

∙ To help avoid risk of injury or death

through unintended operation of the
vehicle and/or its systems, including
entrapment in windows or inadver-
tent door lock activation, do not leave
children, people who require the as-
sistance of others or pets unattended
in your vehicle. Additionally, the tem-
perature inside a closed vehicle on a
warm day can quickly become high
enough to cause a significant risk of
injury or death to people and pets.

The power windows operate when the ig-
nition switch is placed in the ON position or
for a period of time after the ignition switch
is placed in the OFF position. If the driver’s
or passenger’s door is opened during this
period of time, the power to the windows is
canceled.

WINDOWS

Instruments and controls

2-67

Driver’s side power window
switches

1. Window lock button

2. Power door lock switch

3. Front passenger side switch

4. Right rear passenger side switch

5. Left rear passenger side switch

6. Driver side automatic switch

The driver’s side control panel is equipped
with switches to open or close all of the
windows.

To open a window, push the switch to the
first detent and continue to hold down until
the desired window position is reached. To
close a window, pull the switch to the first
detent and continue to hold up until the
desired window position is reached.

Locking passengers’ windows

When the window lock switch is depressed,
only the driver’s side window can be
opened or closed. Push it again to cancel
the window lock function.

Front passenger’s power window
switch

The passenger’s window switch operates
only the corresponding passenger’s win-
dow. To open the window partially, push the
switch down

1

lightly until the desired

window position is reached. To close the
window partially, pull the switch up

2

until

the desired window position is reached.

LIC3208

LIC2309

2-68

Instruments and controls

Rear power window switch

The rear power window switches open or
close only the corresponding windows. To
open the window, push the switch and hold
it down

1

. To close the window, pull the

switch up

2

.

Automatic operation

To fully open a window equipped with au-
tomatic

operation,

push

the

window

switch down to the second detent and re-
lease it; it need not be held. The window
automatically opens all the way. To stop
the window, lift the switch up while the win-
dow is opening.

To fully close a window equipped with au-
tomatic operation, pull the switch up to the
second detent and release it; it need not be
held. To stop the window, push the switch
down while the window is closing.

Auto-reverse function

The auto-reverse function can be acti-
vated when a window is closed by auto-
matic operation.

Depending on the environment or driv-
ing conditions, the auto-reverse func-
tion may be activated if an impact or
load similar to something being caught
in the window occurs.

WARNING

There are some small distances imme-
diately before the closed position which
cannot be detected. Make sure that all
passengers have their hands, etc., in-
side the vehicle before closing the
window.

If the vehicle’s 12–volt battery is discon-
nected, replaced, or jump started, the
power window auto-reverse function may
not operate properly. If this occurs, please
contact the dealer to re-initialize the power
window auto-reverse system.

If the control unit detects something
caught in a window equipped with auto-
matic operation, as it is closing, the window
will be immediately lowered.

LIC2663

LIC0410

Instruments and controls

2-69


Content   ..  8  9  10  11   ..