Mazda CX-3 (2019 year). Manual - part 18


  Index      Mazda     Mazda CX-3 - service manual 2019 year in english


Search            


Content   ..  16  17  18  19   ..


Mazda CX-3 (2019 year). Manual - part 18


1. Shift the shift lever/selector lever to R to switch the display to the rear view monitor

display.

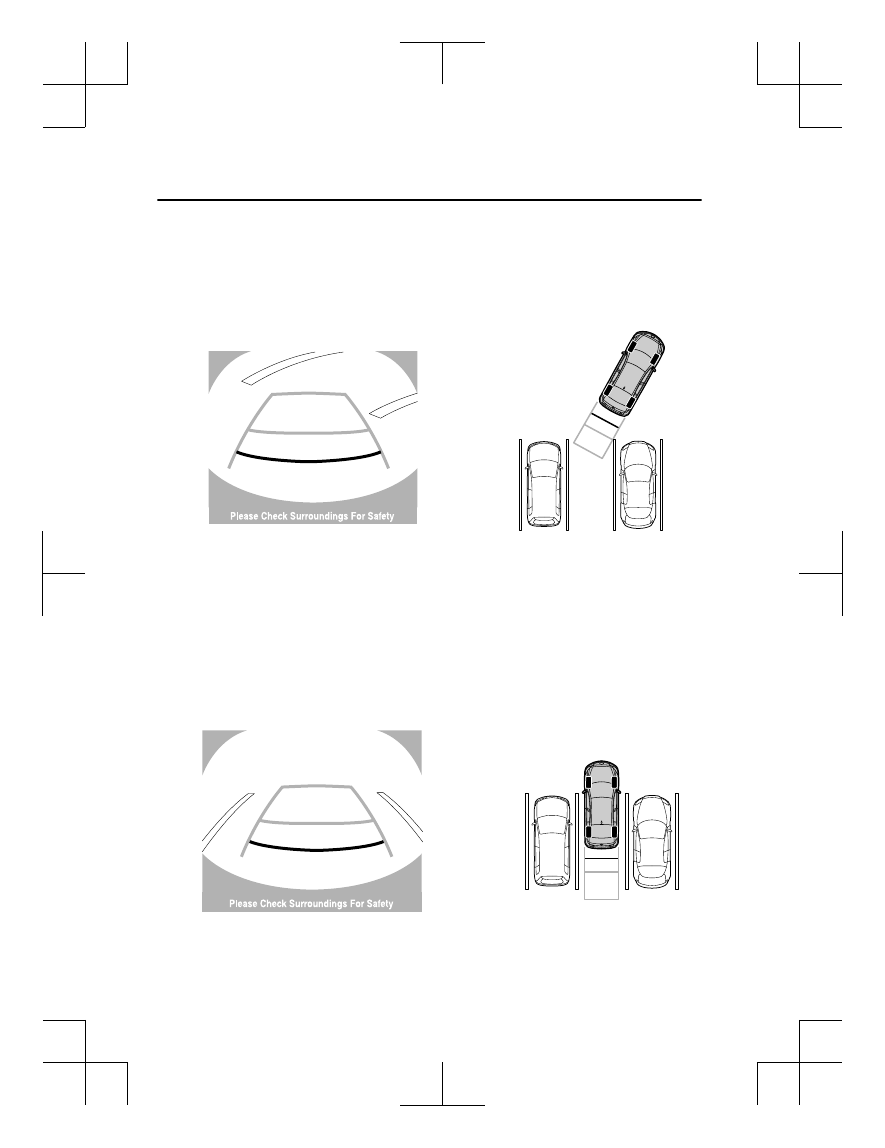
2. Confirming the surrounding conditions, reverse the vehicle.


(Display condition)

(Vehicle condition)

3. After your vehicle begins entering the parking space, continue backing up slowly so that

the distance between the vehicle width lines and the sides of the parking space on the
left and right are roughly equal.

4. Continue to adjust the steering wheel until the vehicle width guide lines are parallel to

the left and right sides of the parking space.

5. Once they are parallel, straighten the wheels and back your vehicle slowly into the

parking space. Continue checking the vehicle's surroundings and then stop the vehicle in
the best possible position.
 

(Display condition)

(Vehicle condition)

6. When the shift lever/selector lever is shifted from R to another shift lever/selector lever

position, the screen returns to the previous display.

When Driving

Rear View Monitor

4-152

CX-3_8GR7-EA-18B_Edition1

2017-12-20 16:18:14

NOTE

If the parking space has division lines, straighten the wheels when the vehicle width

guide lines are parallel to them.

Because there may be a difference between the displayed image, such as indicated

below, and the actual conditions when parking, always verify the safety at the rear of

the vehicle and the surrounding area directly with your eyes.

In the image of the parking space (or garage) displayed on the screen, the back end

and distance guide lines may appear aligned in the monitor, but they may not

actually be aligned on the ground.

When parking in a space with a division line on only one side of the parking space,

the division line and the vehicle width guide line appear aligned in the monitor, but

they may not actually be aligned on the ground.


▼ Variance Between Actual Road Conditions and Displayed Image

Some variance occurs between the actual road and the displayed road. Such variance in
distance perspective could lead to an accident. Note the following conditions that may cause
a variance in distance perspective.

When the vehicle is tilted due to the weight of passengers and load

When the vehicle rear is lowered, the object displayed on the screen appears farther than the
actual distance.

Variance

Object

When Driving

Rear View Monitor

4-153

CX-3_8GR7-EA-18B_Edition1

2017-12-20 16:18:14

When there is a steep grade behind the vehicle

When there is a steep upgrade (downgrade) behind the vehicle, the object displayed on the
screen appears farther (downgrade: closer) than the actual distance.

Appears 
farther than 
actual 
distance

Appears 
closer than 
actual 
distance

Object at actual 
position

Object at actual position

Object on screen

A: Distance between the vehicle and object displayed on the screen.
B: Actual distance between the vehicle and object.

Object on screen

A

A

B

B

Three-dimensional object on vehicle rear

Because the distance guide lines are displayed based on a flat surface, the distance to the
three-dimensional object displayed on the screen is different from the actual distance.

A

A

C

B

C B

(Actual distance) B>C=A

Sensed distance on screen A>B>C

(Screen display)

(Actual condition)

When Driving

Rear View Monitor

4-154

CX-3_8GR7-EA-18B_Edition1

2017-12-20 16:18:14

▼ Picture Quality Adjustment

WARNING

Always adjust the picture quality of the rear view monitor while the vehicle is stopped:
Do not adjust the picture quality of the rear view monitor while driving the vehicle. Adjusting
the picture quality of the rear view monitor such as brightness, contrast, color, and tint while
driving the vehicle is dangerous as it could distract your attention from the vehicle operation
which could lead to an accident.

Picture quality adjustment must be done while the shift lever/selector lever is in reverse (R).
There are four settings which can be adjusted including, brightness, contrast, tint, and color.
When adjusting, pay sufficient attention to the vehicle surroundings.
1. Select the   icon on the screen to display the tabs.
2. Select the desired tab item.
3. Adjust the brightness, contrast, tint, and color using the slider.

If you need to reset, press the reset button.

4. Select the   icon on the screen to close the tab.

When Driving

Rear View Monitor

4-155

CX-3_8GR7-EA-18B_Edition1

2017-12-20 16:18:14

MEMO

4-156

CX-3_8GR7-EA-18B_Edition1

2017-12-20 16:18:14

5

Interior Features

Use of various features for ride comfort, including air-conditioning and
audio system.

Climate Control System....................5-4

Operating Tips.............................. 5-4
Vent Operation..............................5-5
Manual Type.................................5-7
Fully Automatic Type.................5-12

Before Using the Audio System......5-16

Audio Control Switch.................5-16
AUX/USB mode.........................5-17
Antenna.......................................5-19

Audio Set [Type A (non-
touchscreen)]....................................5-20

Power/Volume/Sound
Controls...................................... 5-20
Clock...........................................5-22
Operating the Radio....................5-23
How to use AUX mode.............. 5-24
How to use USB mode............... 5-25
How to use iPod mode................5-28
Error Indications.........................5-30
Bluetooth

®

..................................5-31

Bluetooth

®

 Preparation.............. 5-34

Available Language.................... 5-43
Security Setting.......................... 5-44
Bluetooth

®

 Audio.......................5-46

Bluetooth

®

 Hands-Free.............. 5-48

Voice Recognition.......................5-56
Voice Recognition Learning
Function (Speaker
Enrollment).................................5-57
Troubleshooting..........................5-60

Audio Set [Type B
(touchscreen)]...................................5-64

Basic Operation Method.............5-64
Home screen............................... 5-68
Volume/Display/Sound
Controls...................................... 5-69
Operating the Radio....................5-71
Operating the Satellite Radio

*

...........

.................................................... 5-75
How to use AUX mode.............. 5-78
How to use USB mode............... 5-79
Bluetooth

®

..................................5-84

Bluetooth

®

 Preparation.............. 5-87

Available Language.................... 5-89
Bluetooth

®

 Audio.......................5-90

How to Use Pandora

®*

...............5-93

How to Use Aha™..................... 5-95
How to Use Stitcher™ Radio..... 5-98
Bluetooth

®

 Hands-Free............ 5-100

Voice Recognition.....................5-110
Settings..................................... 5-112
Applications..............................5-114
Troubleshooting........................5-115

Appendix........................................ 5-120

Things You Need to Know.......5-120

*Some models.

5-1

CX-3_8GR7-EA-18B_Edition1

2017-12-20 16:18:14

Interior Equipment....................... 5-126

Sunvisors.................................. 5-126
Interior Lights...........................5-126
Accessory Socket..................... 5-128
Cup Holder............................... 5-129
Bottle Holder............................5-131
Storage Compartments............. 5-131

5-2

CX-3_8GR7-EA-18B_Edition1

2017-12-20 16:18:14

MEMO

5-3

CX-3_8GR7-EA-18B_Edition1

2017-12-20 16:18:14

Operating Tips

Operate the climate control system with
the engine running.

To prevent the battery from being
discharged, do not leave the fan control
dial on for a long period of time with the
ignition switched ON when the engine is
not running.

Clear all obstructions such as leaves,
snow and ice from the hood and the air
inlet in the cowl grille to improve the
system efficiency.

Use the climate control system to defog
the windows and dehumidify the air.

The recirculate mode should be used
when driving through tunnels or while
in a traffic jam, or when you would like
to shut off outside air for quick cooling
of the interior.

Use the outside air position for
ventilation or windshield defrosting.

If the vehicle has been parked in direct
sunlight during hot weather, open the
windows to let warm air escape, then
run the climate control system.

Run the air conditioner about 10
minutes at least once a month to keep
internal parts lubricated.

Have the air conditioner checked before
the weather gets hot. Lack of refrigerant
may make the air conditioner less
efficient.

The refrigerant specifications are
indicated on a label attached to the
inside of the engine compartment. If the
wrong type of refrigerant is used, it
could result in a serious malfunction of
the air conditioner. Consult a
professional, government certified
repairer for the inspection or repair
because a special device is required for
the air conditioner maintenance.
For details, consult an Authorized
Mazda Dealer.

Label

Interior Features

Climate Control System

5-4

CX-3_8GR7-EA-18B_Edition1

2017-12-20 16:18:14

Vent Operation

▼ Adjusting the Vents

Directing airflow

To adjust the direction of airflow, move
the adjustment knob.

NOTE

When using the air conditioner under
humid ambient temperature conditions,
the system may blow fog from the vents.
This is not a sign of trouble but a result
of humid air being suddenly cooled.

Center vents (driver) and Side vents

Air vent open/close

NOTE
The air vents can be fully opened and
closed by operating the knob.

Open

Close

Knob

Airflow direction adjustment

Knob

Center vents (front passenger)

Air vent open/close

Open

Close

Knob

Airflow direction adjustment

Knob

Interior Features

Climate Control System

5-5

CX-3_8GR7-EA-18B_Edition1

2017-12-20 16:18:14

▼ Selecting the Airflow Mode

Dashboard Vents

Dashboard and Floor Vents

Floor Vents

Defroster and Floor Vents

Defroster Vents

NOTE
The location airflow exits the air vents and the airflow amount may change depending on
the open or close status of the air vents.

Interior Features

Climate Control System

5-6

CX-3_8GR7-EA-18B_Edition1

2017-12-20 16:18:14

Manual Type

Rear window defogger switch

Air intake selector (outside air position)

Air intake selector (recirculated air position)

Fan control dial

Temperature control dial

A/C switch

Mode selector dial

Temperature control dial

Fan control dial

Rear window defogger switch

A/C switch

Air intake selector

Mode selector dial

Type A

Type B

Interior Features

Climate Control System

5-7

CX-3_8GR7-EA-18B_Edition1

2017-12-20 16:18:14

▼ Control Switches

Temperature control dial

This dial controls temperature. Turn it
clockwise for hot and counterclockwise
for cold.

NOTE
(Type A)
When the mode is set to   or   with the
fan control dial in a position other than 0
and the temperature control dial in the
maximum cold position, the air intake
selector switches to the recirculated air
position and the A/C turns on
automatically.
If A/C is not desired, press the A/C switch
to turn it off.

Fan control dial

This dial allows variable fan speeds.
(Type A)
The fan has seven speeds.
(Type B)
0―Fan off
1―Low speed
2―Medium low speed
3―Medium high speed
4―High speed

Mode selector dial

Turn the mode selector dial to select
airflow mode (page 5-6).

NOTE

The mode selector dial can be set at the
intermediate positions ( ) between each
mode. Set the dial to an intermediate
position if you want to split the airflow
between the two modes.

For example, when the mode selector
dial is at the   position between the 
and   positions, airflow from the floor
vent is less than that of the   position.

A/C switch

(Type A)
Press the A/C switch to turn the air
conditioner on. The indicator light on the
switch will illuminate when the fan control
dial is in any position except OFF.
(Type B)
Press the A/C switch to turn the air
conditioner on. The indicator light on the
switch will illuminate when the fan control
dial is set at position 1, 2, 3, or 4.
Press the switch once again to turn the air
conditioner off.

NOTE
The air conditioner may not function when
the outside temperature approaches 0 °C
(32 °F).

Air intake selector (Type A)

This switch controls the source of air
entering the vehicle.
Press the air intake selector switch to
alternate between the outside air and
recirculated air positions.

Recirculated air position (

)

Outside air is shut off. Air within the
vehicle is recirculated.

Outside air position (

)

Outside air is allowed to enter the cabin.
Use this mode for ventilation or
windshield defrosting.

Interior Features

Climate Control System

5-8

CX-3_8GR7-EA-18B_Edition1

2017-12-20 16:18:14

WARNING

Do not use the recirculated air position in
cold or rainy weather:
Using the recirculated air position in cold or
rainy weather is dangerous as it will cause
the windows to fog up. Your vision will be
hampered, which could lead to a serious
accident.

Air intake selector (Type B)

This lever controls the source of air
entering the vehicle.
 
It is recommended that under normal
conditions the switch be kept in the
outside air position.

Recirculated air position (

)

Outside air is shut off. Air within the
vehicle is recirculated.

Outside air position (

)

Outside air is taken into the vehicle. Use
this position for normal ventilation and
heating.

WARNING

Do not use the 

 position in cold or rainy

weather:
Using the 

 position in cold or rainy

weather is dangerous as it will cause the
windows to fog up. Your vision will be
hampered, which could lead to a serious
accident.

Rear window defogger switch

Press the rear window defogger switch to
defrost the rear window.

Refer to Rear Window Defogger on page
4-53.

▼ Heating

1. Set the mode selector dial to the 

position.

2. (Type A)

Set the air intake selector to the outside
air position.
(Type B)
Set the air intake selector to the 
position.

3. Set the temperature control dial to the

hot position.

4. Set the fan control dial to the desired

speed.

5. If dehumidified heating is desired, turn

on the air conditioner.

NOTE

If the windshield fogs up easily, set the
mode selector dial to the   position.

If cooler air is desired at face level, set
the mode selector dial to the   position
and adjust the temperature control dial
to maintain maximum comfort.

The air to the floor is warmer than air
to the face (except when the temperature
control dial is set at the extreme hot or
cold position).

▼ Cooling

1. Set the mode selector dial to the 

position.

2. Set the temperature control dial to the

cold position.

3. Set the fan control dial to the desired

speed.

4. Turn on the air conditioner by pressing

the A/C switch.

Interior Features

Climate Control System

5-9

CX-3_8GR7-EA-18B_Edition1

2017-12-20 16:18:14

5. After cooling begins, adjust the fan

control dial and temperature control
dial as needed to maintain maximum
comfort.

CAUTION

If the air conditioner is used while driving
up long hills or in heavy traffic, monitor the
high engine coolant temperature warning
light to see if it is illuminated or flashing
(page 4-24).
The air conditioner may cause engine
overheating. If the warning light is
illuminated or flashing, turn the air
conditioner off (page 7-22).

NOTE

(Type A)
When maximum cooling is desired, set
the temperature control dial to the
extreme cold position and set the air
intake selector to the recirculated air
position, then turn the fan control dial
fully clockwise.

(Type B)
When maximum cooling is desired, set
the temperature control dial to the
extreme cold position and set the air
intake selector to the recirculated air
position, then set the fan control dial to
position 4.

If warmer air is desired at floor level,
set the mode selector dial at the 
position and adjust the temperature
control dial to maintain maximum
comfort.

The air to the floor is warmer than air
to the face (except when the temperature
control dial is set at the extreme hot or
cold position).

▼ Ventilation

1. Set the mode selector dial to the 

position.

2. (Type A)

Set the air intake selector to the outside
air position.
(Type B)
Set the air intake selector to the 
position.

3. Set the temperature control dial to the

desired position.

4. Set the fan control dial to the desired

speed.

▼ Windshield Defrosting and

Defogging

1. Set the mode selector dial to the 

position.

2. (Type B)

Set the air intake selector to the 
position.

3. Set the temperature control dial to the

desired position.

4. Set the fan control dial to the desired

speed.

5. If dehumidified heating is desired, turn

on the air conditioner.

Interior Features

Climate Control System

5-10

CX-3_8GR7-EA-18B_Edition1

2017-12-20 16:18:14

WARNING

Do not defog the windshield using the 
position with the temperature control set
to the cold position:
Using the 

 position with the temperature

control set to the cold position is
dangerous as it will cause the outside of the
windshield to fog up. Your vision will be
hampered, which could lead to a serious
accident. Set the temperature control to
the hot or warm position when using the

 position.

NOTE

(Type A)
For maximum defrosting, turn on the air
conditioner, set the temperature control
dial to the extreme hot position, and turn
the fan control dial fully clockwise.

(Type B)
For maximum defrosting, turn on the air
conditioner, set the temperature control
dial to the extreme hot position, and the
fan control dial to position 4.

If warm air is desired at the floor, set the
mode selector dial to the   position.

(Type A)
In the   or 

 position, the air

conditioner is automatically turned on
and the outside air position is
automatically selected to defrost the
windshield. In the   or 

 position, the

outside air position cannot be changed
to the recirculated air position.

▼ Dehumidifying

Operate the air conditioner in cool or cold
weather to help defog the windshield and
side windows.
1. Set the mode selector dial to the

desired position.

2. (Type A)

Set the air intake selector to the outside
air position.
(Type B)
Set the air intake selector to the 
position.

3. Set the temperature control dial to the

desired position.

4. Set the fan control dial to the desired

speed.

5. Turn on the air conditioner by pressing

the A/C switch.

NOTE
One of the functions of the air conditioner
is dehumidifying the air and, to use this
function, the temperature does not have to
be set to cold. Therefore, set the
temperature control dial to the desired
position (hot or cold) and turn on the air
conditioner when you want to dehumidify
the cabin air.

Interior Features

Climate Control System

5-11

CX-3_8GR7-EA-18B_Edition1

2017-12-20 16:18:14


Content   ..  16  17  18  19   ..