Jaguar XJ-S. Service manual - part 95


  Index      Jaguar     Jaguar XJ-S - service and repair manual 2006 year


Search            


Content   ..  93  94  95  96   ..


Jaguar XJ-S. Service manual - part 95


375

Besides providing lousy response when new, the OEM mounts are also known for a lack of durability, and of course 
when they come apart they come apart all at once.  Ray Johnson says, “everything was fine and then the next thing I 
knew I was tacking a 4200# sailboat down the highway.” 

On the XJ-S discussion list on the Internet, this author mentioned the possibility that this inconsistent response might 
actually be dangerous, especially with drivers that never drive hard and therefore are taken by surprise in the first panic 
situation they encounter.  Of course, the first panic situation may rip the mounts apart -- but do you really care exactly 
why the mounts don’t work right in the first panic situation?  Jim Downes responded:  “Many (too many) moons ago 
when I was a student, I worked part-time at a Jag/Rolls dealership in Ireland.  Occasionally, a customer's Jag would be 
towed in after a very bad crash.  Most customers complained of an apparent loss of directional control during (as Kirby 
correctly identifies) a 'panic' situation.  In almost every case, the bushings were worn and behaved exactly as described 
above.  Absolutely all of the senior mechanics there felt that the bushings were dangerous after a few months of use.” 

The solution is to replace the steering rack mount bushings with ones that are not merely stiffer but of a totally different 
design.  This modification is so common that virtually every aftermarket business dealing in Jaguar stuff offers a kit.  
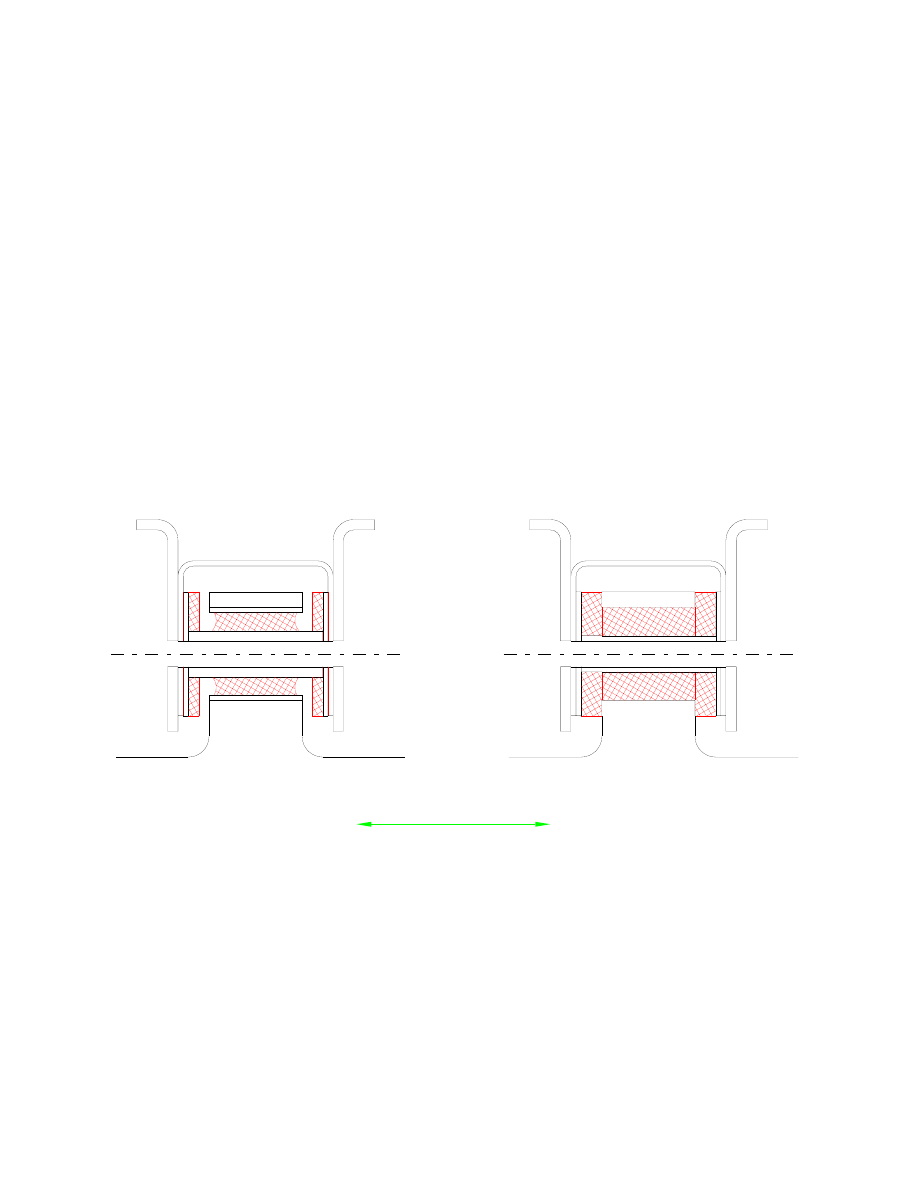
The John’s Cars design (see page 715) subjects the elastomers to compression only, and eliminates the inconsistency in 
the steering response.  They use polyurethane, making the mounts stiff but not totally rigid.  The entire kit is about $50, 
and well worth the money.  A similar kit is the Mackay Sure Trak A1598U, available from BPI (see page 689).  XK’s 
unlimited (see page 694) offers a kit of slightly different design made of delrin, but the function is similar. 

Folks, please take this recommendation seriously:  even if the stock bushings have not yet failed, even if they are brand 
new
, replace them with aftermarket bushings as soon as possible.  If you are determined to keep your car “original”, 
please yank those original junk bushings out and carefully box them away for future concours events, and install some 
good mounts for any actual driving you may do.  Downes concurs: “Regardless of perceived 'quality' of feel, when I 
move the wheel expecting a twenty degree turn, that's what I want, not fifteen or twenty five degrees depending on 
side-loads, braking loads, road camber or any of the other variables that can influence the 'mood' of the original 
bushings.” 

STOCK

BUSHING

AFTERMARKET

BUSHING

DIRECTION OF

STEERING FORCES


Figure 18 - Original vs. Aftermarket Steering Rack Mounts 


376

The stock assembly includes a sheet metal U-channel that fits around both bushing assemblies on the driver’s side, 
holding the whole mess together as you offer it up to the car.  When you lower the rack, this piece might stay up there; 
pull it out, it’s helpful for installation.  The aftermarket bushing set from John’s Cars includes a new one of these pieces 
-- very nice, since the old one might be a little mangled.  

Because there has been some confusion due to inadequate instructions provided with these kits, one thing needs to be 
made very clear: when these aftermarket bushings are installed, they should fit snugly within the bosses on the 
subframe.  There should be no gaps or spaces whatsoever.  If the boss is wide enough that the bushing assembly fits 
with space left over, some 5/16” fender washers should be installed to fill the gaps.  The mounting bolts should be tight
compressing the boss (Slightly!  That’s why you need to add fender washers if necessary!) onto the ends of the metal 
tube within the bushing. 

Jaguar itself offers a stiffer mount scheme in its “SportsPack”, using one normal mount (CAC 1635) and two special 
ones (CBC 5928 or CBC 9107).  While an improvement, this scheme still maintains the lousy shear-loaded design, and 
it is still a better idea to get the aftermarket kits instead; they are easier to install (no press fit required, since there is no 
shear loading) and a good bit cheaper. 

The urethane (red) mounts don’t last forever, however.  Lee Opausky reports:  “Installed 5 or 6 years and 40 M km ago, 
John's poli bushing failed in the last 3 weeks at a very rapid rate.  The steering wheel yesterday went to a "full half 
turn/no change in direction" mode from somewhat loose steering 3 weeks ago.  This part was very good to us for many 
years since it first replaced the "British rubber" and I have no probs with the quality of the part.  What I find intriguing 
is the rapidity of the failure with practically no warning signs.  3 mos ago I had these guys out when the rack had to be 
lowered to install a new starter, and a visual did not reveal any signs of fatigue.  Now they are literally mushed with 
only the outer rim in one piece - like a slice of orange peel. 

“The poli bushings were of orange color and gave excellent service for 5 or 6 years.  No oil or other chemical came into 
contact with these parts (clean car) and all 3 seem to have been affected at the same time to the same extent.”  Of 
course, one wouldn’t expect just one or two to be affected; when the rack decided to move sideways, it must take out all 
three to do it. 

Larue Boyce:  “I installed John's Cars steering rack bushings in my '91 in in January of 1998 at 98,368 miles.  I 
replaced them with the black ones from Welch Jaguar in Dec of 2001 at 140,439 miles when I replaced the rack with a 
rebuilt from Coventry West.  I think the bushings did a great job and were worn out after 42,000 miles along with the 
heat from the motor and Florida.  The bushings had worn, discolored and the end pieces separated into several "O" s.” 

So far, durability seems to be an issue in urethane aftermarket mounts but not delrin (grey) mounts, and may be due to 
this being a poor environment for urethane.  Jim Cantrell says, “The melting point is about 350°F and the maximum 
recommended service temperature is 250°F.  Above this temperature, the esters boil out of the matrix and brittleness 
follows.  However, they rate poor in resistance to hydrocarbon exposure, acids, synthetic lubricants and hydraulic 
fluids.  Could be something there in the engine compartment besides heat that degrades the material.” 

Bolles suggests that instead of replacing the original mounts, you merely insert washers on either side of them to reduce 
the side-to-side travel; washers from mag wheel lug nuts work well.  This makes the original mounts last indefinitely, 
since they hardly move. 

Another idea may be to cut out some hard rubber pieces -- preferably with some cord for strength, like old tires or drive 
belts -- to install on either side of the original mounts, providing a compression member to restrain the side-to-side 
motion.  Make sure to fill the space, leave no gaps; for the rack to move at all, it should be compressing material.  You 
might consider removing the OEM rubber-faced washers on each side of each mount and installing fender washers 
instead along with a broad flat chunk of hard rubber the same or larger OD as the mounting lug and perhaps 1/4” thick. 

Since the three mount bushings work in unison, the stiffness of the rack mount system can be controlled by altering just 
one, two, or all three mounts.  However, this author recommends you treat all three bushings the same so as to 
distribute the load equally on all three mount lugs on the rack rather than concentrating the load on one or two lugs.  An 
alternative idea is to stiffen the two mounts on the driver’s side and allow the one on the passenger’s side to remain 
flexible; some suggest this will minimize stresses due to differences in thermal expansion, allowing the passenger’s end 
to “float” a bit while the driver’s end remains firmly anchored.  It’s not likely there are any significant stresses due to 


377

thermal expansion here, though; stiffening all three while making sure the fender washers are positioned properly to 
avoid stressing the lugs when the bolts are tightened should work best. 


STEERING RACK MOUNT BOLTS:  If you happen to be working on the rack with either the engine or the front 
subframe out of the car, you may be able to put the bolts in any way you wish.  But for the benefit of those who work 
on the car later, please install the upper mount bolt on the driver’s side from the outside inward, and the lower bolts on 
both sides from the inside outward.  This makes it much easier to install or remove the rack with the engine and front 
suspension in the way. 

If you must replace the mounting bolts, be careful not to use bolts that are too long.  When complete, be sure the upper 
bolt on the driver’s side does not protrude too close to the engine block, since the engine moves on its mounts and will 
beat against the bolt.  And the lower bolts should not protrude too closely to the lower A-arms, since they are likewise 
mounted on rubber and may move during operation. 


STEERING RACK REMOVAL:  If you have to totally remove the steering rack, one problem is how to remove the 
pinch bolt that connects the steering column swivel joint to the tower shaft.  Remove the oil filter first, then turn the 
steering wheel until the pinch bolt is positioned where you can get at it. 

Also note that the pinch bolt must be completely removed for the swivel joint to be disconnected from the tower shaft.  
The tower shaft has a recess the bolt fits through; merely loosening it will not permit removal. 

You might find it helpful to carefully mark the relative position of these parts prior to disassembly. 


STEERING RACK TOWER SHAFT SEAL:  This seal is prone to leakage.  John’s Cars (see page 715) offers an 
aftermarket seal that is supposedly better than the original.  It better be, it’s quite expensive. 

Len Olsen offers another option:  “OEM or aftermarket kits no longer include original 'steel cup' style seal.  New type 
frays quickly.  Better than original can be purchased from Autozone, included in kit #7910 (cost $10). 

“Power steering kit #7910 is for a 1980 Chevrolet Camaro, 350 V8, 5.7 liters.  The number stamped on actual seal in 
the kit is '1 PC 7808195', but AutoZone says that as far as they know it is only available as part of kit.  Take my word 
for it, it is better than original for the XJ-S (or any Jaguar sporting the same rack and pinion assembly) being that it is 
slightly oversize and "beefier".  It's been in there 18 months, after wearing out 3 other types of seals in quick 
succession.  Burrs, debris, etc. helped 'do in' the others, but this one's tougher. 

“AutoZone had told me that that the unidentified "Powercraft" seal kit #7910 was from a '85 Chev 350ci truck, but it 
also showed up on their system for a 1980 Chevy Camaro.  Oh well, go figure!  It worked for my Kitty.” 

Tom Bennett adds another:  “Go to your local seal store and ask for an oil seal with the following #22-30-6mm.  The 
I.D. is 22, O.D. 30 and the height is 6mm; this is 2mm more in height than the Jag "New" style but I can assure you 
fitting it is no problem at all!  The particular seal I bought was blue and flexible, no idea what the material was, not 
rubber though!  Cost about $3.” 

Reportedly, one problem associated with the tower seal is incorrect installation by driving it too far into the housing.  
Be sure not to drive it any deeper than it needs to go. 


STEERING RACK REBUILDING:  Judging from the experience of other XJ owners on the Internet, you’re going to 
need a rack rebuild sooner or later.  They start leaking power steering fluid out of the boots.  Replacing the boots won’t 
help, they have deliberate drain holes in them!  They’re not supposed to hold fluid, they just keep dirt out.  The fluid is 
supposed to be kept in the rack by seals on each end of the power piston itself.  If the boots are filling with fluid, rack 
rebuild time.  Of course, there are products on the market that you can supposedly pour into your power steering system 
to stop leaks, but these will be a temporary fix at best. 


378

There is a “seal kit” available for the steering rack.  Note that reportedly the tower shaft seal is not included in this kit; 
check with your source and order the tower shaft seal separately if necessary. 

A high percentage of people who have rebuilt their own steering racks have reported failure on the first try, and all for 
the same reason: when installing the rack bar through the seal on the driver’s side end of the rack, the teeth on the rack 
bar ruined the seal.  This typically results in ordering an entire new seal kit to obtain this one seal, and greater care the 
next try.  The repair manual calls for wrapping the rack with tape prior to sliding the seal over it; apparently this is the 
minimal precaution, experience says to lube it up as well and exercise extreme caution during assembly.  It has also 
been suggested that the seal and the part it mounts into be slid over the rack separately and then assembled, since 
installation in the housing makes the seal more difficult to work with. 

Even with care to not damage that seal on installation, your rack rebuild still might not be successful; you may still have 
fluid in the boots within seconds after startup.  Gregory Wells of Coventry West, Inc. (page 690) says, “We rebuild a 
large number of Jag racks each month and we find that the wear causing the leaks is usually not just the seals; the 
sealing surfaces wear, too.  And unless these are checked and dealt with in one way or another, the rack will probably 
leak immediately or sooner than you'd like.  Modern elastomer seals tend to wear the metal sealing surfaces more than 
the old natural rubber seals.  We have polishing equipment we use to polish the seal surfaces; if they are too worn to 
polish out the grooves without reducing the diameter of the shafts below what we feel are minimum specs, we replace 
the part from the usable spares pile.” 


POWER STEERING BOOST REDUCTION:  Many drivers object to the inert feel of the overboosted power steering, 
and seek ways to reduce the assist.  One of the simplest cures is to install a smaller diameter steering wheel; Momo and 
others make aftermarket wheels and adapters.  The owner of a later car, of course, has a driver’s side air bag to contend 
with. 

John Goodman points out that the XJR-S has reduced power assist, and it may be possible to retrofit the valve body 
onto the steering rack in the regular XJ-S.  “I don't think the racks have changed much, the valve is probably  
interchangeable.  Reduces assistance by.... well, you need two hands to turn the wheel at standstill, normal round town 
corners are OK.  On the road it is noticeably heavier but much improved. 

“SPC 1034 is the part no. for the rack valve from an '89 parts list. 

“SPC 1286 is the part no. for complete rack from '92 parts list. 

“SPC 1158 is the part no. for the rack valve again '92 parts list. 

“The rest of the steering is std.  Front springs/shocks are unique XJR-S items though.” 

The XJ-S owner is advised to only consider the boost reduction mods after replacing the rack mounts with aftermarket 
items.  The rack mounts are the cheaper mod, they will usually provide the feel the driver is looking for -- and they 
make it easier to take the rack in and out to make further mods like the valve replacement. 


STEERING WHEEL ALIGNMENT:  If your steering wheel is cockeyed when driving in a straight line, your problem 
may be in the relationship between the steering wheel and the rack, or between the rack and the front wheels.  Jaguar 
has provided a nifty method of determining which.  If you remove the grease fitting from the steering rack, a dowel (or 
special Jaguar tool no. 12279) can be inserted to engage a notch in the rack.  When the notch is lined up with the grease 
fitting hole, the rack is centered.  The steering wheel can then be lined up properly.  Once this is done, a misalignment 
when driving straight (be sure you’re on a level road, and not in the right lane of a road that is crowned) calls for 
correction at the tie rods.  If the correction is minor and you are confident that the alignment is otherwise OK, this can 
be done by carefully marking both tie rods and adjusting both of them the same amount. 

Franck Guilloteau says “that "special tool" can easily be replaced with a screwdriver (torx T20 for example) that has the 
same ID of the zerk (sp?) grease fitting on the steering rack - remove the fitting, insert the screwdriver - move the 
wheels until it drops in a rack groove - the rack is centered!” 


Content   ..  93  94  95  96   ..