Jaguar XK. Service manual - part 22


  Index      Jaguar     Jaguar XK - service and repair manual 2007 year


Search            


Content   ..  20  21  22  23   ..


Jaguar XK. Service manual - part 22


91

Lighting

R

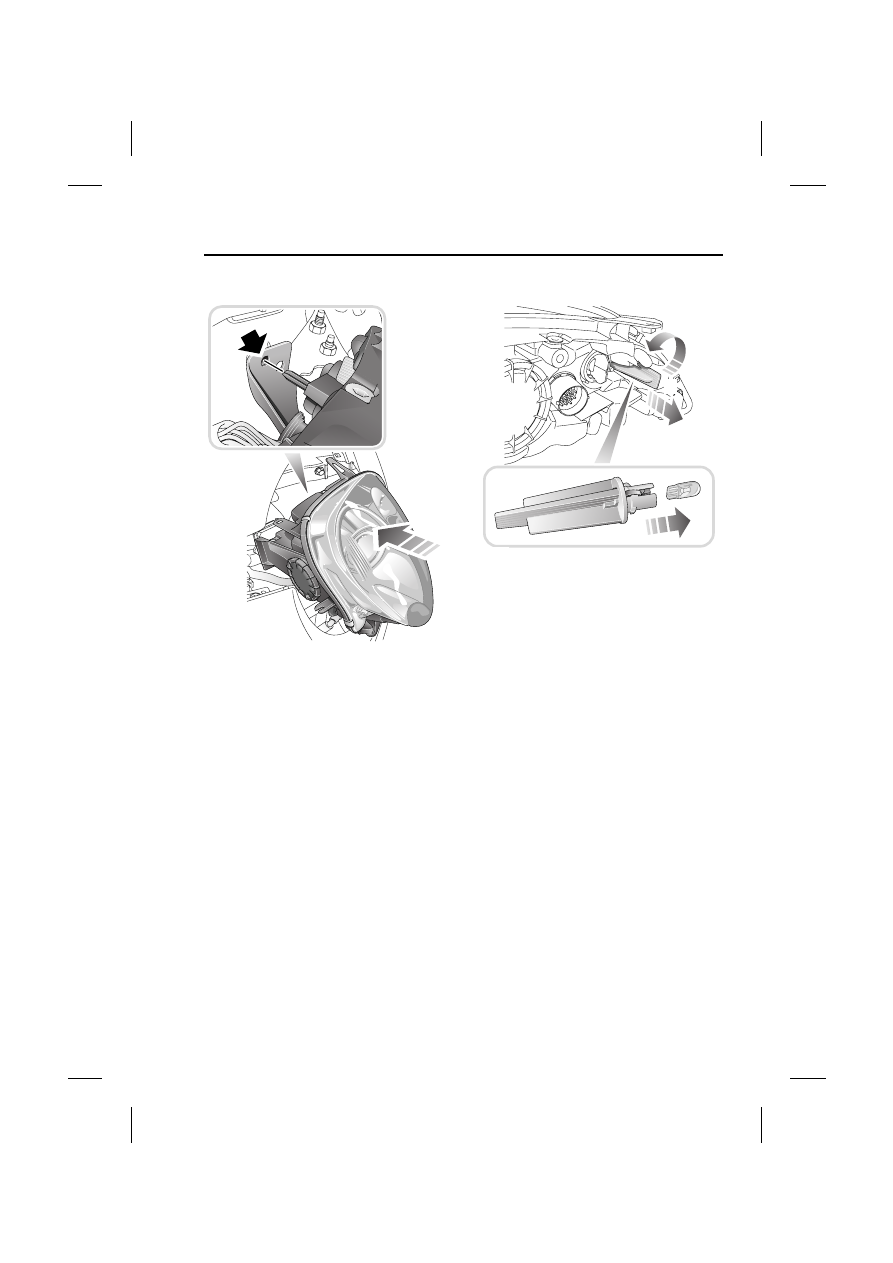
Refitting the headlamp unit

1. Reconnect the wiring multi-plug 

connector.

2. Offer up the unit into position.

3. Ensure that the locating peg is fitted 

into the in-board locating hole.

4. To secure the headlamp unit, first 

secure the wheel arch screw, then 
repeat the removal procedure in the 
reverse order, ensuring that the 
powerwash pipe is reconnected.

Note: After the replacement of any bulb 
and the fitting of the headlamp unit, the 
aim of the headlamps should be checked 
by a Jaguar Dealer.

Front side marker lamp

1. Remove the headlamp unit.

2. Twist the bulb holder counter 

clockwise and pull out the bulb 
complete with the bulb holder.

3. Pull the bulb out of the bulb holder.

4. Insert the new bulb (WY5W) and 

repeat the above procedure in 
reverse order.

3

E91169

2

3

E91170

Lighting

92

L

Front direction indicator lamp

1. Remove the headlamp unit.

2. Twist the bulb holder counter 

clockwise and pull out the bulb 
complete with the electrical 
connector.

3. Twist and pull the bulb out of the bulb 

holder.

4. Insert the new bulb (3457AK) and 

repeat the above procedure in 
reverse order.

Front sidelamp

1. Remove the headlamp unit.

2. Twist and lift off the side domed cap.

3. Pull out the bulb complete with bulb 

holder.

4. Pull the bulb out of the bulb holder.

5. Insert the new bulb (W5W) and repeat 

the above procedure in the reverse 
order. Ensure that the cover is fitted 
correctly to retain the water tightness.

E93800

2

3

2

4

E91172

93

Lighting

R

High and low beam projector unit

1. Remove the headlamp unit.

2. Twist and lift off the rear domed cap.

3. Twist the bulb unit counter clockwise 

to unlock it. Pull the bulb unit clear of 
the headlight unit.

4. Press the electrical connector release 

lever and disconnect the bulb unit.

5. Press the bulb unit adaptor ring catch 

and remove the adaptor ring from the 
bulb unit.

6. Secure the bulb unit adaptor ring onto 

the new bulb (D1S35W) and repeat 
the above procedure in the reverse 
order. Ensure that the cover is fitted 
correctly to retain the water tightness.

CAUTION

It is strongly advised that the High 
Intensity Discharge (HID) Xenon 
low and high beam project unit 

(D1S35W) should be replaced by a 
Jaguar Dealer.

3

2

4

5

E91173

Lighting

94

L

Cornering or static bending lamp

1. Remove the headlamp unit.

2. Twist and lift off the side domed cap.

3. Twist the bulb holder counter 

clockwise to unlock, then pull out the 
bulb complete with electrical 
connector.

4. To release the bulb unit, lift the two 

catches of the electrical connector, 
then pull to remove the bulb unit.

5. Insert the new bulb unit (H8) and 

repeat the above procedure in the 
reverse order. Ensure that the cover is 
fitted correctly to retain the water 
tightness.

Rear fog, reverse and high level 
brake lamps

These lamps are LED units and are 
integral to the luggage compartment lid. 
They should be replaced by a Jaguar 
Dealer.

CAUTION

Halogen bulbs will be damaged if 
touched by hand or contaminated 
with oil or grease. It is important to 

use clean gloves or lint free cloth when 
handling a bulb which is to be used 
again. A contaminated bulb may be 
cleaned with methylated spirit before 
refitting.

2

3

4

E91174

WARNING

LED lamp units operate at a high 
temperature. If they have recently 
been in use, allow sufficient time 

for them to cool down before touching 
them.


Content   ..  20  21  22  23   ..