Jaguar XK. Service manual - part 18


  Index      Jaguar     Jaguar XK - service and repair manual 2007 year


Search            


Content   ..  16  17  18  19   ..


Jaguar XK. Service manual - part 18


75

Child safety

R

BOOSTER CUSHIONS

In a situation where a child is too large to 
fit into a child safety seat, but is still too 
small to safely fit the three point belt 
properly, a booster seat is recommended 
for maximum safety. Follow the 
manufacturer's instructions for fitting and 
use, then adjust the seat belt to rest on 
the child's shoulder, not the neck.

LATCH ANCHOR POINTS

(Latch Anchorages and Tethers for CHild 
restraints)

The rear seats of your vehicle are fitted 
with LATCH brackets that allow the 
LATCH child seat to be secured directly 
and easily to the vehicle body without the 
use of adult seat belts.

The LATCH system reduces the 
likelihood of incorrect fitting and is also 
quicker and simpler to use.

Note: LATCH anchorages are provided 
for rear seats only. LATCH child restraints 
should be securely attached following the 
manufacturer's instructions at these 
locations only.

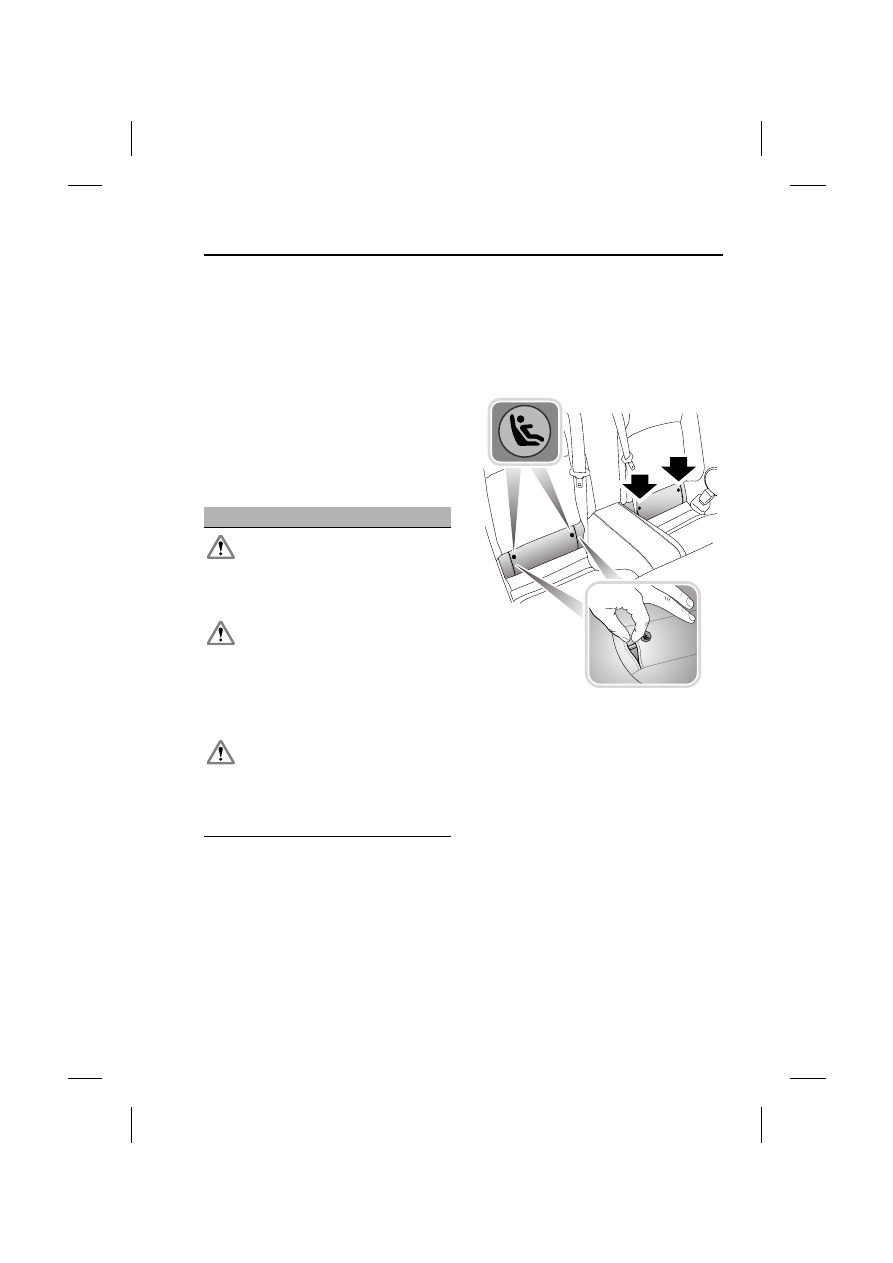
Installing a LATCH child seat

The anchorage loops are accessible 
through two trimmed apertures at the 
back of the rear seat cushion. Their 
location is highlighted by the small tag 
labels with a child seat graphic. The 
anchorage loops are located 
approximately 60 mm (2.5 inches) below 
each label. Pull back the side of the trim 
to reveal the aperture and the anchorage 
loops.

Fit the seat as follows (the following is to 
be considered only as a guide):

1. Push the adult seat belt buckles into 

their stowage recesses, to ensure 
they do not interfere with the fitment 
of the child seat.

WARNINGS

If the restraint is not correctly 
anchored, there is a significant 
risk of injury to the child in the 

event of a collision or emergency 
braking.

Child restraint anchorages are 
designed to withstand only loads 
imposed by correctly fitted child 

restraints. Under no circumstances are 
they to be used for adult seat belts, 
harnesses, or for attaching other items or 
equipment to the vehicle.

If removing a head restraint in 
order to fit a child restraint, always 
secure the head restraint when 

storing it. If left loose in the vehicle it may 
cause death or serious injury during 
sudden braking or an impact.

E91111

Child safety

76

L

2. Make sure there is nothing 

obstructing the seat mounting 
mechanism at the anchorage points.

3. Fully extend the two attachment legs 

on the child seat. Ensure the hook at 
the end of each leg is open.

4. Position the attachment legs just in 

front of the trimmed apertures for the 
LATCH anchorage loops. Push the 
anchorage leg through the trimmed 
aperture to engage with the vehicle’s 
anchorage loop. There should be an 
audible click.

5. Repeat Step 4 for the child seat’s 

second anchorage leg.

6. Using firm and even pressure on both 

sides, push the child seat rearwards 
until it is secured firmly against the 
seat back. Make sure you do not trap 
the top tether strap behind the child 
seat.

7. If your vehicle is fitted with top tether 

anchorage brackets, make sure that 
the top tether strap is secured.

8. As a final check, firmly pull both sides 

of the seat to confirm that it is 
correctly locked into position.

Removing the LATCH seat

To remove the LATCH child seat, press 
the locking button on each side of the 
seat to release anchorage legs. If your 
vehicle is fitted with top tether 
anchorages, undo the top tether strap 
and lift the child seat from the vehicle.

E91112

CAUTION

Always follow the manufacturer’s 
instructions supplied with the 
LATCH child seat.

77

Steering wheel

R

Steering wheel

ADJUSTING THE STEERING 
WHEEL

The steering wheel can be adjusted for tilt 
and reach.

1. Turn the switch to the COLUMN or 

AUTO position.

2. Move the switch forwards or 

backwards to adjust reach.

3. Move the switch up or down to adjust 

tilt.

Three steering wheel positions can be 
stored and recalled by the driver position 
memory system.  See MEMORY 
FUNCTION
 (page 150).

The message centre will indicate which 
switch position has been selected by 
displaying the message COLUMN 
ADJUST
 or COLUMN ADJUST AUTO.

Entry and exit mode

Entry and exit mode provides automatic 
movement of the steering column to 
allow easier entry to or exit from the 
vehicle.

Entry and exit mode is selected by setting 
the steering column adjustment switch to 
the AUTO position.

Exit: If the ignition system is in the 
convenience mode position and the 
driver’s door is opened, the steering 
column will move to the uppermost tilt 
position, unless already in that position.

Entry: When the door is closed and the 
START/STOP button is pressed, the 
steering column will return to the previous 
position.

WARNING

Never adjust the steering wheel 
position whilst the vehicle is in 
motion. Doing so will reduce 

control of the vehicle, and may cause 
unpredictable steering movements.

CAUTION

Do not use steering wheel mounted 
security devices since movement 
of the steering wheel in entry or exit 

mode could result in damage to the 
vehicle (e.g. the windscreen) or possible 
injury to the occupant.

E91122

Steering wheel

78

L

Notes on entry and exit mode 
operation

• If the steering column switch is 

moved away from AUTO whilst the 
steering column is tilted away, the 
steering column will move back to its 
previous position when the driver’s 
door is closed and the START/STOP 
button is pressed.

• If the steering column is adjusted 

during entry and exit operation, 
steering column movement will stop.

HORN

The dual tone horn is operated by 
pressing the centre pad on the steering 
wheel.

The horn also operates as a warning horn 
if the vehicle alarm system is activated.

HEATED STEERING WHEEL

The heated steering wheel is activated via 
the touch-screen main Home screen.

With the engine running, press the 
steering wheel icon for heating either ON 
or OFF.

The heated steering wheel can also be 
activated via the Climate Control main 
screen by pressing the steering wheel 
icon for heating either ON or OFF, while 
the engine is running.

E91123

Home

Audio

Climate

Phone

Navigation

Vehicle

External

Left

Right

20

21

C

C

12

C

.0

.5

Radio
98.9

FM1

BBC R1

TP TA PTY

Valet

12 : 26 pm

E91124

Settings

Temp. sync.

External

12

C

Auto

Left

Right

23

21

C

.5 C

Auto

Econ

Climate

.5

Auto

Climate

12 : 26 pm

E91125


Content   ..  16  17  18  19   ..