JAC Pick-Up. Service manual - part 10


  Index      JAC     JAC Pick-Up - service and repair manual


Search            


Content   ..  8  9  10  11   ..


JAC Pick-Up. Service manual - part 10


Fuse

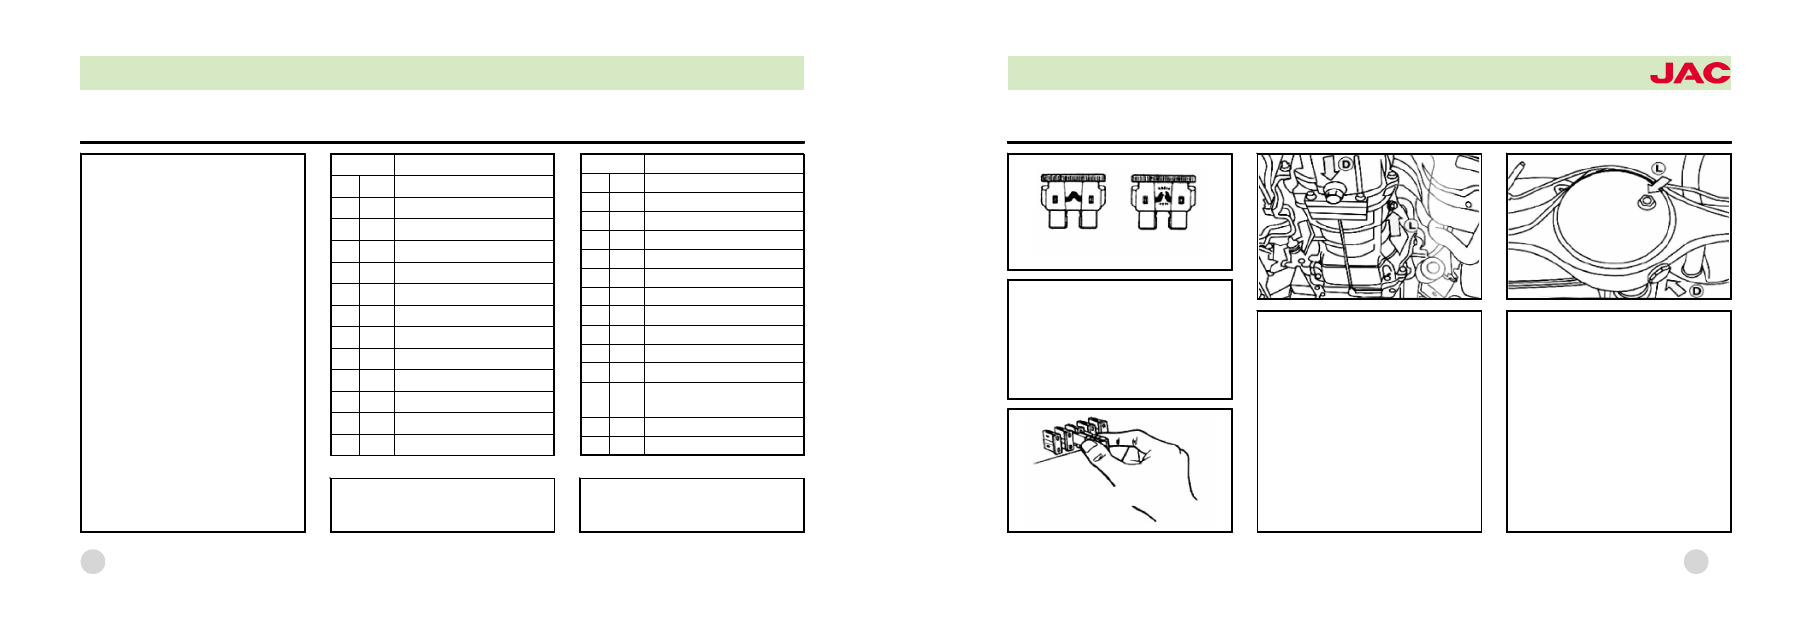
In the figure above, the LH fuse
is operative and the RH is de鄄
fective. Use a fuse piler to re鄄
place the defective fuse with the
same sized one.

Lubrication

Replacing Gearbox Oil

Remove the drain plug under the
gearbox housing. Fill the speci鄄
fied oil into the gearbox through
the screw-plug hole. Stop filling
until oil overflows from the same
hole.

Replacing Main Reducer Oil

Remove the drain plug to dis鄄
charge gear oil from the rear
axle. Fill the specified gear oil in鄄
to the axle housing through the
screw-plug hole. Stop filling un鄄
til oil overflows from the same
hole.

4 -03

Ampere

Application

1

15A Headlamp

2

15A Headlamp

3

10A AC

4

20A Blower

5

10A AC Fan

6

10A Horn

7

10A Warning/Direction Lamp

8

10A Width Lamp

9

15A Front Fog Lamp

10 10A Rear Fog Lamp
11 20A Spare
12 15A Spare
13 10A Spare

Fuse

Fuse Box

The fuse boxes are fitted re鄄
spectively under the driver's in鄄
strument panel and at the right
of engine bay.
The cover can be simply re鄄
moved by a hand.
There are three spare fuses in
the box (20A, 15A and 10A).
* Use the same sized fuse for
replacement; otherwise it may
lead to a fire.
* If the spare fuse blows too, ex鄄
amine the circuit at the nearest
franchised JAC service provider
before it gets worsen.

Fuses in Engine Bay

Fuse Box (LH and Lower Posi鄄
tion of Instrument Panel)

Ampere

Application

1

15A Coil

2

Not Used

3

15A Receiver, Cigarette Lighter

4

10A Charging Indicator

5

Spare

6

Spare

7

Spare

8

10A Brake Lamp

9

10A Courtesy lamp

10 15A Central Lock
11

Not Used

12 15A

Wiper and Windscreen
Washing Device

13 10A Instrument Lamp
14 15A Reverse Lamp

4 -02

OWNER爷S MANUAL

pick-up

Lubrication

Lubricating the driveshaft

Add No. 3 lubricant to the drive
shaft as indicated. Stop filling
until an overflow.

Oil-water Separator

Push the upper button on the
oil -water separator up and
down to discharge air trapped
in the circuit, which is a crucial
operation.

Drain moisture in the circuit as
indicated in order to clean fuel

4 -05

Lubrication

Replacing Power Steering
Fluid

Discharging:
1. Use a jack to raise the front
axle and lift front wheels off the
ground.
2. Disconnect the fluid hose be鄄
tween the steering unit and the
reservoir, as well as that between
the pump and the reservoir.

3. Turn the steering wheel for
several times to completely dis鄄
charge the residual fluid.
4. The reservoir has a compound
construction, where the inner unit
that provides instant filtering for
the working media shall be taken
out so as to clean the reservoir
completely.
Filling:
1. When the specified level has
been reached, wait 2-3 minutes
and refill the reservoir. It de鄄
pends whether there is trapped
air in the reservoir at the time of
refilling.

2. Turn the steering wheel to en鄄
sure fluid entering the system
earlier.
3. Remove the jack and lower
down the front wheels. Start your
vehicle and run at idle for several
minutes. Recheck the fluid level.
Refill where necessary. It means
trapped air available in the sys鄄
tem if the level rises.
4. Do not turn the steering wheel
completely to its side and stay
there for more than 5 seconds,
otherwise temperature may rise
and the system can be damaged
thereby.

4 -04

OWNER爷S MANUAL

pick-up

ing operation entails joint efforts
from two persons.
The following steps shall be fol鄄
lowed:
1) Lift up the handbrake.
2) Examine the level in the oil
cup and refill the circuit as indi鄄
cated where necessary. Brake
fluid and clutch fluid are inter鄄
changeable.
3) Remove the rubber cap for the
bleed screw and clean the bleed
screw carefully. Use a plastic
pipe to connect the bleed screw
and a transparent container filled
with clutch fluid.
4) Apply the clutch pedal re鄄

peatedly and fully press it in the
end. Loosen the bleed screw
and discharge the fluid trapped
with air into the container. Tight鄄
en the screw immediately once
the flow is clear.
5) Release the clutch slowly and
repeat above steps until all air in
the system is fully discharged.
The fluid level in the container
shall be maintained at the speci鄄
fied range. Finally refit the rubber
cap onto the bleed screw.

Adjusting Your Brake System

Adjusting the brake pedal

The push-rod serves as the stop鄄
per when the brake pedal has
been completely released.
To adjust the height of the brake
pedal, follow the steps given below:
1) Measure the height of the brake
pedal that has been fully returned
by the spring.
2) If the result is not compliant with
the specified one, adjust the pedal
as follows:

Adjusting Your Clutch System

4 -07

Air Filter

1) Loose there spring hooks at鄄

tached on the air filter and remove

the air filter cap.

2) Remove the paper element and

keep it properly.

3) Use compressed dry air to blow

the element in a reverse direction.

Rotate the element while blowing

until the surface dust is removed.

When compressed air is not avail鄄

able, a wood stick can be used to

gently hit both ends of the element

to remove dust on the surface.

Adjusting Your Clutch System

Adjusting the clutch pedal
1) Loosen locking nuts
2) Rotate the rod (1) and adjust
the pedal travel.
3) Re -tighten the lock nut (2)
after adjustment.
4) Screw the bolt (3) and allow
the gap (L) ranging over 0.5 -
1.0mm, then finally tighten nut (4).

Bleeding your hydraulic clutch
system
Air trapped in the circuit may
compromise

effective

disen鄄

gagement. As a result, it is re鄄
quired to bleed the system if the
oil cup has not been emptied in
time by adding clutch fluid or air
gets into the circuit after disas鄄
sembling operations. The bleed鄄

4 -06

OWNER爷S MANUAL

pick-up

Adjusting Your Brake System

pipe to connect the bleed screw
and a transparent container filled
with brake fluid.
4. Apply the brake pedal repeat鄄
edly and fully press it in the end.
5. Loosen the bleed screw and dis鄄
charge the fluid trapped with air in鄄
to the container. Tighten the screw
immediately once the flow is clear.
6. Release the clutch slowly and
repeat above steps until all air in
the system is fully discharged.
7. When all tires have been com鄄
pleted, examine fluid level in the
cup and refill where necessary.
8. Bleed your system while the en鄄
gine is running, otherwise it may
affect your vacuum booster nega鄄
tively.

Starting Your Vehicle in an Emergency

When it is impossible to start your
engine due to a low battery, you
can use another battery from the
other vehicle through auxiliary
wire to start it. Follow the points
described below:
Both batteries shall have 12V rat鄄
ed voltage. The capacity (Ah) of
the source battery shall not be

apparently lower than that of the
discharged battery.
Only adequately -sized wire is al鄄
lowed in this purpose and note in鄄
structions from wire manufacturer.

4 -09

Adjusting Your Brake System

(1) Loosen the switch for the
brake lamp
(2) Loosen the lock nut for the
push-rod.
(3) Adjust the brake pedal to
the specified height and rotate
the push -rod at the proper di鄄
rection.
(4) Adjust the switch for the
brake lamp; Clearance: 0.5 -

Bleeding Your Brake Pipe-
line

Follow these steps to bleed your
brake pipeline:
1. Start your engine and lift up
the handbrake.
2. Examine the fluid level in the
brake fluid cup and refill it where
necessary.
3. Remove the rubber cap on
the bleed screw. Use a plastic

1.0mm.
Fully press the brake pedal while
reversing your vehicle and allow
the auto adjusting unit to regu鄄
late the brake clearance reason鄄
ably.

4 -08

OWNER爷S MANUAL

pick-up


Content   ..  8  9  10  11   ..