Ford Focus RS (2011 year). Manual - part 76


  Index      Ford     Ford Focus RS - service repair manual (2011 year) in english


Search            


Content   ..  74  75  76  77   ..


Ford Focus RS (2011 year). Manual - part 76


DETAILS/RESULTS/ACTIONS
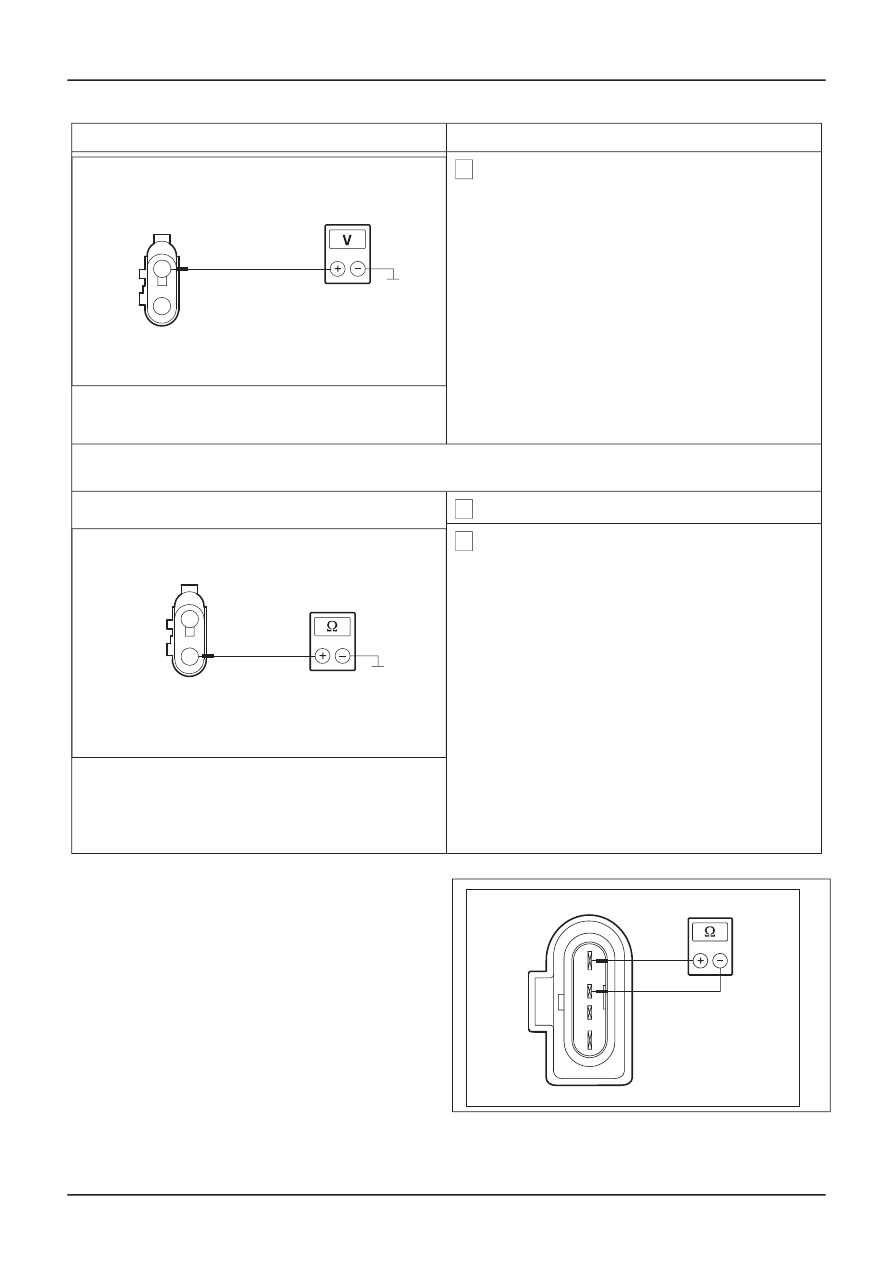
TEST CONDITIONS

4 Measure voltage between right-hand windshield

washer nozzle heater, connector C720, pin 1,
circuit 15-HB26 (GN/RD), wiring harness side
and ground.

• Does the meter display battery voltage?

Yes

VFE0016017

GO to N6.

No

LOCATE and RECTIFY break in circuit
between soldered connection S123 and right-
hand windshield washer nozzle heater using
the Wiring Diagrams. CHECK the operation
of the system.

N6: CHECK GROUND SUPPLY TO RIGHT WINDSHIELD WASHER NOZZLE HEATER FOR OPEN
CIRCUIT

1 Ignition switch in position 0.

2 Measure the resistance between the right-hand

windshield washer nozzle heater, socket C720,
pin 2, circuit 31-HB26 (BK), wiring harness side
and ground.

• Is the resistance less than 2 ohms?

Yes

VFE0022794

RENEW the right-hand windshield washer
nozzle heater. CHECK the operation of the
system.

No

LOCATE and RECTIFY break in circuit
between right-hand windshield washer nozzle
heater and soldered connection S122 using
the Wiring Diagrams. CHECK the operation
of the system.

Component Tests

Front wiper motor

1. TEST the front windshield wiper motor in park

position:

• Measure the resistance at the front

windscreen wiper motor between pin 3 and
pin 4 (or the housing of the wiper motor).

• Is the resistance less than 2 ohms?

• If yes then the wiper motor is OK.
• If not, RENEW the wiper motor.

VFE48149

G401883en

501-16-

58

Wipers and Washers

501-16-

58

DIAGNOSIS AND TESTING

Wash/wipe system switch

Pin assignment:

1

6

7

12

VFE53074

The switch is OK if

Set the switch to the

following position

Connect ohmmeter to
the following terminal

pins

Circuit to test

Circuit closed

Intermittent

3 and 12

Intermittent

Circuit closed

Intermittent level 1

3 and 7

Variable delay

Circuit open

Intermittent level 1

3 and 9

Circuit open

Intermittent level 1

3 and 11

Circuit closed

Intermittent level 2

3 and 7

Variable delay

Circuit closed

Intermittent level 2

3 and 9

Circuit open

Intermittent level 2

3 and 11

Circuit open

Intermittent level 3

3 and 7

Variable delay

Circuit closed

Intermittent level 3

3 and 9

Circuit open

Intermittent level 3

3 and 11

Circuit open

Intermittent level 4

3 and 7

Variable delay

Circuit closed

Intermittent level 4

3 and 9

Circuit closed

Intermittent level 4

3 and 11

Circuit closed

Intermittent level 5

3 and 7

Variable delay

Circuit closed

Intermittent level 5

3 and 9

Circuit closed

Intermittent level 5

3 and 11

Circuit closed

Intermittent level 6

3 and 7

Variable delay

Circuit open

Intermittent level 6

3 and 9

Circuit closed

Intermittent level 6

3 and 11

G401883en

501-16-

59

Wipers and Washers

501-16-

59

DIAGNOSIS AND TESTING

Windshield Wiper Blade and Pivot Arm Adjustment

Special Tool(s)

Aligner, Wiper Arm
501-027 (32-006)

ES32006

General Equipment

Aero-Wiper Measuring and Adjusting Tools AWPE
02 (Order No. 511 5124 001 00)

Vehicles without beam blade wipers

1.

CAUTION: Make sure that the wiper motor

is in the park position.

Remove the wiper blade.

2. Insert the wiper arm in the special tool and

place the special tool on the windshield.

3. NOTE: All three support points of the special

tool must be in contact with the glass.

NOTE: The angle of the wiper on the scale must
point from the zero center line to the center of the
windshield/rear window. Ignore the sign (+/-) on
the alignment tool.

Using the special tool, read off the angle
between the wiper arm and the windshield.

1. Center of windshield

E56969

501-027

1

4. NOTE: Lift the special tool away from the

glass when correcting the angle, in order to
prevent damage.

Using an open-ended wrench on the special
tool, adjust the wiper arm. For additional
information,

refer to Specifications.

E56970

5. Remove the special tool.

6. Install the wiper blade.

Vehicles with beam blade wipers

1. Connect the adapter "B" with the angle

measuring instrument.

• Tighten the knurled screw finger tight.

E60132

2.

CAUTION: Make sure that the wiper motor

is in the park position.

Remove the wiper blade.

3. Insert the wiper arm in the angle measuring

instrument and place the angle measuring
instrument on the windshield.

G18564en

501-16-

60

Wipers and Washers

501-16-

60

GENERAL PROCEDURES

1. Center of windshield

E60133

1

4. NOTE: All three support points of the angle

measuring instrument must be in contact
with the glass.

NOTE: The angle of the wiper on the scale must
point from the zero center line to the center of the
windshield/rear window. Ignore the sign (+/-) on
the alignment tool.

Using the angle measuring instrument, read
off the angle between the wiper arm and the
windshield.

5. CAUTIONS:

Make sure that no mechanical force is

applied to the wiper blade holder while
adjusting the angle.

The wiper arm must not be adjusted by

more than three degrees. If a bigger
adjustment is necessary, check the wiper
arm for damage, replace if necessary.

NOTE: Lift the angle measuring instrument away
from the glass when correcting the angle, in order
to prevent damage.

Using the adjusting tool and the counter
holder, adjust the wiper arm. For additional
information,

refer to Specifications.

E60134

6. Remove the angle measuring instrument.

7. Install the wiper blade.

G18564en

501-16-

61

Wipers and Washers

501-16-

61

GENERAL PROCEDURES

Windshield Wiper Motor

1. Remove the components in the order

indicated in the following illustration(s) and
table(s).

CAUTION: Make sure that the windshield wiper motor is in the park position.

E51544

1

22 Nm

5

7 Nm

3

6

7

4

8

2

Description

Item

Windshield wiper arm nuts

1

Windshield wiper arms

See Installation Detail

2

Clips, cowl panel grille

3

Cowl panel grille

4

Bolts for windshield wiper motor with
linkage

5

Front wiper linkage

6

Description

Item

Windshield wiper motor connector

7

Windshield wiper motor

See Removal Detail

8

2. To install, reverse the removal procedure.

3. Check the angle of the windshield wiper arms

in relation to the windshield.

For additional information,

refer to:

Windshield Wiper Blade and Pivot Arm

Adjustment

(501-16 Wipers and Washers,

General Procedures).

Removal Details

G413303en

501-16-

62

Wipers and Washers

501-16-

62

REMOVAL AND INSTALLATION

Item 8

Windshield wiper motor

1. Detach the wiper linkage from the Windshield

wiper motor lever arm.

E51545

2. Remove the windshield wiper motor bolts.

E51546

9 Nm

3. Pull windshield wiper motor from the wiper

motor bracket.

E51547

Installation Details

Item 2

Windshield wiper arms

CAUTION: Move the windshield wiper
motor to park position before installing the
windshield wiper arms.

G413303en

501-16-

63

Wipers and Washers

501-16-

63

REMOVAL AND INSTALLATION

Windshield Washer Pump(32 624 0)

1. Empty the windshield washer reservoir.

2. Detach the right-hand front wheel.

For additional information,

refer to: Wheel

and Tire

(204-04 Wheels and Tires, Removal

and Installation).

3. Remove the right-hand wheelhouse cover.

VFE0037199

4. Remove the components in the order

indicated in the following illustration(s) and
table(s).

E51866

3

6

5

1

4

2

7

Description

Item

Front windscreen washer lower reservoir
connecting piece

See Removal Detail

1

Windshield washer upper reservoir lower
retaining bolt

2

Description

Item

Windshield washer upper reservoir upper
retaining bolt

3

Windshield washer upper reservoir

See Removal Detail

4

Front windscreen washer pump connector

5

G413304en

501-16-

64

Wipers and Washers

501-16-

64

REMOVAL AND INSTALLATION

Description

Item

Windshield washer pump hoses.

See Removal Detail

6

Description

Item

Windshield washer pump

See Installation Detail

7

5. To install, reverse the removal procedure.

Removal Details

Item 1

Front windscreen washer lower reservoir

connecting piece

1. Pull the connecting piece of the lower

reservoir from the upper reservoir.

E44197

Item 4

Windshield washer upper reservoir

1. Pull the reservoir from the filler neck.

E51867

Item 6

Windshield washer pump hoses.

1. Unclip the reservoir hoses.

Installation Details

Item 7

Windshield washer pump

1. Coat the pump rubber seal – on the front

windscreen washer with soap prior to
installation.

G413304en

501-16-

65

Wipers and Washers

501-16-

65

REMOVAL AND INSTALLATION


Content   ..  74  75  76  77   ..