Ford Orion. Manual - part 66


  Index      Ford     Ford Orion - service and repair manual


Search            


Content   ..  64  65  66  67   ..


Ford Orion. Manual - part 66


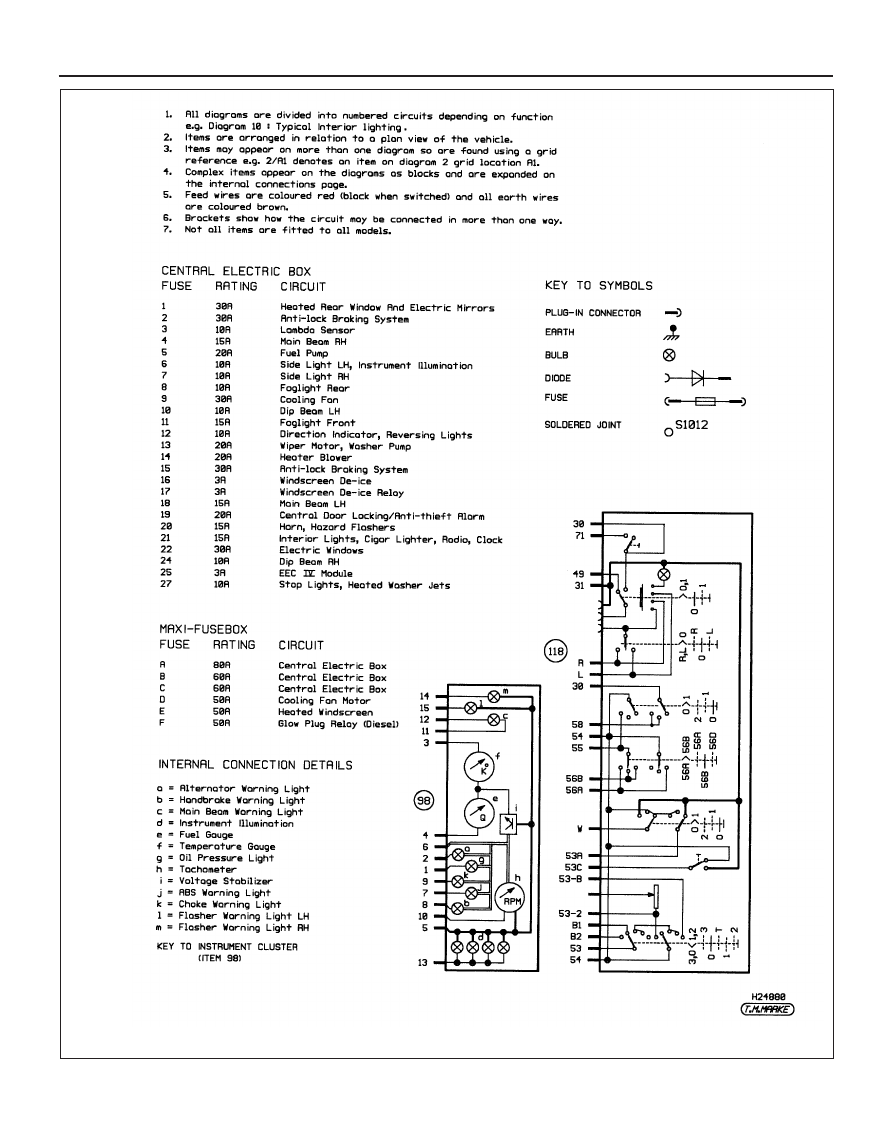
12•22 Wiring diagrams

Information for wiring diagrams

REF•1

REF

MOT Test Checks

This is a guide to getting your vehicle through the MOT test.

Obviously it will not be possible to examine the vehicle to the same
standard as the professional MOT tester. However, working through
the following checks will enable you to identify any problem areas
before submitting the vehicle for the test.

Where a testable component is in borderline condition, the tester

has discretion in deciding whether to pass or fail it. The basis of such
discretion is whether the tester would be happy for a close relative or
friend to use the vehicle with the component in that condition. If the
vehicle presented is clean and evidently well cared for, the tester may
be more inclined to pass a borderline component than if the vehicle is
scruffy and apparently neglected.

It has only been possible to summarise the test requirements here,

based on the regulations in force at the time of printing. Test standards
are becoming increasingly stringent, although there are some
exemptions for older vehicles. For full details obtain a copy of the Haynes
publication Pass the MOT! (available from stockists of Haynes manuals).

An assistant will be needed to help carry out some of these checks.

The checks have been sub-divided into four categories, as follows:

Handbrake

M Test the operation of the handbrake.
Excessive travel (too many clicks) indicates
incorrect brake or cable adjustment.
M Check that the handbrake cannot be
released by tapping the lever sideways. Check
the security of the lever mountings.

Footbrake

M Depress the brake pedal and check that it
does not creep down to the floor, indicating a
master cylinder fault. Release the pedal, wait
a few seconds, then depress it again. If the
pedal travels nearly to the floor before firm
resistance is felt, brake adjustment or repair is
necessary. If the pedal feels spongy, there is
air in the hydraulic system which must be
removed by bleeding.

M Check that the brake pedal is secure and in
good condition. Check also for signs of fluid
leaks on the pedal, floor or carpets, which
would indicate failed seals in the brake master
cylinder.
M Check the servo unit (when applicable) by
operating the brake pedal several times, then
keeping the pedal depressed and starting the
engine. As the engine starts, the pedal will
move down slightly. If not, the vacuum hose or
the servo itself may be faulty.

Steering wheel and column 

M Examine the steering wheel for fractures or
looseness of the hub, spokes or rim. 
M Move the steering wheel from side to side
and then up and down. Check that the 
steering wheel is not loose on the column,
indicating wear or a loose retaining nut.
Continue moving the steering wheel as before,
but also turn it slightly from left to right. 
M Check that the steering wheel is not loose
on the column, and that there is no abnormal

movement of the steering wheel, indicating
wear in the column support bearings or 
couplings.

Windscreen and mirrors 

M The windscreen must be free of cracks or
other significant damage within the driver’s
field of view. (Small stone chips are
acceptable.) Rear view mirrors must be
secure, intact, and capable of being adjusted.

1

Checks carried out
FROM THE DRIVER’S SEAT

1

Checks carried out
FROM THE DRIVER’S
SEAT

2

Checks carried out
WITH THE VEHICLE
ON THE GROUND

3

Checks carried out
WITH THE VEHICLE
RAISED AND THE
WHEELS FREE TO
TURN

4

Checks carried out on
YOUR VEHICLE’S
EXHAUST EMISSION
SYSTEM

REF•2

MOT Test Checks

Seat belts and seats 

Note: The following checks are applicable to
all seat belts, front and rear.

M Examine the webbing of all the belts
(including rear belts if fitted) for cuts, serious
fraying or deterioration. Fasten and unfasten
each belt to check the buckles. If applicable,
check the retracting mechanism. Check the
security of all seat belt mountings accessible
from inside the vehicle.
M The front seats themselves must be
securely attached and the backrests must
lock in the upright position.

Doors 

M Both front doors must be able to be opened
and closed from outside and inside, and must
latch securely when closed.

Vehicle identification

M Number plates must be in good condition,
secure and legible, with letters and numbers
correctly spaced – spacing at (A) should be
twice that at (B).

M The VIN plate and/or homologation plate
must be legible.

Electrical equipment

M Switch on the ignition and check the 
operation of the horn.
M Check the windscreen washers and wipers,
examining the wiper blades; renew damaged
or perished blades. Also check the operation
of the stop-lights.

M Check the operation of the sidelights and
number plate lights. The lenses and reflectors
must be secure, clean and undamaged. 
M Check the operation and alignment of the
headlights. The headlight reflectors must not
be tarnished and the lenses must be
undamaged.
M Switch on the ignition and check the 
operation of the direction indicators (including
the instrument panel tell-tale) and the hazard
warning lights. Operation of the sidelights and
stop-lights must not affect the indicators - if it
does, the cause is usually a bad earth at the
rear light cluster.
M Check the operation of the rear foglight(s),
including the warning light on the instrument
panel or in the switch.

Footbrake

M Examine the master cylinder, brake pipes
and servo unit for leaks, loose mountings, 
corrosion or other damage.  

M The fluid reservoir must be secure and the
fluid level must be between the upper (A) and
lower (B) markings.

M Inspect both front brake flexible hoses for
cracks or deterioration of the rubber. Turn the
steering from lock to lock, and ensure that the
hoses do not contact the wheel, tyre, or any
part of the steering or suspension mechanism.
With the brake pedal firmly depressed, check
the hoses for bulges or leaks under pressure.

Steering and suspension

M Have your assistant turn the steering wheel
from side to side slightly, up to the point where
the steering gear just begins to transmit this
movement to the roadwheels. Check for
excessive free play between the steering
wheel and the steering gear, indicating wear or
insecurity of the steering column joints, the
column-to-steering gear coupling, or the
steering gear itself.
M Have your assistant turn the steering wheel
more vigorously in each direction, so that the
roadwheels just begin to turn. As this is done,
examine all the steering joints, linkages,
fittings and attachments. Renew any
component that shows signs of wear or 
damage. On vehicles with power steering,
check the security and condition of the 
steering pump, drivebelt and hoses.
M Check that the vehicle is standing level,
and at approximately the correct ride height.

Shock absorbers

M Depress each corner of the vehicle in turn,
then release it. The vehicle should rise and
then settle in its normal position. If the vehicle
continues to rise and fall, the shock absorber
is defective. A shock absorber which has
seized will also cause the vehicle to fail.

2

Checks carried out
WITH THE VEHICLE ON THE
GROUND

REF•3

REF

MOT Test Checks

Exhaust system

M Start the engine. With your assistant 
holding a rag over the tailpipe, check the
entire system for leaks. Repair or renew
leaking sections.

Jack up the front and rear of the vehicle,
and securely support it on axle stands.
Position the stands clear of the suspension
assemblies. Ensure that the wheels are
clear of the ground and that the steering
can be turned from lock to lock.

Steering mechanism 

M Have your assistant turn the steering from
lock to lock. Check that the steering turns
smoothly, and that no part of the steering
mechanism, including a wheel or tyre, fouls
any brake hose or pipe or any part of the body
structure.
M Examine the steering rack rubber gaiters
for damage or insecurity of the retaining clips.
If power steering is fitted, check for signs of
damage or leakage of the fluid hoses, pipes or
connections. Also check for excessive
stiffness or binding of the steering, a missing
split pin or locking device, or severe corrosion
of the body structure within 30 cm of any
steering component attachment point.

Front and rear suspension and
wheel bearings 

M Starting at the front right-hand side, grasp
the roadwheel at the 3 o’clock and 9 o’clock
positions and shake it vigorously. Check for
free play or insecurity at the wheel bearings,
suspension balljoints, or suspension mount-
ings, pivots and attachments.
M Now grasp the wheel at the 12 o’clock and
6 o’clock positions and repeat the previous
inspection. Spin the wheel, and check for
roughness or tightness of the front wheel
bearing.

M If excess free play is suspected at a
component pivot point, this can be confirmed
by using a large screwdriver or similar tool and
levering between the mounting and the
component attachment. This will confirm
whether the wear is in the pivot bush, its
retaining bolt, or in the mounting itself (the bolt
holes can often become elongated).

M Carry out all the above checks at the other
front wheel, and then at both rear wheels.

Springs and shock absorbers 

M Examine the suspension struts (when
applicable) for serious fluid leakage, corrosion,
or damage to the casing. Also check the
security of the mounting points.
M If coil springs are fitted, check that the
spring ends locate in their seats, and that the
spring is not corroded, cracked or broken.
M If leaf springs are fitted, check that all
leaves are intact, that the axle is securely
attached to each spring, and that there is no
deterioration of the spring eye mountings,
bushes, and shackles.

M The same general checks apply to vehicles
fitted with other suspension types, such as
torsion bars, hydraulic displacer units, etc.
Ensure that all mountings and attachments are
secure, that there are no signs of excessive
wear, corrosion or damage, and (on hydraulic
types) that there are no fluid leaks or damaged
pipes.
M Inspect the shock absorbers for signs of
serious fluid leakage. Check for wear of the
mounting bushes or attachments, or damage
to the body of the unit.

Driveshafts
(fwd vehicles only)

M Rotate each front wheel in turn and inspect
the constant velocity joint gaiters for splits or
damage. Also check that each driveshaft is
straight and undamaged.

Braking system 

M If possible without dismantling, check
brake pad wear and disc condition. Ensure
that the friction lining material has not worn
excessively, (A) and that the discs are not
fractured, pitted, scored or   badly worn (B).

M Examine all the rigid brake pipes
underneath the vehicle, and the flexible
hose(s) at the rear. Look for corrosion, chafing
or insecurity of the pipes, and for signs of
bulging under pressure, chafing, splits or
deterioration of the flexible hoses.
M Look for signs of fluid leaks at the brake
calipers or on the brake backplates. Repair or
renew leaking components.
M Slowly spin each wheel, while your
assistant depresses and releases the
footbrake. Ensure that each brake is operating
and does not bind when the pedal is released.

3

Checks carried out
WITH THE VEHICLE RAISED
AND THE WHEELS FREE TO
TURN


Content   ..  64  65  66  67   ..