Ford Festiva. Manual - part 25


  Index      Ford     Ford Festiva - service and repair manual 1991 year


Search            


Content   ..  23  24  25  26   ..


Ford Festiva. Manual - part 25


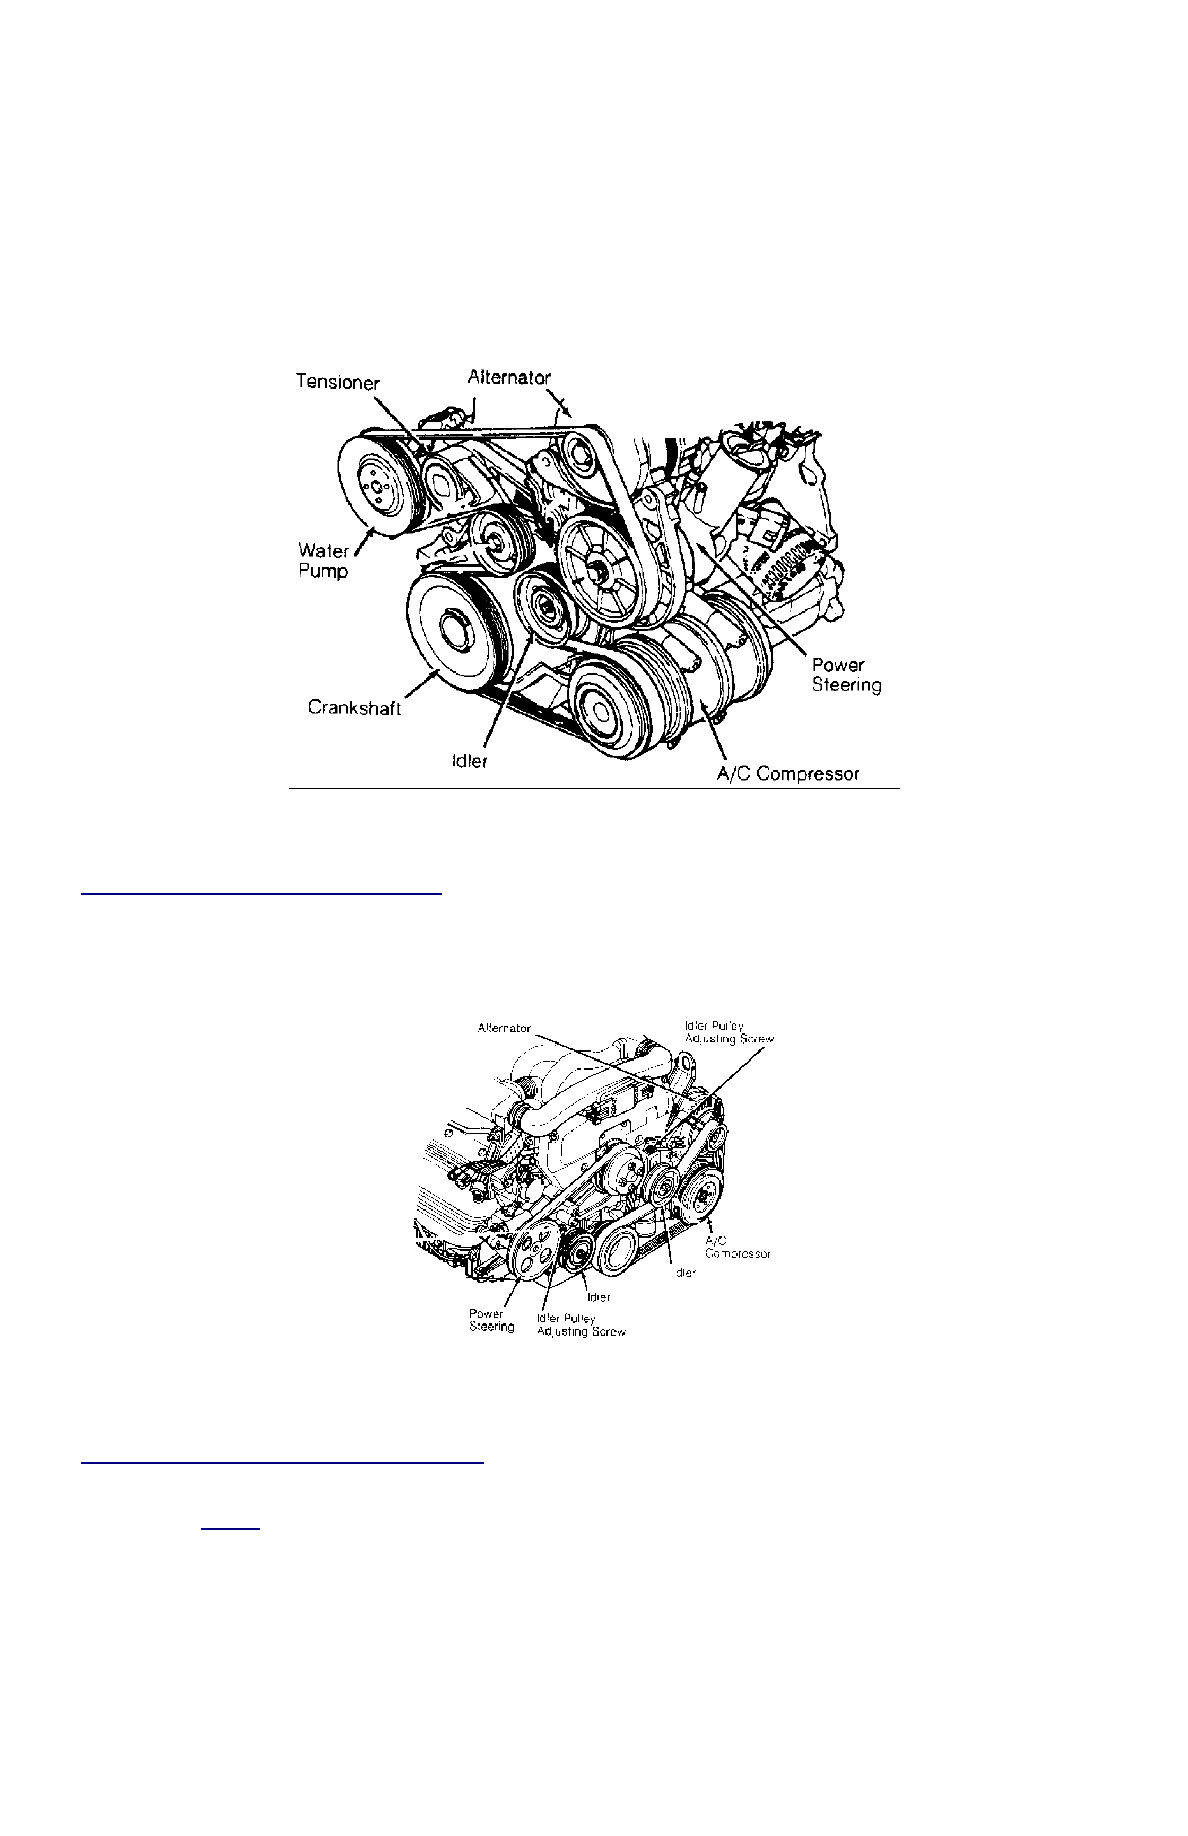
Fig. 17: Serpentine Belt Routing (Taurus 2.5L)


Courtesy of FORD MOTOR CO. 


Fig. 18: Serpentine Belt Routing (Taurus 3.0L SHO)


Courtesy of FORD MOTOR CO. 

NOTE:

Fig. 19

 has been revised as per TSB #93-26-11 dated December 22, 1993.


Fig. 19: Serpentine Belt Routing (Tempo 2.3L & Topaz 2.3L)


Courtesy of FORD MOTOR CO. 


Fig. 20: Serpentine Belt Routing (Thunderbird 3.8L SC)


Courtesy of FORD MOTOR CO. 


Fig. 21: Serpentine Belt Routing (Town Car 4.6L)


Courtesy of FORD MOTOR CO. 

Copyright 2009 Mitchell Repair Information Company, LLC.  All Rights Reserved. 


Article GUID: A00050423 

Back To Article


ENGINE OVERHAUL

1991-92 FORD MOTOR CO. ENGINES 1.3L & 1.6L 4-Cylinder 

ENGINE IDENTIFICATION 

Engine can be identified by Vehicle Identification Number (VIN) on metal tab attached to instrument panel. Tab is close to windshield on 
driver's side and is visible through windshield. VIN has 17 characters. The 8th character identifies engine. 

ENGINE IDENTIFICATION CODES 

ADJUSTMENTS 

VALVE ARRANGEMENT 

Firewall Side 

Intake valves. 

Radiator Side 

Exhaust valves. 

VALVE CLEARANCE ADJUSTMENT 

Hydraulic lifters are used. Adjustment is NOT possible nor necessary. 

REMOVAL & INSTALLATION 

FUEL PRESSURE RELEASE 

Remove rear seat. Remove fuel pump access panel. Disconnect fuel pump electrical connector. Start engine and allow to idle until engine dies.

ENGINE 

Removal (1.3L) 

1. Remove battery and battery tray. Index hood-to-hinge and remove hood. Drain coolant. Drain engine oil and transaxle fluid. Disconnect 

vane airflow meter connector, vane airflow meter and hose.  

2. Remove oil dipstick, cooling fan and radiator assembly. Disconnect accelerator cable from mounting bracket and throttle lever. 

Disconnect speedometer cable at transaxle. Mark and disconnect fuel lines at fuel pump. Plug fuel lines. Remove heater hoses. Remove 
brake booster vacuum hose. Disconnect transaxle vacuum hose.  

3. Remove charcoal canister hoses from engine. Disconnect engine wiring harness. Remove alternator and brackets. Remove engine ground 

strap. Raise vehicle and remove catalytic converter.  

4. Disconnect A/C compressor without removing hoses, and set compressor aside. Disconnect distributor wiring at coil. On automatic 

transaxle models, remove shift lever-to-manual shaft assembly nut. Remove shift cable from transaxle. Loosen front wheel bolts. Raise 
vehicle and remove wheel assemblies.  

5. Remove stabilizer mounting nuts and brackets. Remove lower arm clamp bolts and nuts. Pull lower arms downward, separating lower 

arms from knuckles. Separate halfshafts and install Differential Plugs (T87C-7025-C) between differential side gears. See FWD AXLE 
SHAFTS article in DRIVE AXLES Section.  

6. On manual transaxle vehicles, disconnect clutch control cable and shift control cable rod. Remove stabilizer bar from transaxle. Remove 

catalytic converter inlet pipe. Support engine assembly with hoist. Remove rear crossmember mount bolts. Remove front and rear engine 
mount nuts.  

7. Remove crossmember. Lower vehicle and attach engine lift hooks. Remove right engine mount bolt. Remove engine/transaxle assembly. 

Remove gusset plates. Remove starter and flywheel cover. Remove torque converter bolts on automatic transaxle. Remove engine-to-
transaxle bolts. Separate transaxle from engine.  

Installation (1.3L) 

1. Install transaxle to engine in reverse order of removal. Attach hoist to engine/transaxle assembly and position in vehicle. Support engine 

in chassis and install engine mount bolts. Raise vehicle and install front engine mount nut. Tighten nuts to specification. See 

TORQUE 

SPECIFICATIONS

 table at end of article.  

2. Position crossmember onto mounts and chassis. Tighten rear nut. Install mount-to-crossmember nuts and tighten. Remove differential 

plugs and install halfshafts. To complete installation, reverse removal procedure. Tighten all bolts/nuts to specifications. Fill all fluid 

NOTE:

For engine repair procedures not covered in this article, see 

ENGINE OVERHAUL PROCEDURES - 

GENERAL INFORMATION

 article in the GENERAL INFORMATION section.

Application

VIN Code

Festiva

1.3L SOHC PFI

H

Capri

1.6L DOHC PFI

Z

1.6L DOHC PFI TURBO

6

NOTE:

When removing engine mounts, mark and note location and position to ensure proper installation. 
Engine and transaxle are removed as an assembly.


Content   ..  23  24  25  26   ..