Snowmobile Arctic Cat (2006 year). Instruction - part 16


  Index      Snowmobiles / ATV     Snowmobile Arctic Cat - instruction 2006 year


Search            


Content   ..  14  15  16  17   ..


Snowmobile Arctic Cat (2006 year). Instruction - part 16


60

MAINTENANCE

3. Slowly compress the brake

l e v e r   a n d   h o l d .   O p e n   t h e

bleeder valve to release the

fluid and air. When the fluid

stops, close the bleeder valve;

then release the brake lever.

4. Repeat step 3 until the brake

fluid flows free of air bubbles.

 NOTE: It may be necessary to

refill the reservoir during the
bleeding process.

5. When the brake fluid is free of

all air and the brake lever feels

firm when compressed, fill the

reservoir to a level just below

the high mark; then install and

secure the cover. Remove the

tube from the bleeder valve.

Checking/Changing Brake Pads

The condition of the brake pads

must be checked daily and changed

if worn or damaged. To check and

change the brake pads, use the fol-

lowing procedure:

 NOTE: The brake pads may be

c h a n g e d   by   t h e   s n ow m o b i l e
owner if qualified to do so. If the
owner does not feel qualified,
take the snowmobile to an autho-
r i z e d   A rc t i c   C a t  S n ow m o b i l e
dealer for this service. This ser-
v i c e   i s   a t   t h e   d i s c r e t i o n   a n d
e x p e n s e   o f   t h e   s n o w m o b i l e
owner.

N OT E :   W h e n   i n s t al l in g   n ew

brake pads, always install them
as a set.  Never install just one
pad or use brake pads which
have been used in another snow-
mobile.

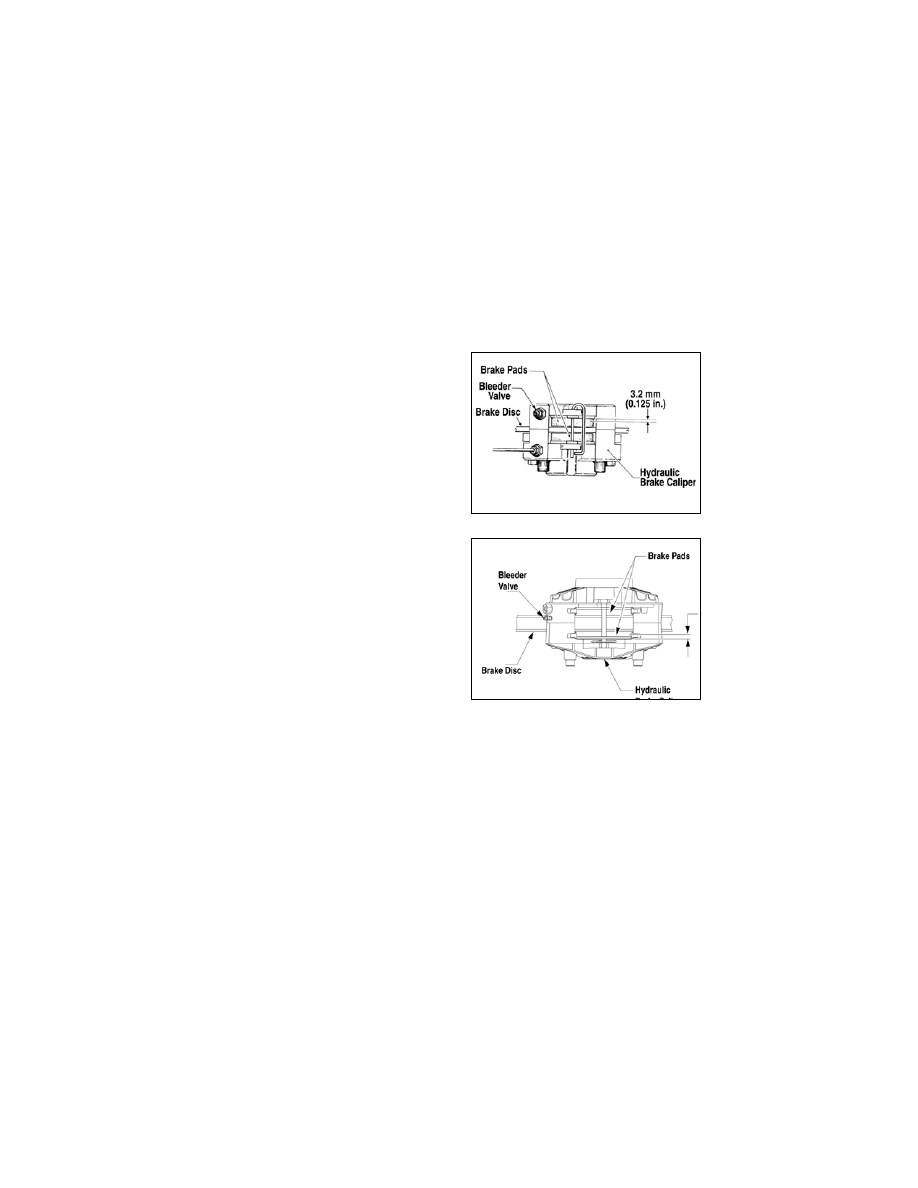
1. Measure the thickness of both

brake pads. The brake pad

thickness must be greater than

3.2 mm (0.125 in.) on the stan-

dard caliper or greater than 5.0

mm (0.20 in.) on the ACT drive

caliper. If the brake pad thick-

ness is less than specified,

replacement of both pads is

necessary.

0730-434

0739-269

2. Remove the pin/hairpin clip

securing the brake pads to the

caliper assembly.

3. Remove the brake fluid reser-

voir cover; then remove most of

the brake fluid from the reser-

voir.  Replace the cover.

NOTE: The above procedure will

allow room for the fluid from the
c a li p er  wh en   t h e  p is t o n s   a r e
pushed into the caliper for install-
ing new brake pads.  Replacing
the cover will prevent fluid spill-
age.

MAINTENANCE

61

4. Using a pair of pliers, pull one

brake pad out of the caliper

assembly.

NOTE: Changing one pad at a

time will prevent one piston from
pushing out the other piston from
the caliper.

5. Using a flat-blade tool, slowly

and carefully push the piston

into the caliper.

6. Position the new brake pads

into the caliper.

7. Repeat steps 4-6 for the other

pad; then secure the pads with

the pin/hairpin clip.

8. Remove the reservoir cover and

remove the remaining fluid;

then fill the reservoir with fresh

fluid.

9. Pump the brake lever to ensure

correct positioning of the brake

pads; then release.

10. Fill the reservoir to the proper

level with fresh brake fluid.

 NOTE: When new brake pads

are installed, a “burnishing” pro-
cess is required. Drive the snow-
mobile slowly and compress the
brake lever several times until the
pads just start to warm up; then
allow them to cool down. This
p ro c e d u r e   s t a b i l i z es   t h e   p a d
material and extends the life of
the pads.

DRIVE BELT

The drive belt transfers power from

the drive clutch to the driven pulley.

If the belt is worn, cracked, or

stretched, maximum power will not

be transmitted and the belt could

also fail and therefore must be

replaced. Periodic checks (at least

once a month under normal usage)

of two drive belt specifications are

essential.

1. Measure the outside circumfer-

ence of the drive belt. The belt

should be within the recom-

mended range in circumference.

2. Measure the outside width of

the drive belt. The belt should

be within the recommended

range in width.

3. Check the belt for cracking,

fraying, etc.

If any of the specifications or condi-

tions are unsatisfactory, replace the

drive belt.

 NOTE: Drive belts should be

purchased from an authorized
Arctic Cat Snowmobile dealer, as
Arctic Cat drive belts are made to
exact specifications and of qual-
ity material. Belts made by other
manufacturers may not be of the
same specifications or quality
and, therefore, usage could result
in poor performance and prema-
ture belt failure.

Before starting the snowmobile in

extremely cold temperatures, the

drive belt should be removed and

warmed up to room temperature.

Once the drive belt is at room tem-

perature, install the drive belt.
Also, drive belts have a break-in

period of approximately 20 miles.

After installing a new drive belt,

drive the snowmobile for 20 miles at

1/2 throttle or less. This will allow

the drive belt to gain its optimum

flexibility and will extend drive belt

life.

! CAUTION

Never run the engine with the
drive belt removed. Excessive
revving of  the engine could
result in serious engine damage
and drive clutch failure.

62

MAINTENANCE

Removing Drive Belt (Standard 
Driven Pulley)

1. Turn ignition key to the OFF

position and wait for all moving

parts to stop.

2. Set the brake lever lock.
3. Open the hood; then open the

belt guard.

0739-613

737-316A

4. Grasp the driven pulley roller

plate and push against it while

rotating it clockwise.

5. When the sheaves are fully

apart, hold the roller plate, pull

up on drive belt, and roll the

belt over the stationary sheave

until it is free of the driven pul-

ley. Slowly release the roller

plate.

731-659A

737-317A

6. When the belt is free of driven

pulley, remove the belt from the

drive clutch.

Installing Drive Belt (Standard 
Driven Pulley)

1. Place the belt (so the part num-

ber can be read) between the

sheaves of the drive clutch.

2. Grasp the driven pulley roller

plate and push against it while

rotating it clockwise.

3. When the sheaves are fully

apart, hold the roller plate, roll

the belt over the stationary

sheave, and slowly release the

roller plate.

MAINTENANCE

63

4. After the belt is installed prop-

erly, close and secure the belt

guard and the hood.

5. Release the brake lever lock.

Removing Drive Belt (ACT 
Roller Driven Pulley)

 NOTE: Changing a drive belt

can be done by the snowmobile
owner if qualified to do so. If the
owner does not feel qualified,
take the snowmobile to an autho-
r i z e d   A rc t i c   C a t  S n ow m o b i l e
dealer for this service. This ser-
v i c e   i s   a t   t h e   d i s c r e t i o n   a n d
e x p e n s e   o f   t h e   s n o w m o b i l e
owner.

 NOTE: On M-Series models, the

drive belt can be removed and
installed by removing the side
panel and  pushing in on   the
driven torque bracket (cam) to
separate the sheaves.

1. Turn ignition key to the OFF

position and wait for all moving

parts to stop.

2. Set the brake lever lock.
3. Open the hood; then open the

belt guard.

4. Remove the driven pulley plug

from the belly pan.

5. Using the spark plug wrench,

screwdriver, and Belt Deflec-

tion Tool (p/n 0644-435) from

the tool kit, remove the sheave

adjuster from the end of the

driven pulley. Account for and

remove the O-ring and shim

washers. Note the orientation of

the components for installing

purposes.

739-266A

739-267A

6. With the O-ring and shim wash-

ers removed, carefully thread

the sheave adjuster back into

the driven pulley; then tighten

the adjuster with the deflection

tool/screwdriver/spark plug

wrench assembly until it bot-

toms against the driven shaft.

 NOTE: By bottoming the sheave

adjuster against the driven shaft,
the sheaves of the driven pulley
will  spread far enough to allow
the removal of the drive belt.

7. Remove the drive belt from the

drive clutch and driven pulley.

Installing Drive Belt (ACT Roller 
Driven Pulley)

1. Place the drive belt (so the part

number can be read) between

the sheaves of the drive clutch

first; then between the sheaves

of the driven pulley.

! WARNING

Never operate the snowmobile
without the belt guard secured
in place.


Content   ..  14  15  16  17   ..