Snowmobile Arctic Cat (2006 year). Instruction - part 11


  Index      Snowmobiles / ATV     Snowmobile Arctic Cat - instruction 2006 year


Search            


Content   ..  9  10  11  12   ..


Snowmobile Arctic Cat (2006 year). Instruction - part 11


40

MAINTENANCE

4. If applicable, turn the gas tank

shut-off valve to the OPEN

position.

Gasoline Additives

Fuel de-icer can be used for all mod-

els. Also, periodic use of an injector

cleaner for EFI models is recom-

mended especially in the last tank of

gasoline before storage. Arctic Cat

Fuel Stabilizer (p/n 0638-165)

should also be added to the last tank

of gasoline before storage.

Fuel Pickup Valves

A l l   2 - St r o k e   E F I   m o d e l s   a r e

equipped with fuel pickup valves in

the gas tank. If ever there is a

restricted fuel flow and a pickup

valve is suspected, take the snow-

mobile to an authorized Arctic Cat

Snowmobile dealer for this service.

If not under warranty, this service is

at the discretion and expense of the

snowmobile owner.

CHECKING OIL-INJECTION 
SYSTEM (2-Stroke Models)

The oil-injection system has been

synchronized at the factory; how-

ever, Arctic Cat recommends peri-

odic checking of the oil-injection

system synchronization. The syn-

chronization and maintenance must

be done by an authorized Arctic Cat

Snowmobile dealer. If not under

warranty, this service is at the dis-

cretion and expense of the snowmo-

b i l e   o w n e r.   To   c h ec k   th e   o i l -

injection system synchronization,

use the following procedure:

N OT E :   O n   t h e   “ L a y d o w n ”

engine models to access the oil
pump, tip the snowmobile onto its
left side; then using a torx-bit,
remove the screws securing the
center belly pan (skid plate) to the
front end.

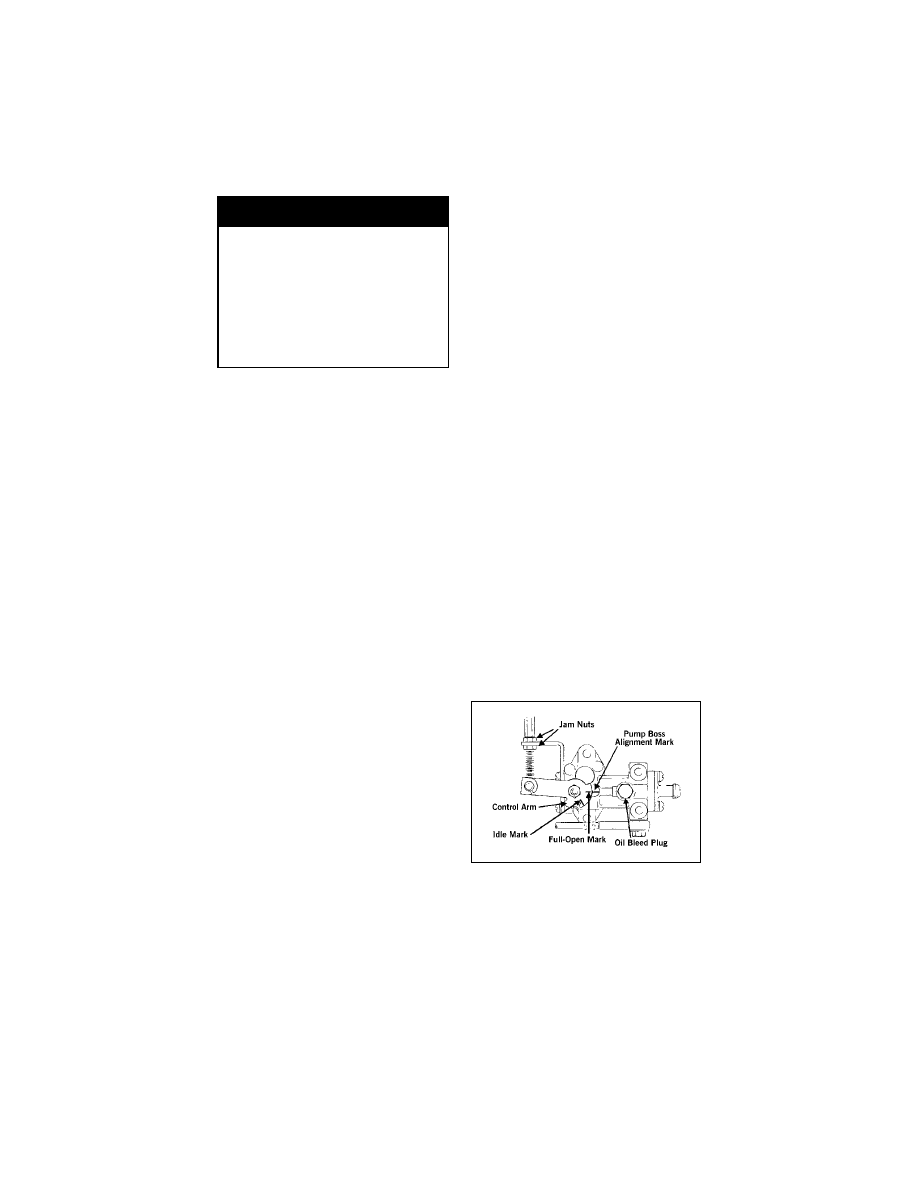
1. With the engine off and the

ignition key in the OFF posi-

tion, move the throttle control

lever to the full-open position.

2. In the full-open position, the

alignment mark on the control

arm must align with the station-

ary alignment mark on the

pump boss.

727-185C

! WARNING

The fuel hoses must fit tightly
on the fuel filter. If the fuel hose
length doesn’t permit this pro-
cedure, replace the fuel hose.
Also, after installing the fuel
hoses on the filter, check to be
sure that the fuel hoses do not
contact any hot or rotating com-
ponents.

MAINTENANCE

41

738-338A

3. Make sure the cable/linkage rod

jam nuts are tight.

CHECKING ENGINE OIL LEVEL 
(660 cc Models)

NOTE: The snowmobile must

be on a level surface for this pro-
cedure.

1. Open the hood and pull up on

the oil level stick until the top

mark on the stick is even with

the top of the oil level stick

tube. Wait 30 seconds before

proceeding.

NOTE: Failure to perform step 1

as stated will result in an inaccu-
rate reading.

2. After 30 seconds, remove the

oil level stick and wipe it with a

clean cloth. Insert the oil level

stick fully into the engine and

remove. Read the oil level

shown on the oil level stick.

The oil level must be between

the two marks on the bottom

end of the stick. 

AA054B

3. If the oil level is at or below the

bottom mark on the oil level

stick, add recommended oil

until the oil level is slightly

below the top mark on the bot-

tom end of the stick.

NOTE: It takes 800 ml (27 fl oz)

to raise the oil level from the
lower mark to the upper mark on
the bottom end of the stick.

CHANGING ENGINE OIL (660 cc 
Models)

N OT E :   T h e   o i l   s h o u l d   b e

c h a n g e d   w h e n   t h e   e n g i n e   i s
warm to allow all oil to drain from
the crankcase.

NOTE: Recycle or properly dis-

pose of the used engine oil.

1. Using a putty knife, remove the

belly pan plug.

! CAUTION

Only an authorized Arctic Cat
S n o w m o b i l e   d e a l e r   s h o u l d
adjust the oil-injection system
s y n c h r o n i z a t i o n .   I m p r o p e r
adjustment of the oil-injection
pump cable may result in throt-
tle/ignition monitor switch fail-
ure creating a risk of personal
injury or may result in insuffi-
cient oil flow causing severe
engine damage.

! WARNING

Care must be taken if a hot drain
plug is removed by hand. Burn-
ing could occur.

42

MAINTENANCE

2. Place a drain pan beneath the

b e l l y   p a n   p l u g   h o l e ;   t h e n

remove the oil drain plug and

washer from the underside of

the crankcase.

3. Remove the oil fill cap from the

top of the engine.

4. After the oil has drained com-

pletely, install the oil drain plug

and washer and tighten to 2.3

kg-m (16.5 ft-lb).

5. Install a new belly pan plug. 
6. Remove the oil filter using Oil

Filter Wrench (p/n 0644-389).

0644-389

7. Apply a light coat of fresh

engine oil to the gasket of the

new oil filter.

8. Install the new oil filter by turn-

ing the oil filter by hand until

the gasket has contacted the oil

filter mounting surface; then

tighten the oil filter 3/4 turn by

hand.

9. Pour 2.9 l (3 U.S. qt) of the rec-

ommended engine oil into the

oil fill tube; then check the oil

level.

ADJUSTING CARBURETOR — 
VM-STYLE (Single)

The carburetor has been calibrated

at the factory for average riding con-

ditions; however, altitude, tempera-

t u r e ,   a n d   g e n e r a l   w e a r   m a y

necessitate certain carburetor adjust-

ments. Be sure the correct carbu-

retor main jet for the operating

temperature, altitude, and type of

gasoline is being used (see Select-

ing Carburetor Main Jet(s) sec-

tion). Since carburetor adjustments

critically affect engine perfor-

mance, Arctic Cat recommends that

all changes in internal carburetor

calibration be made by an autho-

rized Arctic Cat Snowmobile dealer;

however, four external adjustments

can be made on the carburetor.

These are the choke cable travel,

piston valve, pilot air screw, and idle

speed screw. Due to cable “stretch,”

it is recommended to check throttle

cable tension periodically and adjust

the swivel adapter as necessary.

NOTE: Carburetor adjustments

and changing the main jet may be
done by the snowmobile owner if
qualified to do so. If the owner
does not feel qualified, take the
snowmobile to an authorized Arc-
tic Cat Snowmobile dealer for this
service. This service is at the dis-
cretion and expense of the snow-
mobile owner.

Adjusting Choke Cable

1. Be sure the ignition switch key

is in the OFF position and the

parking brake is set.

2. Loosen the jam nut securing the

choke cable adjuster. Rotate the

choke cable adjuster clockwise

until it bottoms against the

brass plunger cap.

MAINTENANCE

43

3. Slowly rotate the choke cable

adjuster counterclockwise

while checking the choke lever

for free-play. As soon as all

free-play has been removed

from the end of the lever, stop

rotating the adjuster.

4. With free-play removed from

the lever, slowly rotate the

choke cable adjuster once again

clockwise while checking the

choke cable lever for free-play.

Adjust until 3 mm (1/8 in.) free-

play between front bottom edge

of lever and housing is attained.

Securely tighten the adjuster

jam nut.

732-848B

Adjusting Piston Valve

1. Remove the air-intake silencer

boot; then rotate the idle speed

screw counterclockwise until

all spring tension is removed.

0727-156

2. Loosen the jam nut securing the

throttle cable swivel adapter;

then rotate the swivel adapter

clockwise until the piston valve

bottoms in the piston valve

bore.

3. Place a finger lightly against the

side of the valve; then rotate the

carburetor swivel adapter coun-

terclockwise until slight upward

movement of the valve is noted.

4. Place a finger against the valve.

Rotate the idle speed screw

clockwise until it contacts the

valve.

5. Compress the throttle lever to

the full-open position; then

rotate the idle speed screw

clockwise 2 complete turns.

Release the throttle lever.

 NOTE: There must be free-play

between the throttle lever and the
control housing.

6. At this point, there must be

cable free-play gap in the throt-

tle lever. 

733-081C

 NOTE: If no cable free-play gap

is detected, rotate the swivel
a d a p t e r   u n t i l   f r e e - p l a y   i s
achieved. The piston valve must
be resting against the tip of its
idle speed screw.


Content   ..  9  10  11  12   ..