Snowmobile Polaris Touring and WideTrack (2005 year). Instruction - part 9


  Index      Snowmobiles / ATV     Snowmobile Polaris Touring and WideTrack - instruction 2005 year


Search            


Content   ..  7  8  9  10   ..


Snowmobile Polaris Touring and WideTrack (2005 year). Instruction - part 9


34

THE PERFECT FIT

Front Suspension Adjustments

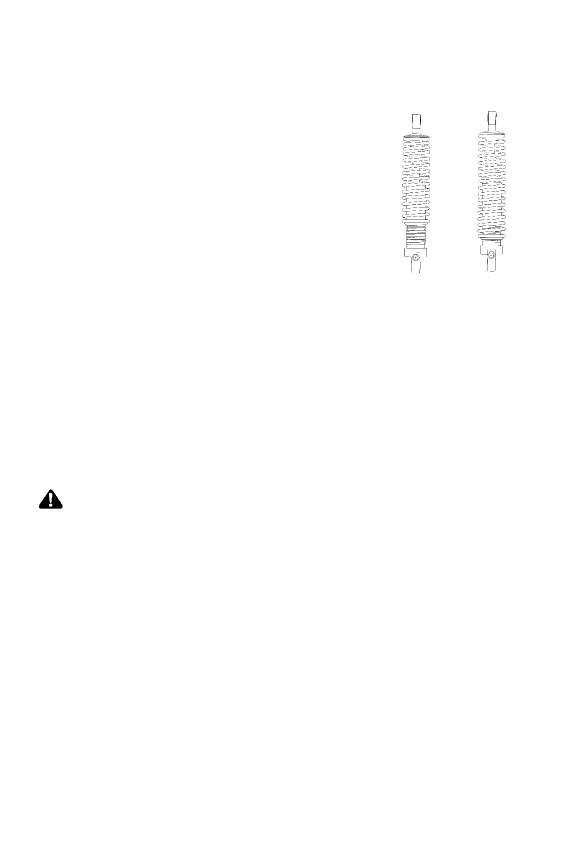
Adjusting Front Shock Spring Preload

Increasing spring preload will increase

ski-to-ground pressure. Decreasing spring

preload will decrease ski-to-ground

pressure. When adjusting, be sure the

springs on both the left and right sides of

the machine are at the same adjustment.
To increase front shock spring preload,

grasp the spring and turn it to the right.

Turn it to the left to decrease preload.

Illustration B indicates high preload and

illustration C indicates low preload.
Increasing the spring preload too much may adversely affect the

handling of the snowmobile and the performance of the suspension.

Never exceed one inch of preload beyond the factory settings, and

ensure that both sides are adjusted the same. When decreasing preload,

make sure at least two turns of preload are holding the spring between

the retainer on top of the shock and the threaded spring preload

adjuster nut on the shock body.

NOTE: Not all models have shocks with thread adjustable spring

preload. See your dealer for more information.

CAUTION

Always leave one thread showing above the adjuster nut. On

models equipped with a plastic adjuster nut, if the nut is

unscrewed from the threaded body, the nut will break.

C

B

35

THE PERFECT FIT

Front Suspension Adjustments

Shock Valving

RydeFX or RydeFX SOLO shocks can be revalved if spring preload

alone isn’t sufficient and further adjustment is desired to control

suspension stiffness.

WARNING

Changing shock valving on

RydeFX

and

RydeFX

SOLO shocks

requires special tools and a sound knowledge of mechanical

theory, tool use, and shop procedures to perform the work safely

and correctly. Shocks contain high-pressure nitrogen gas. Use

extreme caution when handling high-pressure service equipment.

We recommend that this work be performed by a Polaris dealer.

Front Springs

For models without externally adjustable or revalvable shocks, the

front springs can be changed if spring preload alone isn’t sufficient and

further adjustment is desired to control suspension stiffness. See your

Polaris dealer for more information.

36

THE PERFECT FIT

Rear Suspension Adjustments

Rider weight, riding style, trail conditions, and vehicle speed all affect

suspension action.
Each rear suspension can be adjusted to suit rider preference and

deliver excellent performance for a given set of conditions. However,

all suspension designs and adjustments involve a compromise, or

trade-off. For example, a suspension set up for snow-cross racing

would provide a very stiff ride on the trail. A suspension set up for

trail riding would bottom out harshly on a snow-cross course.
A decal outlining rear suspension set-up options is located either under

the hood or on the clutch cover. It provides a guideline for initial

suspension set-up. Additional adjustments can be made from this

point. Make adjustments to one area at a time so you can evaluate the

change. For further assistance, see your dealer.

Suspension Performance Tips

S

Rider weight usually determines the position at which the spring pre-

load should be set. However, this may vary with riding style. With

a little experimentation, each rider can find a preferred set-up. These

adjustments are easy to make, involve very little time or effort, and

greatly affect the ride.

S

In deep snow, a new Hi-fax will offer improved performance over

worn Hi-fax. It can also improve top speed.

S

When riding on ice or hard-packed snow, adding a set of bogie

wheels to the rail may enhance the machine’s performance. Bogie

wheel kits are available from your dealer.

S

Polaris offers track kits for improved flotation in deep snow. See

your dealer for assistance.

NOTE: Keep the suspension pivot points lubricated. This will reduce

moisture and rust build-up and ensure proper function of the

suspension components. Grease rear suspension pivots

before adjusting the rear suspension. Refer to Suspension

Maintenance beginning on page 124.

37

THE PERFECT FIT

Edge 136 Rear Suspension Adjustments

(Indy 340 Touring)

Initial Spring Preload Setting (Sag Method)

To set up the EDGE rear suspension

torsion spring preload, measure the

distance between the ground and rear

bumper. This is measurement X.
Take the first measurement with no

rider and with the rear suspension at

full extension.

NOTE: The rear bumper may need

to be lifted upward slightly

to fully extend the rear

suspension.

Next, have the rider drop down hard

on the seat and bounce up and down

several times, collapsing the rear

suspension. With the rider seated,

measure the distance between the

ground and the rear bumper at the

exact location used for measurement

X. This is measurement Y.
To determine sag, commonly referred to as ride-in, subtract

measurement Y from X (Sag=X-Y). Adjust sag by rotating the torsion

spring preload cams located on the rear torque arm. Use the illustration

or the decal found under the hood for reference. The ideal amount of

Sag for the EDGE rear suspension is four inches (X-Y=4).
If the rear suspension rides in less than three inches or more than five

inches with the torsion spring preload cams at their maximum range of

adjustment, optional torsion springs (softer or stiffer, respectively) may

be required. This is only an initial set-up, and final spring preload may

vary based on rider preference and riding conditions.

X

Y


Content   ..  7  8  9  10   ..